Home>Furniture & Design>Outdoor Furniture>How To Make Outdoor Cup Holders
Outdoor Furniture
How To Make Outdoor Cup Holders
Modified: February 27, 2024
Discover how to make outdoor cup holders for your patio or garden. Get creative with outdoor furniture, furniture, and design ideas for your outdoor space.
(Many of the links in this article redirect to a specific reviewed product. Your purchase of these products through affiliate links helps to generate commission for Storables.com, at no extra cost. Learn more)
Introduction
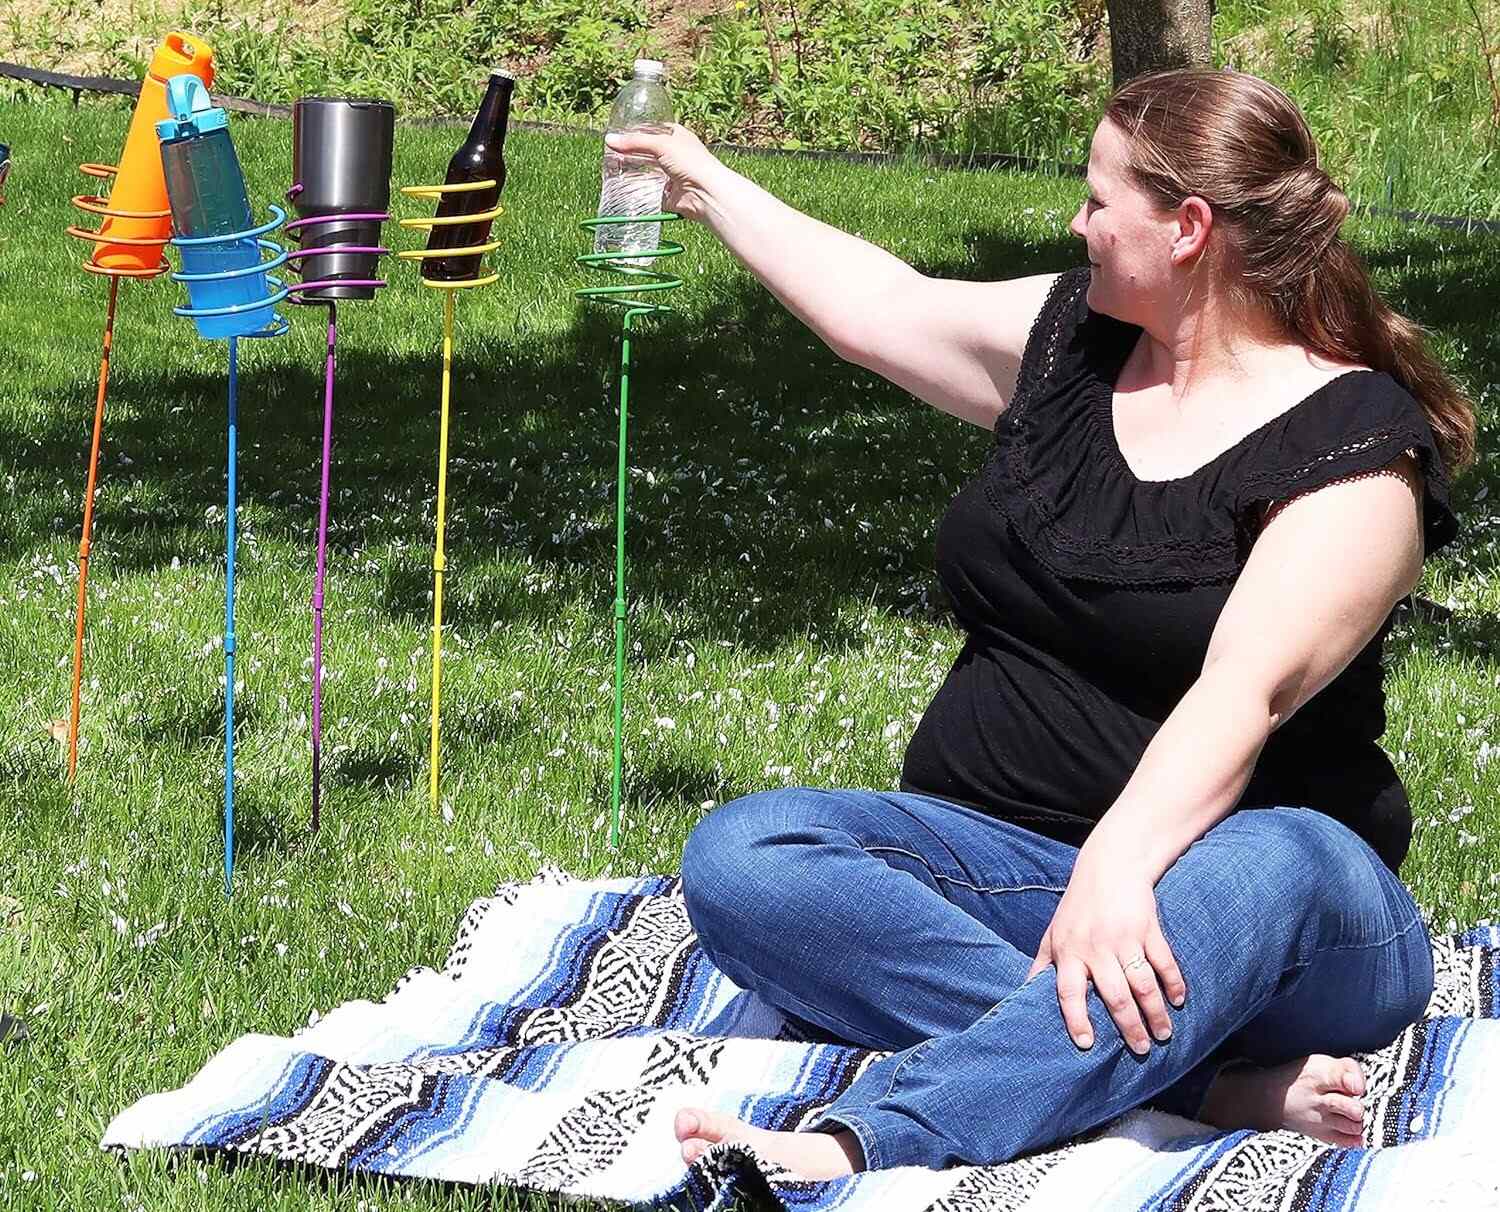
Are you tired of spilling your favorite beverage while enjoying the great outdoors? Whether you're lounging on your patio, relaxing by the pool, or camping in the wilderness, having a secure spot for your drink is a game-changer. In this guide, we'll walk you through the process of creating your own outdoor cup holders. With just a few simple materials and a bit of creativity, you can craft custom cup holders that perfectly complement your outdoor furniture and design aesthetic.
Picture this: a warm summer day, the sun shining, a gentle breeze rustling the leaves, and you, comfortably seated in your outdoor oasis. You reach for your refreshing drink, only to realize there's nowhere to place it securely. Frustrating, right? That's where outdoor cup holders come to the rescue. By crafting your own cup holders, you can ensure that your beverages are always within reach, whether you're hosting a backyard barbecue, unwinding with a good book, or simply soaking up the natural beauty around you.
Not only are outdoor cup holders practical, but they also offer a fantastic opportunity to showcase your DIY skills and add a personal touch to your outdoor space. By following the steps outlined in this guide, you'll be able to tailor the cup holders to your specific needs and preferences, ensuring that they seamlessly integrate with your existing outdoor furniture and design scheme.
So, roll up your sleeves, gather your materials, and get ready to embark on a fun and rewarding DIY project. Let's dive into the step-by-step process of creating outdoor cup holders that will elevate your outdoor experience to a whole new level.
Key Takeaways:
- Create custom outdoor cup holders using PVC pipes and basic tools to keep your drinks secure and add a personal touch to your outdoor space.
- By making and installing your own cup holders, you can elevate your outdoor experience and showcase your DIY skills while enjoying the convenience of having your beverages within reach.
Read more: How To Make A Toothbrush Holder
Materials Needed
Before diving into the construction of your outdoor cup holders, it’s essential to gather all the necessary materials. Here’s what you’ll need to bring your DIY project to life:
- PVC Pipe: Opt for a durable PVC pipe with a diameter that accommodates your preferred cup size. The length of the pipe will depend on how tall you want your cup holders to be.
- Sandpaper: Select fine-grit sandpaper to smooth out the edges of the PVC pipe, ensuring a safe and polished finish.
- Drill and Drill Bits: A drill will be used to create holes in the PVC pipe, so choose drill bits that match the diameter of your cups or beverage containers.
- Marker or Pen: You’ll need a marker or pen to indicate where you’ll cut and drill the PVC pipe.
- Measuring Tape: A measuring tape is essential for accurately determining the desired height of your cup holders and marking the cutting points on the PVC pipe.
- Protective Gear: Safety first! Don’t forget to wear protective gear such as gloves and safety goggles while working with the PVC pipe and power tools.
- Optional: Paint and Brushes: If you want to add a pop of color or personalize your cup holders, consider using outdoor-friendly paint and brushes to decorate the PVC pipe.
By ensuring that you have all these materials on hand, you’ll be fully equipped to tackle the upcoming steps with confidence and creativity. Now that you’ve gathered your supplies, it’s time to move on to the first step: measuring and cutting the PVC pipe.
Step 1: Measure and Cut PVC Pipe
The foundation of your outdoor cup holders lies in the PVC pipe, which will serve as the main structure for supporting your beverages. Before you begin cutting, it’s crucial to determine the desired height for your cup holders. Consider the typical sizes of the cups or containers you’ll be using, as well as the height of your outdoor furniture, to ensure a comfortable and convenient fit.
Once you’ve settled on the height, use a measuring tape to mark the cutting points on the PVC pipe. Double-check your measurements to guarantee precision, as accuracy at this stage will directly impact the functionality of the cup holders. After marking the pipe, carefully cut it to the specified length using a saw or PVC pipe cutter. Take your time and maintain a steady hand to achieve clean and even cuts.
It’s important to note that the number of cup holders you intend to create will determine the quantity of PVC pipe needed. Whether you’re making a single cup holder or a set of holders for multiple beverages, ensure that each piece of PVC pipe is cut to the correct height, maintaining consistency across all the holders.
With the PVC pipe segments cut to size, you’re now ready to move on to the next step: sanding the edges to create a smooth and safe surface for your outdoor cup holders.
Step 2: Sand the Edges
After cutting the PVC pipe to the desired height, the next crucial step in creating your outdoor cup holders is to smooth out the edges. This not only enhances the visual appeal of the cup holders but, more importantly, ensures that they are safe to handle and won’t cause any accidental scrapes or cuts.
To begin, wrap a piece of fine-grit sandpaper around the cut edges of the PVC pipe. Using a back-and-forth motion, gently sand the edges until they are no longer rough or sharp. Pay close attention to achieving a consistent smoothness around the entire circumference of the pipe. It’s essential to take your time during this process, as thorough sanding will result in a polished and professional finish.
As you sand, periodically run your fingers along the edges to check for any remaining rough spots. Smooth out any imperfections until the edges feel uniformly smooth to the touch. Additionally, visually inspect the edges to ensure that they appear even and free from any jagged areas.
By investing effort into this step, you’ll not only enhance the overall appearance of your DIY cup holders but also prioritize safety and comfort for anyone using them. With the edges of the PVC pipe now impeccably smoothed, you’re one step closer to completing your custom outdoor cup holders. The next step will guide you through the process of drilling holes in the pipe to accommodate your beverages securely.
When making outdoor cup holders, consider using durable materials such as PVC pipes or metal rods to ensure they can withstand outdoor conditions. Additionally, make sure to secure the holders firmly in the ground to prevent them from tipping over.
Step 3: Drill Holes in the Pipe
With the PVC pipe segments cut to the desired height and their edges smoothly sanded, it’s time to create the openings that will securely cradle your beverages. This step involves using a drill to carefully bore holes into the PVC pipe, allowing your cup holders to accommodate various cup sizes while providing a snug fit for each.
Before drilling, consider the diameter of the cups or beverage containers you typically use. This will guide you in determining the appropriate size of the holes to be drilled. Using a marker or pen, mark the positions where you want the holes to be located on the PVC pipe. Ensure that the markings are evenly spaced around the circumference of the pipe, maintaining a consistent distance between each hole.
When drilling the holes, it’s essential to use a drill bit that matches the diameter of your cups or containers. This precision will result in a secure and stable fit for your beverages. As you operate the drill, maintain a steady hand and apply gentle pressure to create clean and uniform holes. Take care to drill through both sides of the PVC pipe, ensuring that the holes are aligned and parallel to each other.
After drilling the holes, inspect the pipe to confirm that the openings are smooth and free from any burrs or rough edges. If necessary, use sandpaper to gently smooth out the interior of the holes, ensuring a seamless and safe surface for your cups to rest in.
By completing this step with attention to detail and precision, you’ll have successfully prepared the PVC pipe to function as effective and versatile cup holders. With the holes drilled, you’re now ready to move on to assembling the cup holders, bringing you one step closer to enjoying your favorite beverages in the great outdoors.
Read more: How To Make A Napkin Holder
Step 4: Assemble the Cup Holder
Now that you’ve prepared the PVC pipe by measuring, cutting, sanding, and drilling, it’s time to bring your outdoor cup holders to life by assembling the components. This step will involve arranging the PVC pipe segments in a manner that creates stable and functional holders for your beverages.
If you’re creating multiple cup holders, consider the arrangement that best suits your outdoor furniture and design layout. Whether you opt for standalone cup holders or a connected cluster, ensure that the spacing between each holder is sufficient to accommodate your cups comfortably. Experiment with different configurations to find the arrangement that best complements your outdoor space.
For standalone cup holders, simply position each PVC pipe segment upright on a flat surface, ensuring that they are stable and level. If you’re creating a connected cluster, you may choose to secure the pipe segments together using PVC cement for added stability. This step offers an opportunity to customize the design of your cup holders, allowing you to tailor them to your specific preferences and the aesthetic of your outdoor area.
As you assemble the cup holders, envision how they will seamlessly integrate with your outdoor furniture and enhance the overall functionality of your space. The assembly process marks the transition from individual components to a cohesive and practical solution for keeping your beverages secure and easily accessible while you enjoy the outdoors.
With the cup holders assembled, you’re ready to proceed to the final step: attaching them to your outdoor furniture, completing the transformation of your outdoor space into a haven of relaxation and convenience.
Step 5: Attach to Outdoor Furniture
As you near the completion of your outdoor cup holder project, the final step involves integrating these custom creations with your outdoor furniture. Whether you have a patio table, deck chairs, or other outdoor seating options, attaching the cup holders will elevate the convenience and functionality of your outdoor space.
Begin by identifying the ideal placement for your cup holders. Consider the layout of your outdoor furniture and the areas where you typically relax or entertain. Once you’ve determined the locations, secure the cup holders in place by attaching them to the furniture surface. Depending on the furniture material and design, there are various methods for attachment:
- Clamp-On Holders: If you have lightweight, portable cup holders, consider using clamp-on attachments that can be easily affixed to the edges of tables, chairs, or other furniture pieces.
- Mounting Brackets: For more permanent cup holder installations, mounting brackets can be utilized to secure the holders to the furniture, providing a stable and long-lasting solution.
- Adhesive Strips or Pads: In some cases, adhesive strips or pads can be employed to attach the cup holders to the furniture surface, offering a simple and non-invasive attachment method.
As you attach the cup holders, ensure that they are positioned at a convenient height and within easy reach from your outdoor seating areas. Test the stability and functionality of the holders once they are attached, making any necessary adjustments to guarantee a secure and reliable setup.
By integrating the cup holders with your outdoor furniture, you’ll create a seamless and unified space that caters to your beverage-holding needs while you enjoy the outdoor ambiance. With the cup holders now securely attached, take a moment to appreciate the transformation of your outdoor area into a more inviting and practical environment.
Congratulations, you’ve successfully completed the process of making and installing your own outdoor cup holders. It’s time to sit back, relax, and savor your favorite drinks in the comfort of your personalized outdoor oasis.
Conclusion
Congratulations on creating your own custom outdoor cup holders! By embarking on this DIY project, you’ve not only enhanced the functionality of your outdoor space but also added a personal touch that reflects your unique style and practical needs. These cup holders are more than just accessories; they’re a testament to your creativity and resourcefulness in optimizing your outdoor experience.
As you enjoy the convenience of having secure spots for your beverages while basking in the beauty of the outdoors, take pride in the craftsmanship and attention to detail that went into creating these cup holders. Whether you’re hosting gatherings, unwinding with a good book, or simply relishing quiet moments in nature, your custom cup holders will be there to elevate the enjoyment of your favorite outdoor activities.
Moreover, the process of crafting and installing the cup holders has likely sparked a sense of empowerment and satisfaction, knowing that you have the skills and creativity to customize your outdoor environment to suit your preferences. This project serves as a reminder that small, practical enhancements can make a significant impact on your overall outdoor lifestyle.
As you revel in the functionality and charm of your newly installed cup holders, take a moment to appreciate the journey from conceptualization to completion. Your DIY spirit has not only resulted in practical cup holders but has also enriched your outdoor space with a touch of ingenuity and personal flair.
So, raise a toast to your DIY prowess and the delightful outdoor moments that lie ahead. Your custom cup holders stand as a testament to your ability to transform everyday experiences into extraordinary ones, one creative project at a time.
Frequently Asked Questions about How To Make Outdoor Cup Holders
Was this page helpful?
At Storables.com, we guarantee accurate and reliable information. Our content, validated by Expert Board Contributors, is crafted following stringent Editorial Policies. We're committed to providing you with well-researched, expert-backed insights for all your informational needs.


0 thoughts on “How To Make Outdoor Cup Holders”