Furniture
How To Organize A Dresser
Modified: October 27, 2024
Learn how to effectively organize your dresser and maximize storage space. Get expert tips and ideas for arranging your furniture and decluttering your bedroom.
(Many of the links in this article redirect to a specific reviewed product. Your purchase of these products through affiliate links helps to generate commission for Storables.com, at no extra cost. Learn more)
Introduction
Having an organized dresser is essential for maintaining a clutter-free and functional bedroom. However, it’s not uncommon for dressers to become messy and disorganized over time, making it difficult to find what you need and causing unnecessary stress. If your dresser drawers are filled to the brim with clothes and accessories, it’s time for a fresh start with a proper organization system.
In this article, we will guide you through a step-by-step process on how to organize your dresser effectively. Whether you have a small dresser with limited space or a large one with plenty of compartments, these tips and techniques will help you make the most of your storage area and create a visually appealing display of your clothes.
By following these steps, you’ll not only save time getting ready in the morning, but you’ll also prolong the lifespan of your clothes by storing them properly. So, let’s get started with emptying the dresser and preparing for an organized and stress-free wardrobe!
Key Takeaways:
- Empty, declutter, and categorize your dresser to create a functional and visually appealing space. Utilize organization systems, drawer dividers, and labels to maintain long-term organization and efficiency.
- Maintain an organized dresser by developing daily habits, regular decluttering, and utilizing additional tips and tricks. Enjoy the benefits of a clutter-free and functional space for your clothes and accessories.
Read more: How To Organize Dresser Top
Step 1: Emptying the Dresser
The first step in organizing your dresser is to remove all the items inside and empty the drawers completely. This will give you a blank canvas to work with and allow you to assess the amount of space you have available.
Take all the clothes, accessories, and any other items out of your dresser and place them on your bed or a nearby clean surface. As you empty each drawer, take a moment to inspect each item and determine if it belongs in your dresser or if it needs to be donated or discarded. This is an excellent opportunity to declutter and get rid of items that you no longer wear or need.
While emptying the dresser, it’s also a good idea to wipe down the inside of each drawer with a damp cloth or mild cleaning solution. This will remove any dust or debris that may have accumulated over time, leaving your dresser fresh and clean.
As you remove the items, create separate piles or categories for different types of clothing, such as tops, bottoms, underwear, and accessories. This will help you later when you start organizing and putting everything back. It’s also a great time to evaluate if any of your clothing items need repairs or alterations.
Once you have emptied the dresser and categorized your items, it’s time to move on to the next step of decluttering and sorting through your belongings. Let’s dive in!
Step 2: Decluttering and Sorting
Now that your dresser is empty, it’s time to declutter and sort through your belongings. This step is crucial in creating a well-organized and functional dresser space.
Start by going through each pile or category of clothing that you created during the emptying process. Carefully examine each item and ask yourself if it sparks joy, fits you well, and if you have worn it in the past year. If the answer is no to any of these questions, it’s time to let go of that item.
Consider donating clothes that are in good condition but no longer serve you. You can also sell or swap items online or in local consignment stores. Discard any clothes that are worn-out, torn, or stained beyond repair.
Sorting through accessories is also important during this step. Match up pairs of socks, earrings, and other small items. If you come across any single socks or broken accessories, it’s time to bid them farewell.
By decluttering and getting rid of items you no longer need or use, you’ll create more space in your dresser for the things you truly love and wear. It will also make the organizing process much easier and more efficient.
Once you have decluttered and sorted your clothing and accessories, it’s time to move on to the next step: choosing an organization system that suits your needs and preferences.
Step 3: Choosing an Organization System
Now that you have decluttered and sorted your clothing and accessories, it’s time to choose an organization system that will work best for you. There are various options to consider, depending on your dresser’s size, the number of drawers, and your personal preferences.
One popular organization system is to group items by category. This means keeping all your tops together, bottoms together, and so on. Within each category, you can further subdivide by sleeve length, color, or material. This system allows you to quickly locate specific items and create a visually pleasing arrangement.
If you have limited drawer space, another option is to use foldable storage bins or containers. These bins can be placed inside the drawers to create additional compartments and keep items separated. You can designate specific bins for different categories like socks, underwear, or accessories.
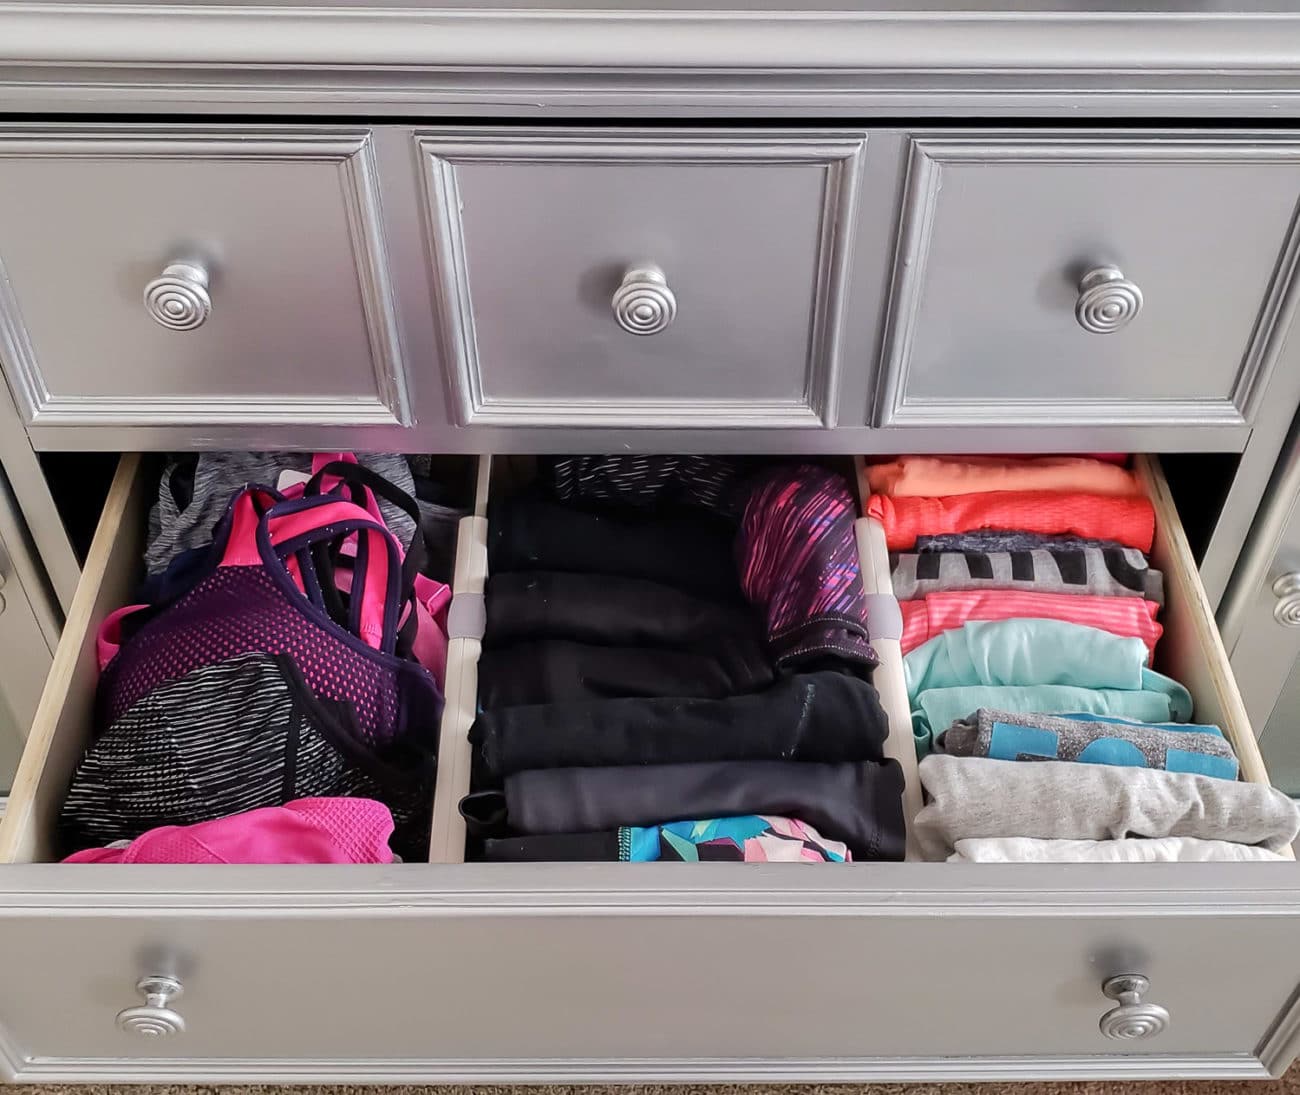
For those with a larger dresser, drawer dividers can be a great organizational tool. These dividers create separate sections within each drawer, making it easy to keep items neatly arranged. You can find adjustable dividers that can be customized to fit various drawer sizes.
Another popular option is to invest in drawer organizers specifically designed for organizing clothing items like socks, ties, or jewelry. These organizers usually come with compartments or small slots to keep everything in place and prevent tangling or damage.
When choosing an organization system, it’s important to consider your specific needs and the type of items you have. Take measurements of your drawers and assess your belongings to ensure that the system you choose will fit properly and accommodate your items effectively.
Once you have decided on the organization system that works best for you, it’s time to move on to the next step: folding and storing your clothes.
Step 4: Folding and Storing Clothes
After choosing an organization system for your dresser, it’s time to start folding and storing your clothes in a way that maximizes space and keeps everything easily accessible.
Start by folding your clothes properly to save space and maintain their condition. There are various folding techniques you can use, such as the KonMari method or the Marie Kondo fold, which involves folding items into small rectangles or squares. This not only saves space but also allows you to see all your clothes at a glance.
When folding tops, such as t-shirts or sweaters, fold them in thirds lengthwise and then in half or thirds widthwise. This helps prevent wrinkles and allows you to stack them neatly in the drawer. For bottoms, fold them in half lengthwise and then in thirds or quarters, depending on the size of the drawer and the item itself.
As you fold your clothes, consider the organization system you chose in the previous step. Place each folded item into the designated section or container. You can group clothes by category, color, or any other system that makes it easy for you to find what you need.
For delicate or special items, like lingerie or accessories, consider using fabric pouches or small storage boxes to keep them protected and easily identifiable. Jewelry organizers or separators are also helpful for keeping necklaces, bracelets, or earrings tangle-free.
Remember to utilize the space efficiently by stacking folded items vertically rather than horizontally. This way, you can see everything without needing to move items around or dig through the pile. Stacking clothes vertically also minimizes the chances of items getting creased or wrinkled.
Keep in mind that different types of clothing may require different storage methods. For example, hanging dress shirts, blouses, or dresses can help maintain their shape and prevent wrinkles. Utilize any available closet space or invest in a garment rack if needed.
Once you have folded and stored all your clothes, it’s time to move on to the next step: utilizing drawer dividers to further organize your dresser.
Use drawer dividers to separate different types of clothing, such as socks, underwear, and t-shirts. This will make it easier to find what you need and keep your dresser organized.
Step 5: Utilizing Drawer Dividers
Drawer dividers are a fantastic tool to further maximize the organization and efficiency of your dresser. They help create separate compartments within each drawer, allowing you to keep different items neatly separated and easily accessible.
Start by measuring the dimensions of your drawers and determine the number of dividers you will need. Adjustable dividers are great because they can be customized to fit your specific drawer dimensions and can be easily moved or readjusted as needed.
When using drawer dividers, consider the categories or subcategories of items you have and allocate a section for each category. For example, you can use dividers to create separate compartments for socks, underwear, accessories, or even specific types of clothing like tank tops or scarves.
Dividers can also be useful for separating different sizes or styles of clothing within each category. This helps you quickly locate the specific item you are looking for without rummaging through the entire drawer.
When placing items in the divided sections, make sure to keep similar items together. This will not only make it easier to find what you need but also maintain the organization system you have set up.
Furthermore, consider the depth and height of your drawer dividers. Some dividers may be shallow, allowing you to stack items vertically, while others may be deeper for larger or bulkier items.
Drawer dividers can also be used to organize smaller items like belts, ties, or even cosmetics and skincare products. These dividers help prevent them from getting tangled or mixed up with other items.
Remember to adjust the dividers as needed and reassess the organization system if you add new items to your collection. It’s important to periodically review and adjust your organization system to ensure it continues to meet your needs.
Once you have utilized drawer dividers to create separate compartments for your belongings, it’s time to move on to the next step: labeling and categorizing your dresser.
Step 6: Labeling and Categorizing
Labeling and categorizing your dresser drawers is an essential step in maintaining an organized and functional system. It helps you quickly identify the contents of each drawer and ensures that items are returned to their designated place after use.
Start by deciding on the categories or subcategories you want to label for each drawer. This can be as simple as labeling drawers as “Tops,” “Bottoms,” “Underwear,” or you can get more specific with labels like “Short Sleeve Shirts,” “Jeans,” “Socks,” etc.
There are various labeling options you can choose from. You can use adhesive labels or small chalkboard tags attached to the front of each drawer. Alternatively, you can use clear plastic sleeves or pockets and insert labeled cards inside.
Consider using a label maker or handwrite the labels for a personalized touch. Make sure the labels are visible and easy to read at a glance, especially if you have different people sharing the dresser.
In addition to labeling the drawers themselves, you can also label smaller containers or bins within the drawers. This is particularly helpful if you are using dividers or storage containers to further organize your items.
Labeling not only helps you locate items quickly but also encourages others to maintain the system you have set up. It reduces the chances of drawers becoming disorganized and ensures that everything has a designated place.
Remember to periodically review and update the labels if you make any changes to the organization system or add new categories of clothing or accessories.
With your dresser drawers labeled and categorized, you are now ready to move on to the next step: maintaining the organized dresser.
Step 7: Maintaining the Organized Dresser
Now that you have put in the effort to organize your dresser, it’s important to maintain its tidiness and functionality. Follow these tips to keep your dresser organized on an ongoing basis:
1. Daily Habits: Develop a habit of putting items back in their designated places after use. This prevents clutter from accumulating and ensures that you always know where to find what you need.
2. Regular Decluttering: Set aside time every few months to declutter and reassess the items in your dresser. Remove any clothing items that no longer serve you or are in poor condition.
3. Seasonal Rotation: Consider rotating your clothing seasonally to make the most of your drawer space. Store out-of-season items in a separate storage space, such as vacuum-sealed bags or under-bed storage boxes.
4. Maintenance Checks: Regularly check for any damaged or worn-out drawer dividers, containers, or labels. Replace them as needed to maintain an efficient organization system.
5. Folding Techniques: Continuously improve your folding techniques to maximize space and maintain the neatness of your folded clothes.
6. Avoid Overstuffing: Resist the temptation to overstuff your drawers. Leave some breathing room for easy access to the items inside and to prevent clothes from becoming wrinkled.
7. Quality Hangers: If you also hang some clothing items in your dresser, invest in sturdy and appropriate hangers to maintain the shape and condition of your garments.
8. Regular Cleaning: Wipe down the inside of your dresser drawers periodically to remove any dust or debris that may have accumulated.
By incorporating these tips into your routine, you’ll be able to maintain an organized dresser and enjoy the benefits of a clutter-free and functional space.
With your dresser organized and maintained, you can now move on to the final step: exploring additional tips and tricks to enhance your dresser organization further.
Step 8: Additional Tips and Tricks
While you have successfully organized your dresser using the previous steps, there are additional tips and tricks that can further enhance the organization and functionality of your dresser. Consider implementing these ideas:
1. Drawer Liners: Use drawer liners to protect the bottom of your dresser drawers and add a decorative touch. Liners can also prevent clothes from sliding around and keep the drawers clean.
2. Utilize Vertical Space: If your dresser has a tall and narrow design, make use of vertical space by adding hanging organizers on the sides or back of the dresser. This allows for additional storage of accessories or folded clothes.
3. Store Off-Season Items Elsewhere: If you have limited dresser space, store off-season clothing in vacuum-sealed bags or under-bed storage containers to free up room for the items you regularly use.
4. Utilize Spare Drawers: If you have spare drawers in your dresser or use a smaller dresser, consider repurposing them for other items like bed linens, towels, or even office supplies.
5. Utilize the Top Surface: Maximize the functionality of your dresser by using the top surface to display decorative items or jewelry organizers. This way, you’ll create an aesthetically pleasing space while keeping smaller items easily accessible.
6. Color Coordinate: Arrange your clothes by color within each category to create a visually appealing and organized display. This makes it easier to find specific items and adds a touch of elegance to your dresser.
7. Personalize with Labels or Photos: Add a personal touch to your dresser by labeling drawer compartments with inspiring quotes, favorite song lyrics, or even photos of the items inside. This adds a unique and creative aspect to your organization system.
8. Rotate Accessories: If you have a collection of accessories, rotate them periodically to give each piece a chance to shine. This way, you can enjoy all your accessories without overwhelming your dresser space.
By incorporating these additional tips and tricks, you’ll elevate your dresser organization to a whole new level of functionality and aesthetics. Remember to adapt these suggestions to suit your personal style and preferences.
Now that you have completed all the steps and explored the additional tips and tricks, you can take pride in your impeccably organized dresser. Enjoy the ease of finding your favorite clothes and accessories, and revel in the sense of peace and order that an organized dresser brings to your daily routine.
Congratulations on achieving a beautifully organized dresser!
Read also: 15 Amazing Nursery Dresser for 2025
Conclusion
Organizing a dresser is a task that requires time, effort, and attention to detail, but the benefits are well worth it. A well-organized dresser not only saves you time and reduces daily stress but also prolongs the lifespan of your clothes and creates a visually appealing space in your bedroom.
By following the step-by-step process outlined in this article, you can transform your dresser into a functional and efficient storage solution. Emptying the dresser, decluttering and sorting, choosing an organization system, folding and storing clothes, utilizing drawer dividers, labeling and categorizing, maintaining the organized dresser, and incorporating additional tips and tricks—all contribute to an effective and sustainable organization system.
Remember that everyone’s organizational needs and preferences are different, so adapt these suggestions to suit your own style and requirements. Regular maintenance and periodic reassessment of your dresser organization will help you keep it in top-notch condition and adjust it as needed.
As you maintain an organized dresser, make sure to enjoy the benefits it brings—quick access to your favorite clothes, a clutter-free environment, and a sense of accomplishment. With an organized dresser, you’ll start each day with a calm and clear mind, ready to take on the world.
So, gather your motivation and get started on organizing your dresser today! Embrace the process, have fun with it, and revel in the joy of an immaculately organized dresser. Your clothes and your bedroom will thank you for it.
Frequently Asked Questions about How To Organize A Dresser
Was this page helpful?
At Storables.com, we guarantee accurate and reliable information. Our content, validated by Expert Board Contributors, is crafted following stringent Editorial Policies. We're committed to providing you with well-researched, expert-backed insights for all your informational needs.


0 thoughts on “How To Organize A Dresser”