Furniture
How To Whitewash A Dresser
Modified: January 9, 2024
Learn how to whitewash a dresser and transform your furniture with this easy step-by-step guide. Create a distressed, vintage look that will elevate your home decor.
(Many of the links in this article redirect to a specific reviewed product. Your purchase of these products through affiliate links helps to generate commission for Storables.com, at no extra cost. Learn more)
Introduction
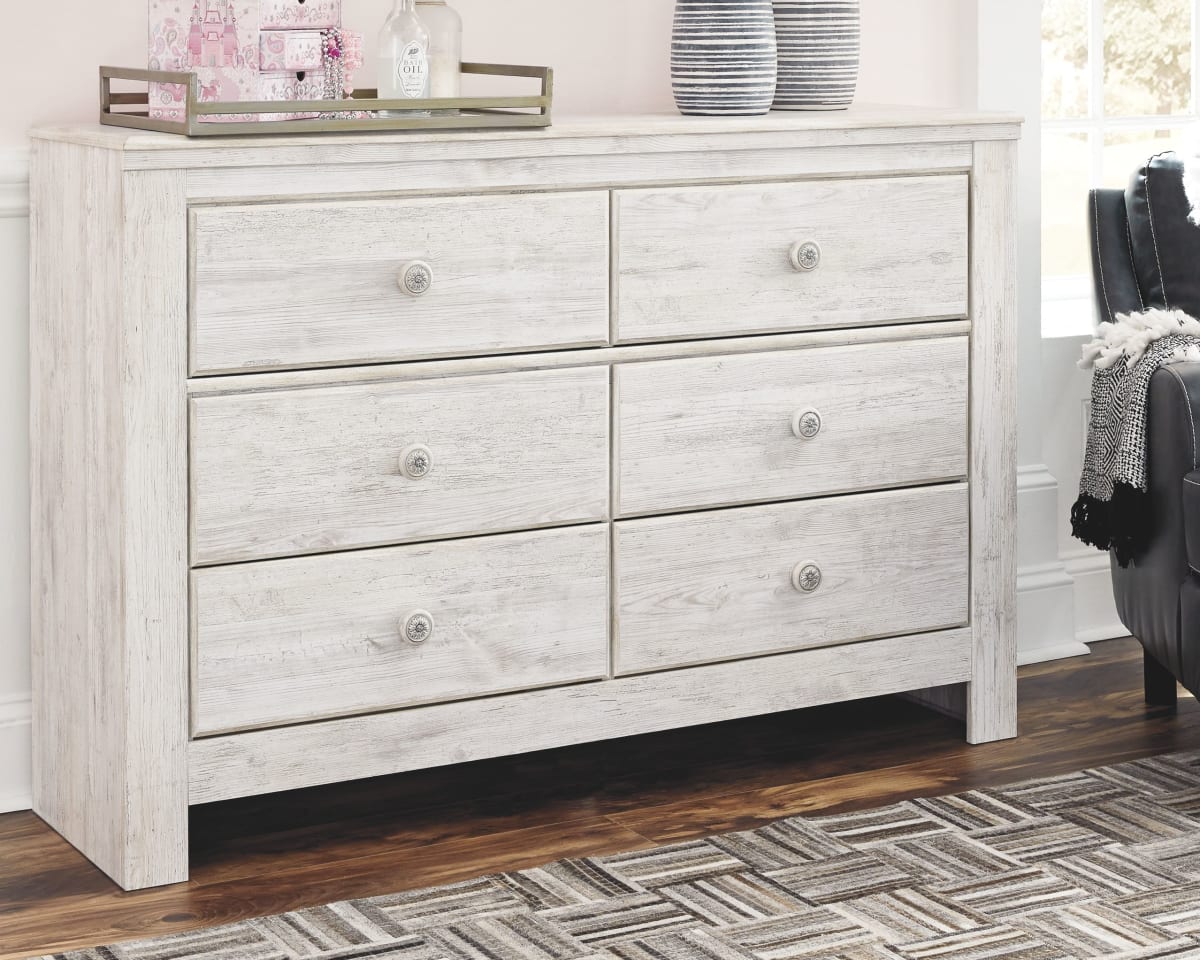
Whitewashing furniture is a popular technique that can transform the look of a dresser and give it a fresh, cottage-like appeal. Whether you’re reviving an old piece or looking to update your bedroom decor, learning how to whitewash a dresser is a rewarding DIY project that can breathe new life into your furniture.
In this article, we will guide you through the step-by-step process of whitewashing a dresser, from the necessary preparations to the finishing touches. By following these instructions, you’ll be able to achieve a beautifully whitewashed finish that complements any style of furniture.
Before diving into the process, gather the necessary materials, including sandpaper, cleaning supplies, whitewash solution, sealant, and brushes. Additionally, ensure you have a well-ventilated area, as the fumes from some of the products can be strong.
So, without further ado, let’s get started on transforming your dresser into a stunning whitewashed masterpiece!
Key Takeaways:
- Transform your dresser into a charming, coastal-inspired masterpiece by following the step-by-step whitewashing process. Proper preparation, thoughtful application, and sealing ensure a stunning, durable finish that breathes new life into your furniture.
- Embrace your creativity and personalize your whitewashed dresser with new hardware, distressed details, and unique accents. Enjoy the DIY journey and create a one-of-a-kind piece that reflects your individual style and adds a fresh, airy ambiance to your space.
Read more: How To Whitewash A Stone Fireplace
Preparation
Before beginning the whitewashing process, it’s important to prepare your dresser properly. This involves a few necessary steps to ensure that the whitewash adheres well and the surface is smooth and clean.
The first step in the preparation process is to remove any hardware or accessories from the dresser, such as drawer pulls or decorative knobs. This will allow you to work on the dresser more easily and prevent any damage to these items during the whitewashing process.
Next, give your dresser a thorough cleaning. Use a mild soap or detergent mixed with warm water and a soft cloth to remove any dirt, grease, or stains. Wipe down all surfaces, including the top, sides, front, and back of the dresser, as well as the drawers.
After cleaning, it’s time to sand the dresser. Start by using a medium-grit sandpaper (around 120-150 grit) to gently sand all of the surfaces. This will help roughen up the wood and remove any existing finish or sealant. Make sure to sand in the direction of the wood grain to avoid scratches or damage to the surface.
Once you’ve sanded the dresser with the medium-grit sandpaper, switch to a finer grit (around 220-240 grit) to smooth out the surface. This will create a solid base for the whitewash and ensure an even application. Use a sanding block or sandpaper wrapped around a sanding sponge for better control and to reach any corners or detailed areas.
After sanding, wipe away any dust or debris using a tack cloth or a lint-free cloth dampened with a little water. Ensure that the dresser is completely dry before moving on to the next step.
With the dresser now clean and sanded, it’s time to protect the surrounding area. Lay down a drop cloth or old sheets to catch any drips or spills. It’s also a good idea to cover nearby furniture or flooring to prevent any accidental contact with the whitewash.
By properly preparing your dresser, you create a smooth and clean surface that will allow the whitewash to adhere well and result in a beautifully finished piece of furniture.
Sanding the Dresser
Once you have completed the initial preparation steps, it’s time to move on to sanding the dresser. Sanding helps to smooth out the surface, remove any imperfections, and create a suitable base for the whitewash.
Start by using medium-grit sandpaper, around 120-150 grit, to sand the entire surface of the dresser. It’s best to sand in the direction of the wood grain to prevent any scratches or damage. Use long, even strokes and apply gentle pressure to remove any existing finish or sealant.
If your dresser has intricate or hard-to-reach areas, you can use sandpaper wrapped around a sanding sponge or a sanding block to ensure better control and access.
After sanding with the medium-grit sandpaper, switch to a finer grit, around 220-240 grit, for a smoother finish. Sand the dresser again, this time with lighter pressure, to ensure that the surface is smooth and free from any rough textures.
As you sand, periodically wipe away the dust and debris with a tack cloth or a lint-free cloth. This will help you get a better view of the surface and ensure that you don’t inadvertently sand over areas that still need attention.
Pay close attention to any blemishes or imperfections on the dresser’s surface. Sand these spots more thoroughly to achieve a more uniform appearance. If you encounter any deep scratches or dents that cannot be sanded away, you may need to consider using wood filler to repair them before continuing with the whitewashing process.
Remember, the goal of sanding is to create a smooth and even surface, so take your time and be thorough. Once you are satisfied with the sanding results, wipe down the dresser one last time to remove any lingering dust.
By sanding the dresser properly, you create a clean canvas for the whitewash to adhere to, ensuring a beautiful and professional-looking finish.
Cleaning the Dresser
After sanding the dresser, the next step in preparing for the whitewashing process is to give the furniture a thorough cleaning. Cleaning the dresser removes any lingering dust, dirt, or grease, ensuring a clean surface for the whitewash to adhere to.
Start by filling a bucket with warm water and adding a small amount of mild detergent or soap. Dip a soft cloth or sponge into the soapy water and wring out any excess moisture. Begin wiping down the entire surface of the dresser, including the top, sides, front, and back, as well as the drawers.
Pay special attention to any areas that may have accumulated dirt or grime, such as corners or decorative moldings. Use a soft toothbrush or a cotton swab to gently clean these tighter spots where a cloth or sponge may not reach easily.
If there are any tough stains or sticky residues on the dresser, you may need to use a more targeted approach. For sticky substances, such as tape residue or adhesive, apply a small amount of rubbing alcohol to a clean cloth and gently rub the area until the residue is removed.
For stubborn stains, such as ink or marker, create a paste with baking soda and water. Apply the paste to the stained area and let it sit for a few minutes before gently scrubbing it with a soft cloth. Rinse the area with clean water and wipe away any excess paste.
Once you’ve thoroughly cleaned the dresser, use a clean, damp cloth to remove any traces of soap or detergent. It’s important to ensure that the surface is completely dry before moving on to the next step of the whitewashing process.
Allow the dresser to air dry naturally, or you can use a fan to speed up the drying process. Make sure there are no damp or wet areas, as moisture can affect the application and durability of the whitewash.
By cleaning the dresser prior to whitewashing, you create a fresh and clean surface for the whitewash to adhere to, resulting in a more professional and long-lasting finish.
Before whitewashing a dresser, make sure to sand the surface to remove any existing finish. Apply a watered-down white paint mixture in thin layers, allowing each layer to dry before adding the next. Sand lightly between coats for a smooth finish.
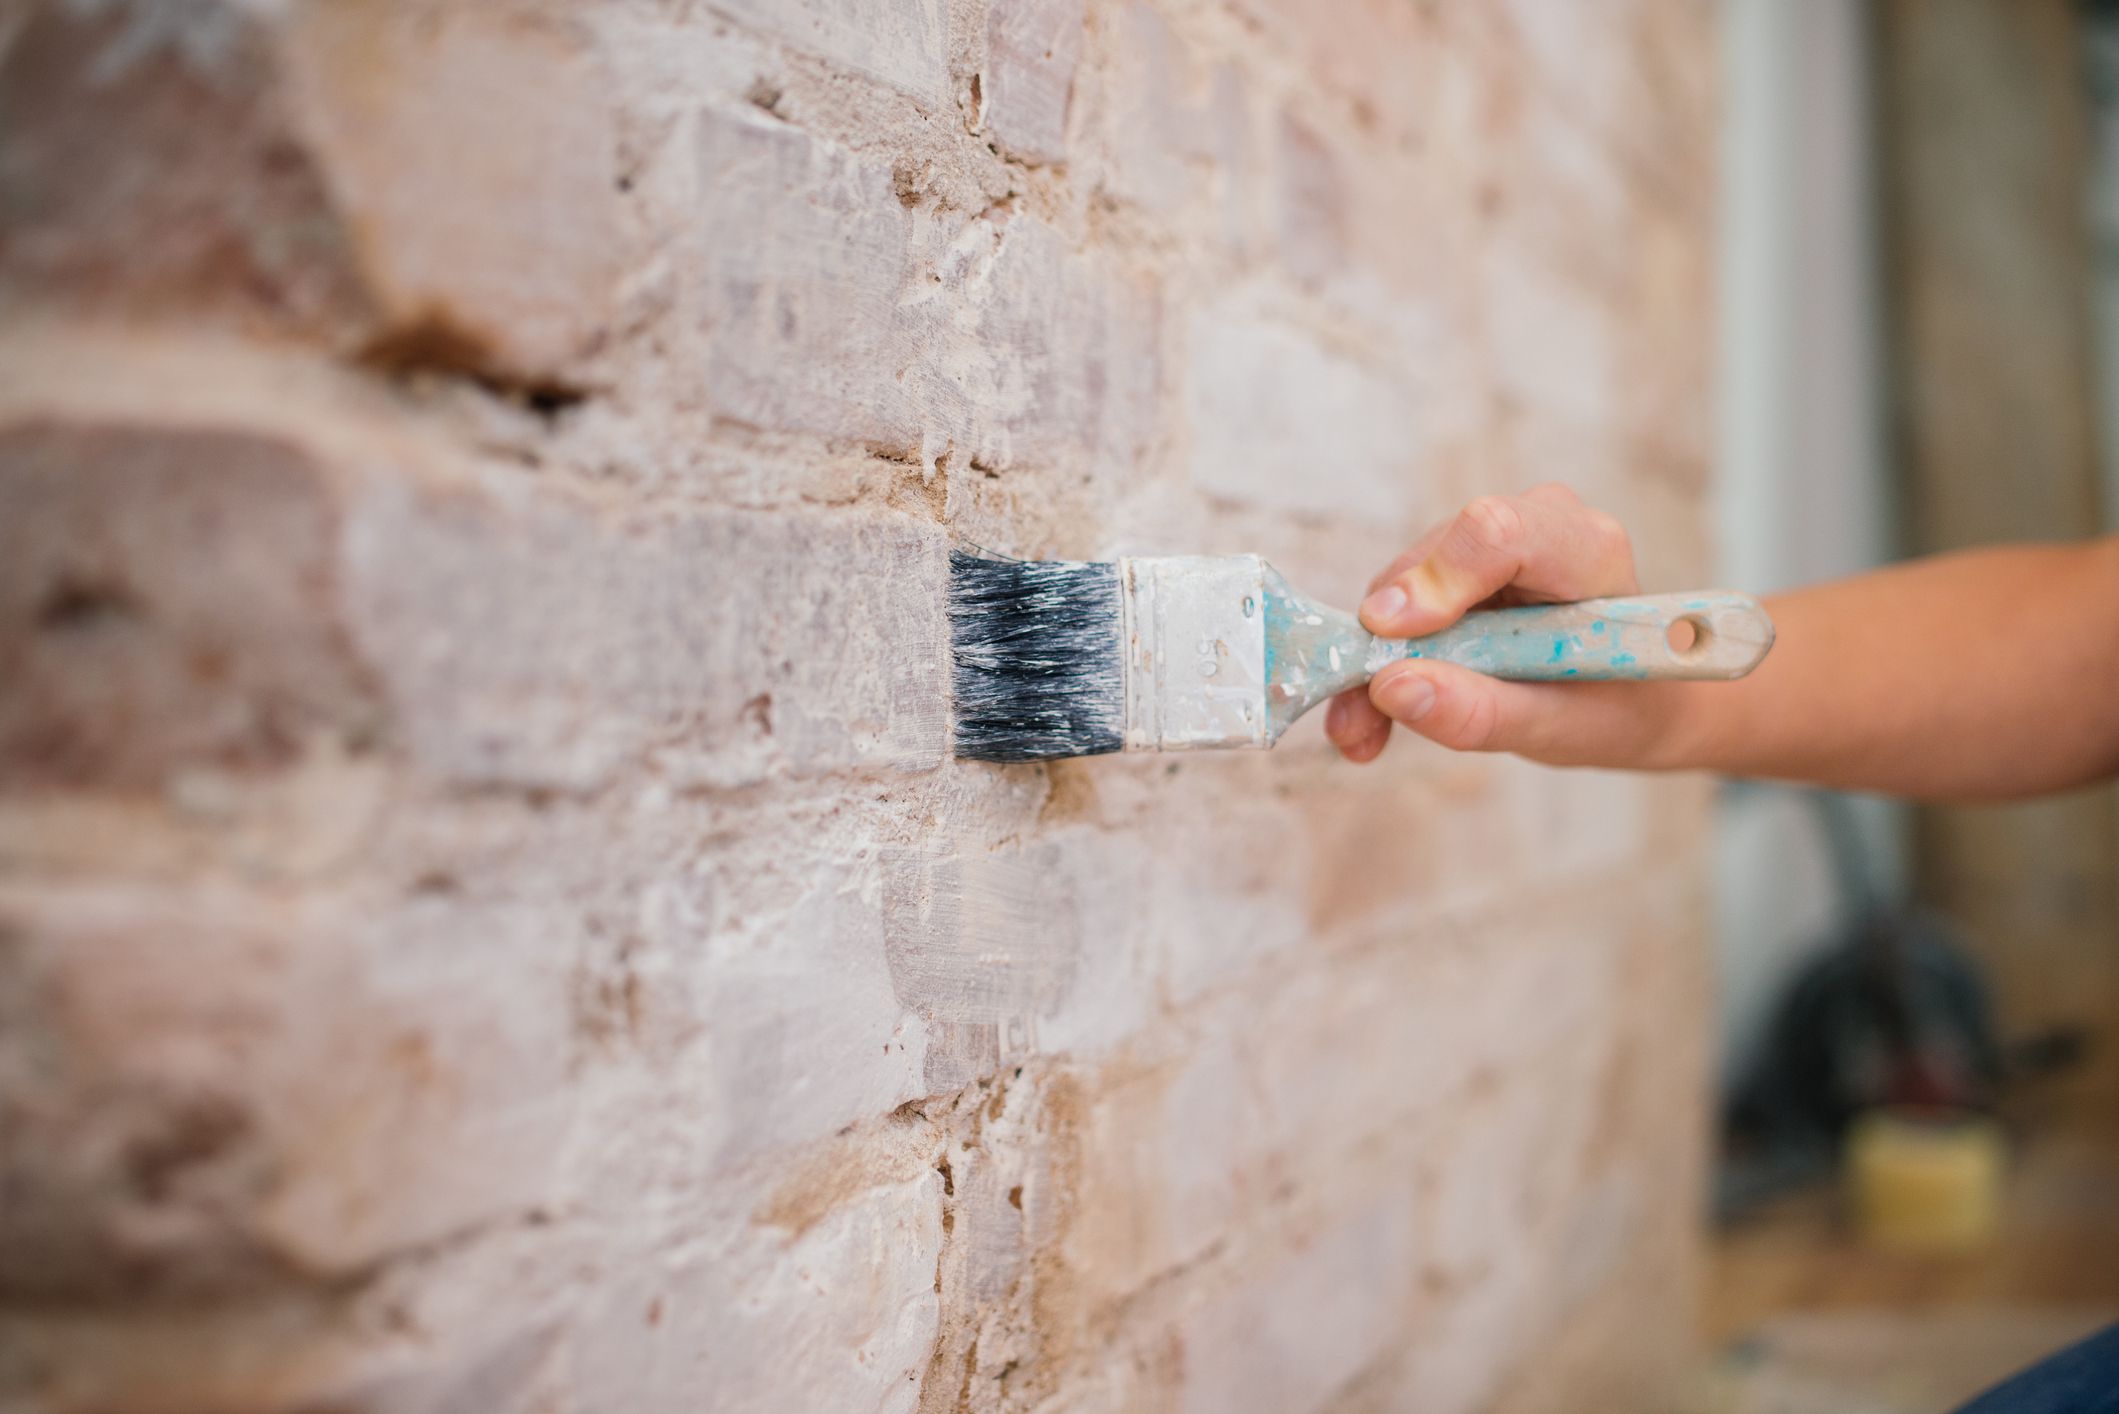
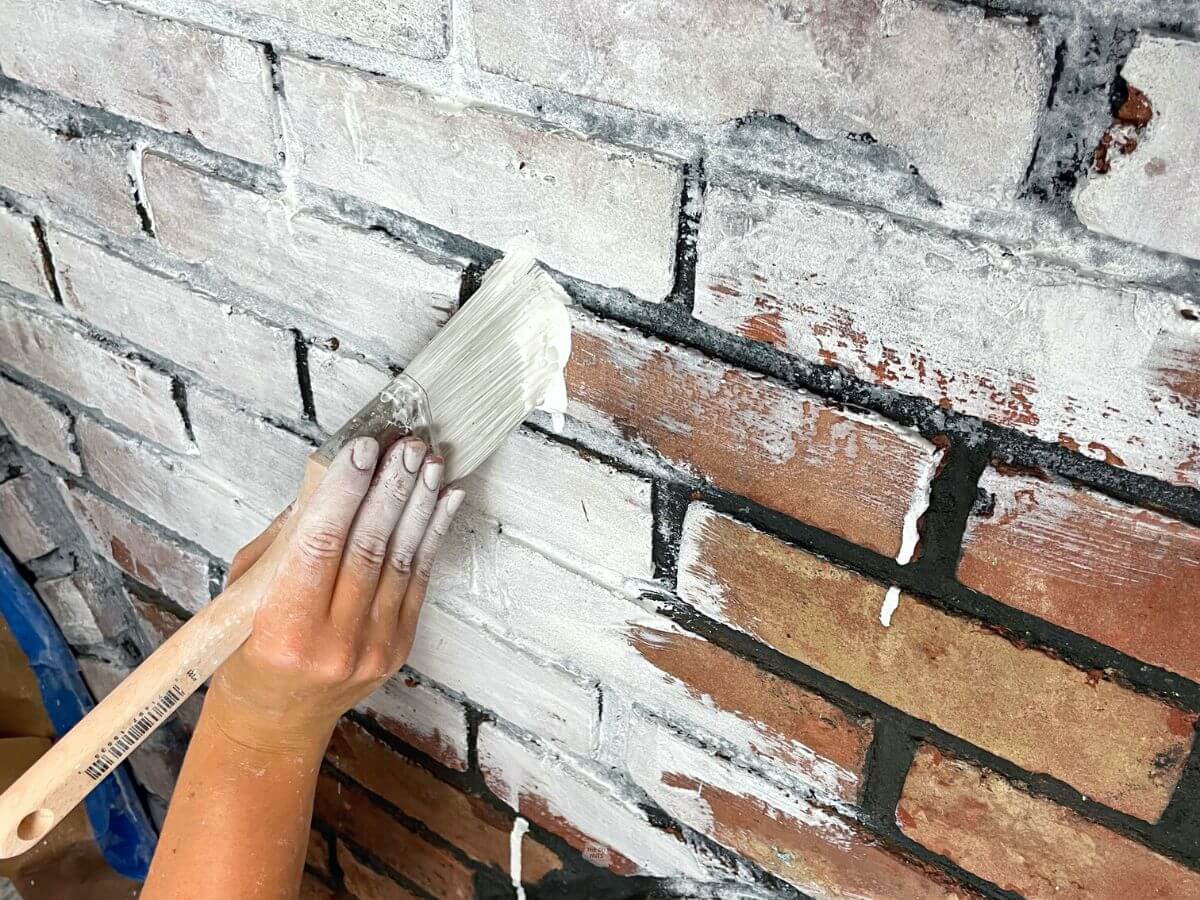
Applying the Whitewash
Now that you’ve completed the preparation steps, it’s time to start applying the whitewash to your dresser. The whitewash solution will give your furniture a beautiful, lightened appearance while allowing the wood grain to show through.
Before applying the whitewash, give the solution a good stir to ensure an even consistency. Whitewash can be purchased premixed, or you can create your own by diluting white latex paint with water. The ratio of paint to water will depend on the level of transparency you desire, so feel free to experiment to achieve your desired look.
Start by applying a thin layer of the whitewash solution to one small area of the dresser. Using a brush or a clean cloth, work the whitewash into the wood grain, making sure to cover the entire surface evenly. Keep in mind that it’s better to apply thin coats and build up the intensity gradually, rather than applying a thick layer all at once.
As you work on each section, continuously blend and feather the whitewash to create a consistent and seamless look. This will help prevent any visible lines or brush marks on the dresser’s surface.
For a more distressed look, you can use a dry brush technique. Dip a brush into the whitewash solution and then dab most of the excess paint off onto a paper towel. Lightly brush the dresser’s surface in quick, random strokes to create a faded and uneven appearance.
If you find that the whitewash is too thick or opaque for your liking, simply wipe away some of the solution with a clean cloth or sponge while it is still wet. This will lighten the effect and allow the wood grain to show through more prominently.
Continue applying the whitewash to the rest of the dresser, working in small sections until you have covered the entire surface. Make sure to also whitewash the drawers, paying attention to the fronts and sides.
Once you’ve applied the initial coat of whitewash, allow it to dry completely. This may take several hours or even overnight, depending on the humidity levels in your area. It’s essential to ensure the whitewash is dry before moving on to the next step.
By applying the whitewash in a controlled and thoughtful manner, you will achieve a beautifully lightened finish that enhances the natural beauty of the wood.
Read more: How To Whitewash Backsplash
Sealing the Whitewash
After you have applied the whitewash and allowed it to dry completely, it’s time to seal the finish. Sealing the whitewash not only protects the surface but also adds a subtle sheen and durability to your dresser.
There are several options for sealing the whitewash, depending on your preference and the level of protection you desire. One popular choice is to use a clear water-based polyurethane sealant. This type of sealant is easy to apply and provides a durable finish without altering the color or appearance of the whitewash.
Before applying the sealant, ensure that the whitewash is clean and free of dust or debris. Use a clean, dry cloth to gently wipe away any loose particles. This will help ensure a smooth and even finish.
Start by pouring a small amount of the polyurethane sealant into a separate container. Using a high-quality synthetic brush or a foam brush, apply a thin and even layer of the sealant to the whitewashed surface. Brush in the direction of the wood grain for a more natural look.
Work in small sections, applying the sealant to one area at a time. Make sure to cover all surfaces, including the top, sides, front, back, and drawers of the dresser. Make smooth, long strokes to minimize any visible brush marks.
Allow the first coat of sealant to dry for the recommended time indicated on the product’s instructions. This typically takes a few hours. Once dry, lightly sand the surface with a fine-grit sandpaper to smooth out any imperfections or bubbles in the sealant.
After sanding, remove the sanding dust with a clean cloth or tack cloth. Apply a second coat of sealant in the same manner as the first coat. This second coat will provide an additional layer of protection and enhance the overall appearance of the whitewashed finish.
Allow the second coat of sealant to dry completely. It’s important to follow the drying time specified on the product’s instructions to ensure proper protection. Once dry, inspect the dresser for any areas that may require touch-ups or additional sealing.
By sealing the whitewash, you not only protect and preserve the finish but also enhance its beauty and longevity. The sealed surface will be easier to clean and maintain, allowing your whitewashed dresser to stay looking fresh and beautiful for years to come.
Finishing Touches
Now that you’ve applied the whitewash and sealed the dresser, it’s time to add the finishing touches to complete the transformation. These final touches will enhance the overall look of your dresser and make it a standout piece in your room.
First, consider adding new hardware to your dresser. Drawer pulls, knobs, or handles can easily be replaced to complement the whitewashed finish and suit your personal style. Choose hardware that enhances the desired aesthetic, whether it’s modern, vintage, or rustic.
Next, take a step back and assess the overall appearance of your dresser. If you notice any areas that require touch-ups or additional whitewash, now is the time to address them. Use a small brush or cloth to carefully apply more whitewash to these areas, ensuring a seamless and cohesive finish.
Consider adding a distressed or worn look to your whitewashed dresser for a vintage or shabby chic vibe. Use sandpaper or a sanding block to gently sand the edges and corners of the dresser, revealing the natural wood beneath the whitewash. This technique adds character and charm to the piece.
Take the opportunity to personalize your dresser even further with decorative accents. Consider adding stenciled designs, decoupage, or hand-painted motifs to make it truly unique. These personal touches will make your dresser a statement piece in any room.
To protect the surface of your dresser and prevent any damage from everyday use, consider using felt or rubber pads on the bottom of objects that will be in constant contact with the dresser’s surface.
Finally, step back and admire your beautifully whitewashed and finished dresser. Admire the transformation and the hard work you put into revitalizing this piece of furniture.
Remember, the finishing touches add that extra flair and personalization to make your whitewashed dresser truly one-of-a-kind. Have fun with the process and let your creativity shine.
Conclusion
Whitewashing a dresser is a fantastic way to breathe new life into your furniture and create a fresh, coastal-inspired look. By following the step-by-step process outlined in this article, you can achieve a stunning whitewashed finish that enhances the natural beauty of the wood and transforms your dresser into a standout piece.
The key to a successful whitewashing project lies in proper preparation, including sanding the dresser to create a smooth surface and cleaning it thoroughly. Applying the whitewash requires patience and attention to detail, ensuring that the solution is applied evenly and in thin layers to achieve the desired effect.
Sealing the whitewash with a protective sealant not only enhances its durability but also adds a subtle sheen, making your dresser resistant to everyday wear and tear. Adding the finishing touches, such as new hardware or personalized accents, allows you to customize your dresser to suit your unique style and taste.
Throughout the entire process, remember to enjoy the journey and embrace your creativity. Whitewashing a dresser is not only a DIY project but also an opportunity to unleash your imagination and create a piece of furniture that reflects your individuality.
With a beautifully whitewashed dresser in your home, you’ll enjoy the soothing and airy ambiance it brings to your space. Whether it’s in your bedroom, living room, or hallway, your whitewashed dresser is sure to be a conversation starter and a focal point of your decor.
So, go ahead and give your old dresser a fresh and rejuvenated look through the timeless technique of whitewashing. Get your materials ready, follow the steps outlined in this article, and soon you’ll have a stunning whitewashed dresser that adds charm and elegance to your home.
Frequently Asked Questions about How To Whitewash A Dresser
Was this page helpful?
At Storables.com, we guarantee accurate and reliable information. Our content, validated by Expert Board Contributors, is crafted following stringent Editorial Policies. We're committed to providing you with well-researched, expert-backed insights for all your informational needs.


0 thoughts on “How To Whitewash A Dresser”