Home>Furniture>Outdoor Furniture>How To Make An Underquilt For Hammock
Outdoor Furniture
How To Make An Underquilt For Hammock
Modified: August 20, 2024
Learn how to make your own underquilt for your hammock with this easy step-by-step guide. Stay warm and comfortable during your outdoor adventures. Perfect for outdoor furniture enthusiasts.
(Many of the links in this article redirect to a specific reviewed product. Your purchase of these products through affiliate links helps to generate commission for Storables.com, at no extra cost. Learn more)
Introduction
Welcome to the world of hammock camping! Sleeping in a hammock has become a popular choice for outdoor enthusiasts looking for a lightweight and comfortable alternative to traditional tents. One essential piece of gear every hammock camper needs is an underquilt.
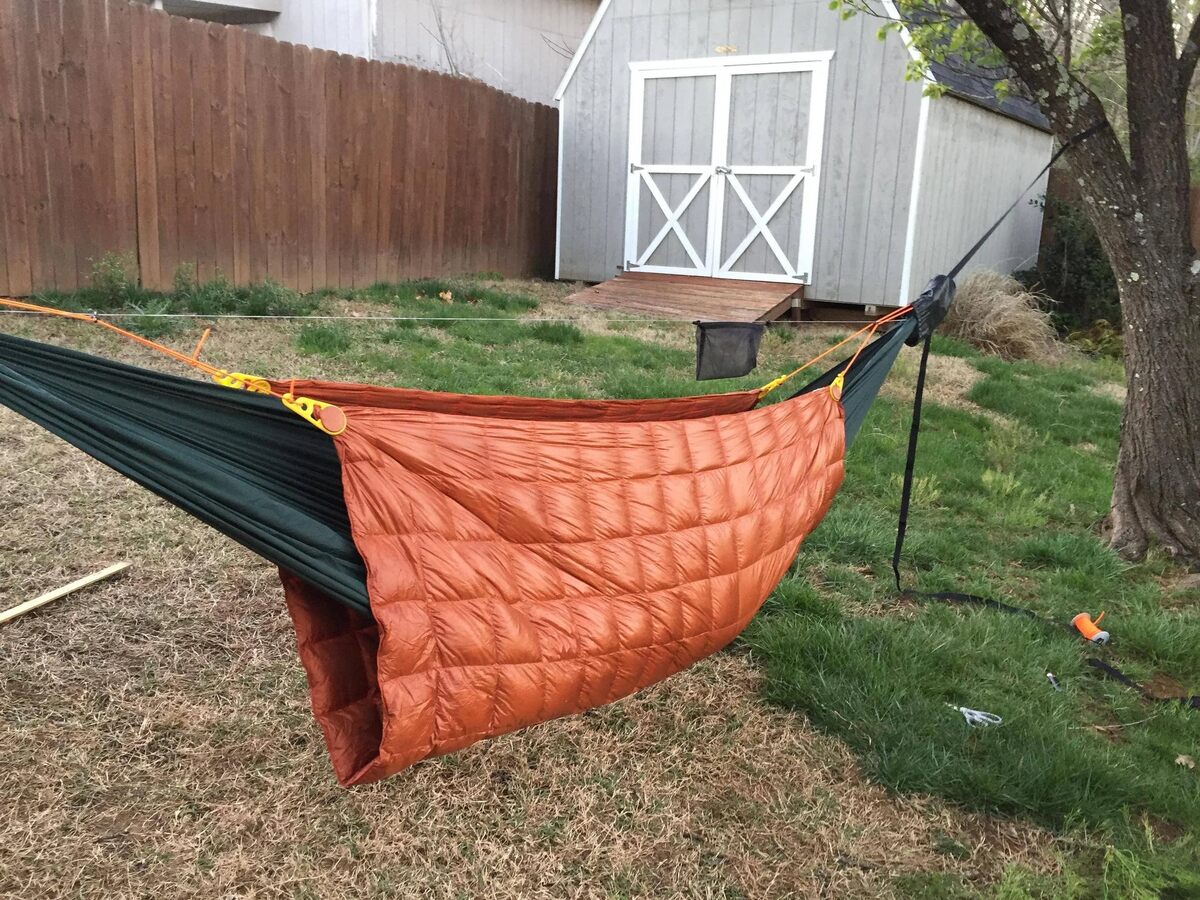
An underquilt is a quilted insulation layer that hangs beneath the hammock, providing much-needed warmth and protection from the cold ground. It is designed to prevent heat loss from below and keep you cozy throughout the night. While there are many commercially available underquilts, making your own can be a rewarding and cost-effective option.
In this guide, we will walk you through the process of making your own underquilt for your hammock. Whether you’re an experienced DIYer or a beginner, with a little time and effort, you’ll have a custom underquilt that will keep you snug and cozy in your hammock.
Before we get started, let’s gather the materials you’ll need for this project.
Key Takeaways:
- Stay warm and cozy during hammock camping by making your own underquilt using lightweight fabric and synthetic insulation. Customize the size and design for a cost-effective and rewarding DIY project.
- Ensure optimal comfort by testing and adjusting your homemade underquilt. Attach a suspension system for easy installation and make necessary adjustments for a snug fit. Enjoy warm and cozy nights under the stars!
Read also: 8 Best Hammock Underquilt For 2025
Materials Needed
Before diving into the process of making an underquilt for your hammock, it’s important to gather all the necessary materials. Here’s a list of what you’ll need:
- Fabric: You’ll need a durable, lightweight, and insulating fabric for the quilt. Ripstop nylon or polyester is a popular choice.
- Insulation: Opt for a synthetic insulation material like Climashield or PrimaLoft. These materials are lightweight, retain warmth even when wet, and are easy to work with.
- Thread: Choose a high-quality thread that matches the color of your fabric.
- Sewing Machine: A basic sewing machine will suffice for this project. Make sure it’s in good working condition.
- Measuring Tape: A measuring tape or ruler will help you accurately measure your fabric and insulation.
- Scissors: Make sure you have a sharp pair of scissors for cutting fabric, insulation, and thread.
- Straight Pins or Clips: These will come in handy for keeping fabric layers in place during sewing.
- D-Rings and Cord: These will be used for attaching the underquilt to your hammock suspension system.
- Shock Cord: Shock cord or bungee cord will provide suspension and adjustability to your underquilt.
- Cord Locks: Cord locks are useful for securing the shock cord tight.
- Sewing Supplies: Ensure you have a seam ripper, fabric marker, and any other sewing supplies you regularly use.
Once you’ve gathered all these materials, you’re ready to move on to the next step: measuring and cutting the fabric.
Step 1: Measuring and Cutting the Fabric
Now that you have all the necessary materials, it’s time to measure and cut the fabric for your underquilt. Follow these steps:
- Lay out your fabric on a flat surface. Measure and mark the desired dimensions for your underquilt. The typical size is around 6 feet long and 4 feet wide, but you can adjust it based on your preferences and the size of your hammock.
- Use scissors to carefully cut along the marked lines, ensuring clean and even edges.
- Repeat this process with your insulation material, cutting it to the same dimensions as your fabric. Take your time to ensure accurate cuts.
- Once you have your fabric and insulation cut to size, it’s time to move on to the next step: sewing the quilt layers.
Pro tip: If you’re not confident in your cutting skills or want a more precise result, consider using a rotary cutter and a ruler. This will help you achieve straighter lines and cleaner cuts.
With your fabric and insulation ready, let’s move on to the next step: sewing the quilt layers together.
Step 2: Sewing the Quilt Layers
With your fabric and insulation cut to size, it’s time to sew the quilt layers together. Follow these steps:
- Place one layer of fabric on a flat surface, right side up. Position the insulation layer on top, aligning the edges.
- Pin or clip the layers together along the edges, ensuring they stay in place during sewing.
- Set up your sewing machine with the appropriate thread and needle for your fabric type.
- Starting at one end, stitch along the edges of the fabric and insulation layers, leaving a small seam allowance of about ¼ inch.
- Continue sewing around all sides, removing pins or clips as you go. Take your time to ensure straight and even stitches.
- Once you’ve sewn around all sides, reinforce the stitching at the corners and backstitch at the beginning and end to secure the threads.
- Trim any excess thread and remove any stray threads from the quilt.
By sewing the fabric and insulation layers together, you create quilted channels that help distribute the insulation evenly and prevent it from shifting.
With the quilt layers now sewn together, it’s time to move on to the next step: creating the channel system.
Consider using a high-quality, lightweight insulation material such as down or synthetic fill to make your underquilt. This will provide the best warmth-to-weight ratio for your hammock camping adventures.
Step 3: Creating the Channel System
Creating a channel system in your underquilt is crucial for keeping the insulation in place and distributing warmth evenly. Follow these steps to create the channel system:
- Decide on the spacing and size of your channels. Typically, channels are spaced around 4-6 inches apart to prevent the insulation from bunching up.
- Use a fabric marker or tailor’s chalk to mark the lines where you’ll stitch the channels. Make sure the lines are parallel and evenly spaced.
- Set up your sewing machine with a walking foot attachment. This helps to feed the layers evenly and prevents shifting during sewing.
- Start at one end of the quilt and stitch along the marked lines, creating long, straight channels. Backstitch at the beginning and end of each channel to secure the stitches.
- Continue stitching all the channels until you reach the opposite end of the quilt.
- Once you’ve sewn all the channels, give the underquilt a gentle shake to distribute the insulation evenly. This will ensure maximum warmth and comfort during use.
Creating the channel system is an essential step in making your underquilt. It ensures that the insulation stays in place, providing optimal warmth and comfort during your hammock camping trips.
With the channel system in place, it’s time to move on to the next step: attaching the suspension system.
Read more: How To Make A Rat Hammock
Step 4: Attaching the Suspension System
Attaching a suspension system to your underquilt is essential for easy installation and adjustment. Follow these steps to attach the suspension system:
- Start by selecting a suitable suspension system for your hammock. This can include D-rings, webbing straps, and shock cord.
- Place the underquilt on a flat surface, quilted side down.
- Position one end of the suspension system on the edge of the underquilt, ensuring that it aligns with one of the quilt channels.
- Sew the end of the suspension system securely to the underquilt by stitching back and forth several times.
- Repeat this process for the other end of the suspension system, ensuring it aligns with the corresponding quilt channel.
- Once both ends of the suspension system are securely attached, thread the shock cord through the quilt channels, creating a gathered effect. This allows you to easily adjust the underquilt’s tension.
- Secure the shock cord with cord locks, making sure it is tight enough to keep the underquilt in place but still allows for some adjustability.
- Attach the D-rings or webbing straps to the suspension system, ensuring they are securely sewn or linked.
By attaching a suspension system to your underquilt, you can easily hang it beneath your hammock and make necessary adjustments to achieve the perfect fit.
With the suspension system attached, it’s time to move on to the final step: testing and adjusting the underquilt.
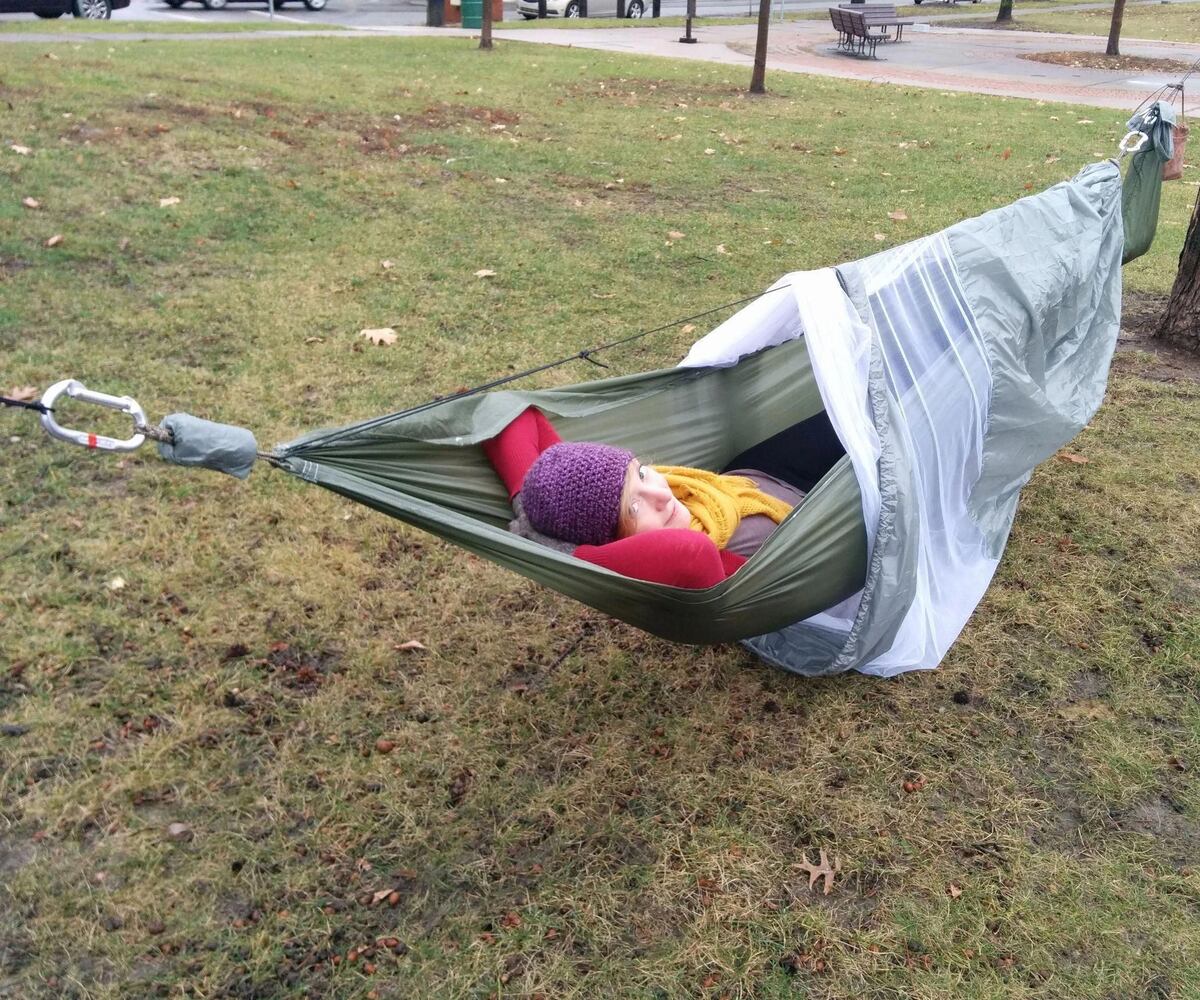
Step 5: Testing and Adjusting the Underquilt
Now that your underquilt is complete, it’s time to test it out and make any necessary adjustments for optimal comfort. Follow these steps to test and adjust your underquilt:
- Set up your hammock in a comfortable spot, ensuring it is properly suspended and securely anchored.
- Attach the underquilt to your hammock suspension system using the D-rings or webbing straps.
- Climb into your hammock and position yourself in the center, allowing the underquilt to hang beneath your hammock.
- Take note of how the underquilt feels in terms of coverage and warmth. You may need to make adjustments to the tension of the shock cord for a snug fit.
- Experiment with different tension settings and positions until you find the sweet spot where the underquilt provides optimal insulation and coverage.
- Make sure the underquilt is evenly spread beneath your hammock, with no cold spots or gaps.
- Once you’re satisfied with the fit and comfort, take some time to relax and enjoy the cozy warmth of your newly made underquilt.
Testing and adjusting your underquilt is essential to ensure you get a good night’s sleep while hammock camping. Everyone’s preferences and hammock setups are different, so take the time to find the right adjustments that work best for you.
Congratulations! You have successfully made your own underquilt for your hammock. With your custom underquilt in hand, you’re ready to tackle any camping adventure, staying warm and comfortable throughout the night.
Remember to take good care of your underquilt by regularly inspecting and cleaning it. Proper maintenance will ensure its longevity and continued performance for many hammock camping trips to come.
Happy hammock camping!
Conclusion
Congratulations on completing your DIY underquilt for your hammock! By following the steps outlined in this guide, you have successfully created a custom underquilt that will keep you warm and cozy during your outdoor adventures. Not only is making your own underquilt a cost-effective option, but it also allows you to customize the design and functionality to suit your specific needs.
Remember, the key to a successful underquilt is proper insulation, even distribution of warmth, and a secure attachment to your hammock. Take the time to test and adjust your underquilt to ensure optimal comfort before heading out on your next camping trip.
When using your underquilt, be sure to pay attention to the temperature and weather conditions. It’s always a good idea to layer your clothing and use additional insulation if needed. Your underquilt will provide a significant boost in warmth and comfort, but it’s essential to dress appropriately for the conditions as well.
Additionally, proper care and maintenance of your underquilt will ensure its longevity. Inspect it regularly for any signs of wear or damage, and clean it according to the manufacturer’s instructions or by handwashing with a gentle detergent. Storing it in a dry and well-ventilated area will also help preserve its quality and performance.
Now that you have your own underquilt, you can experience the joy of hammock camping in any season. The added warmth and comfort will make your outdoor adventures even more enjoyable, allowing you to relax and unwind amidst nature’s beauty.
So, pack your hammock, grab your underquilt, and get ready for unforgettable nights under the stars. Happy hammock camping!
Frequently Asked Questions about How To Make An Underquilt For Hammock
Was this page helpful?
At Storables.com, we guarantee accurate and reliable information. Our content, validated by Expert Board Contributors, is crafted following stringent Editorial Policies. We're committed to providing you with well-researched, expert-backed insights for all your informational needs.


0 thoughts on “How To Make An Underquilt For Hammock”