Home>Furniture>Outdoor Furniture>How To Make A Macrame Hammock
Outdoor Furniture
How To Make A Macrame Hammock
Modified: March 16, 2024
Learn how to make a stunning macrame hammock for your outdoor furniture. Perfect for relaxation and adding a stylish touch to your space.
(Many of the links in this article redirect to a specific reviewed product. Your purchase of these products through affiliate links helps to generate commission for Storables.com, at no extra cost. Learn more)
Introduction
Welcome to the world of outdoor relaxation! If you’re looking to create a cozy and stylish addition to your outdoor space, a macrame hammock might just be the perfect project for you. Combining the art of macrame with the comfort of a hammock, this DIY project allows you to create a unique and inviting space to unwind and enjoy the fresh air.
Macrame, a centuries-old craft of knotting cords together, has experienced a resurgence in popularity in recent years. Its intricate designs and bohemian charm have captivated the hearts of many craft enthusiasts. By incorporating macrame techniques into the construction of a hammock, you can elevate a simple outdoor furniture piece into a statement of style and relaxation.
In this article, we will guide you through the process of making your own macrame hammock. From gathering the necessary materials to the step-by-step instructions, you’ll learn everything you need to know to create a stunning piece of outdoor furniture that will become the focal point of your backyard oasis.
So, roll up your sleeves, grab your scissors, and let’s dive into the world of macrame and hammocks!
Key Takeaways:
- Unleash your creativity and craft a stunning macrame hammock to elevate your outdoor space with style and relaxation. Follow the step-by-step guide to create your own cozy oasis.
- Choose durable ropes, adjust the size to fit your space, and add personal touches to make your macrame hammock unique. Enjoy the process and unwind in your handcrafted masterpiece.
Read more: How To Make A Macrame Fruit Hammock
Materials Needed
- Rope: Choose a sturdy and durable rope for your macrame hammock. Cotton rope is a popular choice due to its natural and soft feel, but you can also opt for nylon or polyester ropes for added strength and weather resistance. Make sure to calculate the length of rope based on the desired size of your hammock.
- Wooden dowel or hoop: This will serve as the base of your macrame hammock. You can use a wooden dowel or a metal hoop, depending on your preference and availability. The size of the dowel or hoop will determine the width of your hammock, so choose accordingly.
- Scissors: A pair of sharp scissors is essential for cutting the rope and trimming any excess. Make sure to use scissors that can handle thick and sturdy materials.
- Measuring tape: Accurate measurements are crucial for ensuring that your macrame hammock turns out the right size and shape. A measuring tape or ruler will help you measure the length of the ropes and maintain symmetry throughout the project.
These basic materials will provide a strong foundation for your macrame hammock. Depending on your design preferences, you can also consider additional decorative elements like beads, feathers, or tassels to add a personalized touch to your creation. Now that you have gathered all the necessary materials, let’s move on to the step-by-step process of creating your macrame hammock.
Step 1: Measure and cut the ropes
The first step in creating your macrame hammock is to measure and cut the ropes. Start by determining the desired length and width of your hammock. Measure from the top of the wooden dowel or hoop to the desired length of the hammock bed. This will determine the length of the ropes needed.
Once you have the measurements, begin cutting the ropes according to the desired length. It’s always a good idea to add a few extra inches to account for any knots or adjustments later on. Use sharp scissors to ensure clean and even cuts.
Make sure to cut an equal number of ropes to maintain symmetry. For example, if you want six ropes on each side of the hammock, you will need to cut twelve pieces of rope in total.
Remember to work in a well-lit and spacious area to avoid any accidents. Take your time as you measure and cut the ropes, paying attention to accuracy to ensure a well-balanced hammock.
Once all the ropes are cut and ready, it’s time to move on to the next step: attaching the ropes to the wooden dowel or hoop.
Step 2: Attach the ropes to the dowel or hoop
With your cut ropes in hand, it’s time to attach them to the wooden dowel or hoop, which will serve as the base of your macrame hammock. This step will create the foundation from which you will build the macrame knotting.
Start by grouping the ropes together in pairs. Take one pair of ropes and fold them in half. Create a loop at the folded end and place it under the dowel or hoop. Pull the loose ends of the ropes through the loop and tighten it securely. Repeat this process with the remaining pairs of ropes, spacing them evenly along the dowel or hoop.
Ensure that the loops are securely attached and the ropes are evenly spaced to maintain stability and balance. You can use a measuring tape to ensure equal spacing between the pairs of ropes if desired.
Take a moment to inspect each attachment point, making sure the ropes are tightly secured and the weight is evenly distributed. This will ensure a sturdy foundation for your macrame hammock.
Once all the ropes are attached to the dowel or hoop, you’re ready to move on to the next step: creating the macrame knots that will form the unique pattern of your hammock.
Step 3: Begin the macrame knots
Now that you have successfully attached the ropes to the dowel or hoop, it’s time to start creating the macrame knots. These knots will form the intricate and decorative patterns that give your macrame hammock its unique charm.
Begin by selecting a pair of ropes adjacent to each other. Take the left rope of the pair and cross it over the right rope to create a loop. Pass the left rope behind the right rope and through the loop. Pull it tightly to secure the knot. This is known as a half square knot, and it will be the basis for the macrame pattern.
Now, move on to the next pair of ropes and repeat the process. Take the left rope and cross it over the right rope, creating a loop. Pass the left rope behind the right rope and through the loop, pulling it tightly. Continue this pattern across all the pairs of ropes, working from left to right.
As you progress, you’ll start to see the macrame pattern taking shape. The half square knots will create a series of diagonal lines across the hammock. Ensure that each knot is tight and secure, as this will provide strength and stability to the hammock.
Work your way down the ropes, creating the half square knots until you reach the desired length for the macrame pattern. Remember to maintain consistency in the tension and tightness of the knots to achieve an even and visually pleasing design.
With the macrame knots started, you’re ready to move on to the next step: continuing the macrame knots to complete the pattern of the hammock.
Read more: How To Make A Macrame Cat Hammock
Step 4: Continue the macrame knots
With the macrame pattern in motion, it’s time to continue the knots to complete the design of your macrame hammock. This step will add depth and intricacy to the overall appearance of the hammock.
Start by selecting a new pair of adjacent ropes. Take the left rope of the pair and cross it over the right rope, creating a loop. Pass the left rope behind the right rope and through the loop, just like you did in the previous step. This will create another half square knot.
Next, move on to the next pair of ropes and repeat the same process. Cross the left rope over the right rope, create a loop, pass the left rope behind the right rope, and through the loop. Pull the knot tightly to secure it.
Continue this pattern across all the pairs of ropes, making sure to maintain the consistency and tightness of the knots. As you work your way down, the macrame pattern will start to grow and become more defined.
Keep an eye on the overall symmetry and balance of the hammock as you continue the macrame knots. Adjust the tension of the ropes if needed to ensure an even and visually appealing design. Take your time with this step, as the quality of the knots will greatly impact the final appearance of your macrame hammock.
Once you have reached the desired length for the macrame pattern, it’s time to move on to the next step: creating the hammock bed.
When making a macrame hammock, be sure to use strong and durable rope or cord to ensure the hammock can support your weight. It’s important to regularly check the knots and overall structure for any signs of wear and tear.
Step 5: Create the hammock bed
Now that you have completed the macrame knots, it’s time to create the hammock bed where you’ll relax and unwind. This step involves weaving the ropes together to form a comfortable and supportive surface.
Start by taking two adjacent ropes and tying them together in a square knot. To do this, cross the left rope over the right rope, creating a loop. Pass the left rope behind the right rope and through the loop. Then, pass the right rope behind the left rope and through the loop, pulling it tightly to secure the knot.
Continue tying square knots across the ropes, working your way from left to right. Ensure that each knot is tied tightly and securely to create a sturdy hammock bed.
As you progress, you’ll notice the hammock bed taking shape. The tightly woven knots will provide a stable and comfortable surface for lounging and relaxing. Adjust the tension of the knots as needed to achieve an even and supportive hammock bed.
Make sure to maintain symmetry and balance throughout this process. Pay attention to the spacing and alignment of the knots to create a visually pleasing pattern.
Continue tying square knots until you’ve covered the desired area of the hammock bed. Take your time with this step, as the quality of the knots will determine the durability and comfort of the hammock.
Once you’re satisfied with the hammock bed, you’re ready to move on to the next step: finalizing the macrame knots.
Step 6: Finalize the macrame knots
With the hammock bed completed, it’s time to finalize the macrame knots and add any finishing touches to your macrame hammock. This step will ensure that all the knots are secure and the design is visually appealing.
Start by checking each knot along the sides of the hammock. If any knots feel loose or unstable, tighten them by pulling the ropes and adjusting the tension. This will enhance the overall stability and durability of the hammock.
Once you’ve tightened any loose knots, take a step back and evaluate the design. Look for any areas that may need additional knots or adjustments to achieve a symmetrical and balanced look. Make any necessary changes to ensure a visually pleasing pattern.
If you wish to add decorative elements to your macrame hammock, now is the time to do so. Consider adding beads, feathers, or tassels to the knots or choosing a different colored rope for a unique touch.
Take this opportunity to trim any excess rope that may be hanging below the hammock bed. Use sharp scissors to cut the ropes at a length that is aesthetically pleasing and won’t interfere with the functionality of the hammock.
Take one final look at your macrame hammock and make any last-minute adjustments or refinements. Once you’re satisfied with the overall design and stability, your macrame hammock is complete!
Congratulations on creating a beautiful and cozy outdoor haven. It’s time to move on to the final step: hanging your macrame hammock and enjoying the fruits of your labor.
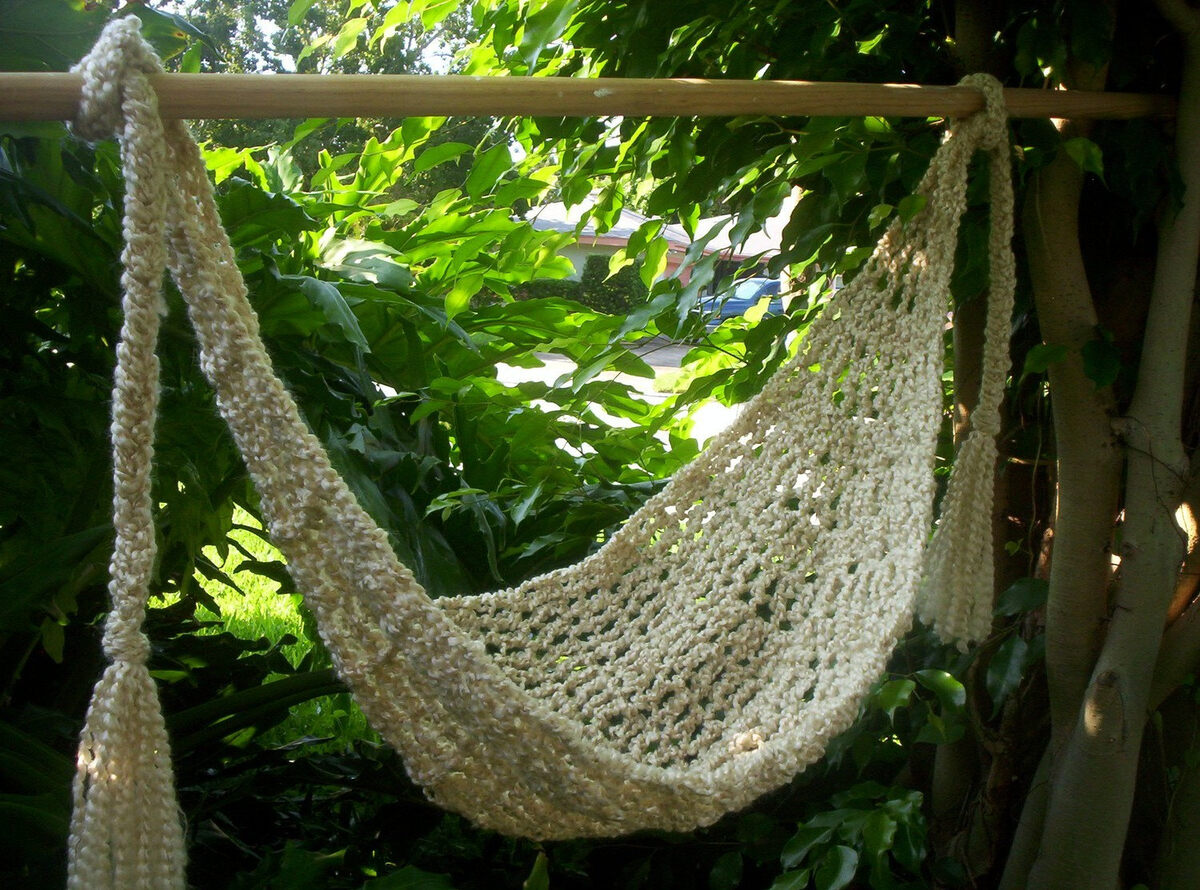
Step 7: Hang and enjoy your macrame hammock
Now that your macrame hammock is complete, it’s time to find the perfect spot to hang it and start enjoying the ultimate relaxation experience. Follow these steps to ensure a secure and comfortable suspension:
- Choose a sturdy support: Look for a strong and stable structure, such as a tree branch or sturdy beam, to hang your hammock from. Make sure the support can bear the weight and provides a safe and comfortable environment for lounging.
- Measure the height: Use a measuring tape to determine the ideal height for your hammock. Keep in mind that the hammock should have a slight sag when you lie in it, so it’s not too taut or uncomfortable.
- Attach the hammock: Securely attach the loops or hooks at the ends of your hammock to the support. Ensure that the knots or hooks are strong and properly fastened to avoid any accidents.
- Test the suspension: Before fully committing to relaxing in your hammock, give it a few gentle swings to test its stability. Check that it feels secure and comfortable before settling in.
- Add pillows or blankets: Enhance the coziness of your macrame hammock by adding pillows, cushions, or blankets. This will create a comfortable and inviting space for relaxation.
- Enjoy your hammock: Now that everything is in place, it’s time to lay back, unwind, and enjoy the serenity of your macrame hammock. Spend some quality time outdoors, reading a book, or simply taking a well-deserved nap.
Remember to always follow safety guidelines and precautions when using your macrame hammock. Avoid excessive swinging or jumping that may cause the hammock to lose balance or strain the ropes.
With your macrame hammock hanging majestically in your outdoor space, you’ve created a tranquil oasis for relaxation and rejuvenation. Take the time to enjoy these moments and embrace the beauty of nature as you unwind in your handcrafted masterpiece.
Congratulations on successfully completing your macrame hammock project, and may your outdoor adventures be filled with comfort and serenity!
Read more: How To Macrame A Hammock Chair
Tips and Tricks
Creating a macrame hammock can be a rewarding and enjoyable project. To help you along the way, here are some tips and tricks to consider:
- Choosing the right type of rope: When selecting the rope for your macrame hammock, consider factors such as durability, weather resistance, and comfort. While cotton rope is popular for its softness, nylon and polyester ropes offer greater strength and can withstand outdoor elements. Choose a rope that suits your needs and preferences.
- Adjusting the size of the hammock: If you want to customize the size of your macrame hammock, you can easily do so by adjusting the length and number of ropes used. Measure the space where you plan to hang the hammock and ensure that it fits comfortably. Remember to take into account the sag when calculating the length of the ropes.
- Adding decorative elements: While macrame itself is visually stunning, you can enhance the beauty of your hammock by adding decorative elements. Consider incorporating beads, feathers, tassels, or even weaving different colored ropes into the design. These details can add a personal touch and make your macrame hammock truly unique.
Experiment with these tips and tricks to make your macrame hammock stand out and suit your style and needs. Don’t be afraid to get creative and try new techniques!
Lastly, remember to have fun throughout the process. Crafting a macrame hammock allows you to unleash your creativity and create a special space for relaxation and enjoyment in your outdoor area.
Now that you’re armed with these tips and tricks, go ahead and dive into the wonderful world of macrame hammocks. Happy crafting!
Conclusion
Congratulations! You’ve reached the end of this comprehensive guide on how to make your own macrame hammock. By combining the art of macrame with the comfort of a hammock, you have created a stunning outdoor furniture piece that is both visually appealing and inviting.
Throughout this article, you’ve learned the step-by-step process of measuring and cutting the ropes, attaching them to the dowel or hoop, creating the macrame knots, and weaving the hammock bed. Each step has allowed you to unleash your creativity and craftsmanship, resulting in a beautiful and functional macrame hammock that you can proudly display in your outdoor space.
Remember to choose the right type of rope for durability and comfort, adjust the size of the hammock to fit your needs, and consider adding decorative elements to make your hammock truly unique.
As you hang your macrame hammock in a serene spot in your backyard, take a moment to appreciate the beauty and relaxation it brings. This inviting piece of furniture will become a cherished spot for you to unwind, read a book, enjoy a afternoon nap, or simply soak up the natural surroundings.
Now it’s time to grab a book, a refreshing drink, or simply revel in the beauty of nature as you recline in your handcrafted macrame hammock. Let the gentle sway and the comfort of the woven ropes transport you to a place of relaxation and tranquility.
Thank you for joining us on this creative journey. We hope you’ve enjoyed learning how to make a macrame hammock and that you find joy in the process of crafting your own outdoor oasis.
Happy hammocking!
Frequently Asked Questions about How To Make A Macrame Hammock
Was this page helpful?
At Storables.com, we guarantee accurate and reliable information. Our content, validated by Expert Board Contributors, is crafted following stringent Editorial Policies. We're committed to providing you with well-researched, expert-backed insights for all your informational needs.

0 thoughts on “How To Make A Macrame Hammock”