Home>Furniture>Outdoor Furniture>How To Make A Bug Net For A Hammock
Outdoor Furniture
How To Make A Bug Net For A Hammock
Modified: March 16, 2024
Learn how to create a bug net for your outdoor furniture, specifically for your hammock. Stay protected from pesky insects while enjoying the great outdoors.
(Many of the links in this article redirect to a specific reviewed product. Your purchase of these products through affiliate links helps to generate commission for Storables.com, at no extra cost. Learn more)
Introduction
Welcome to the world of outdoor relaxation and comfort! If you’re an avid hammock user, you know that there’s nothing quite like swinging gently in the breeze and soaking in the beauty of nature. However, one pesky annoyance that often comes with hammock lounging is the presence of bugs. Whether it’s mosquitoes, flies, or other insects, their constant buzzing and biting can put a damper on your peaceful retreat.
But fear not, because in this article, we’re going to show you how to make a bug net for your hammock. With a few simple materials and some basic sewing skills, you’ll be able to enjoy bug-free bliss while still being able to enjoy the great outdoors. So let’s dive in and get started!
Key Takeaways:
- Say goodbye to pesky bugs while hammock lounging by making your own bug net. Just follow simple steps like measuring, sewing, and testing to create a bug-free outdoor sanctuary.
- Enjoy bug-free relaxation in your hammock by crafting a custom bug net. With basic materials and sewing skills, you can keep mosquitoes and flies at bay while soaking in nature’s beauty.
Read also: 13 Best Net Hammock For 2025
Materials Needed
Before you begin making your bug net, let’s gather all the necessary materials. Here’s what you’ll need:
- 1. Lightweight fabric – Choose a breathable and durable fabric that will provide adequate protection from bugs. Nylon or polyester with a tight weave are ideal options.
- 2. Bug netting – Look for mosquito netting specifically designed to keep bugs out. This can be found at outdoor supply stores or online.
- 3. Sewing machine – While it’s possible to sew the bug net by hand, using a sewing machine will make the process quicker and ensure a sturdier end result.
- 4. Thread – Opt for a strong thread that matches the color of your fabric. This will ensure that your bug net blends seamlessly with your hammock.
- 5. Scissors – Sharp fabric scissors will make cutting through the materials much easier.
- 6. Measuring tape – This will help you get accurate measurements for your fabric and bug netting.
- 7. Pins – Pins will come in handy to hold the fabric and bug netting in place during the sewing process.
- 8. Rope or cord – You’ll need some rope or cord to attach the bug net to your hammock. Make sure it’s sturdy enough to support the weight of the net.
- 9. Cord locks or toggles – These will be used to adjust and secure the bug netting to your hammock.
Once you have gathered all these materials, you’ll be ready to move on to the next step of creating your bug net.
Step 1: Measure and cut the fabric
The first step in making your bug net for a hammock is to measure and cut the fabric. Start by spreading out the fabric on a flat surface and ensuring that it is free from wrinkles.
Measure the length and width of your hammock, allowing for additional fabric for seam allowances and a comfortable fit. You’ll want the bug net to extend beyond the edges of the hammock to provide ample protection.
Mark the measurements on the fabric using a fabric marker or pins, ensuring that you have a rectangular shape that matches the dimensions of your hammock. Double-check the measurements and make any necessary adjustments before proceeding.
Once you’re confident in the measurements, use a pair of sharp fabric scissors to carefully cut along the marked lines. Take your time to ensure clean and straight edges.
It’s important to note that if your hammock has a ridgeline, make sure to factor that into your measurements. The ridgeline will create a curved shape in the bug net, so you’ll need to adjust accordingly.
After cutting the fabric, double-check the dimensions to make sure they match your hammock. This will ensure that the bug net fits properly and provides adequate coverage.
With the fabric cut to the correct size, you’re now ready to move on to the next step: sewing the fabric edges.
Step 2: Sew the fabric edges
Now that you have your fabric cut to the appropriate size, it’s time to sew the edges to prevent fraying and create a clean finish.
- Prepare your sewing machine by threading it with a suitable thread color and selecting a straight stitch.
- Take one edge of the fabric and fold it over by about half an inch, towards the wrong side of the fabric. Pin it in place to secure the fold.
- With the folded edge pinned, carefully sew a straight stitch along the edge, about a quarter inch away from the fold. Remove the pins as you go and continue sewing until the entire edge is secured.
- Repeat this process for all four edges of the fabric, folding and sewing each side in the same manner. This will create a neat and finished look to your bug net.
While sewing, make sure to maintain a consistent seam allowance to ensure an even look. Backstitch at the beginning and end of each seam for added durability.
If you prefer a different finish, you can also consider using a serger or zig-zag stitch to prevent fraying. However, the straight stitch method works well for most lightweight fabrics.
Once you have sewn all the fabric edges, give it a final press with an iron to smooth out any wrinkles or creases and ensure a polished appearance.
With the fabric edges neatly sewn, you can now move on to the next step: attaching the suspension system to the bug net.
Step 3: Attach the suspension system
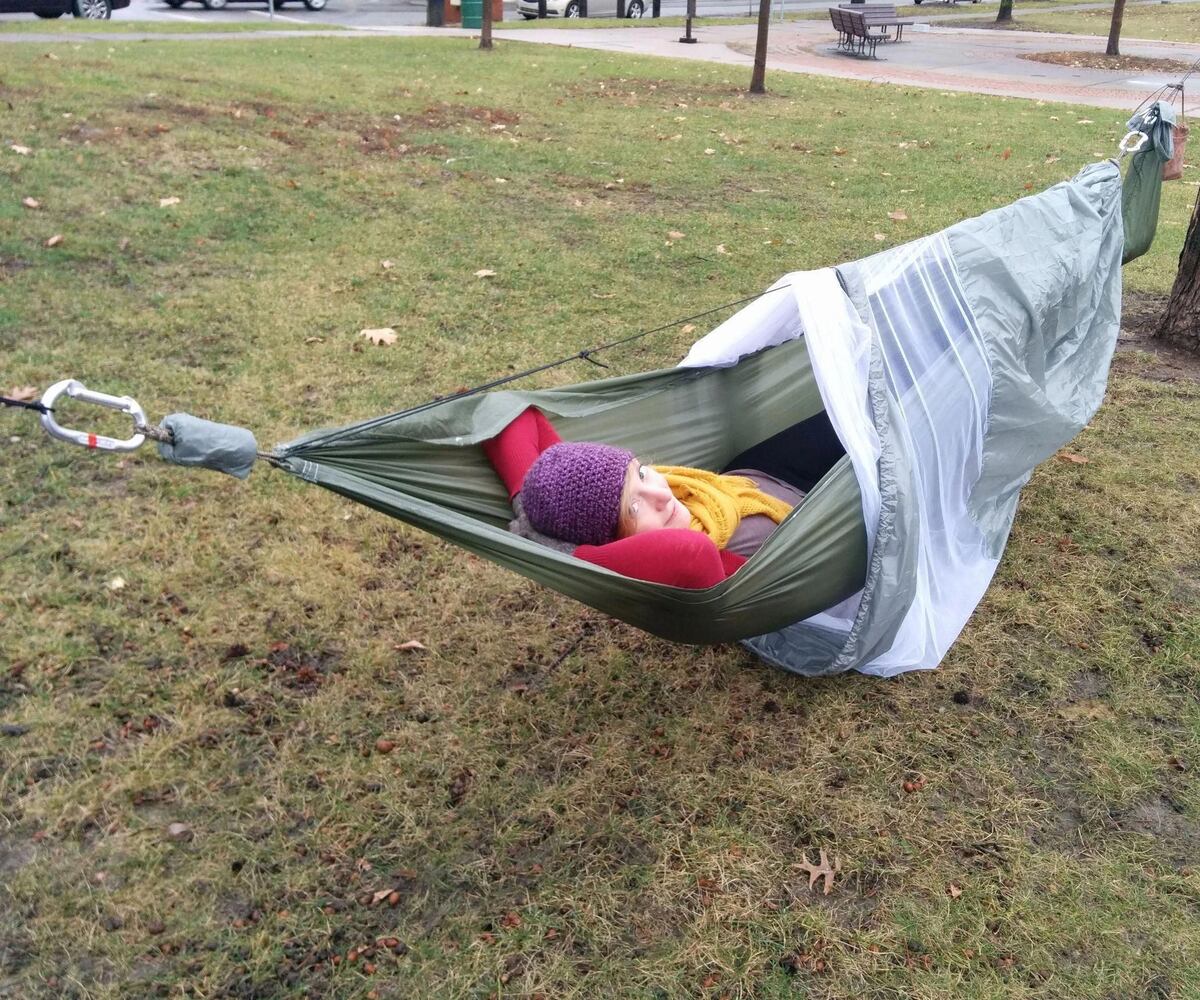
Now that the fabric edges are neatly sewn, it’s time to attach the suspension system to the bug net. The suspension system will allow you to secure the bug net to your hammock.
- Determine where you want the bug net to be attached to your hammock. This will depend on your personal preference and the design of your hammock. Typically, the bug net is attached above the hammock, creating a protective cocoon.
- Measure and cut two pieces of rope or cord, each long enough to extend from one side of the bug net to the other side of your hammock.
- On the top edge of the bug net, about an inch away from each corner, fold the fabric over the rope or cord. This will create a casing for the suspension system.
- Secure the folded fabric by sewing a straight seam along the entire length of each casing, making sure the rope or cord is securely enclosed. This will create a tunnel for the suspension system to pass through.
- Once the casings are sewn, slide one end of each rope or cord through the corresponding casing on one side of the bug net. Repeat with the other end of each rope or cord on the opposite side of the bug net.
- Adjust the length of the ropes or cords as needed to ensure the bug net will hang at the desired height above your hammock. Tie knots or use cord locks or toggles to secure the ropes or cords in place.
Make sure the suspension system is securely attached to the bug net and can support the weight of the net without any sagging. Give it a gentle test pull to ensure everything is secure.
With the suspension system in place, you’re now ready to move on to the next step: sewing the bug netting.
When making a bug net for a hammock, make sure to use fine mesh netting to keep out small insects. It’s also important to ensure that the netting is securely attached to the hammock to prevent any gaps for bugs to enter.
Read also: 11 Best Hammock With Mosquito Net For 2025
Step 4: Sew the bug netting
Now that the fabric and suspension system are prepared, it’s time to sew the bug netting onto the fabric. This will create a barrier between you and the bugs, ensuring a peaceful and enjoyable hammock experience.
- Measure and cut the bug netting to match the size of the fabric, allowing for an extra inch or so on all sides to ensure proper coverage.
- Place the bug netting on top of the fabric, aligning the edges. Make sure the bug netting is centered and covers the entire surface area of the fabric.
- Pin the bug netting in place along the edges of the fabric to hold it securely during the sewing process.
- Using a straight stitch on your sewing machine, sew along the edge of the bug netting, attaching it to the fabric. Sew as close to the edge as possible to ensure a strong and secure bond.
- Continue sewing along all four edges, removing the pins as you go. Take your time to ensure that the bug netting is sewn securely to the fabric.
It’s important to note that when sewing the bug netting, be cautious not to catch any loose threads or create any large openings. The goal is to create a barrier that effectively keeps bugs out.
Once all four edges are sewn, carefully inspect the bug netting to ensure that it is securely attached to the fabric without any gaps or loose sections.
With the bug netting sewn to the fabric, you’re now one step closer to enjoying bug-free hammock relaxation. The next step involves attaching the bug netting to the fabric, making it fully functional.
Step 5: Attach the bug netting to the fabric
With the bug netting sewn onto the fabric, it’s time to attach it so that it becomes an integral part of your bug net hammock setup. This step will ensure that the bug netting is securely in place and effectively keeps bugs out.
- Start by laying out the bug netting and fabric flat on a clean surface. Ensure that there are no wrinkles or folds that may interfere with the attachment process.
- Align the edges of the bug netting and fabric, making sure that they match up perfectly. This will ensure a neat and seamless attachment.
- Using clips or pins, secure the bug netting to the fabric along all edges. Make sure that the bug netting is taut and straight.
- Once the bug netting is securely clipped or pinned to the fabric, use your sewing machine to sew along the edges of the bug netting, attaching it to the fabric. Sew as close to the edge as possible.
- Continue sewing along all sides, removing the clips or pins as you go. This step will ensure that the bug netting is firmly attached to the fabric, providing a secure barrier against bugs.
Be sure to check for any missed spots or loose sections as you sew. It’s important to have a seamless and secure attachment to ensure that bugs cannot find their way into your hammock.
Once you have sewn all the edges, give the bug netting a gentle tug to make sure it’s securely attached to the fabric. Inspect the entire bug netting to ensure that there are no gaps or loose areas.
With the bug netting fully attached to the fabric, you’re almost ready to enjoy bug-free relaxation in your hammock. The next step involves testing and adjusting the bug net to ensure a perfect fit.
Step 6: Test and adjust
Now that you have completed the sewing process and the bug net is attached to the fabric, it’s time to test and make any necessary adjustments. This step will ensure that your bug net hammock provides the desired level of protection and comfort.
- Set up your hammock in a suitable location, preferably outdoors, where you can fully test the bug net.
- Carefully climb into the hammock, making sure to position yourself within the bug net area.
- Take note of any areas where the bug netting may be too tight, restricting your movement or creating discomfort. Use scissors to carefully trim away any excess bug netting while being cautious not to cut into the fabric.
- On the other hand, if you find any areas where the bug netting seems too loose or has gaps, use small safety pins or clips to temporarily tighten or close those areas. This will allow you to make adjustments without damaging the bug netting.
- Spending some time inside the hammock, move around and test the bug netting’s effectiveness in keeping bugs out. Take note of any areas where bugs may still have access, and adjust the bug netting accordingly.
During the testing process, it’s essential to ensure that the bug netting provides ample protection while allowing for comfortable movement and breathability. You want to strike the right balance between keeping bugs out and enjoying the fresh air and views of nature.
Make any necessary adjustments, such as trimming excess bug netting or tightening loose areas, until you are satisfied with the bug net’s fit and functionality.
Once you are confident that the bug net is properly adjusted and working effectively, congratulations! You have successfully made a bug net for your hammock.
Remember to always inspect and maintain the bug net regularly, checking for any wear and tear and making any necessary repairs or replacements to ensure its continued effectiveness.
Now you can fully enjoy your hammock, free from the annoyance of bugs. Happy hammock lounging!
Conclusion
Creating a bug net for your hammock is a rewarding and practical DIY project that allows you to enjoy the great outdoors without the unwanted company of bugs. By following the steps outlined in this guide, you have learned how to make a bug net that provides protection, comfort, and peace of mind.
Starting with measuring and cutting the fabric to sewing the edges, attaching the suspension system, sewing the bug netting, and finally, adjusting and testing, you have gained the skills and knowledge needed to craft a bug net that suits your hammock perfectly.
With your bug net in place, you can now relax and unwind in your hammock, knowing that you are shielded from mosquitoes, flies, and other pesky insects. Whether you’re camping, hiking, or just enjoying your backyard, the bug net will enhance your outdoor experience.
Remember to maintain and inspect the bug net regularly, ensuring that it remains in good condition and provides the desired level of protection. If any repairs or adjustments are needed, address them promptly to keep the bug net functional and effective.
Now, go forth and enjoy bug-free hammocking adventures. Embrace the serenity of nature, unwind in your hammock, and let the bug net provide you with a peaceful and comfortable outdoor sanctuary.
Happy hammock lounging!
Frequently Asked Questions about How To Make A Bug Net For A Hammock
Was this page helpful?
At Storables.com, we guarantee accurate and reliable information. Our content, validated by Expert Board Contributors, is crafted following stringent Editorial Policies. We're committed to providing you with well-researched, expert-backed insights for all your informational needs.


0 thoughts on “How To Make A Bug Net For A Hammock”