Home>Garden Essentials>How To Make A Greenery Wreath

Garden Essentials
How To Make A Greenery Wreath
Modified: March 7, 2024
Learn how to create a stunning greenery wreath for your garden with our step-by-step guide. Transform your space with this beautiful DIY project.
(Many of the links in this article redirect to a specific reviewed product. Your purchase of these products through affiliate links helps to generate commission for Storables.com, at no extra cost. Learn more)
Introduction
Welcome to the wonderful world of wreath-making! If you’re looking to add a touch of natural beauty to your home or create a stunning centerpiece for a special occasion, making a greenery wreath is a fantastic choice. Wreaths have been used for centuries as a symbol of celebration, welcome, and festivity. They can be customized to suit any style or occasion, and the best part is that you can make them yourself! In this article, we will guide you through the step-by-step process of creating a gorgeous greenery wreath that will add life and charm to any space.
Before we delve into the exciting world of wreath creation, let’s take a moment to discuss why greenery wreaths are such a popular choice. Greenery symbolizes freshness, growth, and vitality, making it a perfect choice for adding a natural and organic touch to your home decor. Greenery wreaths can be made using a variety of plant materials, such as eucalyptus, ferns, ivy, and even herbs like rosemary or lavender, allowing you to customize your wreath to match your personal style and preferences.
Whether you are a seasoned wreath-maker or a complete beginner, this guide will equip you with the knowledge and inspiration to create a stunning greenery wreath that will make a statement in any room. So roll up your sleeves, gather your materials, and let’s get started on this exciting journey of creativity and nature!
Key Takeaways:
- Embrace nature by creating your own greenery wreath using a variety of foliage and decorative elements. Hang it with care and enjoy the natural charm it brings to your space.
- Personalize your greenery wreath to reflect your style and the occasion. Follow the steps to gather, arrange, and care for your wreath, and let your creativity shine!
Read more: How To Make An Artificial Greenery Wreath
Materials Needed
Before diving into the wreath-making process, it’s essential to gather all the necessary materials. Having everything prepared and within reach will make the crafting experience smooth and enjoyable. Here’s a list of the materials you’ll need to create your greenery wreath:
- Wreath base: You can choose between a foam wreath base or a wire wreath frame. Foam bases provide a sturdy structure, while wire frames offer flexibility and allow for a variety of greenery arrangements.
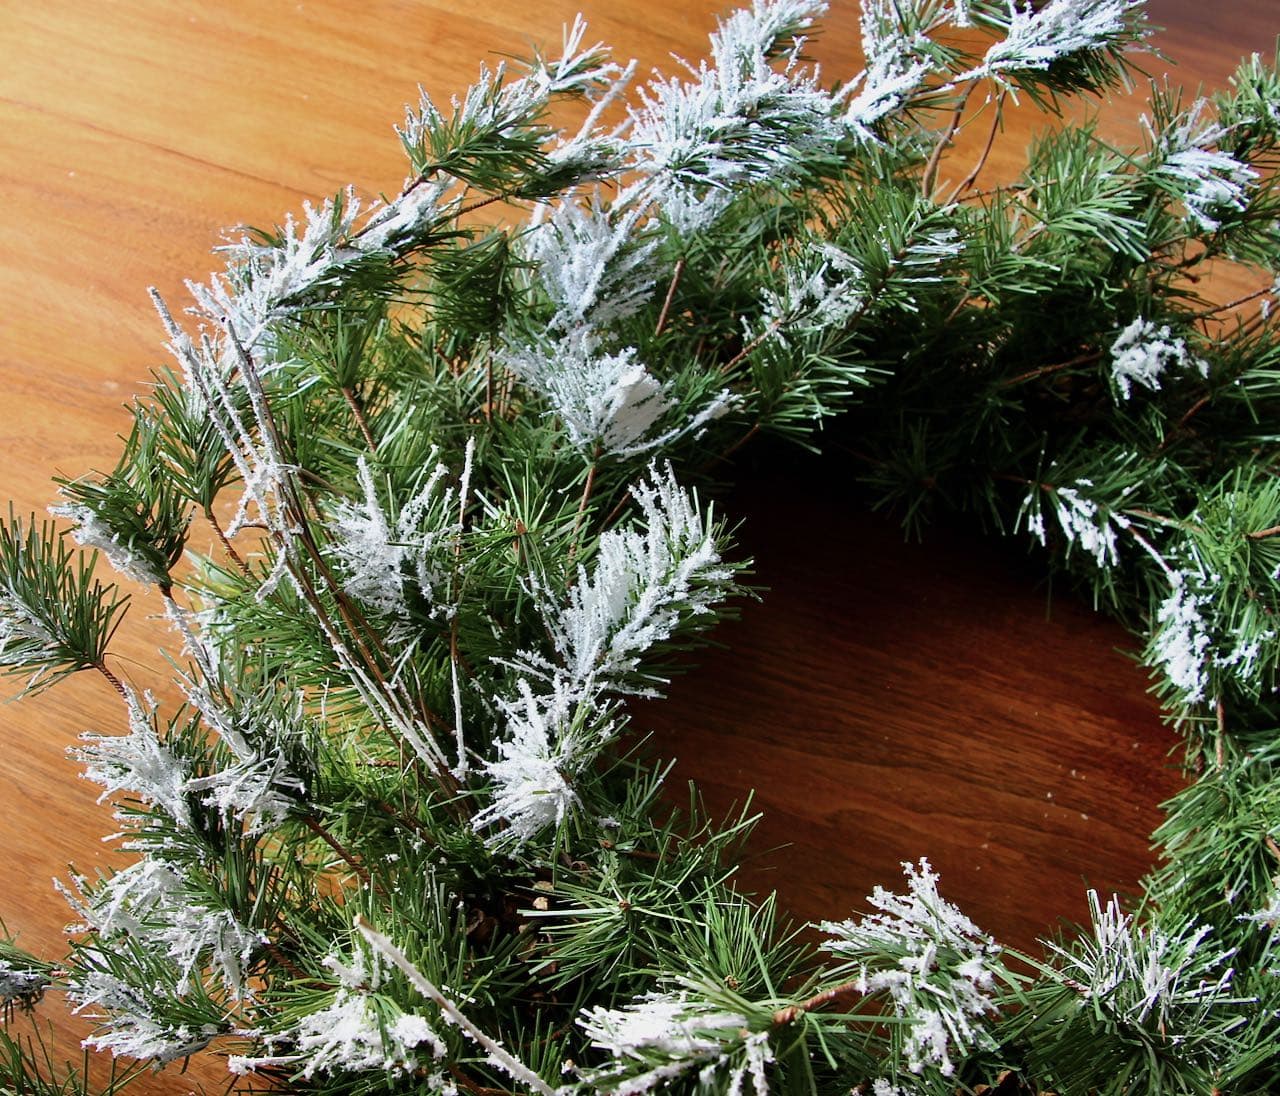
- Greenery: This is the star of the show! You can use a mix of different greenery types, such as eucalyptus, ferns, ivy, or any other foliage that catches your eye. Aim for a variety of textures and colors to create an eye-catching and dynamic wreath.
- Pruning shears or scissors: These will be necessary for cutting and trimming the greenery to the desired lengths.
- Floral wire or twist ties: These will be used to secure the greenery to the base and keep it in place.
- Ribbon or twine: This will serve as a hanger for your wreath. Choose a ribbon or twine that matches the style and color scheme of your wreath.
- Decorative elements (optional): If you wish to add some extra flair to your wreath, consider including decorative elements such as pine cones, berries, feathers, or small ornaments. These elements can add a festive touch or complement your existing decor.
- Hot glue gun and glue sticks (optional): If you are using decorative elements that are not easily secured with wire, a hot glue gun can come in handy to securely attach them to the wreath.
Once you have gathered all these materials, you’re ready to embark on your wreath-making adventure! Having everything on hand will save you time and ensure a smooth and stress-free crafting process. Now that you’re fully prepared, it’s time to move on to the exciting part – creating your greenery wreath!
Step 1: Gathering Greenery
The first step in creating your greenery wreath is to gather the foliage you’ll be using. This is an opportunity to be creative and choose greenery that reflects your personal style and the desired aesthetic of your wreath. Here’s how you can go about gathering your greenery:
- Take a walk in your garden, local park, or natural area to find inspiration. Look for a variety of foliage that catches your eye. You can choose different textures, shades of green, or even incorporate some colorful accents.
- Consider the season and the occasion for which you are creating the wreath. For example, in the fall, you may want to include some vibrant autumn leaves or berries, while in the spring, you could opt for fresh and delicate flowers.
- Ensure that you have permission and adhere to any guidelines when gathering greenery from public areas.
- Look for long stems with multiple branches or leaves. These will make it easier for you to arrange and attach them to the wreath base.
- Take into account the growth pattern of the plants you choose, as some may have sprawling or trailing branches that can add an interesting dimension to your wreath.
- When gathering the greenery, also keep in mind the size of the wreath base. You’ll want to collect enough foliage to adequately cover the entire base without overwhelming it.
Remember to gather more greenery than you think you’ll need. It’s always better to have extra foliage on hand for filling in any gaps or adding additional layers to your wreath.
Once you have gathered your greenery, give it a gentle shake to remove any insects or debris that may have attached themselves. You can also rinse the foliage with water to ensure it’s clean and ready to be used.
Now that you have a beautiful collection of greenery, it’s time to move on to the next step – preparing the base for your wreath!
Step 2: Preparing the Base
Now that you have gathered your greenery, it’s time to start preparing the base for your wreath. The base is the foundation of your wreath and provides the structure for attaching the greenery. Here’s how you can prepare the base:
- If you are using a foam wreath base, begin by soaking it in water for a few minutes. This will help the foam absorb moisture and keep your greenery fresh for a longer period. After soaking, let the foam drain excess water.
- If you are using a wire wreath frame, skip the soaking step as it is not necessary.
- Decide how you want to position your wreath. You can choose to have the base visible, or you can cover it with a layer of greenery for a more natural and seamless look.
- If you opt for a visible base, consider wrapping it with ribbon or twine that matches the color scheme of your wreath. This will add a decorative touch and can also help secure the greenery in place.
- If you prefer to cover the base, start by attaching a few pieces of greenery to the wreath using floral wire or twist ties. This will create a base layer that will serve as a foundation for the rest of the greenery.
- Ensure that the pieces are securely attached by twisting the floral wire tightly or securing the twist ties.
- If you find that the greenery is not staying in place, you can also use a hot glue gun to secure it to the base.
Once you have prepared the base, take a step back and evaluate the overall appearance. Make any adjustments or additions as needed to achieve the desired look and ensure that the base is sturdy and ready to support the weight of the remaining greenery.
You are now ready to move on to the next step – arranging the greenery and bringing your wreath to life!
Step 3: Arranging the Greenery
With the base prepared, it’s time to start arranging the greenery and bringing your wreath to life. This step is where your creativity can truly shine as you experiment with different placements and combinations of foliage. Here’s how you can arrange the greenery for your wreath:
- Start by selecting a focal point for your wreath. This can be a large, eye-catching piece of greenery or a decorative element that you want to feature prominently.
- Attach the focal point to the wreath base using floral wire or twist ties, ensuring that it is secure and centered.
- Work your way around the wreath base, adding pieces of greenery one by one. Start from the bottom and move upwards, overlapping the stems as you go to create a layered effect.
- Alternate different types of greenery to add texture and visual interest to your wreath. For example, you can combine larger leaves with smaller, more delicate foliage to create contrast.
- Try arranging the greenery in a spiral pattern, radiating from the center of the wreath. This will give your wreath a cohesive and balanced look.
- Step back regularly to assess the arrangement and make adjustments as needed. Pay attention to the overall shape and fullness of the wreath, and ensure that there are no bare spots.
- Experiment with different angles and orientations of the greenery to create movement and dimension. Some stems can be positioned diagonally or even arranged to cascade down the sides of the wreath.
- As you work, keep in mind the size and scale of your wreath. If you’re aiming for a more minimalist look, leave some negative space between the greenery. If you prefer a lush and full wreath, pack the greenery closely together.
Don’t be afraid to get creative and trust your instincts as you arrange the greenery. Play around with different combinations and take the time to create a composition that pleases your eye.
Once you are satisfied with the arrangement, it’s time to secure the greenery in place. Let’s move on to the next step – securing the greenery!
When making a greenery wreath, start with a sturdy base like a wire wreath frame. Use a variety of greenery for texture and color, and secure the stems with floral wire. Hang and enjoy!
Step 4: Securing the Greenery
Now that you’ve arranged the greenery to your liking, it’s essential to secure it in place to ensure that your wreath remains intact and long-lasting. The last thing you want is for your carefully arranged foliage to come loose or fall off. Here’s how you can properly secure the greenery:
- Take a moment to reinforce any attachments you have already made with floral wire or twist ties. Double-check that they are tight and secure.
- Start from the bottom of the wreath and work your way up, securing each stem of greenery to the base.
- Use floral wire or twist ties to wrap around the stem and the base, twisting tightly to ensure a firm hold. Trim any excess wire or tie ends.
- Repeat this process for every stem of greenery, ensuring that each one is securely attached.
- As you work, make sure the greenery is evenly distributed around the wreath and cover any gaps or areas that may be showing the base.
- If you’re using a foam wreath base, be mindful not to push too hard and pierce the foam. Gentle pressure is usually sufficient to secure the greenery.
- If you find that certain pieces of greenery are not staying in place, you can use a hot glue gun to add a small dab of glue to the base of the stem before inserting it into the foam or wrapping it with wire. Be cautious not to use excessive glue, as it can be difficult to remove if you need to make adjustments later.
- Continue securing the greenery until you are confident that everything is tightly attached and the wreath looks cohesive.
Take a step back and give your wreath a gentle shake to make sure the greenery remains in place. If any stems feel loose, go back and reinforce the attachments as needed.
Now that your greenery is securely attached, it’s time to add some decorative elements to enhance your wreath further. Let’s move on to the next step – adding decorative elements!
Step 5: Adding Decorative Elements
Adding decorative elements to your greenery wreath is a wonderful way to personalize it and add a unique touch. These elements can complement your chosen greenery, add pops of color, or reflect the theme or occasion you’re celebrating. Here’s how you can go about adding decorative elements to your wreath:
- Consider the overall style and aesthetic of your wreath. Are you going for a natural, rustic look? Or perhaps a more vibrant and festive vibe? Choose decorative elements that align with your desired aesthetic.
- If you’re using natural elements such as pine cones, berries, or dried flowers, make sure they’re clean and free from any bugs or debris. You may want to give them a gentle rinse or wipe before attaching them to the wreath.
- Position the decorative elements strategically around the wreath. Place them in areas that need a little extra flair or in spots where they will catch the eye.
- Secure the decorative elements to the wreath using hot glue, floral wire, or twist ties, depending on their size and weight. Be mindful of the materials you’re working with and ensure they adhere securely to the greenery.
- For a cohesive look, try to distribute the decorative elements evenly around the wreath. Avoid overcrowding and make sure they complement the greenery rather than overpowering it.
- Consider adding a bow or ribbon as a finishing touch. This can be placed at the bottom, top, or side of the wreath, depending on your preference. Choose a ribbon that matches the color scheme and style of your wreath.
- Step back and assess the placement of the decorative elements. Make sure they enhance the overall look of the wreath and contribute to the desired theme or aesthetic.
- Make any necessary adjustments or additions until you’re satisfied with the final result.
Remember that adding decorative elements is optional. If you prefer a more minimalist, greenery-focused wreath, you can choose to skip this step or keep it simple with just a bow or ribbon. The key is to create a wreath that reflects your personal style and brings joy to your space.
With the decorative elements in place, your wreath is almost complete! The final step is to hang it and ensure proper care to maintain its beauty. Let’s move on to step six – hanging the wreath!
Step 6: Hanging the Wreath
Now that you’ve finished creating your gorgeous greenery wreath, it’s time to find the perfect spot to hang it and showcase your handiwork. Here’s how you can properly hang your wreath:
- Select the desired location for your wreath. It could be a front door, a wall, a mantel, or any other area where you want to add a touch of natural beauty.
- Decide on the method of hanging that best suits your needs and the type of surface you’re working with. Some options include:
- Command hooks: These adhesive hooks are perfect for hanging wreaths on smooth surfaces such as doors or walls without causing any damage.
- Nail or hook: If you’re hanging the wreath on a wooden surface, you can use a small nail or hook to support its weight. Just be careful not to damage the surface.
- Over-the-door wreath hanger: This hanger is designed to fit over standard-sized doors and provides a simple and secure way to hang wreaths without the need for nails or adhesive.
- If using a wreath hanger or hook, position it at the desired height and ensure that it is securely attached.
- If using adhesive hooks, follow the manufacturer’s instructions to attach them to the surface. Make sure the hooks are level and firmly in place.
- Once your hanging method is ready, gently lift the wreath by its base and place it on the hook or hanger. Adjust the position if needed to ensure it hangs straight and looks balanced.
- Stand back and admire your beautiful greenery wreath as it enhances your space with its natural charm.
- Consider the area where you’ve hung your wreath and make sure it’s protected from harsh weather, direct sunlight, or excessive moisture, as these factors can impact the longevity of your wreath.
Now that your wreath is securely hung, it’s important to provide the proper care to ensure its longevity and continued beauty. Let’s move on to the final step – caring for your wreath.
Step 7: Caring for Your Wreath
Caring for your wreath will help maintain its freshness and beauty throughout the season. With proper care, your greenery wreath can last for weeks or even months. Here are some essential tips to keep your wreath looking its best:
- Keep your wreath away from direct sunlight, as prolonged exposure to sunlight can cause the greenery to fade and dry out.
- Avoid placing your wreath in areas with high humidity or excessive moisture, as this can cause the greenery to wilt or develop mold.
- If you’ve used fresh greenery in your wreath, mist it lightly with water every few days to keep it hydrated and prevent it from drying out too quickly.
- If any leaves or foliage start to wilt or turn brown, gently remove them to maintain the wreath’s overall appearance.
- Consider displaying your wreath indoors rather than outdoors, as indoor environments tend to have more controlled temperature and humidity levels.
- If your wreath is exposed to dust or debris, gently brush it off using a soft-bristled brush or a hairdryer on the cool setting.
- For faux greenery wreaths, periodically fluff and reshape the foliage to keep it looking full and vibrant.
- If you’re using a foam wreath base, be mindful of overwatering as it can cause the foam to become soggy and break down. Use a light touch when misting or watering.
- Lastly, enjoy your wreath! Take a moment to appreciate the beauty of nature that you’ve brought into your space.
By following these care tips, you can extend the lifespan of your wreath and continue to enjoy its natural charm for weeks to come. Remember that each greenery wreath is unique, and its lifespan may vary depending on environmental conditions and the freshness of the foliage used.
Congratulations on creating a stunning greenery wreath and completing all the steps! You’ve brought a piece of nature into your home and added a touch of beauty to your space. Whether it’s for a special occasion or simply to brighten up your everyday life, your wreath is sure to be a delightful focal point.
Now it’s time to sit back, relax, and bask in the joy that your handmade greenery wreath brings to your home. Well done!
Read more: What Greenery To Use For Wreaths
Conclusion
Congratulations! You have successfully learned how to create a beautiful greenery wreath from scratch. From gathering the greenery to securing it onto the base and adding decorative elements, this step-by-step guide has provided you with the knowledge and inspiration to create a stunning wreath that reflects your personal style and brings the beauty of nature into your space.
By following these steps and caring for your wreath, you can enjoy its charm for weeks or even months. As you admire your handmade creation, take a moment to appreciate the natural beauty and creativity that went into crafting your wreath.
A greenery wreath not only adds a touch of elegance to any room but also serves as a welcoming symbol to guests and creates a welcoming atmosphere. Whether it’s for a special occasion, a holiday celebration, or simply to spruce up your home, your wreath will be a talking point and a source of pride.
Feel free to experiment with different types of greenery and decorative elements to create wreaths for various seasons and occasions. Don’t be afraid to let your creativity shine through and make each wreath unique to you.
Remember, wreath-making is a continuous learning process, and with each creation, you’ll gain more experience and develop your own style. Enjoy the journey of creating beautiful wreaths and sharing them with your loved ones.
Now, gather your materials, allow your imagination to run wild, and start crafting your next stunning greenery wreath. Happy wreath-making!
Frequently Asked Questions about How To Make A Greenery Wreath
Was this page helpful?
At Storables.com, we guarantee accurate and reliable information. Our content, validated by Expert Board Contributors, is crafted following stringent Editorial Policies. We're committed to providing you with well-researched, expert-backed insights for all your informational needs.


0 thoughts on “How To Make A Greenery Wreath”