Home>Garden Essentials>How To Make A Greenery Swag
Garden Essentials
How To Make A Greenery Swag
Modified: August 27, 2024
Learn how to create a stunning garden greenery swag with our step-by-step guide. Transform your outdoor space with this beautiful garden DIY project.
(Many of the links in this article redirect to a specific reviewed product. Your purchase of these products through affiliate links helps to generate commission for Storables.com, at no extra cost. Learn more)
Introduction
Creating a greenery swag is a wonderful way to add a touch of natural beauty to your home or garden. Whether you’re looking for a festive decoration for the holidays or a year-round accent piece, a greenery swag is a versatile and visually appealing option. This article will guide you through the process of making a greenery swag, providing you with step-by-step instructions and tips for creating a stunning and long-lasting piece.
Not only is making a greenery swag a fun and creative activity, but it also allows you to showcase your personal style and customize the swag to suit your preferences. You can choose from a variety of greenery options such as pine branches, eucalyptus, or even dried flowers and herbs to create a unique and fragrant swag. Additionally, by adding decorative elements such as berries, pinecones, or ribbons, you can elevate the swag’s aesthetics and tailor it to your desired theme or occasion.
Before diving into the step-by-step instructions, let’s briefly go over the materials you’ll need to gather in order to create your greenery swag.
Key Takeaways:
- Crafting a greenery swag is a fun and creative way to bring nature into your home. By gathering greenery, arranging it with care, and adding decorative elements, you can create a stunning and personalized swag that adds natural charm to any space.
- Whether you hang it on your front door or use it as a centerpiece, a greenery swag will impress your guests and bring a sense of natural beauty to your surroundings. Embrace your creativity, let nature inspire you, and enjoy the crafting process!
Read more: How To Make Swag Drapes
Materials Needed
To create a greenery swag, you’ll need the following materials:
- Greenery: Choose a variety of fresh or artificial greenery such as pine branches, cedar, eucalyptus, or boxwood. This will serve as the base for your swag.
- Pruning Shears: These will be used to trim and shape the greenery.
- Wire or Floral Tape: This will be used to secure the greenery and other elements together.
- Decorative Elements: Optional decorative elements such as berries, pinecones, bows, or ornaments can be added to enhance the swag’s appearance.
- Scissors: These will be handy for trimming any ribbons or string used in the swag.
- Wire Cutters: If you prefer to use wire for securing your swag, wire cutters will be necessary to trim it to the desired length.
- Ribbon or String: Use ribbon or string to create a loop for hanging the swag, if desired.
- Hot Glue Gun (optional): If you plan to add delicate or heavy decorative elements, a hot glue gun can help with securing them to the swag.
Make sure to gather all the materials before starting the crafting process. This will ensure a smooth and uninterrupted creative experience.
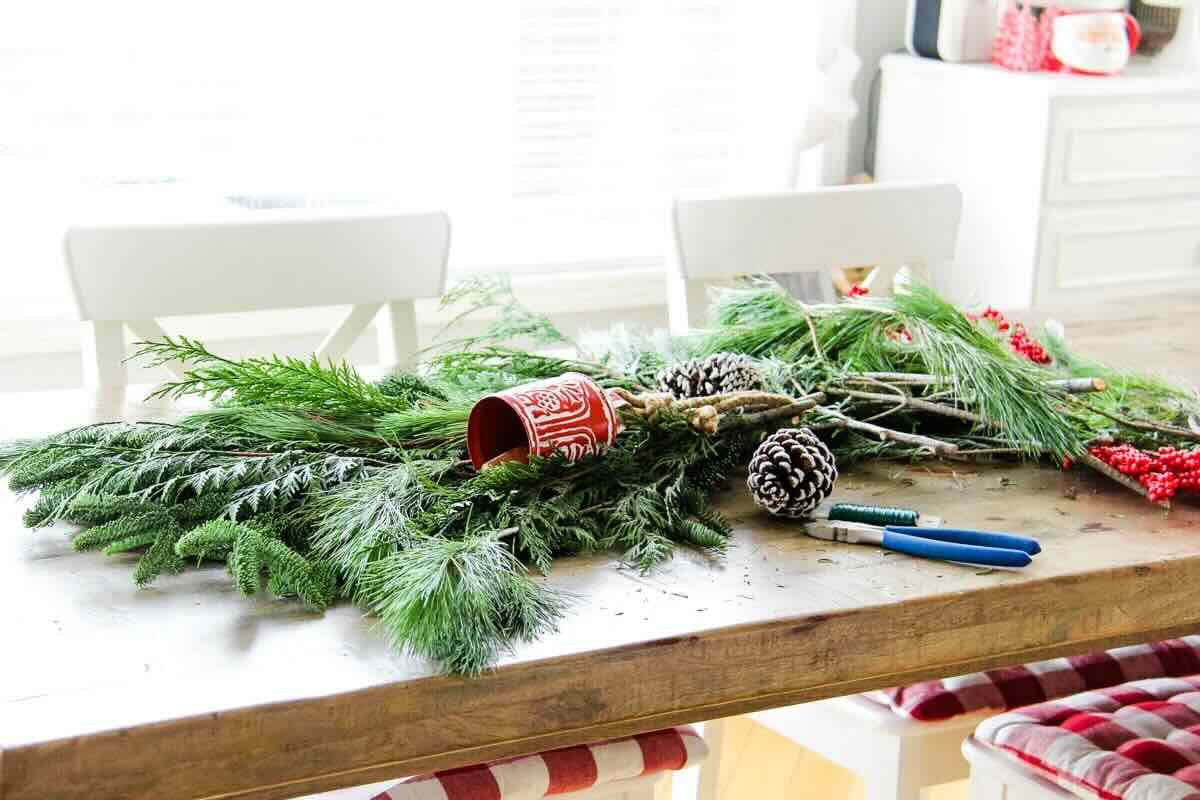
Step 1: Gather Greenery
The first step in creating a stunning greenery swag is to gather the greenery components. This can be done by exploring your own garden, visiting a local nursery, or even collecting fallen branches from nearby wooded areas (if permitted). Here’s how to get started:
- Decide on the type of greenery you want to use based on your preference and the availability in your area. Popular options include pine branches, cedar, eucalyptus, or boxwood.
- Using pruning shears, carefully cut small to medium-sized branches or stems of the greenery. Aim for a variety of lengths to add depth and dimension to your swag.
- Collect enough greenery to create a visually balanced swag. You can always gather more than you need, as you can trim excess later.
When gathering the greenery, take care to select pieces that are healthy and free from pests or diseases. Inspect the leaves or needles for any signs of damage or discoloration, and trim off any unsightly portions.
Remember to be mindful of any local rules or regulations when collecting greenery from public or protected areas, and always ask for permission if you’re collecting from someone else’s property.
Once you have gathered the desired amount of greenery, you can move on to the next step: preparing the base for your swag.
Step 2: Prepare the Base
Now that you have gathered your greenery, it’s time to prepare the base of your greenery swag. The base will provide structure and support for the rest of the elements you’ll be adding. Follow these steps to ensure a sturdy and attractive foundation:
- Start by selecting a long, flexible branch or stem of your chosen greenery. This will serve as the backbone of the swag.
- Using pruning shears, trim the branch or stem to your desired length. A typical swag length can range from 18 to 30 inches, but feel free to adjust it to your preference.
- Next, select a few more branches or stems of greenery to place alongside the backbone. Arrange them in a fan-like pattern, with the ends overlapping slightly.
- Secure the overlapping ends of the greenery together using floral tape or wire. This will hold the base in place and ensure it remains intact as you add more elements.
When securing the greenery together, make sure to wrap the tape or wire tightly but not too tightly to avoid damaging the stems or branches. The base should feel secure and stable.
Trim any excess branches or stems that extend beyond the desired length of the swag. This will help create a clean and polished look. You can save the trimmed pieces to add texture and fill in gaps later in the process if desired.
With the base prepared, you’re now ready to move on to the next step: arranging the greenery to create a visually appealing swag.
Step 3: Arrange the Greenery
Now that you have the base prepared, it’s time to arrange the greenery to create a visually appealing swag. This step allows you to unleash your creativity and bring your own unique style to the design. Follow these steps to achieve a well-balanced and visually pleasing arrangement:
- Start by placing larger and fuller branches or stems of greenery towards the center of the base. These will serve as the focal point and main visual attraction.
- Gradually work your way towards the sides of the swag, adding smaller and more delicate pieces of greenery. This will create a cascading effect and give your swag a natural and flowing appearance.
- Take the time to step back and assess the arrangement as you go. Adjust the position of the greenery as needed to ensure a balanced and symmetrical look.
- If desired, you can intersperse different types of greenery to add texture and variety to the swag. For example, mix in sprigs of eucalyptus or cedar with pine branches for an interesting contrast.
- Continue adding greenery until you achieve the desired fullness and shape for your swag. Remember to keep in mind the overall dimensions and aesthetic you want to achieve.
As you arrange the greenery, consider the placement of the swag. If you plan to hang it vertically, ensure that the greenery is angled downwards to maintain its natural appearance. If you plan to display it horizontally, arrange the greenery to flow gracefully along the length of the swag.
Don’t be afraid to experiment and make adjustments along the way. The beauty of a greenery swag is that it can be tailored to your personal taste and the specific occasion or season.
Once you are satisfied with the arrangement of the greenery, it’s time to move on to the next step: adding decorative elements to enhance the swag’s aesthetics.
To make a greenery swag, start with a base of sturdy branches and then layer on different types of greenery for texture and visual interest. Be sure to secure everything tightly with floral wire to keep it in place.
Read more: How To Do Greenery Swags Over Windows
Step 4: Add Decorative Elements
Now that you have arranged the greenery to create a beautiful base for your swag, it’s time to add decorative elements to enhance its aesthetics and personalize it to your liking. This step allows you to infuse your own creativity and style into the design. Follow these steps to incorporate decorative elements into your greenery swag:
- Choose the decorative elements you want to include in your swag. Popular options include berries, pinecones, bows, ornaments, or even dried flowers and herbs.
- Start by strategically placing the larger elements, such as pinecones or ornaments, towards the focal point of the swag. This will draw attention and create visual interest.
- Next, add smaller decorative elements, such as berries or dried flowers, throughout the swag to provide pops of color and texture.
- Take the time to step back and assess the placement of the decorative elements. Make adjustments as needed to achieve a balanced and visually pleasing arrangement.
- If desired, you can hot glue the decorative elements to the greenery for added stability. However, be mindful of the fragility of certain elements and use caution to avoid damaging the greenery.
When selecting decorative elements, consider the theme or season you want to portray. For example, use red berries and gold accents for a festive holiday swag, or opt for dried flowers and herbs for a rustic and natural look.
Remember to maintain a sense of balance and harmony when adding decorative elements. Aim for an arrangement that complements the greenery and enhances its overall beauty without overpowering it.
With the decorative elements in place, you’re almost ready to complete your greenery swag. The next step will focus on securing the swag to ensure it remains intact and retains its shape over time.
Step 5: Secure the Swag
With the greenery and decorative elements in place, it’s important to secure the swag to ensure that it remains intact and retains its shape over time. Follow these steps to securely fasten your greenery swag:
- Inspect the base of the swag where the greenery and decorative elements meet. Make sure everything is tightly secured and adjust any loose components if necessary.
- If you used floral tape, ensure that it is wrapped tightly around the stems and branches, holding them securely in place. If you used wire, twist it tightly around the base to secure the components together.
- If you notice any gaps or areas that need additional support, you can add more greenery or small branches to fill them in.
- Trim any excess stems or branches that extend beyond the desired length of the swag. This will create a neater appearance and prevent any potential tripping hazards.
Once you are satisfied with the security and appearance of your swag, it’s time to move on to the final step: hanging or displaying your greenery swag.
It’s important to note that over time, the greenery may dry and shrink. Therefore, periodically check the swag’s integrity and make any necessary adjustments to maintain its stability and visual appeal.
Now that your greenery swag is securely fastened, let’s move on to the final step: hanging or displaying your creation for all to admire.
Step 6: Hang or Display the Swag
Congratulations! You have successfully created a beautiful greenery swag. Now, it’s time to decide how you want to showcase your creation. Follow these steps to hang or display your swag:
- If you plan to hang the swag, attach a loop of ribbon or string to the back of the swag. Make sure it is securely fastened to support the weight of the swag.
- Choose a location to hang your swag. Common options include the front door, a mantel, a staircase rail, or a wall hook.
- Using a hook or adhesive, hang the swag in the desired location. Make sure it is properly aligned and centered.
- Step back and admire your creation. Adjust the positioning if needed to achieve the desired look.
If you prefer to display the swag horizontally, there are several creative options available:
- Place the swag on a fireplace mantel or console table, allowing it to drape gracefully over the edge. Add candles or other decorative items to enhance the overall display.
- Use the swag as a centerpiece for a dining table. Lay it across the table, tucking in some additional greenery or decorative elements. Add candles or small ornaments to create a festive ambiance.
- Hang the swag horizontally on a wall or above a large mirror for an eye-catching focal point. Secure it with sturdy adhesive or hooks to ensure it remains in place.
Remember to consider the overall aesthetics and style of your space when deciding how to hang or display the swag. Take into account the colors, textures, and theme of the room to create a harmonious and visually appealing arrangement.
You have now completed the final step and can enjoy your stunning greenery swag. Whether you choose to hang it on your front door to welcome guests or display it as a centerpiece in your home, your swag will add a touch of natural beauty and charm to any setting.
Remember, you can always make a new swag for different seasons or occasions, allowing you to continuously update and personalize your home décor.
Enjoy the beauty and fragrant essence of your greenery swag, and have fun exploring new ways to incorporate nature into your living space.
Happy crafting!
Conclusion
Creating a greenery swag is a delightful way to bring the beauty of nature into your home or garden. This article has provided you with a comprehensive guide on how to make a greenery swag, from gathering the greenery to hanging or displaying the final product. By following the step-by-step instructions and incorporating your own creativity, you can create a stunning and personalized swag that adds a touch of natural charm to any space.
Throughout the process, we emphasized the importance of selecting high-quality greenery, arranging it in an appealing manner, and adding decorative elements to enhance the swag’s aesthetics. By securing the swag carefully, you can ensure its longevity and enjoyment. Whether you choose to hang the swag on your front door, display it on a mantel, or use it as a centerpiece, it will undoubtedly become a focal point that impresses your guests and brings a sense of natural beauty to your surroundings.
As you embark on your greenery swag crafting journey, remember to infuse your own style and creativity. Experiment with different types of greenery, decorate with seasonal elements, and adapt the design to suit your preferences. Let your imagination soar and create a swag that truly reflects your personality.
Take pleasure in the process of gathering the greenery, arranging it with care, and adding meaningful decorative elements. Crafting a greenery swag is not only a joyful and creative activity, but it also allows you to connect with nature and appreciate the beauty it offers. The final result will be a testament to your love for gardening and your ability to transform natural elements into a stunning piece of art.
So, gather your materials, embrace your creativity, and start making your own greenery swag. Enjoy the process and the sense of accomplishment when you see your creation hanging or displayed for all to admire. Let nature inspire you, and let your greenery swag be a reflection of your love for gardening and your unique style.
Happy crafting!
Frequently Asked Questions about How To Make A Greenery Swag
Was this page helpful?
At Storables.com, we guarantee accurate and reliable information. Our content, validated by Expert Board Contributors, is crafted following stringent Editorial Policies. We're committed to providing you with well-researched, expert-backed insights for all your informational needs.


0 thoughts on “How To Make A Greenery Swag”