Home>Garden Essentials>How To Make Greenery From Pineapple Growing
Garden Essentials
How To Make Greenery From Pineapple Growing
Modified: March 7, 2024
Learn how to create a beautiful garden filled with lush greenery by growing your own pineapple plants. Discover helpful tips and tricks for cultivating a thriving garden.
(Many of the links in this article redirect to a specific reviewed product. Your purchase of these products through affiliate links helps to generate commission for Storables.com, at no extra cost. Learn more)
Introduction
Welcome to the world of greenery! If you’re a gardening enthusiast with a taste for the unique, then you’ll love this guide on how to make greenery from pineapple growing. Yes, you read that right – you can actually grow a beautiful and vibrant pineapple plant right in your own home!
Gardening is not only a rewarding hobby but also a way to bring a touch of nature into our lives. With the pineapple plant’s lush foliage and exotic fruit, it’s a perfect addition to any indoor or outdoor space. Plus, the process of growing your own pineapple plant can be an incredibly satisfying experience.
In this article, we will take you through the step-by-step process of growing greenery from pineapple. From preparing the pineapple top to providing the right growing conditions, we’ll cover everything you need to know to successfully cultivate your pineapple plant.
Whether you’re a seasoned gardener looking for a new challenge or a beginner with a desire to dive into the world of green thumbs, this guide is for you. So, let’s get started!
Key Takeaways:
- You can grow a pineapple plant at home by preparing the pineapple top, creating the right soil mixture, and providing it with bright, indirect sunlight. It’s a unique and rewarding experience for any gardening enthusiast!
- To care for your pineapple plant, ensure it gets the right amount of water, sunlight, and fertilizer. Regular pruning and shaping, along with troubleshooting common issues, will help your plant thrive and eventually produce delicious fruit.
Read more: How To Grow A Pineapple From Seed
Step 1: Preparing the Pineapple Top
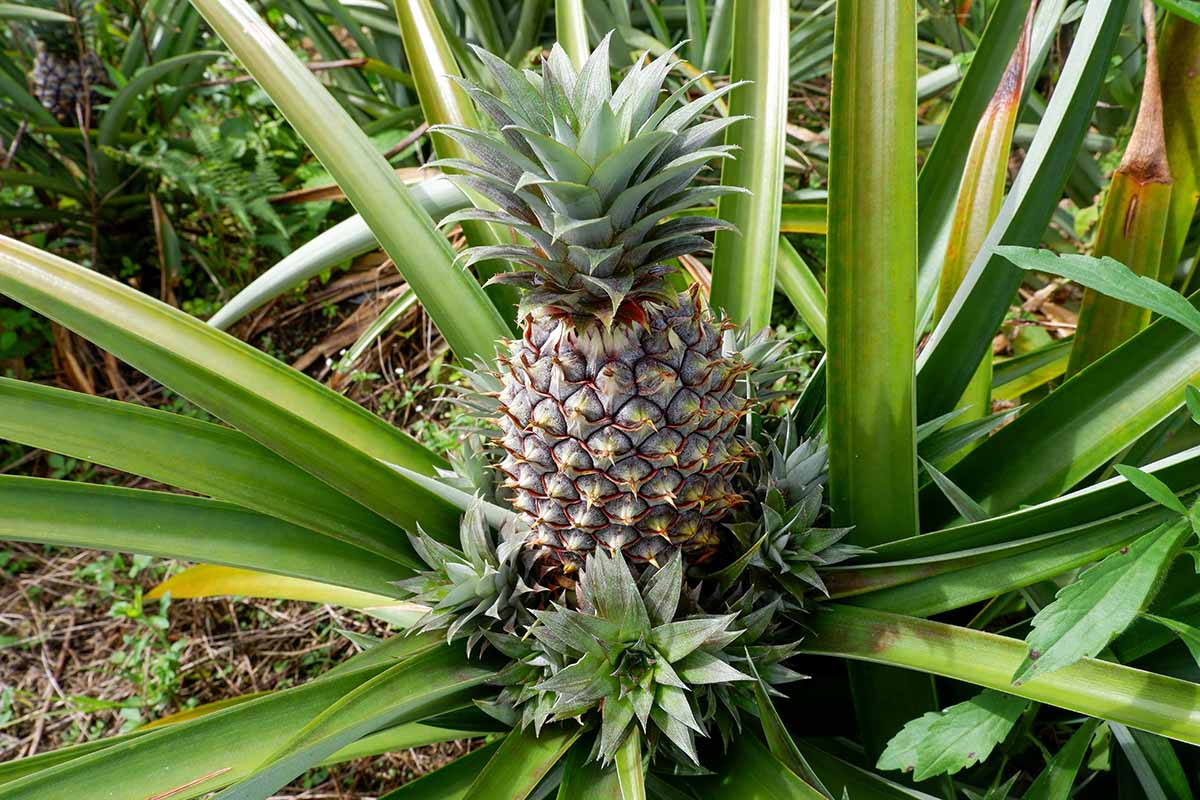
The first step in growing greenery from pineapple is to prepare the pineapple top. When you buy a whole pineapple from your local grocery store or farmer’s market, make sure to choose one with a healthy and vibrant top.
To begin, carefully twist or cut off the crown of the pineapple. This is the leafy portion at the top of the fruit. Ensure that you have a clean cut, removing any excess fruit flesh from the base of the crown.
Once you have separated the crown from the fruit, remove a few of the lower leaves from the base of the crown. This will expose some of the nodes, which are tiny brown spots found along the stem. These nodes are essential for root development, so it’s important to expose them for the next step.
After removing the lower leaves, allow the pineapple top to dry for a couple of days. This will help prevent rotting when it’s time to plant. You can simply place it on a windowsill or somewhere with indirect sunlight and proper airflow.
During this drying period, it’s essential to check for any signs of disease or pests. Inspect the pineapple top closely for any mold, rot, or insect infestation. If you notice any issues, discard the crown and start with a fresh pineapple top.
Once the pineapple top is fully dried and free from any health concerns, it’s ready for the next step: creating the growing medium.
Step 2: Creating the Growing Medium
Now that your pineapple top is prepared, it’s time to create the perfect growing medium for it. The growing medium is the material in which the plant will establish its roots and receive nutrients.
Start by choosing a well-draining pot or container for your pineapple plant. A container with drainage holes at the bottom will help prevent waterlogging and root rot. Select a pot that is slightly larger than the pineapple top to allow room for root expansion.
Next, you’ll need to create a suitable soil mixture for your pineapple plant. Pineapple plants prefer well-draining soil with good moisture retention. To create such a mixture, combine equal parts of organic potting soil and perlite or vermiculite. This blend will provide the necessary drainage while retaining enough moisture for the plant.
Alternatively, you can use a pre-mixed cactus and succulent soil, which is readily available at most gardening stores. This type of soil is designed to provide excellent drainage while still holding onto enough moisture for succulent plants like pineapple.
Before filling the container with the soil mixture, place a layer of small pebbles or gravel at the bottom to further enhance drainage. This will prevent water from pooling at the bottom of the pot and rotting the roots.
Once the preparatory steps are completed, fill the container with the soil mixture, leaving about an inch of space from the rim. Gently pat down the soil to remove any air pockets and ensure a stable base for the pineapple top.
With the growing medium prepared, you’re now ready to move on to the next step: planting the pineapple top.
Step 3: Planting the Pineapple Top
With the growing medium ready, it’s time to plant the pineapple top. This step involves carefully placing the prepared pineapple crown into the container and providing it with the right conditions to establish roots.
Begin by creating a small hole in the center of the soil mixture, wide enough to accommodate the base of the pineapple top. Gently place the crown into the hole, ensuring that the exposed nodes come into contact with the soil.
Next, lightly press the soil around the base of the crown to secure it in place. Be careful not to apply too much pressure, as the crown may get damaged. The nodes should be covered with a thin layer of soil, but the top leaves should remain above the surface.
Once the pineapple top is securely planted, give it a thorough but gentle watering. Use a watering can or a sprayer to moisten the soil evenly. Avoid overwatering, as this can lead to root rot.
After watering, place the container in a location with bright, indirect sunlight. Pineapple plants love warm and tropical environments, so ensure that the temperature remains between 70°F and 85°F (21°C and 30°C). Keep in mind that pineapple plants can tolerate lower light conditions, but they thrive best in bright light.
Now that the pineapple top is planted, it’s time to move on to the next step: providing adequate sunlight for optimal growth.
Step 4: Providing Adequate Sunlight
Proper sunlight is crucial for the growth and development of your pineapple plant. Pineapples are sun-loving plants that thrive in bright, indirect light. Here’s what you need to know about providing adequate sunlight for your pineapple plant.
Place your container in a location where it can receive at least 6-8 hours of sunlight per day. If you’re growing your pineapple plant indoors, choose a spot near a sunny window or use artificial grow lights to supplement the light. Rotate the container occasionally to ensure even light distribution on all sides of the plant.
While pineapples love sunlight, it’s important to protect them from intense, direct sunlight, especially during the hottest parts of the day. If the sun gets too intense, it can scorch the leaves and cause damage to the plant. Consider using sheer curtains or providing shade during the peak sunlight hours to prevent leaf burn.
Keep in mind that the amount of sunlight required may vary depending on the specific variety and the climate you are in. If you live in a region with limited sunlight, you may need to supplement natural light with artificial grow lights to ensure your pineapple plant receives the necessary amount of light.
By providing the right amount of sunlight, your pineapple plant will thrive and grow towards the next step: watering and fertilizing.
Read more: How Long To Grow Pineapple From Seed
Step 5: Watering and Fertilizing
Watering and fertilizing are important aspects of pineapple plant care. By providing the right amount of water and nutrients, you’ll ensure healthy growth and vibrant foliage. Here’s what you need to know about watering and fertilizing your pineapple plant.
Water your pineapple plant regularly, keeping the soil evenly moist but not waterlogged. The top 2-3 inches of soil should be allowed to dry out between waterings to avoid root rot. Use your finger to check the moisture level in the soil and adjust your watering schedule accordingly.
During the summer months, when the plant is actively growing, you may need to water more frequently. In contrast, reduce watering during the winter months when growth slows down. Remember that overwatering can be just as harmful as underwatering, so finding the right balance is key.
In addition to water, your pineapple plant will benefit from regular fertilization. Feed it with a balanced, slow-release fertilizer specially formulated for fruiting plants. Follow the instructions on the fertilizer packaging for the correct dosage and frequency.
Apply the fertilizer to the soil around the base of the plant, being careful not to let it come into direct contact with the leaves. Gently work the fertilizer into the top layer of soil and water thoroughly to ensure proper absorption.
During the growing season, which typically lasts from spring to early fall, fertilize your pineapple plant every 2-3 months. Reduce or stop fertilization during the winter months when growth slows down.
By maintaining a proper watering and fertilizing routine, your pineapple plant will receive the nutrition it needs to flourish. Next, we’ll dive into step 6: maintaining optimal temperature and humidity.
To make greenery from pineapple growing, cut off the leafy top of a pineapple, remove some lower leaves, and place it in water until roots form. Then, plant it in well-draining soil and water regularly.
Step 6: Maintaining Optimal Temperature and Humidity
Optimal temperature and humidity levels are crucial for the healthy growth of your pineapple plant. Pineapples thrive in warm and tropical conditions, so it’s important to provide the right environment. Here’s what you need to know about maintaining optimal temperature and humidity for your pineapple plant.
Pineapple plants prefer temperatures between 70°F and 85°F (21°C and 30°C). They can tolerate slightly lower temperatures, but prolonged exposure to temperatures below 60°F (15°C) can stunt growth and even cause root damage. Therefore, it’s essential to keep your pineapple plant in a warm area of your home or garden.
Avoid placing your pineapple plant near drafty windows, air conditioning vents, or doors that may expose it to sudden temperature changes. If you’re growing your pineapple plant outdoors, monitor the weather and bring it inside or provide protection during cold snaps or frosty periods.
In addition to temperature, humidity levels play a role in the overall health and well-being of your pineapple plant. Pineapples prefer a relative humidity level of around 50-60%. If the air is too dry, especially in heated indoor environments, it can lead to leaf browning and drying.
To increase humidity, you can mist the leaves of your pineapple plant regularly or use a humidity tray filled with water near the plant. Another option is to group your pineapple plant with other moisture-loving plants to create a mini microclimate with higher humidity.
Monitor the moisture level in the soil and adjust your watering schedule accordingly. Avoid overwatering, as it can create excessively moist conditions and promote fungal issues.
By maintaining optimal temperature and humidity levels, your pineapple plant will thrive and move forward to step 7: pruning and shaping.
Step 7: Pruning and Shaping
Pruning and shaping your pineapple plant is an important step in maintaining its form and encouraging healthy growth. Regular pruning helps remove dead or damaged leaves, promotes air circulation, and encourages the production of new shoots. Here’s what you need to know about pruning and shaping your pineapple plant.
Begin by inspecting your pineapple plant regularly for any yellow or brown leaves, as well as any damaged or wilted foliage. These should be carefully pruned off using clean and sharp pruning shears. Make sure to sanitize the pruning shears before use to prevent the spread of diseases.
Focus on removing any dead or dying leaves from the base of the plant or those that obstruct airflow. This helps prevent the buildup of moisture and reduces the risk of fungal diseases. Additionally, remove any suckers or offshoots that appear at the base of the plant to maintain the desired shape.
As your pineapple plant matures, a central stalk will develop, producing a single fruit at the top. Once the fruit has been harvested, the central stalk will not produce another pineapple. At this point, you can either remove the stalk completely or trim it down to encourage the growth of side shoots.
Trimming the central stalk will redirect the plant’s energy towards developing offshoots. These side shoots, also known as slips or suckers, can be propagated into new pineapple plants. To propagate, remove the side shoots when they are approximately 1/3 to 1/2 the size of the mother plant, taking care to keep some of their attached roots.
Regular shaping can also be done by removing any excessive or unwanted growth. Prune off any excessively long or unruly leaves to maintain a tidy and compact appearance. This will also ensure that all parts of the plant receive adequate sunlight and airflow.
By regularly pruning and shaping your pineapple plant, you’ll promote its overall health and aesthetics. Next, let’s move on to step 8: repotting the pineapple plant, if necessary.
Step 8: Repotting the Pineapple Plant
Repotting your pineapple plant is necessary when it outgrows its current container or when the soil becomes compacted and loses its drainage properties. Repotting allows for the plant’s roots to have ample space to grow and access essential nutrients. Here’s what you need to know about repotting your pineapple plant.
Observe the roots of your pineapple plant to determine if it’s time for repotting. If you notice the roots circling the bottom of the container or peeking through the drainage holes, it’s an indication that the plant has outgrown its current pot.
Begin by selecting a new pot that is one size larger than the current one. The new pot should have drainage holes at the bottom to prevent waterlogging. Prepare the potting mix by combining general-purpose potting soil with perlite or vermiculite to ensure good drainage.
Gently remove the pineapple plant from its current pot, being careful not to damage the roots. If the plant is root-bound, gently tease the roots apart and trim any overly long or damaged ones. This will encourage new root growth.
Place an inch or two of the prepared potting mix at the bottom of the new pot. Position the pineapple plant in the center and fill the remainder of the pot with the potting mix, ensuring that the plant sits at the same level as before. Firmly but gently press the soil around the base of the plant to secure it in the new container.
After repotting, thoroughly water the plant, allowing the excess water to drain away. Place the plant in a location with bright, indirect light and continue to provide the appropriate care and maintenance, including regular watering and fertilization.
Remember to monitor the plant closely after repotting to ensure that it adjusts well to its new home. Keep an eye out for any signs of stress or root damage, and make adjustments to the care routine as needed.
By repotting your pineapple plant when necessary, you’ll provide it with the space and resources it needs to continue thriving. Now, let’s move on to step 9: troubleshooting common issues in pineapple plant care.
Read more: How To Grow Pineapple Seeds
Step 9: Troubleshooting Common Issues
While growing greenery from pineapple can be a rewarding experience, it’s not uncommon to encounter some challenges along the way. Understanding and addressing common issues will help ensure the health and vitality of your pineapple plant. Here are some common problems and their solutions.
Yellowing Leaves: If you notice yellowing leaves, it could be a sign of overwatering or inadequate drainage. Adjust your watering schedule and ensure that the soil is well-draining. Additionally, check for pests such as mealybugs or spider mites, which can also cause leaf discoloration.
Brown Leaves: Brown or dry leaves can indicate either underwatering or insufficient humidity. Check the moisture level in the soil and adjust your watering accordingly. Increase humidity levels by misting the leaves or placing a humidity tray nearby.
Root Rot: Root rot can occur when the soil is consistently too wet and lacks proper drainage. To prevent root rot, ensure that the pot has drainage holes, and allow the top portion of the soil to dry out between waterings. If root rot has already set in, it may be necessary to repot the plant in fresh, well-draining soil.
Lack of Fruit Production: Pineapple plants typically take around two to three years to produce fruit. Ensure that your plant is receiving adequate sunlight, water, and proper fertilization. Patience is key, as the fruiting process requires time and favorable growing conditions.
Pest Infestation: Common pests that may attack pineapple plants include mealybugs, spider mites, and aphids. Regularly inspect your plants for signs of pests, and if an infestation is detected, use organic pest control methods or insecticidal soaps to eradicate them.
Fungal Diseases: Pineapple plants are susceptible to fungal diseases such as root rot and leaf spot. Maintain good air circulation around the plant, avoid overwatering, and ensure proper drainage to minimize the risk of fungal infections. If fungal issues arise, treat them promptly with appropriate fungicides.
Regular monitoring, prompt action, and providing the proper care will help you overcome most of these common issues. Remember that every plant is unique, and adjustments may be needed based on specific environmental conditions and individual plant requirements.
With these troubleshooting tips in mind, you’ll be well-equipped to address any potential issues that may arise in your pineapple plant’s care. Armed with knowledge and experience, you’re ready to enjoy the beauty and satisfaction of successfully growing greenery from pineapple.
Happy gardening!
Conclusion
Congratulations! You have now learned how to make greenery from pineapple growing. By following the steps outlined in this guide, you can successfully cultivate a beautiful and vibrant pineapple plant in your own home or garden.
Growing greenery from pineapple is not only a unique and rewarding experience, but it also adds a touch of tropical charm to your surroundings. From preparing the pineapple top to planting it in a suitable medium, providing adequate sunlight, water, and nutrients, and maintaining optimal temperature and humidity levels, you have gained valuable knowledge on how to care for your pineapple plant.
Remember to regularly prune and shape your plant to encourage healthy growth and maintain its desired form. Repotting, when necessary, will give your pineapple plant ample space for root expansion and continued vitality. Stay vigilant and address any common issues such as yellowing leaves, pests, or fungal diseases promptly to ensure the health and well-being of your plant.
As you embark on this greenery adventure, enjoy the journey and be patient. Growing fruit on your pineapple plant may take a couple of years, but the wait will be well worth it when you finally enjoy the sweet taste of your homegrown pineapple.
So, get your pineapple top ready, prepare the ideal growing medium, provide it with the right conditions, and watch as your pineapple plant flourishes and brings a little piece of the tropics to your garden or home.
Happy growing!
Frequently Asked Questions about How To Make Greenery From Pineapple Growing
Was this page helpful?
At Storables.com, we guarantee accurate and reliable information. Our content, validated by Expert Board Contributors, is crafted following stringent Editorial Policies. We're committed to providing you with well-researched, expert-backed insights for all your informational needs.


0 thoughts on “How To Make Greenery From Pineapple Growing”