Home>Garden Essentials>How To Make TPU Infill Squishy
Garden Essentials
How To Make TPU Infill Squishy
Modified: September 2, 2024
Learn how to make your garden TPU infill squishy and bouncy with our step-by-step guide. Create a playful and fun environment for your outdoor space.
(Many of the links in this article redirect to a specific reviewed product. Your purchase of these products through affiliate links helps to generate commission for Storables.com, at no extra cost. Learn more)
Introduction
Gardening is not just about plants and flowers; it’s also about creating a beautiful and inviting space. One way to enhance the overall aesthetic of your garden is by incorporating various garden ornaments and decorations. These additions can add personality and charm to any outdoor space, making it more visually appealing and enjoyable to spend time in.
In this article, we will explore different types of garden ornaments and discuss how they can transform your garden into a tranquil oasis. Whether you prefer modern and minimalist designs or classical and ornate styles, there is a garden ornament out there for you. Let’s dive in and explore the world of garden ornaments!
Key Takeaways:
- Garden ornaments add charm and personality to outdoor spaces. Choose ornaments that complement your garden’s theme and style, and remember to gather the necessary tools and materials for installation.
- Creating a squishy TPU infill for 3D printed objects involves careful preparation, temperature adjustment, infill density setting, and post-processing. Test the squishiness and enjoy your unique garden decor!
Read more: How To Make Squishies With Memory Foam
Materials and Equipment Needed
Before you begin adding garden ornaments to your space, it’s essential to gather the necessary materials and equipment. Here are some items you may need:
- Garden ornaments: These can include statues, sculptures, birdbaths, wind chimes, hanging baskets, and more. Choose ornaments that complement your garden’s overall theme and style.
- Garden tools: You may need some basic gardening tools, such as a shovel, trowel, rake, and gloves, to prepare the area for the ornaments and make any necessary adjustments.
- Fasteners: Depending on the type of ornament and its installation method, you may need fasteners like screws, nails, or wires to secure the ornaments in place.
- Level and measuring tools: These will help you ensure that the ornaments are properly aligned and positioned in your garden.
- Protective coatings: If your garden ornaments are made of materials like metal or wood, you may want to consider applying a protective coating to prevent rust or decay.
- Decorative elements: You may also want to gather decorative elements like pebbles, stones, mulch, or plants to enhance the overall look and feel of your garden.
Once you have gathered the necessary materials and equipment, you can proceed with the placement and installation of your garden ornaments. Remember to take into account the size, color, and style of the ornaments to ensure they harmonize with the existing elements in your garden.
Step 1: Preparing the TPU Filament
TPU (Thermoplastic Polyurethane) is a flexible and elastic material commonly used in 3D printing. To make the TPU infill squishy and pliable, it’s essential to prepare the filament before printing. Here are the steps to prepare the TPU filament:
- Inspect the filament: Before using the TPU filament, visually inspect it for any signs of damage or contamination. Check for knots, kinks, or excessive dust that may affect the printing process.
- Store the filament properly: TPU is susceptible to moisture absorption, so it’s crucial to store the filament in an airtight container with a desiccant pack. This will help maintain its flexibility and prevent printing issues.
- Preheat the printer bed: TPU is best printed onto a heated bed. Preheat the printer bed to the recommended temperature according to the manufacturer’s guidelines.
- Load the TPU filament: Insert the TPU filament into the printer’s filament path or extruder. Make sure it is properly seated and secured to ensure a smooth extrusion process.
- Purge the extruder: To ensure that any previous material is cleared from the extruder, extrude a small amount of filament before starting the actual printing process. This will help avoid any possible contamination or clogging.
- Perform a test print: Before printing the TPU infill, it’s a good practice to perform a test print. This will help you verify the extrusion settings, bed adhesion, and overall print quality.
By following these steps, you can effectively prepare the TPU filament for printing the squishy infill. Remember to refer to your 3D printer’s user manual and adjust the settings accordingly to ensure the best results with TPU filament.
Step 2: Adjusting the Extrusion Temperature
TPU filament requires specific extrusion temperature settings to ensure optimal printing results. Unlike rigid materials, TPU is more sensitive to temperature fluctuations, so it’s crucial to adjust the extruder temperature appropriately. Follow these steps to adjust the extrusion temperature for printing the TPU infill:
- Refer to the manufacturer’s guidelines: Consult the manufacturer’s recommendations for the ideal extrusion temperature range for the specific TPU filament you are using. Different TPU brands may have slightly different temperature requirements.
- Start with a lower temperature: Begin by setting the extrusion temperature towards the low end of the recommended range. This helps prevent excessive heat that can lead to stringing or oozing during the printing process.
- Conduct temperature tests: Print a small test object using the lower temperature and examine the results. Look for any issues like under-extrusion, poor layer adhesion, or excessive warping. If these issues are present, gradually increase the temperature and repeat the test until the desired print quality is achieved.
- Avoid excessive heat: While it’s essential to reach the optimal extrusion temperature, be cautious not to go too high. Excessive heat can cause the TPU filament to degrade or become too fluid, resulting in poor print quality or even clogs in the extruder.
- Take note of the successful temperature: Once you find the ideal extrusion temperature that produces high-quality prints with the TPU infill, make a note of it for future reference. This will help streamline your printing process and ensure consistent results.
Adjusting the extrusion temperature is crucial for achieving successful prints with TPU infill. It may require some trial and error to find the ideal temperature for your specific printer and TPU filament. Remember to document your findings and make any necessary adjustments to optimize the temperature settings for future prints.
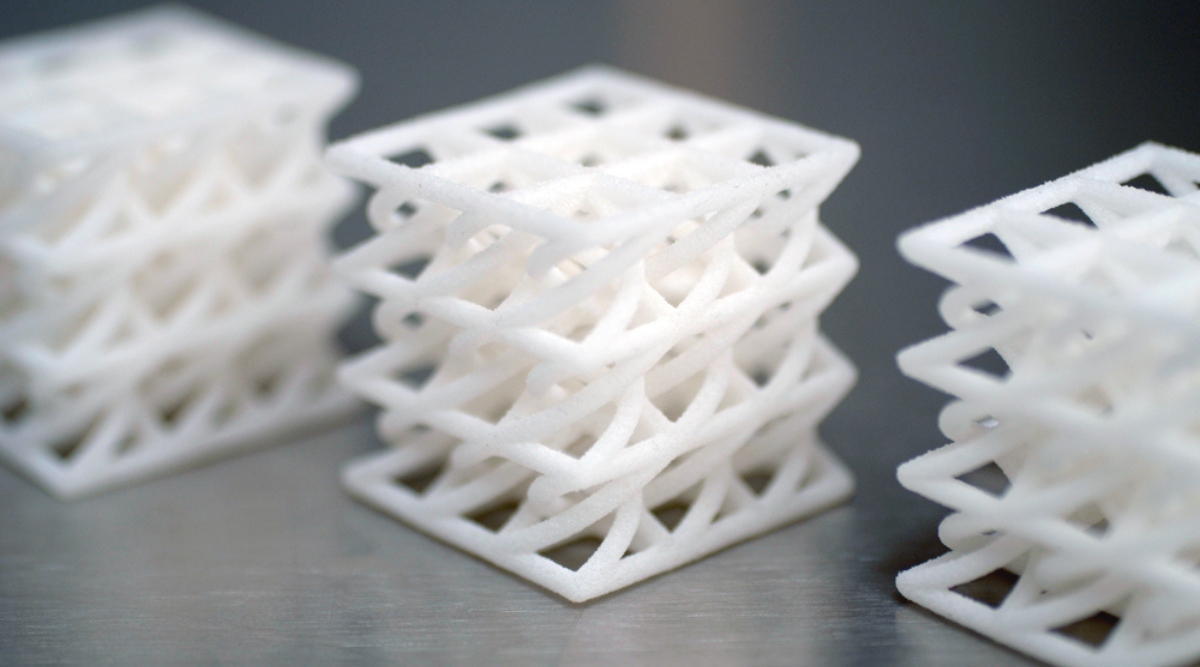
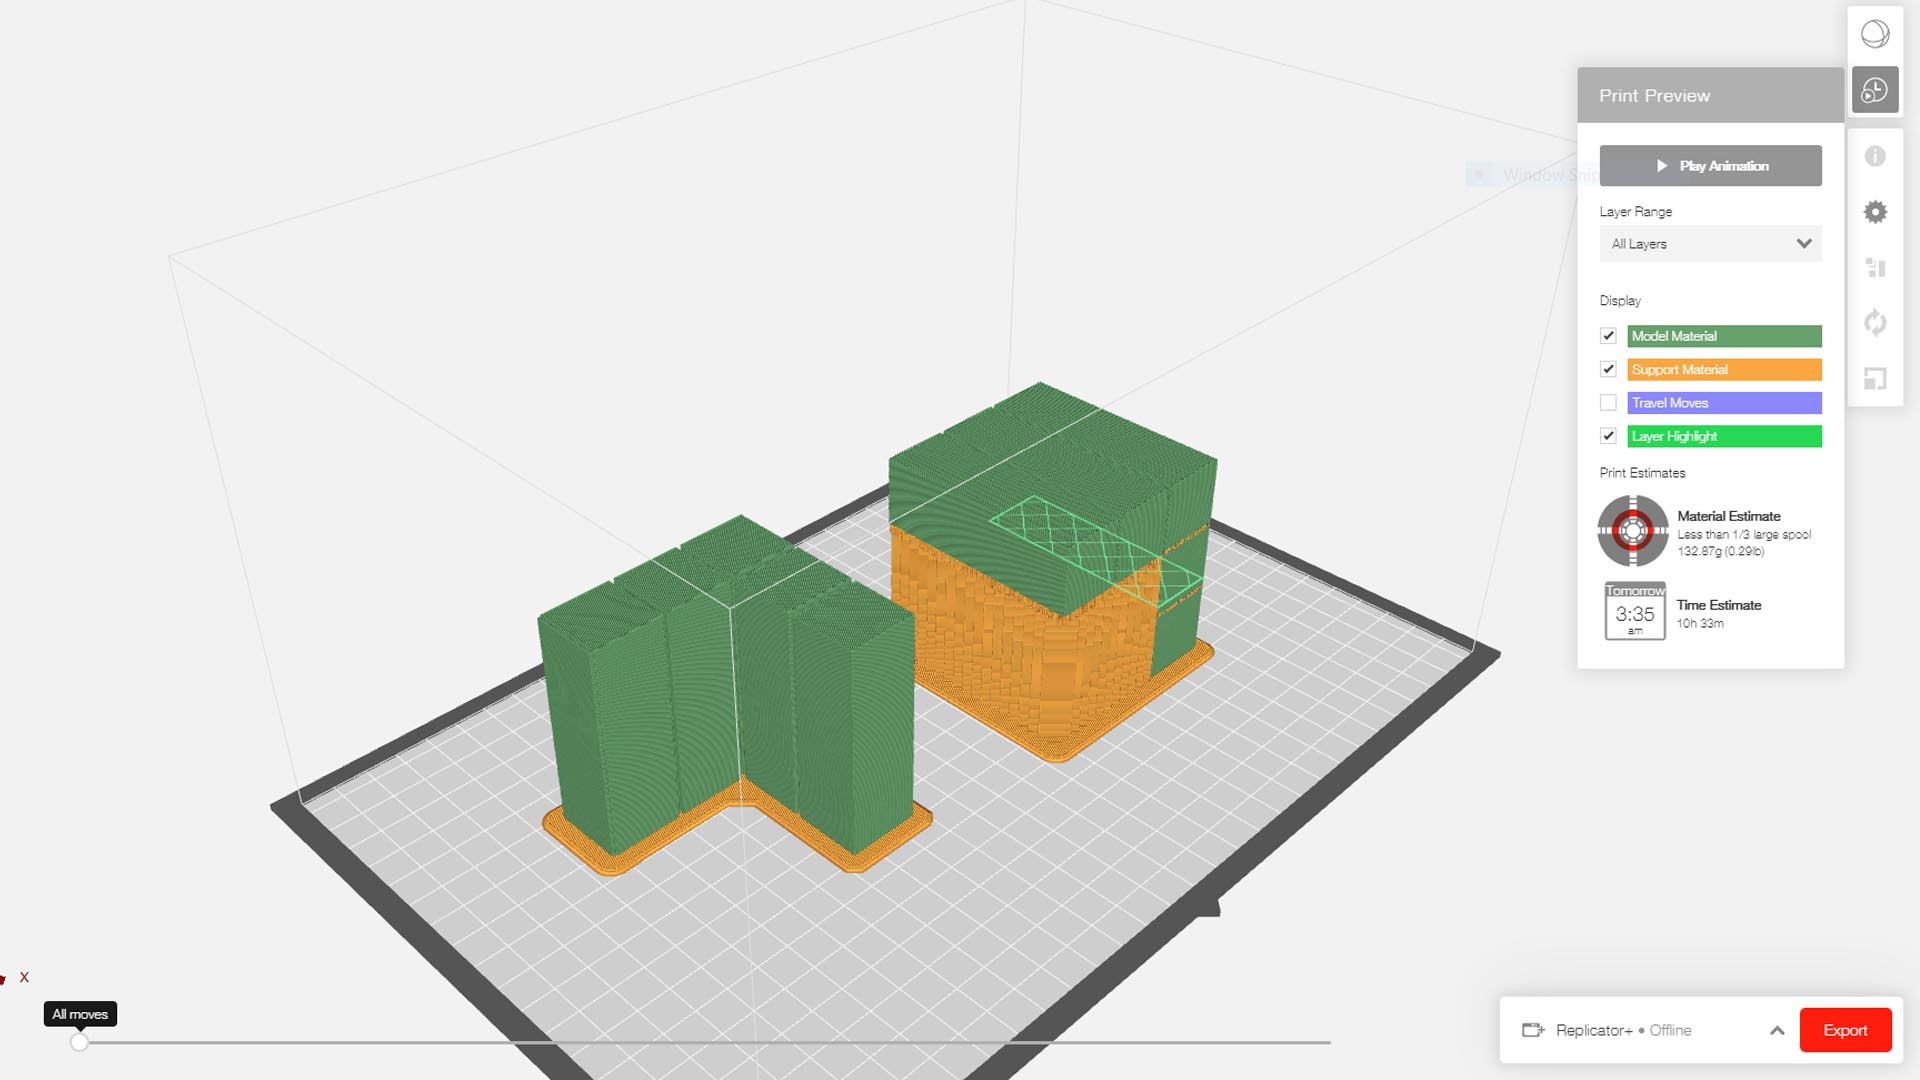
Step 3: Setting the Infill Density
The infill density determines the amount of material that will fill the interior of your 3D printed object. When it comes to creating a squishy TPU infill, adjusting the infill density is crucial. Follow these steps to set the appropriate infill density for your TPU prints:
- Consider the desired squishiness: Before adjusting the infill density, consider how squishy you want your printed object to be. A higher infill density will result in a more rigid structure, while a lower density will create a softer and more flexible outcome.
- Balance between strength and squishiness: It’s important to strike a balance between strength and squishiness. Lower infill densities are ideal for objects that require flexibility, such as phone cases or stress balls, while higher densities are suitable for more structural parts like brackets or prototypes.
- Experiment with different densities: Start by testing different infill densities to determine the optimal squishiness for your specific object. Print a small test piece with varying infill percentages, such as 10%, 20%, 30%, and so on, to evaluate the level of flexibility achieved at each density.
- Consider the structural integrity: While aiming for a squishy infill, it’s important to consider the overall structural integrity of your printed object. Ensure that the chosen infill density provides enough support for the external layers and any functional requirements of the object.
- Adjust based on the object’s purpose: The infill density can also be adjusted based on the purpose of the printed object. For example, if you are printing a cushion or a shoe insole, a lower density would be more comfortable, while a higher density may be preferred for a toy or tool handle that requires a sturdier construction.
By experimenting with different infill densities and considering the intended purpose of your printed object, you can achieve the desired level of squishiness with the TPU infill. Remember to take into account the balance between flexibility and structural integrity to ensure optimal print results.
To make TPU infill squishy, decrease the infill density in your 3D printing settings. A lower infill percentage will result in a softer and more flexible final product.
Read more: How To Spread Infill Without Infill Machine
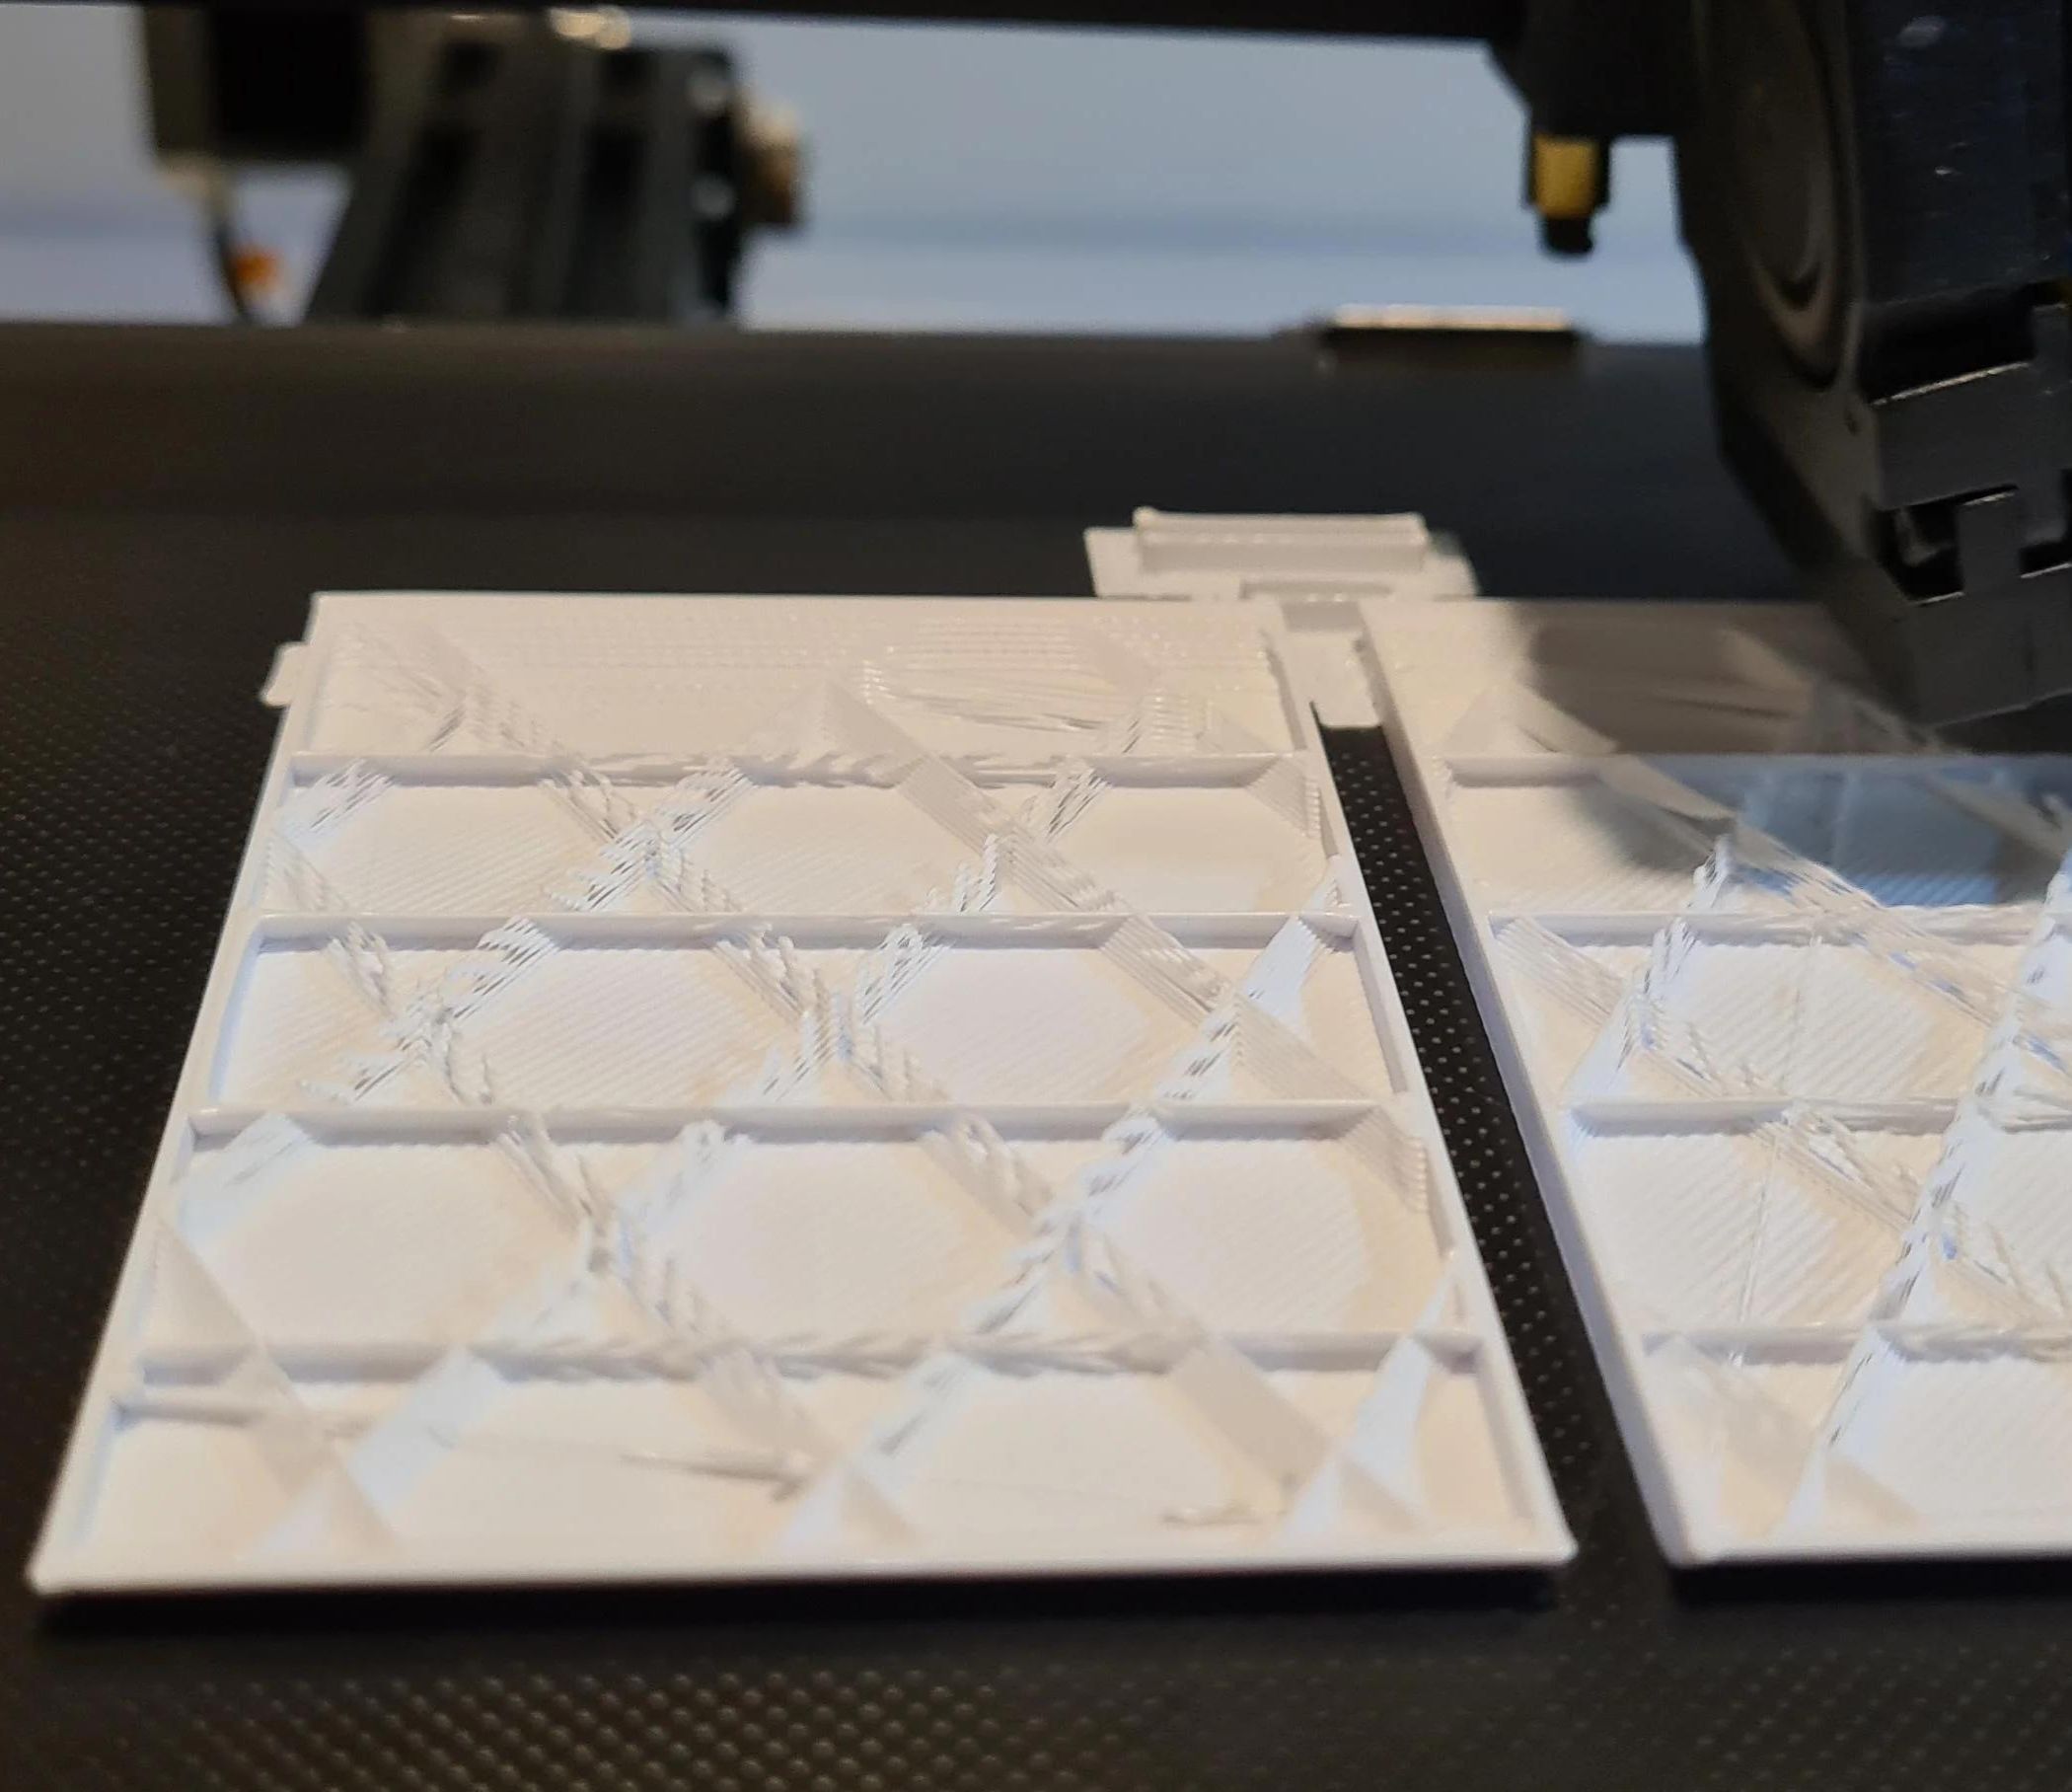
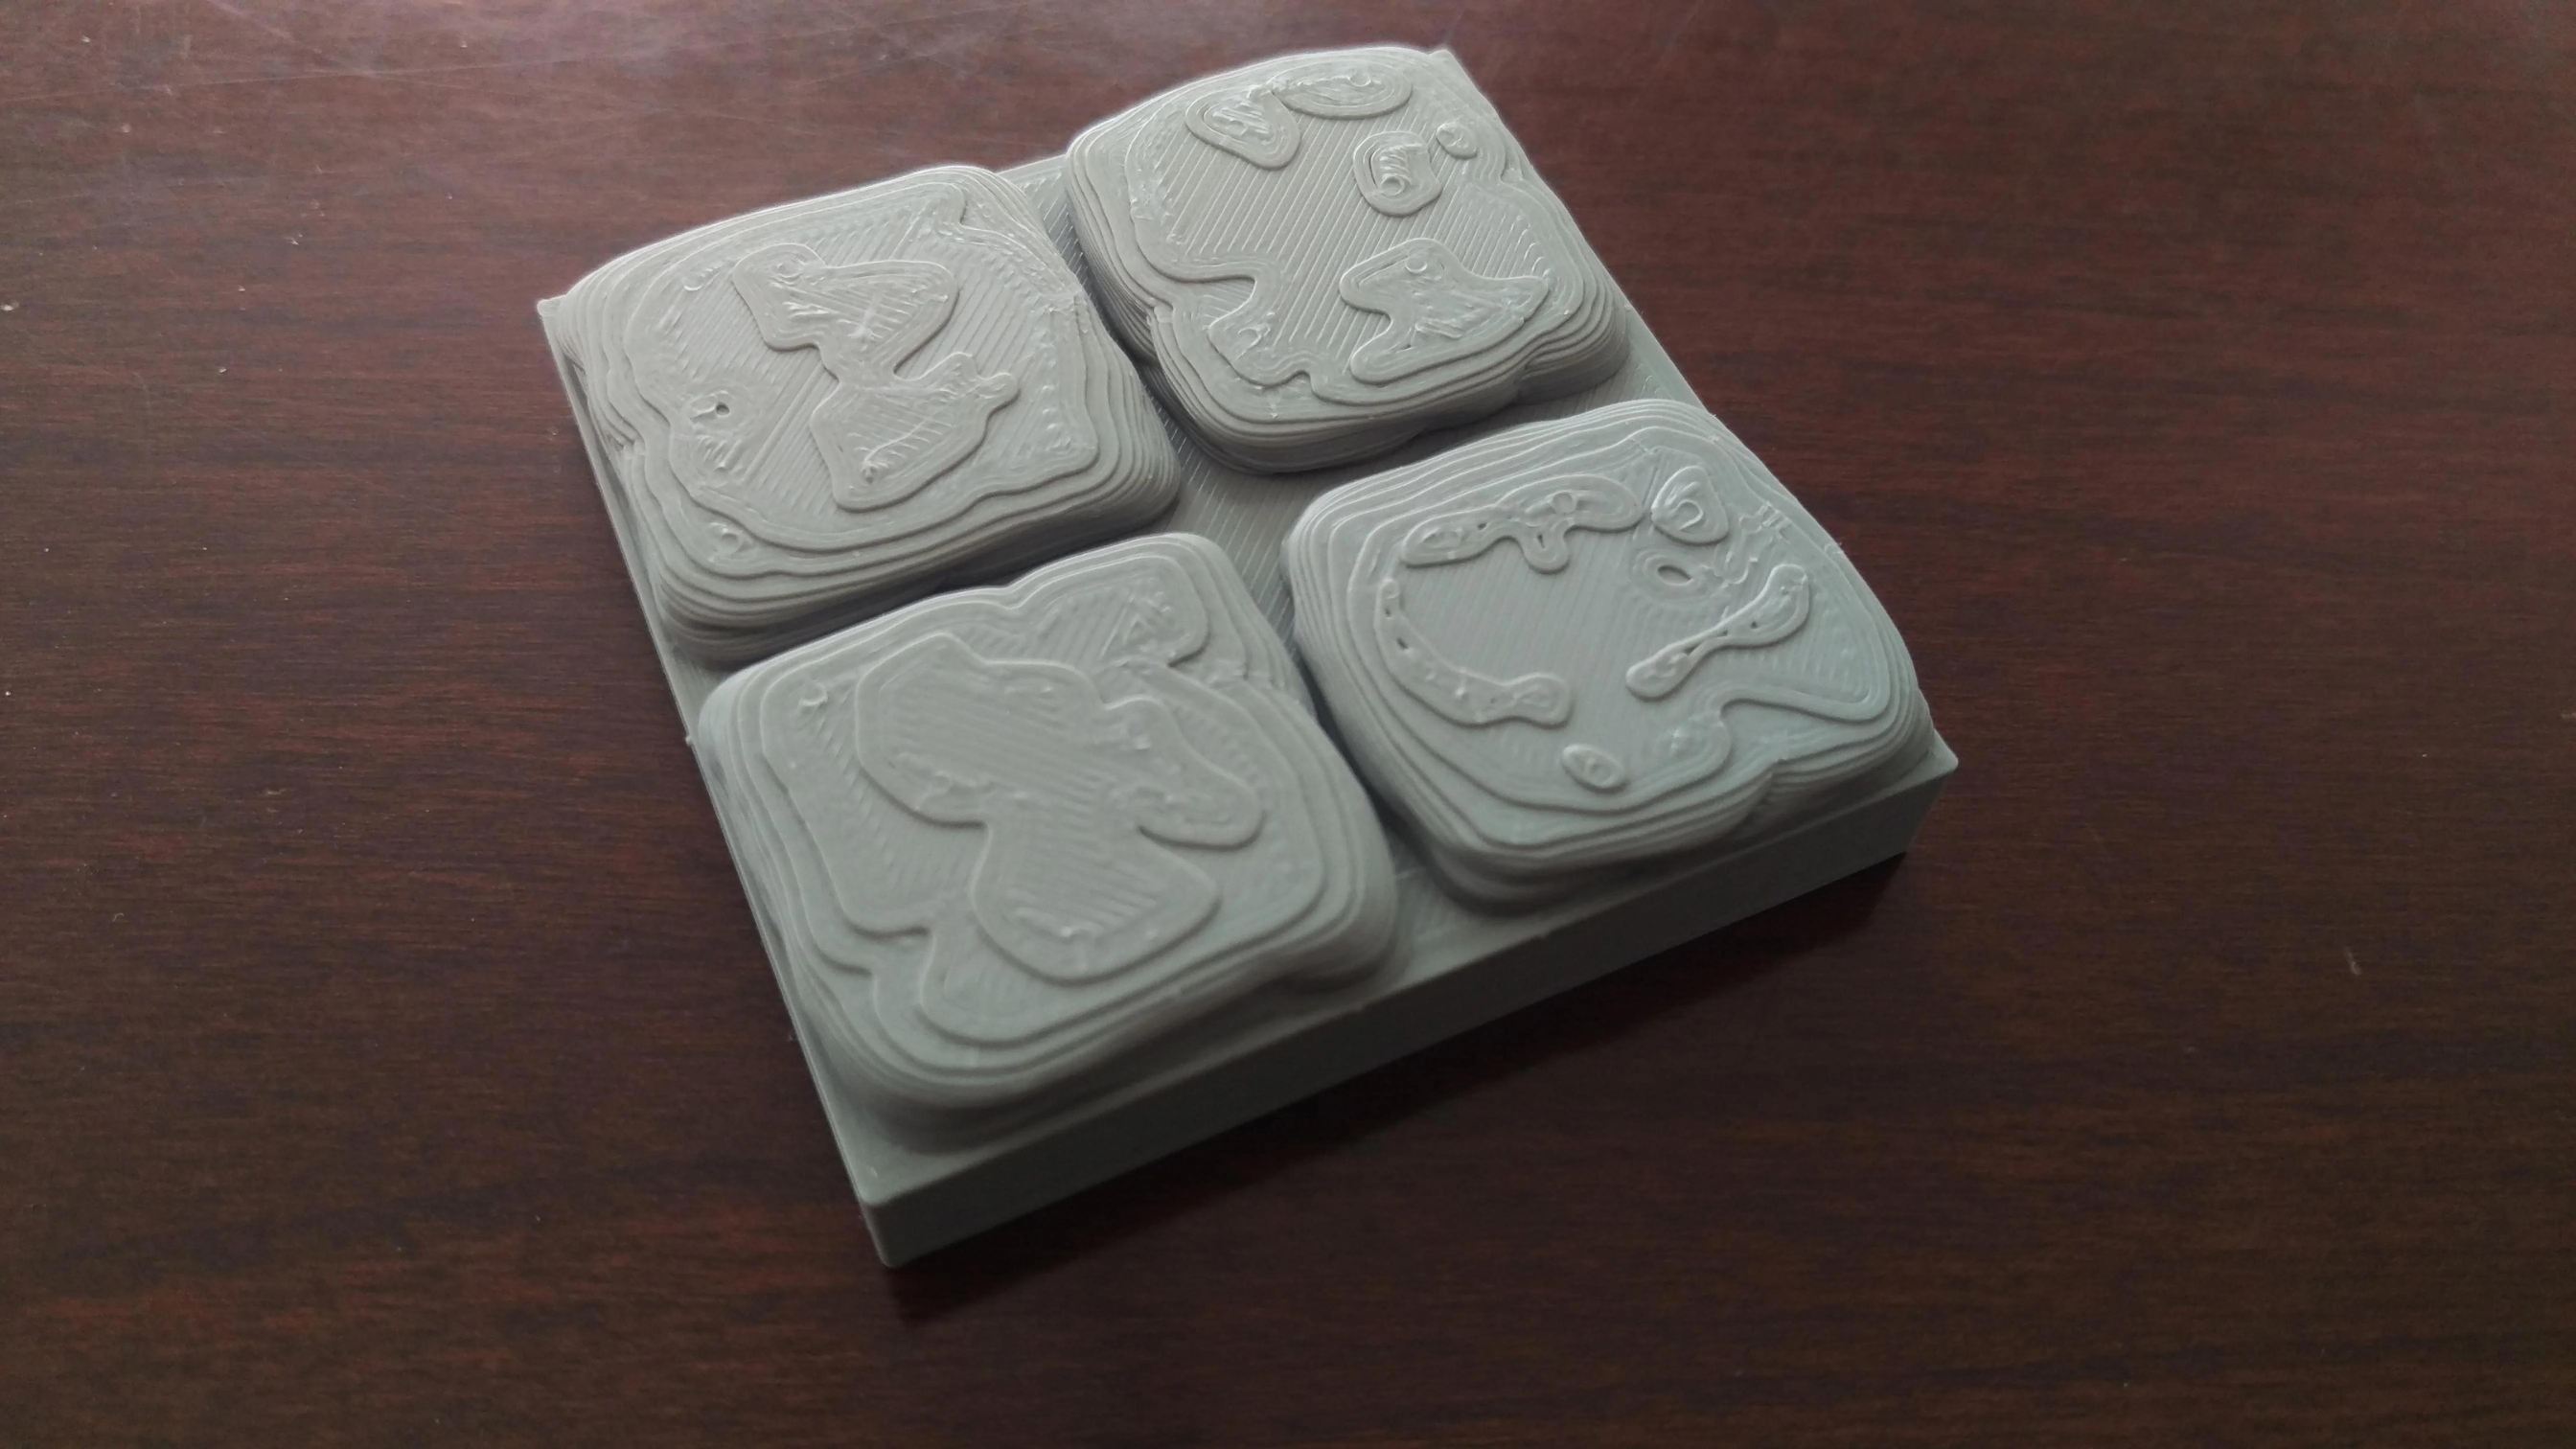
Step 4: Customizing the Infill Pattern
Customizing the infill pattern allows you to add a personal touch to your 3D printed object. When it comes to creating a squishy TPU infill, choosing the right infill pattern can enhance its flexibility and compressibility. Follow these steps to customize the infill pattern for your TPU prints:
- Explore different infill patterns: Most 3D printing software offers various infill patterns, such as honeycomb, grid, triangles, or gyroids. Each pattern has its own unique characteristics, which can affect the squishiness and strength of the printed object.
- Consider the desired flexibility: The choice of infill pattern can significantly impact the flexibility of the printed object. Patterns with larger voids or more open spaces, like honeycomb or gyroids, tend to provide greater flexibility and squishiness. On the other hand, patterns with denser structures, like grids or triangles, can result in a more rigid infill.
- Experiment with different patterns: Print small test pieces with different infill patterns to evaluate their impact on the squishiness of the TPU infill. Adjust the infill percentage along with the pattern to fine-tune the level of compressibility and flexibility.
- Consider the print time and material usage: Keep in mind that complex infill patterns may increase the print time and require more material compared to simpler structures. Consider the trade-off between the desired squishiness and the time and material constraints of your project.
- Combine different patterns: You can also experiment with combining different infill patterns in a single print to create unique and customized effects. This can add visual interest to your printed objects while maintaining the desired level of squishiness.
By exploring different infill patterns and understanding their impact on flexibility and compression, you can tailor the infill pattern to achieve the desired level of squishiness for your TPU prints. Experimentation and testing with different patterns and percentages will help you find the perfect combination for your specific project.
Step 5: Printing the TPU Infill
Now that you have prepared the TPU filament, adjusted the extrusion temperature, and customized the infill settings, it’s time to start printing the TPU infill. Follow these steps to ensure a successful print with the desired squishy infill:
- Prepare the printer: Make sure your 3D printer is properly calibrated and leveled. Ensure that the printer bed is clean and free from any debris or residue that may affect adhesion.
- Select the appropriate print settings: Set the desired layer height, print speed, and wall thickness according to your specific project requirements. Refer to the manufacturer’s recommendations for optimal settings when printing with TPU filament.
- Apply a suitable bed adhesive: TPU has a tendency to warp during the printing process. To prevent this, consider using a suitable bed adhesive, such as a specialized TPU adhesive or a glue stick, to improve bed adhesion.
- Start the printing process: Load the TPU filament into the printer according to the manufacturer’s instructions. Set the desired infill density, pattern, and percentage. Begin the printing process and monitor the progress.
- Observe the print: Keep an eye on the print as it progresses. Look for any signs of issues like stringing, oozing, or warping. If you notice any problems, pause the print and make the necessary adjustments, such as adjusting the extrusion temperature or repositioning the infill pattern.
- Allow the print to cool: Once the print is complete, allow it to cool down before removing it from the printer bed. This will ensure that the TPU infill retains its desired squishiness and shape.
- Post-process the print if needed: Depending on your project, you may need to do some post-processing to achieve the desired final result. This can include removing any support structures or sanding any rough edges.
By following these steps, you can successfully print the TPU infill with the desired level of squishiness. Remember to take your time, monitor the printing process, and make any necessary adjustments to achieve the best print quality possible.
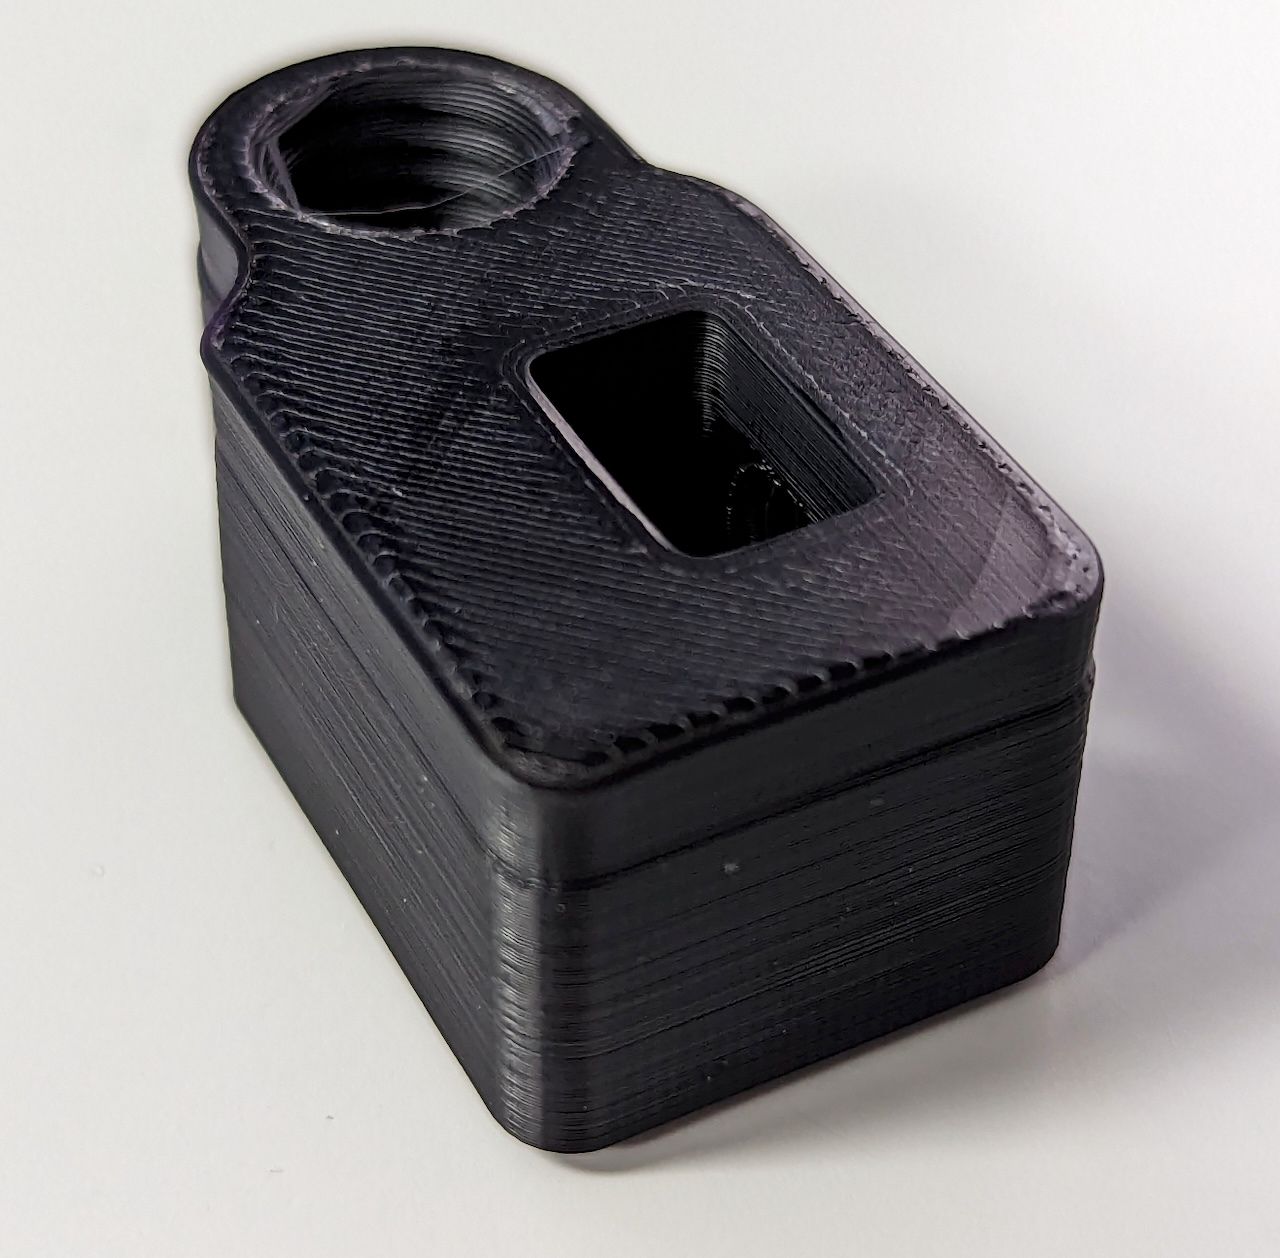
Step 6: Post-processing and Testing the Squishiness
After printing the TPU infill, it’s time to perform post-processing and test the squishiness of your 3D printed object. This step will ensure that the desired level of flexibility and compressibility has been achieved. Follow these steps to complete the process:
- Inspect the print: Carefully examine the printed object for any imperfections, such as rough surfaces, stringing, or print artifacts. Use sandpaper or a file to smooth out any rough edges or uneven surfaces if necessary.
- Remove support structures: If your print required support structures, carefully remove them using appropriate tools like pliers or cutters. Take caution not to damage the main structure while removing the supports.
- Perform squishiness test: To test the squishiness of the TPU infill, gently squeeze the printed object. Observe how it compresses and regains its shape. The squishiness should be evident, allowing the object to deform under pressure and return to its original shape once released.
- Evaluate the desired level of squishiness: Compare the actual squishiness of the printed object to your initial expectations. Determine whether it meets your desired level of flexibility and compressibility. If the squishiness is not to your liking, consider adjusting the infill density or pattern for future prints.
- Share and enjoy: Once you are satisfied with the post-processing and squishiness, share your creation with others. Display it in your garden, use it as a stress-relief tool, or give it as a unique gift to someone special. Enjoy the fruits of your 3D printing journey!
By following these steps, you can ensure that the post-processing of your TPU print is complete and that the desired level of squishiness has been achieved. Remember to test the squishiness of your print, adjust as needed, and share your creation with pride.
Conclusion
Garden ornaments can breathe life and personality into any garden space and create a captivating atmosphere. By incorporating various garden ornaments and decorations, you can transform a plain outdoor area into a vibrant and enchanting oasis. Whether you prefer classic statues, whimsical wind chimes, or modern sculptures, there is a diverse range of garden ornaments to suit your style and taste.
In this article, we covered the importance of gathering the necessary materials and equipment for installing garden ornaments. We then explored the essential steps involved in creating a squishy TPU infill for 3D printed objects. From preparing the TPU filament and adjusting the extrusion temperature to setting the infill density and customizing the infill pattern, each step plays a crucial role in achieving the desired level of flexibility and compressibility.
We also discussed the importance of post-processing and testing the squishiness of the printed object. Through careful inspection, removal of support structures, and performing squishiness tests, you can ensure that your 3D printed TPU infill meets your expectations in terms of flexibility and shape retention.
By exploring different Garden ornaments, customizing infill patterns, and testing squishiness, you can create unique and visually stunning garden decor that truly reflects your personal style. Remember to balance aesthetics with practicality and to take the time to maintain your garden ornaments to preserve their beauty for years to come.
Incorporating garden ornaments into your outdoor space is an opportunity for self-expression and creativity. Let your imagination run wild, and watch as your garden transforms into a captivating haven filled with charm and personality. Start exploring the world of garden ornaments today and bring your garden dreams to life!
Frequently Asked Questions about How To Make TPU Infill Squishy
Was this page helpful?
At Storables.com, we guarantee accurate and reliable information. Our content, validated by Expert Board Contributors, is crafted following stringent Editorial Policies. We're committed to providing you with well-researched, expert-backed insights for all your informational needs.


0 thoughts on “How To Make TPU Infill Squishy”