Home>Gardening & Outdoor>Outdoor Structures>How To Make Skids For A Shed
Outdoor Structures
How To Make Skids For A Shed
Modified: March 1, 2024
Learn how to build durable skids for your shed to ensure stability and longevity. Discover essential tips for constructing outdoor structures.
(Many of the links in this article redirect to a specific reviewed product. Your purchase of these products through affiliate links helps to generate commission for Storables.com, at no extra cost. Learn more)
Introduction
Welcome to the world of DIY shed building! Whether you’re a seasoned DIY enthusiast or just starting out, constructing a shed can be a rewarding project that adds both functionality and charm to your outdoor space. One essential aspect of building a shed is creating sturdy skids, which serve as the foundation and support for the structure. In this guide, we’ll walk you through the process of making skids for a shed, providing you with the necessary steps and tips to ensure that your shed stands the test of time.
By following these instructions, you’ll be equipped with the knowledge and skills to successfully construct skids for your shed, laying a solid groundwork for your upcoming building venture. Let’s dive into the materials needed and the step-by-step process of creating and assembling skids for your shed.
Key Takeaways:
- Building sturdy skids for a shed requires precise measurements, quality lumber, and secure assembly. This foundation elevates the shed, protecting it from moisture and ensuring long-term durability.
- Attaching the shed to the skids is a pivotal step, setting the stage for further construction. This process anchors the structure, signaling the transition to adding walls, a roof, and personalized touches.
Read more: How To Put Skids On A Shed
Materials Needed
Before embarking on the skid construction process, it’s crucial to gather all the necessary materials. Here’s a comprehensive list of what you’ll need:
- Lumber: Select high-quality, pressure-treated lumber for durability and longevity. The dimensions will depend on the size of your shed, but 4×4 or 6×6 lumber is commonly used for skids.
- Measuring Tools: A tape measure, framing square, and pencil are essential for accurately measuring and marking the lumber.
- Saw: A circular saw or a handsaw will be needed to cut the lumber to the required dimensions.
- Fasteners: Obtain galvanized or stainless-steel screws or nails to secure the lumber pieces together. These fasteners should be resistant to corrosion, ensuring the stability of the skids over time.
- Drill: A power drill with appropriate drill bits will be used to create pilot holes and drive the screws into the lumber.
- Level: To ensure the skids are perfectly horizontal when installed, a reliable level is indispensable.
- Work Gloves and Safety Glasses: Prioritize safety by wearing work gloves to protect your hands and safety glasses to shield your eyes while cutting and assembling the lumber.
- Work Surface: A flat and spacious work area, such as a sturdy workbench or a level ground, will facilitate the assembly and construction process.
By gathering these materials, you’ll be well-prepared to commence the construction of skids for your shed. With everything in place, it’s time to move on to the first step: measuring and cutting the skids.
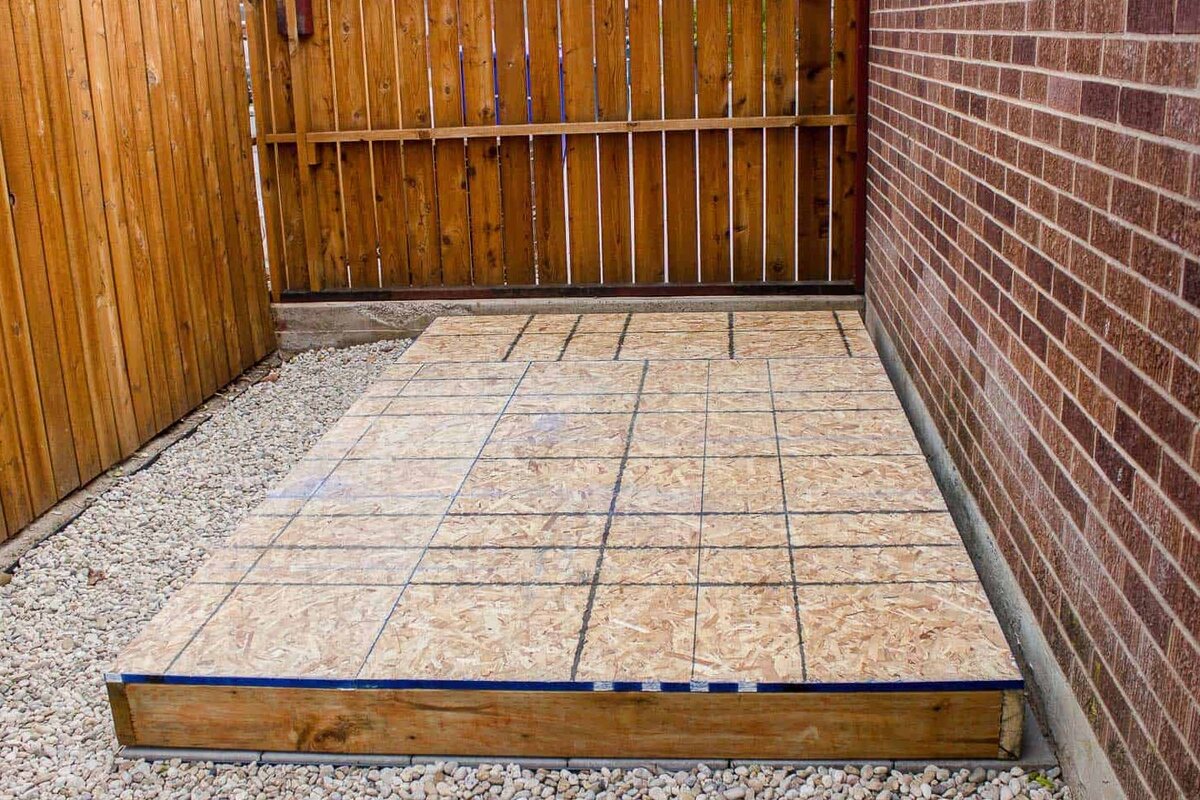
Step 1: Measure and Cut the Skids
The initial phase of creating skids for your shed involves precise measurements and accurate cuts to ensure the foundational elements are constructed to the required specifications. Follow these steps to measure and cut the skids:
- Measure the Lumber: Using a tape measure, determine the necessary length for the skids based on the dimensions of your shed. Mark the measurements clearly with a pencil.
- Cut the Lumber: With a saw appropriate for the thickness of the lumber, carefully cut along the marked lines to create the individual skids. Ensure that the cuts are straight and accurate to maintain the structural integrity of the skids.
- Check the Dimensions: After cutting the lumber, verify that the dimensions of the skids align with the shed’s requirements. Make any adjustments if needed to achieve the precise measurements.
Accurate measurements and precise cuts are fundamental to the stability and functionality of the skids. Once the skids are cut to the correct dimensions, you’re ready to proceed to the next step: assembling the skids.
When making skids for a shed, use pressure-treated lumber to prevent rot and decay. Make sure the skids are level and properly spaced to evenly distribute the weight of the shed.
Step 2: Assemble the Skids
With the skids cut to the required dimensions, the next crucial step is to assemble them effectively. This process involves joining the individual lumber pieces to form the sturdy foundation for your shed. Follow these steps to assemble the skids:
- Arrange the Lumber: Place the cut lumber pieces in the designated configuration, ensuring that they are aligned and positioned correctly for assembly.
- Create Pilot Holes: Using a drill with an appropriate drill bit, create pilot holes in the lumber where the pieces will be joined. This step is essential for preventing the wood from splitting when the fasteners are inserted.
- Secure the Joints: Utilize galvanized or stainless-steel screws or nails to securely fasten the lumber pieces together. Ensure that the joints are tightly connected to provide maximum stability for the skids.
- Check for Alignment: Verify that the assembled skids are perfectly aligned and level, making any adjustments as necessary to guarantee uniformity and stability.
By following these steps, you’ll successfully assemble the skids, laying the groundwork for the next phase: attaching the skids to the shed. With the skids securely assembled, your shed project is well on its way to fruition.
Step 3: Attach the Skids to the Shed
As the skids are assembled and ready, the final step involves attaching them to the shed, effectively establishing the foundation for the structure. Follow these essential steps to securely attach the skids to the shed:
- Position the Shed: Carefully maneuver the shed into the desired location, ensuring that it is aligned with the skids for seamless attachment.
- Secure the Shed to the Skids: Utilize appropriate fasteners to firmly secure the shed to the skids, effectively anchoring the structure to the foundational support. This step is crucial for stabilizing the shed and ensuring its resilience against external forces.
- Verify Stability: Once the shed is attached to the skids, assess the stability of the entire structure. Confirm that the shed is level and securely positioned on the skids, making any adjustments if necessary.
- Prepare for Further Construction: With the skids successfully attached to the shed, you’re now ready to proceed with additional construction tasks, such as erecting the walls, installing the roof, and adding finishing touches to complete your shed project.
By following these steps, you’ll effectively attach the skids to the shed, setting the stage for the seamless integration of the shed’s components. With the foundation firmly in place, your shed is poised to become a functional and enduring outdoor structure.
Read more: What Is A Skid In Construction
Conclusion
Congratulations on successfully completing the construction of skids for your shed! By following the step-by-step process outlined in this guide, you’ve laid a solid foundation for your shed’s structural integrity and longevity. The meticulous measurement, precise cutting, and skillful assembly of the skids have set the stage for a robust and reliable outdoor structure.
As you reflect on the journey of creating the skids, it’s important to recognize the significance of this foundational element. The skids not only provide structural support for the shed but also elevate it above the ground, safeguarding the structure from moisture and potential damage. With the skids securely in place, your shed is well-equipped to withstand the elements and serve its intended purpose for years to come.
Furthermore, the attachment of the shed to the skids marks a pivotal moment in the construction process, signaling the transition to further building endeavors. With the shed firmly anchored to the skids, you’re now poised to continue the construction journey, adding walls, a roof, and personalized touches to transform your vision into a tangible outdoor space.
As you embark on the next phases of shed construction, remember the foundational role that the skids play in ensuring the stability and resilience of the structure. By investing time and attention into crafting sturdy skids, you’ve established a durable groundwork for your shed, setting the stage for a successful and fulfilling DIY project.
With the skids expertly constructed and integrated into your shed project, you’re well on your way to enjoying the practicality and charm of your newly built outdoor structure. Embrace the journey ahead, and revel in the satisfaction of creating a functional and enduring addition to your outdoor space.
Frequently Asked Questions about How To Make Skids For A Shed
Was this page helpful?
At Storables.com, we guarantee accurate and reliable information. Our content, validated by Expert Board Contributors, is crafted following stringent Editorial Policies. We're committed to providing you with well-researched, expert-backed insights for all your informational needs.


0 thoughts on “How To Make Skids For A Shed”