Home>Home Appliances>Laundry Appliances>How To Replace A Washing Machine Outlet Box

Laundry Appliances
How To Replace A Washing Machine Outlet Box
Modified: August 27, 2024
Learn how to replace a washing machine outlet box with our step-by-step guide. Ensure the safety and efficiency of your laundry appliances with this DIY project.
(Many of the links in this article redirect to a specific reviewed product. Your purchase of these products through affiliate links helps to generate commission for Storables.com, at no extra cost. Learn more)
Introduction
Replacing a washing machine outlet box may seem like a daunting task, but with the right tools and a clear understanding of the process, it can be a manageable DIY project. The washing machine outlet box is a crucial component of your laundry room plumbing, responsible for connecting the water supply and drainage for your washing machine. Over time, these outlet boxes can deteriorate, leading to leaks and potential water damage. By replacing the outlet box, you can ensure the proper functioning of your washing machine and prevent any water-related mishaps.
In this comprehensive guide, we will walk you through the step-by-step process of replacing a washing machine outlet box. From shutting off the water supply to testing the new outlet box, we will cover each stage in detail, providing you with the knowledge and confidence to tackle this project effectively. Whether you are a seasoned DIY enthusiast or a novice homeowner looking to take on a new challenge, this guide will equip you with the essential information to successfully replace your washing machine outlet box.
Before diving into the practical aspects of the replacement process, it's important to gather the necessary tools and materials. Having these items on hand will streamline the project and ensure that you can work efficiently. With the right preparation and a clear understanding of the steps involved, you can embark on this home improvement task with confidence and achieve a functional and leak-free washing machine outlet box.
Key Takeaways:
- Replacing a washing machine outlet box is a manageable DIY project with the right tools and knowledge. Shut off the water supply, remove the old box, install the new one, and test for leaks to ensure a successful replacement.
- Gathering the necessary tools and materials, shutting off the water supply, and testing the new outlet box are crucial steps in replacing a washing machine outlet box. Following these steps ensures a safe and efficient process.
Read more: How To Replace Washing Machine Bearings
Tools and Materials Needed
Before embarking on the task of replacing a washing machine outlet box, it's essential to gather the necessary tools and materials. Having these items readily available will streamline the process and ensure that you can work efficiently. Here's a comprehensive list of the tools and materials you will need for this project:
Tools:
- Adjustable Wrench: This versatile tool will be used to loosen and tighten various connections during the replacement process.
- Pipe Cutter: A pipe cutter is essential for cleanly and accurately cutting the water supply pipes, ensuring a precise fit for the new outlet box.
- Screwdriver Set: A set of screwdrivers, including both flathead and Phillips head varieties, will be needed for removing and installing screws throughout the project.
- Tubing Cutter: This tool is crucial for cutting copper tubing, providing clean and precise cuts for the water supply lines.
- Teflon Tape: Teflon tape, also known as plumber's tape, will be used to seal the threaded connections, preventing leaks in the plumbing system.
- Plumber's Putty: Plumber's putty is a versatile sealing compound that will help create a watertight seal around the new outlet box's connections.
- Level: Ensuring that the new outlet box is installed level is crucial for its proper functioning, making a level an essential tool for this project.
- Flashlight: A flashlight will come in handy for illuminating tight spaces and providing visibility during the replacement process.
Materials:
- New Washing Machine Outlet Box: Select a high-quality outlet box that matches the specifications of your existing plumbing system, ensuring a proper fit and functionality.
- Copper Tubing: Depending on the configuration of your plumbing system, you may need new copper tubing to connect the water supply to the new outlet box.
- Shutoff Valves: If the existing shutoff valves are old or malfunctioning, it's advisable to replace them with new, reliable shutoff valves for the water supply lines.
- Pipe Connectors: These connectors will facilitate the connection between the existing water supply and the new outlet box, ensuring a secure and leak-free joint.
- Drain Hose: A new drain hose may be required to connect the washing machine to the drainage system via the new outlet box.
- Fasteners: Depending on the installation requirements of the new outlet box, you may need screws or other fasteners to secure it in place.
By ensuring that you have all the necessary tools and materials at your disposal, you can approach the task of replacing a washing machine outlet box with confidence and efficiency. This comprehensive list will help you prepare for the project and minimize any potential delays or interruptions during the replacement process.
Shutting Off the Water Supply
Before beginning the process of replacing a washing machine outlet box, it is crucial to shut off the water supply to the laundry room. This step is essential for ensuring a safe and controlled environment for the replacement project. Here's a detailed guide on how to shut off the water supply effectively:
-
Locate the Main Water Shutoff Valve: The main water shutoff valve is typically located near the water meter or where the main water line enters your home. It is essential to familiarize yourself with the location of this valve beforehand.
-
Turn Off the Main Water Supply: Using a wrench or the appropriate tool, turn the main water shutoff valve clockwise to close it. This action will stop the flow of water into your home, effectively shutting off the water supply to the entire property.
-
Drain the Remaining Water: After shutting off the main water supply, it is advisable to open a few faucets in the house to drain any remaining water from the plumbing system. This step will help minimize the amount of water present in the pipes when you begin working on the washing machine outlet box.
-
Verify the Water Supply is Off: Once you have closed the main water shutoff valve and allowed the remaining water to drain, double-check that the water supply is indeed turned off. This verification is crucial for ensuring a safe working environment as you proceed with the replacement process.
By following these steps to shut off the water supply, you can create a safe and controlled environment for replacing the washing machine outlet box. It is essential to exercise caution and verify that the water supply is effectively turned off before proceeding with the subsequent stages of the replacement project. This proactive approach will contribute to a smooth and efficient replacement process, minimizing the risk of water-related mishaps during the installation of the new outlet box.
Read more: How To Replace Washing Machine Water Valves
Removing the Old Washing Machine Outlet Box
Removing the old washing machine outlet box is a critical step in the process of replacing this essential plumbing component. It involves disconnecting the existing water supply and drainage connections, as well as removing the old box from its mounting location. Here's a detailed guide on how to effectively remove the old washing machine outlet box:
-
Turn off the Water Supply: Before proceeding with the removal, ensure that the water supply to the washing machine outlet box is completely shut off. This is a crucial safety measure to prevent any water leakage during the removal process.
-
Disconnect the Water Supply Lines: Using an adjustable wrench, carefully loosen and disconnect the water supply lines from the inlet ports of the old outlet box. It's important to have a bucket or towels on hand to catch any residual water that may drain from the disconnected lines.
-
Remove the Drain Hose: If the washing machine is connected to the drainage system through the outlet box, detach the drain hose from the box's drainage port. Be prepared for some residual water in the hose and have a container ready to catch any spillage.
-
Unscrew the Mounting Fasteners: The old outlet box is typically secured to the wall with mounting screws or fasteners. Using a screwdriver, carefully remove these fasteners to detach the box from its mounting location. It's important to support the box while removing the fasteners to prevent it from falling and causing damage.
-
Inspect the Surrounding Area: Once the old outlet box is removed, take the time to inspect the surrounding area for any signs of water damage, mold, or mildew. Addressing any underlying issues at this stage will ensure a clean and secure foundation for installing the new outlet box.
-
Cap the Water Supply Pipes: After removing the old outlet box, cap the exposed water supply pipes to prevent any debris or contaminants from entering the plumbing system. This temporary measure will maintain the integrity of the water supply lines until the new outlet box is installed.
By following these detailed steps, you can effectively remove the old washing machine outlet box in preparation for installing the new one. This process sets the stage for a seamless transition to the next phase of the replacement project, ensuring that the plumbing system is properly prepared for the installation of the new outlet box.
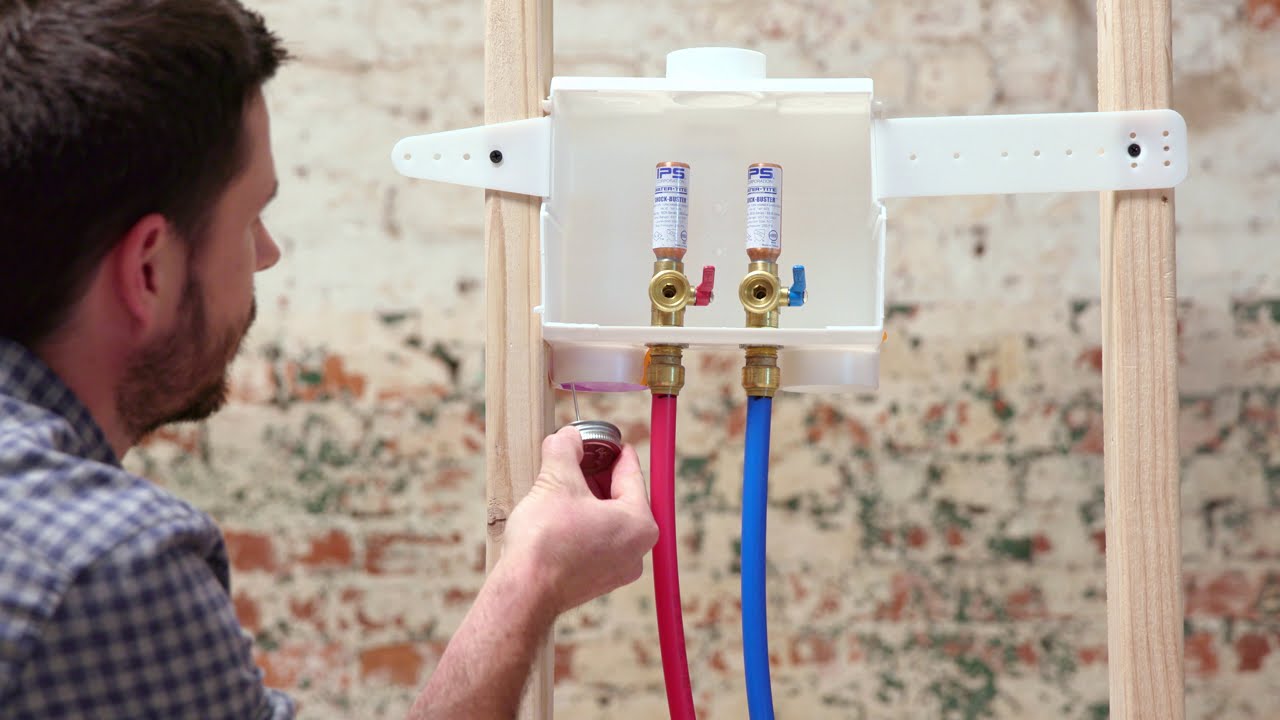
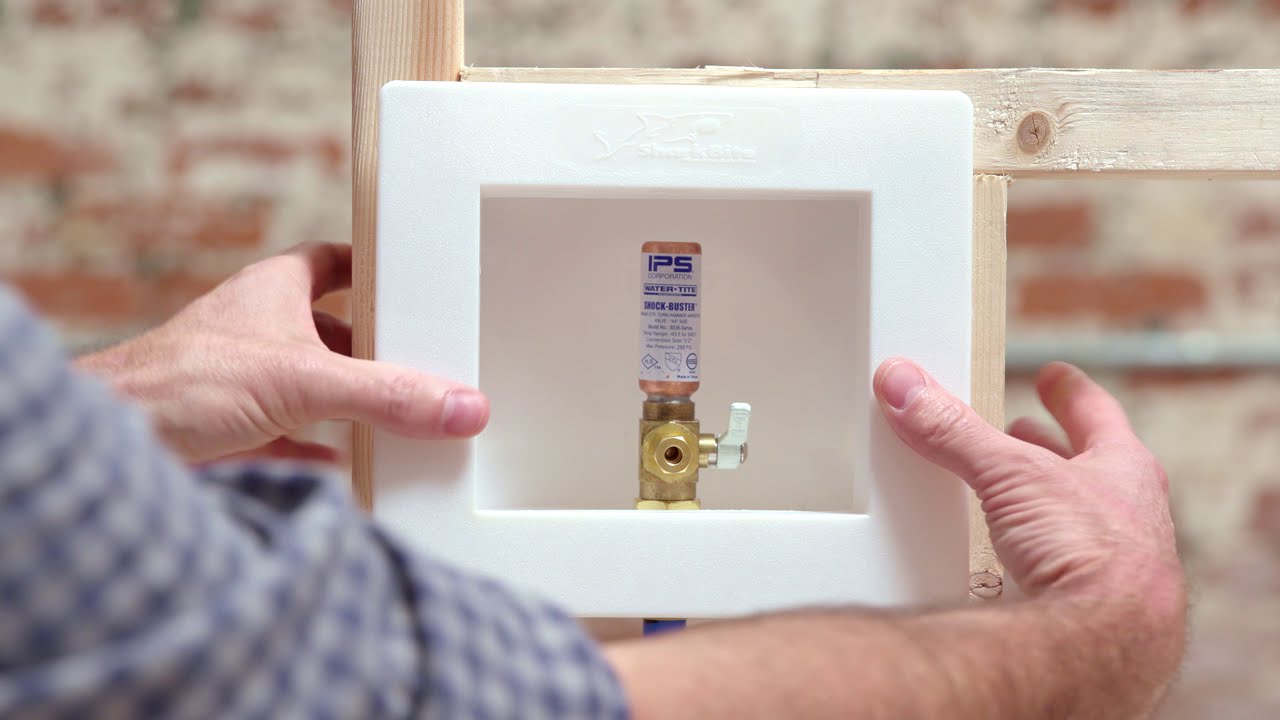
Installing the New Washing Machine Outlet Box
With the old washing machine outlet box successfully removed, the next crucial step is the installation of the new outlet box. This phase involves securing the new box in place, connecting the water supply and drainage components, and ensuring a watertight seal for optimal functionality. Here's a detailed guide on how to effectively install the new washing machine outlet box:
-
Positioning the New Outlet Box: Before securing the new outlet box, carefully position it at the desired location on the wall. Ensure that the box is level using a spirit level, as proper alignment is essential for its functionality and aesthetic appeal.
-
Securing the Box: Once the box is positioned correctly, use appropriate fasteners to secure it to the wall. Ensure that the fasteners are tightly secured, providing a stable and reliable mounting for the outlet box.
-
Connecting the Water Supply Lines: Begin by connecting the water supply lines to the inlet ports of the new outlet box. Use an adjustable wrench to tighten the connections, ensuring a secure and leak-free joint. Applying plumber's tape to the threaded ends of the supply lines can further enhance the seal.
-
Attaching the Drain Hose: If the washing machine drains through the outlet box, attach the drain hose to the designated drainage port on the new box. Ensure a snug and secure fit, as any loose connections may lead to leaks during machine operation.
-
Installing Shutoff Valves: If the new outlet box does not include built-in shutoff valves, consider installing them on the water supply lines. Shutoff valves provide a convenient means of isolating the outlet box for maintenance or repairs in the future.
-
Sealing the Connections: Apply plumber's putty or silicone sealant around the water supply and drainage connections to create a watertight seal. This step is crucial for preventing leaks and ensuring the long-term integrity of the plumbing system.
-
Testing for Leaks: Once all connections are in place and sealed, turn on the main water supply and carefully inspect the outlet box for any signs of leakage. Additionally, run the washing machine through a cycle to verify that the drainage system is functioning properly without any leaks or issues.
By following these detailed steps, you can effectively install the new washing machine outlet box, setting the stage for a reliable and efficient laundry room plumbing system. This phase of the replacement process plays a pivotal role in ensuring the proper functioning of the washing machine and safeguarding against potential water-related issues.
Connecting the Water Supply and Drainage
Connecting the water supply and drainage components is a pivotal stage in the replacement of a washing machine outlet box. This phase involves establishing secure and leak-free connections to ensure the proper functioning of the washing machine and the integrity of the plumbing system. Here's a detailed guide on how to effectively connect the water supply and drainage components to the new outlet box:
Water Supply Connection
-
Prepare the Water Supply Lines: Before connecting the water supply lines to the new outlet box, ensure that the ends of the lines are clean and free from any debris or damage. Trim any frayed ends and ensure that the copper tubing is cut to the appropriate length for a precise fit.
-
Apply Teflon Tape: To create a secure seal, wrap the threaded ends of the water supply lines with Teflon tape. This step helps prevent leaks and ensures a tight connection between the supply lines and the inlet ports of the outlet box.
-
Secure the Connections: Using an adjustable wrench, carefully thread and tighten the water supply lines onto the inlet ports of the new outlet box. It's essential to avoid over-tightening, as this can damage the threads or fittings. Instead, aim for a snug and secure connection that prevents any potential leaks.
-
Install Shutoff Valves (If Necessary): If the new outlet box does not include built-in shutoff valves, consider installing them on the water supply lines. Shutoff valves provide a convenient means of isolating the outlet box for maintenance or repairs in the future, enhancing the overall functionality of the plumbing system.
Drainage Connection
-
Attach the Drain Hose: If the washing machine drains through the outlet box, attach the drain hose to the designated drainage port on the new box. Ensure that the hose is securely fastened to prevent any dislodging during the machine's operation.
-
Inspect the Drainage System: Before finalizing the connection, inspect the drainage system to ensure that it is free from any obstructions or blockages. A clear and unobstructed drainage path is essential for the efficient operation of the washing machine and the prevention of potential backups or overflows.
-
Test the Drainage Functionality: Once the drain hose is connected, run a brief cycle on the washing machine to verify that the drainage system is functioning properly. Monitor the drainage process to ensure that water flows smoothly through the outlet box and into the household drainage system without any leaks or issues.
By meticulously following these steps, you can effectively connect the water supply and drainage components to the new washing machine outlet box. This meticulous approach ensures that the plumbing system is properly configured to support the seamless operation of the washing machine, providing a reliable and leak-free solution for your laundry room needs.
When replacing a washing machine outlet box, make sure to turn off the water supply and disconnect the hoses. Use a wrench to remove the old box and install the new one according to the manufacturer’s instructions. Double check for any leaks before using the washing machine.
Testing the New Outlet Box
After completing the installation of the new washing machine outlet box, it is crucial to conduct comprehensive testing to ensure its functionality and integrity. This phase serves as a critical quality assurance step, allowing you to verify that the plumbing connections are secure, the water supply is leak-free, and the drainage system operates efficiently. Here's a detailed guide on how to effectively test the new outlet box:
-
Inspect for Leaks: Before proceeding with any testing, visually inspect all the connections, including the water supply lines, drainage port, and any sealed joints. Look for any signs of moisture, drips, or water accumulation around the outlet box. This visual inspection provides an initial indication of the integrity of the installation.
-
Turn on the Water Supply: Gradually turn on the main water supply and monitor the inlet ports of the outlet box for any leaks or seepage. It's advisable to have a flashlight on hand to illuminate the connections and ensure a thorough inspection. Address any leaks immediately by tightening the connections or reapplying sealant as needed.
-
Check Shutoff Valve Functionality: If shutoff valves were installed as part of the replacement process, verify that they effectively control the water flow to the outlet box. Open and close the valves to confirm their smooth operation and ensure that they provide a reliable means of isolating the outlet box when necessary.
-
Run a Test Cycle: With the water supply confirmed to be leak-free, initiate a test cycle on the washing machine to observe the functionality of the outlet box during the machine's operation. Monitor the drainage process to ensure that water flows smoothly through the outlet box and into the household drainage system without any backups or overflows.
-
Verify Level Alignment: Revisit the installation to ensure that the outlet box is level and securely mounted to the wall. A level box not only enhances the aesthetic appeal of the laundry room but also contributes to the proper functioning of the washing machine and the overall plumbing system.
-
Inspect Surrounding Area: After completing the testing process, inspect the surrounding area for any signs of water accumulation or leaks. Address any issues promptly to prevent potential water damage and ensure the long-term reliability of the new outlet box.
By meticulously conducting these testing procedures, you can verify the successful installation of the new washing machine outlet box and address any potential issues before they escalate. This proactive approach contributes to a reliable and efficient laundry room plumbing system, providing peace of mind and ensuring the optimal performance of your washing machine.
Now that you've mastered replacing your washing machine outlet box, why not tackle more home improvement tasks? If DIY projects are up your alley, our next guide on home maintenance skills is a must-read. From fixing leaky faucets to patching drywall, you'll find practical advice to handle common issues around your house, boosting both its functionality and value. Ready to roll up your sleeves for more? Check out our comprehensive guide on home repairs.
Frequently Asked Questions about How To Replace A Washing Machine Outlet Box
Was this page helpful?
At Storables.com, we guarantee accurate and reliable information. Our content, validated by Expert Board Contributors, is crafted following stringent Editorial Policies. We're committed to providing you with well-researched, expert-backed insights for all your informational needs.


0 thoughts on “How To Replace A Washing Machine Outlet Box”