Home>Home Appliances>Lighting Appliances>How To Attach A Ceiling Light
Lighting Appliances
How To Attach A Ceiling Light
Modified: August 17, 2024
Learn how to properly attach a ceiling light with our step-by-step guide. Find expert tips and advice for installing lighting appliances.
(Many of the links in this article redirect to a specific reviewed product. Your purchase of these products through affiliate links helps to generate commission for Storables.com, at no extra cost. Learn more)
Introduction
Installing a ceiling light can instantly transform the ambiance of a room, adding both functionality and aesthetic appeal. Whether you're replacing an outdated fixture or adding a new lighting element to your space, the process of attaching a ceiling light can be a rewarding and relatively straightforward DIY project. By following a few simple steps and ensuring safety precautions, you can illuminate your room with a beautiful new fixture.
In this comprehensive guide, we will walk you through the process of attaching a ceiling light, providing clear instructions and valuable tips to help you complete the task with confidence. From gathering the necessary tools and materials to safely connecting the wires and testing the fixture, each step is crucial to achieving a successful and safe installation.
By the end of this guide, you will have the knowledge and skills to confidently tackle the task of attaching a ceiling light, bringing a renewed sense of brightness and style to your living space. So, let's dive into the process and illuminate your home with a stunning new ceiling light fixture.
Key Takeaways:
- Gathering the right tools and materials, turning off the power, and safely removing the old fixture are crucial steps in attaching a ceiling light. This ensures a safe and successful installation process.
- Properly connecting the wires, securing the light fixture, and thorough testing are essential for a reliable and stylish ceiling light attachment. This ensures a well-lit and safe living space.
Read more: How To Attach Insulation To Ceiling
Step 1: Gather Necessary Tools and Materials
Before embarking on the installation of a ceiling light, it's essential to gather all the required tools and materials. Having the right equipment at hand will streamline the process and ensure a smooth and efficient installation. Here's a comprehensive list of the necessary items you'll need:
Tools:
- Screwdriver Set: A set of screwdrivers, including both flathead and Phillips head, will be essential for removing the existing fixture and securing the new one in place.
- Wire Strippers: These will be used to strip the insulation from the electrical wires, allowing for proper connections.
- Voltage Tester: A voltage tester is crucial for ensuring that the power is indeed turned off before beginning any work on the electrical connections.
- Ladder or Step Stool: Depending on the height of the ceiling, a stable and secure ladder or step stool will be necessary to reach the installation area safely.
- Pliers: Having a pair of pliers on hand will aid in twisting and securing wire connections.
- Utility Knife: This tool will come in handy for cutting and stripping wire insulation.
- Adjustable Wrench: An adjustable wrench will be useful for securing the mounting bracket in place.
Materials:
- Ceiling Light Fixture: Ensure you have the new ceiling light fixture ready for installation, including any accompanying hardware and components.
- Mounting Bracket and Screws: If the new fixture requires a mounting bracket, make sure it is included and ready for installation.
- Wire Nuts: These will be used to secure the electrical connections between the fixture wires and the house wiring.
- Electrical Tape: Electrical tape will help insulate and secure wire connections.
- Wire Connectors: These connectors will be used to join the wires securely and prevent any loose connections.
- Safety Glasses: It's crucial to prioritize safety, so having protective eyewear is essential when working with electrical components.
- Owner's Manual: If the ceiling light fixture comes with an owner's manual, keep it accessible for reference throughout the installation process.
By ensuring that you have all the necessary tools and materials gathered before starting the installation, you'll be well-prepared to proceed with confidence and efficiency. This proactive approach will contribute to a successful and safe ceiling light attachment process.
Step 2: Turn Off Power
Before beginning any work on the ceiling light installation, it is absolutely crucial to ensure that the power to the existing fixture is completely turned off. This step is paramount for your safety and the integrity of the electrical components. Here's a detailed guide on how to safely turn off the power:
-
Locate the Circuit Breaker: The first step is to locate the circuit breaker panel in your home. This panel is typically located in the basement, utility room, or garage. Once you've located the panel, open the door to reveal the circuit breakers inside.
-
Identify the Correct Breaker: With the help of a flashlight, carefully scan the breakers to identify the one that controls the power supply to the area where the ceiling light is located. Most circuit breakers are labeled to indicate which areas or fixtures they control. Look for a label that corresponds to the room or area where the ceiling light is installed.
-
Switch Off the Breaker: Once you've identified the correct breaker, firmly switch it to the "off" position. You may hear a click as the breaker shuts off the power supply to the designated area. To ensure that the power is indeed turned off, use a voltage tester to check the wires in the existing fixture. If the tester does not detect any voltage, it is safe to proceed with the installation.
-
Double-Check the Power: For added safety, it's advisable to double-check that the power is truly off before proceeding with any work. You can do this by attempting to turn on the light switch associated with the fixture. If the power is off, the switch should not activate the light.
By diligently following these steps to turn off the power, you are taking a crucial safety measure that will protect you from the risk of electrical shock or injury. Always proceed with caution and never assume that the power is off without verifying it with a voltage tester. This proactive approach ensures a safe working environment as you move forward with the ceiling light installation process.
Read more: How To Attach A Chandelier To The Ceiling
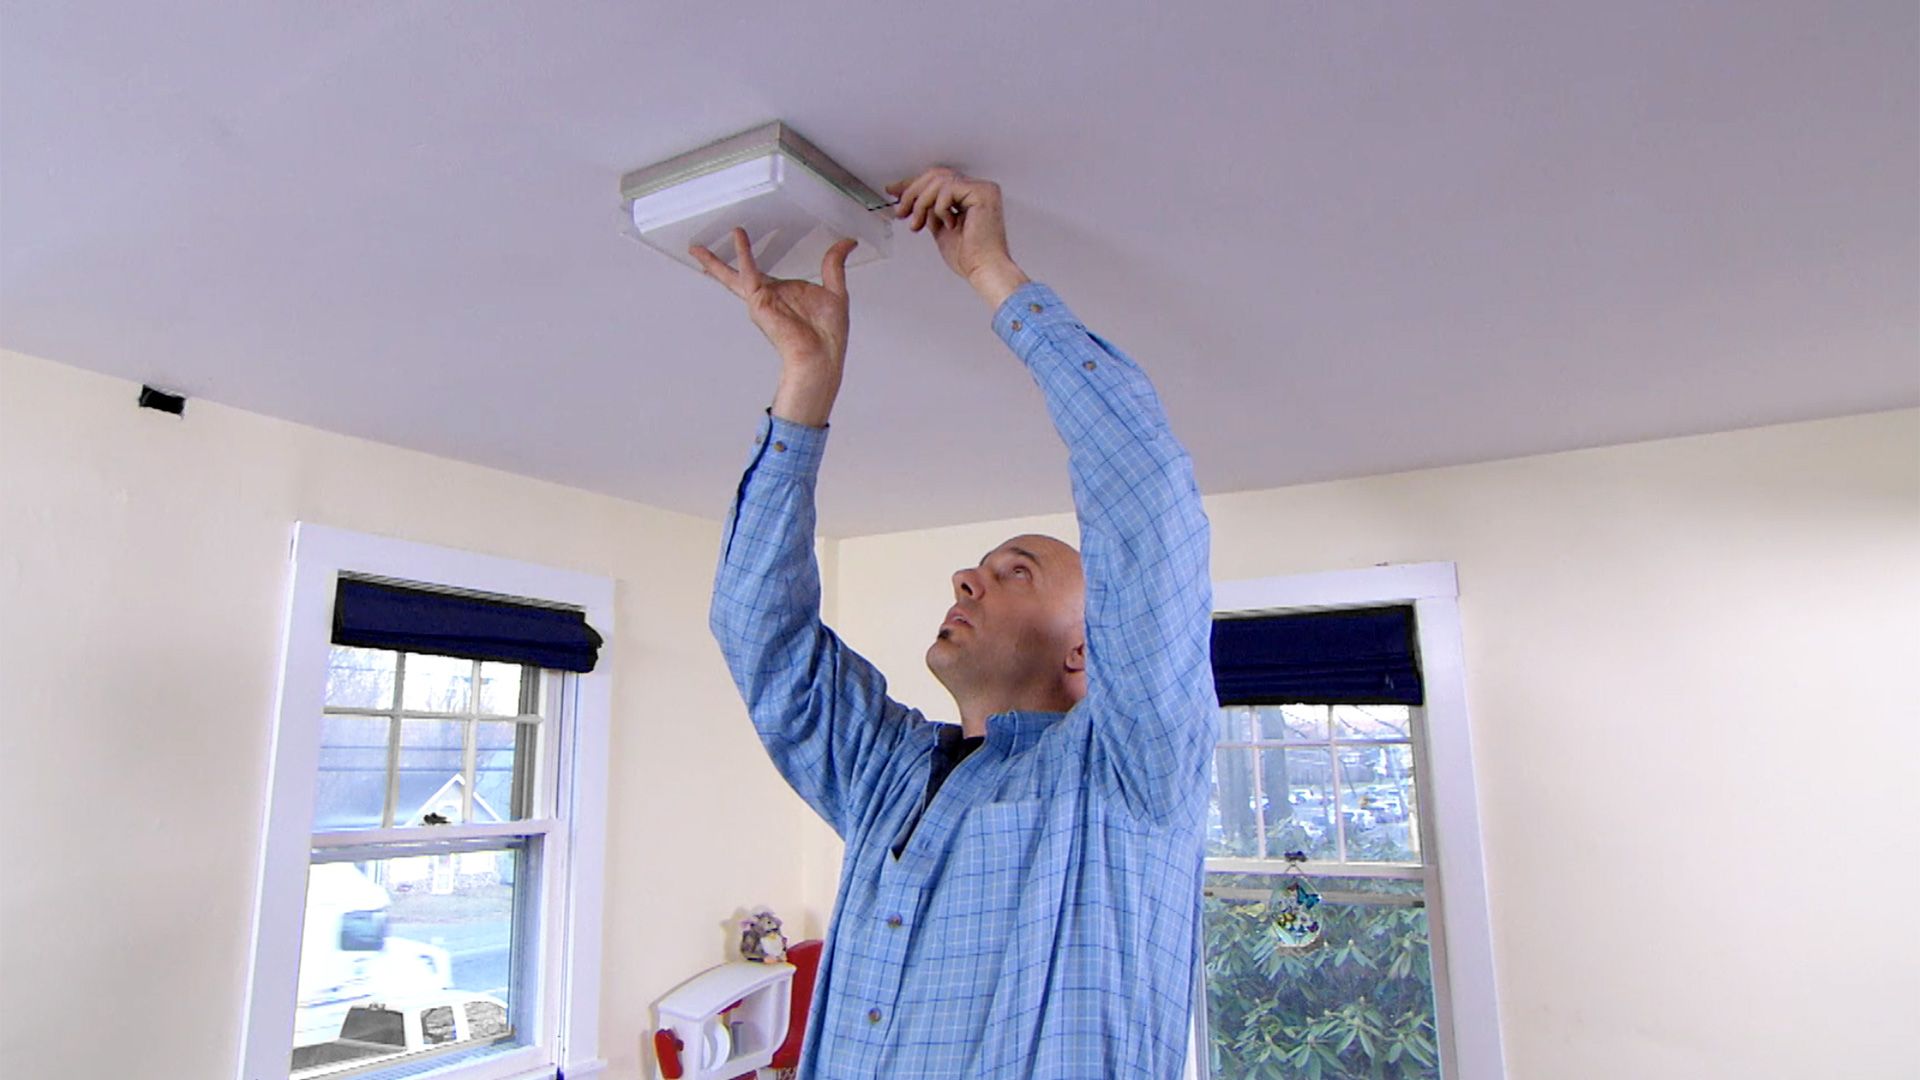
Step 3: Remove Existing Fixture
Removing the existing ceiling light fixture is a crucial step in the process of attaching a new one. This phase requires careful attention to detail and a methodical approach to ensure a smooth transition to the installation of the new fixture. Here's a detailed guide on how to effectively remove the existing fixture:
-
Prepare the Workspace: Before starting the removal process, it's essential to create a clear and unobstructed workspace. Remove any furniture or objects from the area beneath the fixture to ensure a safe and uncluttered environment for the task at hand.
-
Detach the Fixture Cover: Most ceiling light fixtures are equipped with a cover or canopy that conceals the electrical components and mounting hardware. Using a screwdriver, carefully remove the screws securing the cover in place. Once the screws are removed, gently lower the cover to expose the wiring and mounting bracket.
-
Disconnect the Wiring: With the cover removed, you'll have access to the electrical wiring connecting the fixture to the house wiring. Before proceeding, it's crucial to ensure that the power is still turned off by using a voltage tester to check for any live wires. Once confirmed, carefully disconnect the wires by unscrewing the wire nuts and separating the fixture wires from the house wiring.
-
Remove the Mounting Bracket: In some cases, the existing fixture may be secured to a mounting bracket attached to the ceiling junction box. Using a screwdriver, loosen and remove any screws or fasteners securing the mounting bracket to the junction box. Once detached, carefully lower the fixture from the ceiling and set it aside.
-
Inspect the Wiring and Junction Box: With the fixture removed, take a moment to inspect the exposed wiring and the junction box. Ensure that the wires are in good condition and that there are no signs of damage or wear. Additionally, check the junction box for stability and proper mounting.
By following these detailed steps to remove the existing ceiling light fixture, you are setting the stage for a successful transition to the installation of the new fixture. This careful and methodical approach ensures that the workspace is prepared, the wiring is safely disconnected, and the existing fixture is removed without any complications. With the old fixture out of the way, you're now ready to proceed to the next phase of the installation process.
Step 4: Install Mounting Bracket
With the existing fixture removed, the next critical step in attaching a ceiling light is to install the mounting bracket. The mounting bracket serves as the anchor point for securing the new light fixture to the ceiling, providing stability and support. Here's a detailed guide on how to effectively install the mounting bracket:
-
Assess the Junction Box: Begin by examining the junction box in the ceiling where the new fixture will be installed. Ensure that the junction box is securely mounted to the ceiling structure and can support the weight of the new fixture. If the existing junction box is not suitable or stable, it may be necessary to install a new one that meets the required specifications.
-
Position the Mounting Bracket: If the new fixture requires a mounting bracket, carefully position it over the junction box, aligning the screw holes in the bracket with the openings in the junction box. The bracket should sit flush against the ceiling, providing a solid foundation for the fixture.
-
Secure the Mounting Bracket: Using the provided screws or fasteners, secure the mounting bracket to the junction box. Ensure that the screws are tightened firmly to hold the bracket in place securely. It's essential to verify that the bracket is level and stable before proceeding to the next step.
-
Double-Check Stability: Once the mounting bracket is installed, give it a gentle shake to confirm that it is securely fastened and does not wobble. A stable and properly installed mounting bracket is crucial for the safe and secure attachment of the new ceiling light fixture.
By following these steps to install the mounting bracket, you are laying the foundation for a successful and stable attachment of the new ceiling light fixture. The careful positioning and secure fastening of the bracket ensure that the fixture will be safely supported and aligned with the ceiling. With the mounting bracket in place, you're now ready to proceed to the next phase of the installation process, bringing you one step closer to illuminating your space with a stunning new ceiling light.
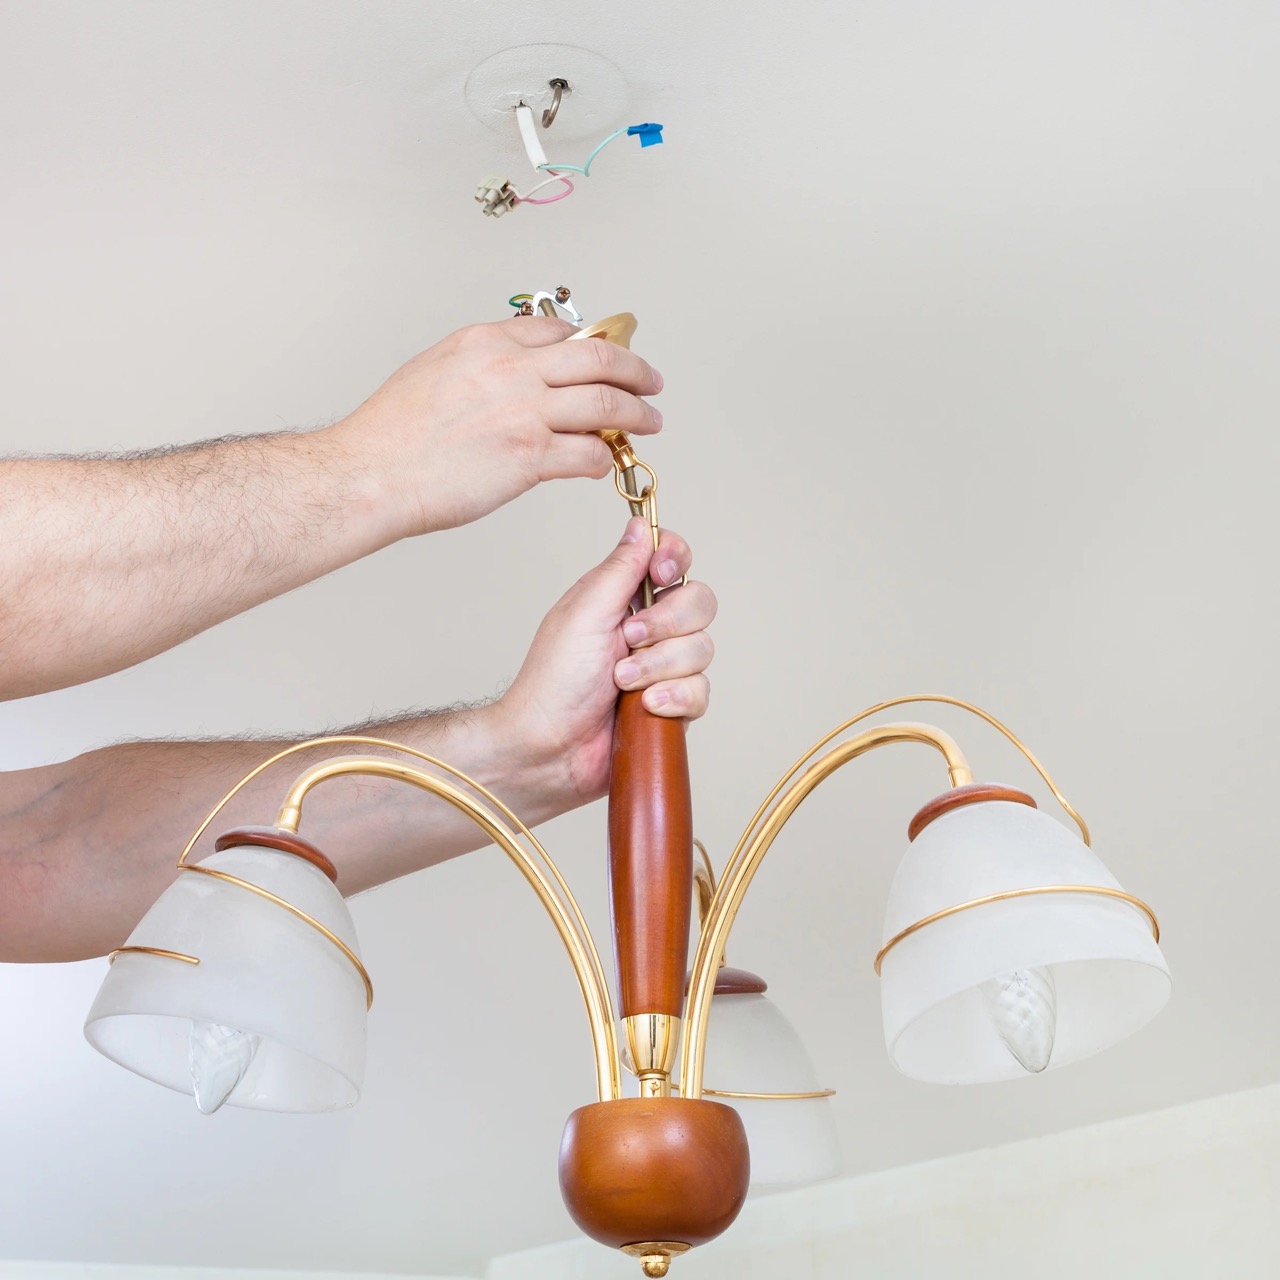
Step 5: Connect Wires
Connecting the wires is a pivotal step in the process of attaching a ceiling light, as it establishes the electrical connection between the fixture and the house wiring. Properly connecting the wires is essential for ensuring the functionality and safety of the new light fixture. Here's a detailed guide on how to effectively connect the wires:
-
Prepare the Wires: Begin by preparing the wires for connection. If the new fixture comes with exposed wires, carefully strip off a small amount of insulation from the ends of the fixture wires using wire strippers. This will expose the conductive metal for proper connection. Additionally, if the house wiring has insulation that is frayed or damaged, it's crucial to trim the damaged portion to reveal clean, undamaged wire.
-
Match the Wires: Identify the corresponding wires from the fixture and the house wiring. Typically, these wires are color-coded for easy identification. Match the black or red wire from the fixture to the black or red house wire (which represents the live or "hot" wire), and connect them by twisting the exposed ends together in a clockwise direction.
-
Secure with Wire Nut: Once the wires are twisted together, place a wire nut over the twisted connection and twist it in a clockwise direction until it is firmly secured. The wire nut serves to insulate the connection and prevent any exposed wires, ensuring a safe and reliable electrical joint.
-
Connect the Neutral Wires: In most cases, the white wires from the fixture and the house wiring represent the neutral connection. Similarly, twist the exposed ends of the white wires together and secure them with a wire nut. This connection completes the circuit and provides the return path for the electrical current.
-
Grounding Wire Connection: If the fixture includes a grounding wire (usually green or bare copper), it must be connected to the grounding wire in the house wiring. Twist the grounding wires together and secure them with a wire nut. Proper grounding is essential for safety, providing a path for electrical fault currents to prevent the risk of electric shock.
-
Insulate the Connections: After all the wire connections are made, it's crucial to insulate each connection with electrical tape. Wrapping the exposed wire nuts and connections with electrical tape provides an additional layer of insulation and ensures that the connections remain secure.
By following these detailed steps to connect the wires, you are establishing the essential electrical connections that power the new ceiling light fixture. Ensuring secure and properly insulated connections is crucial for the safe and reliable operation of the fixture. With the wires connected and insulated, you're now ready to proceed to the next phase of the installation process, bringing you one step closer to enjoying the illumination of your newly attached ceiling light.
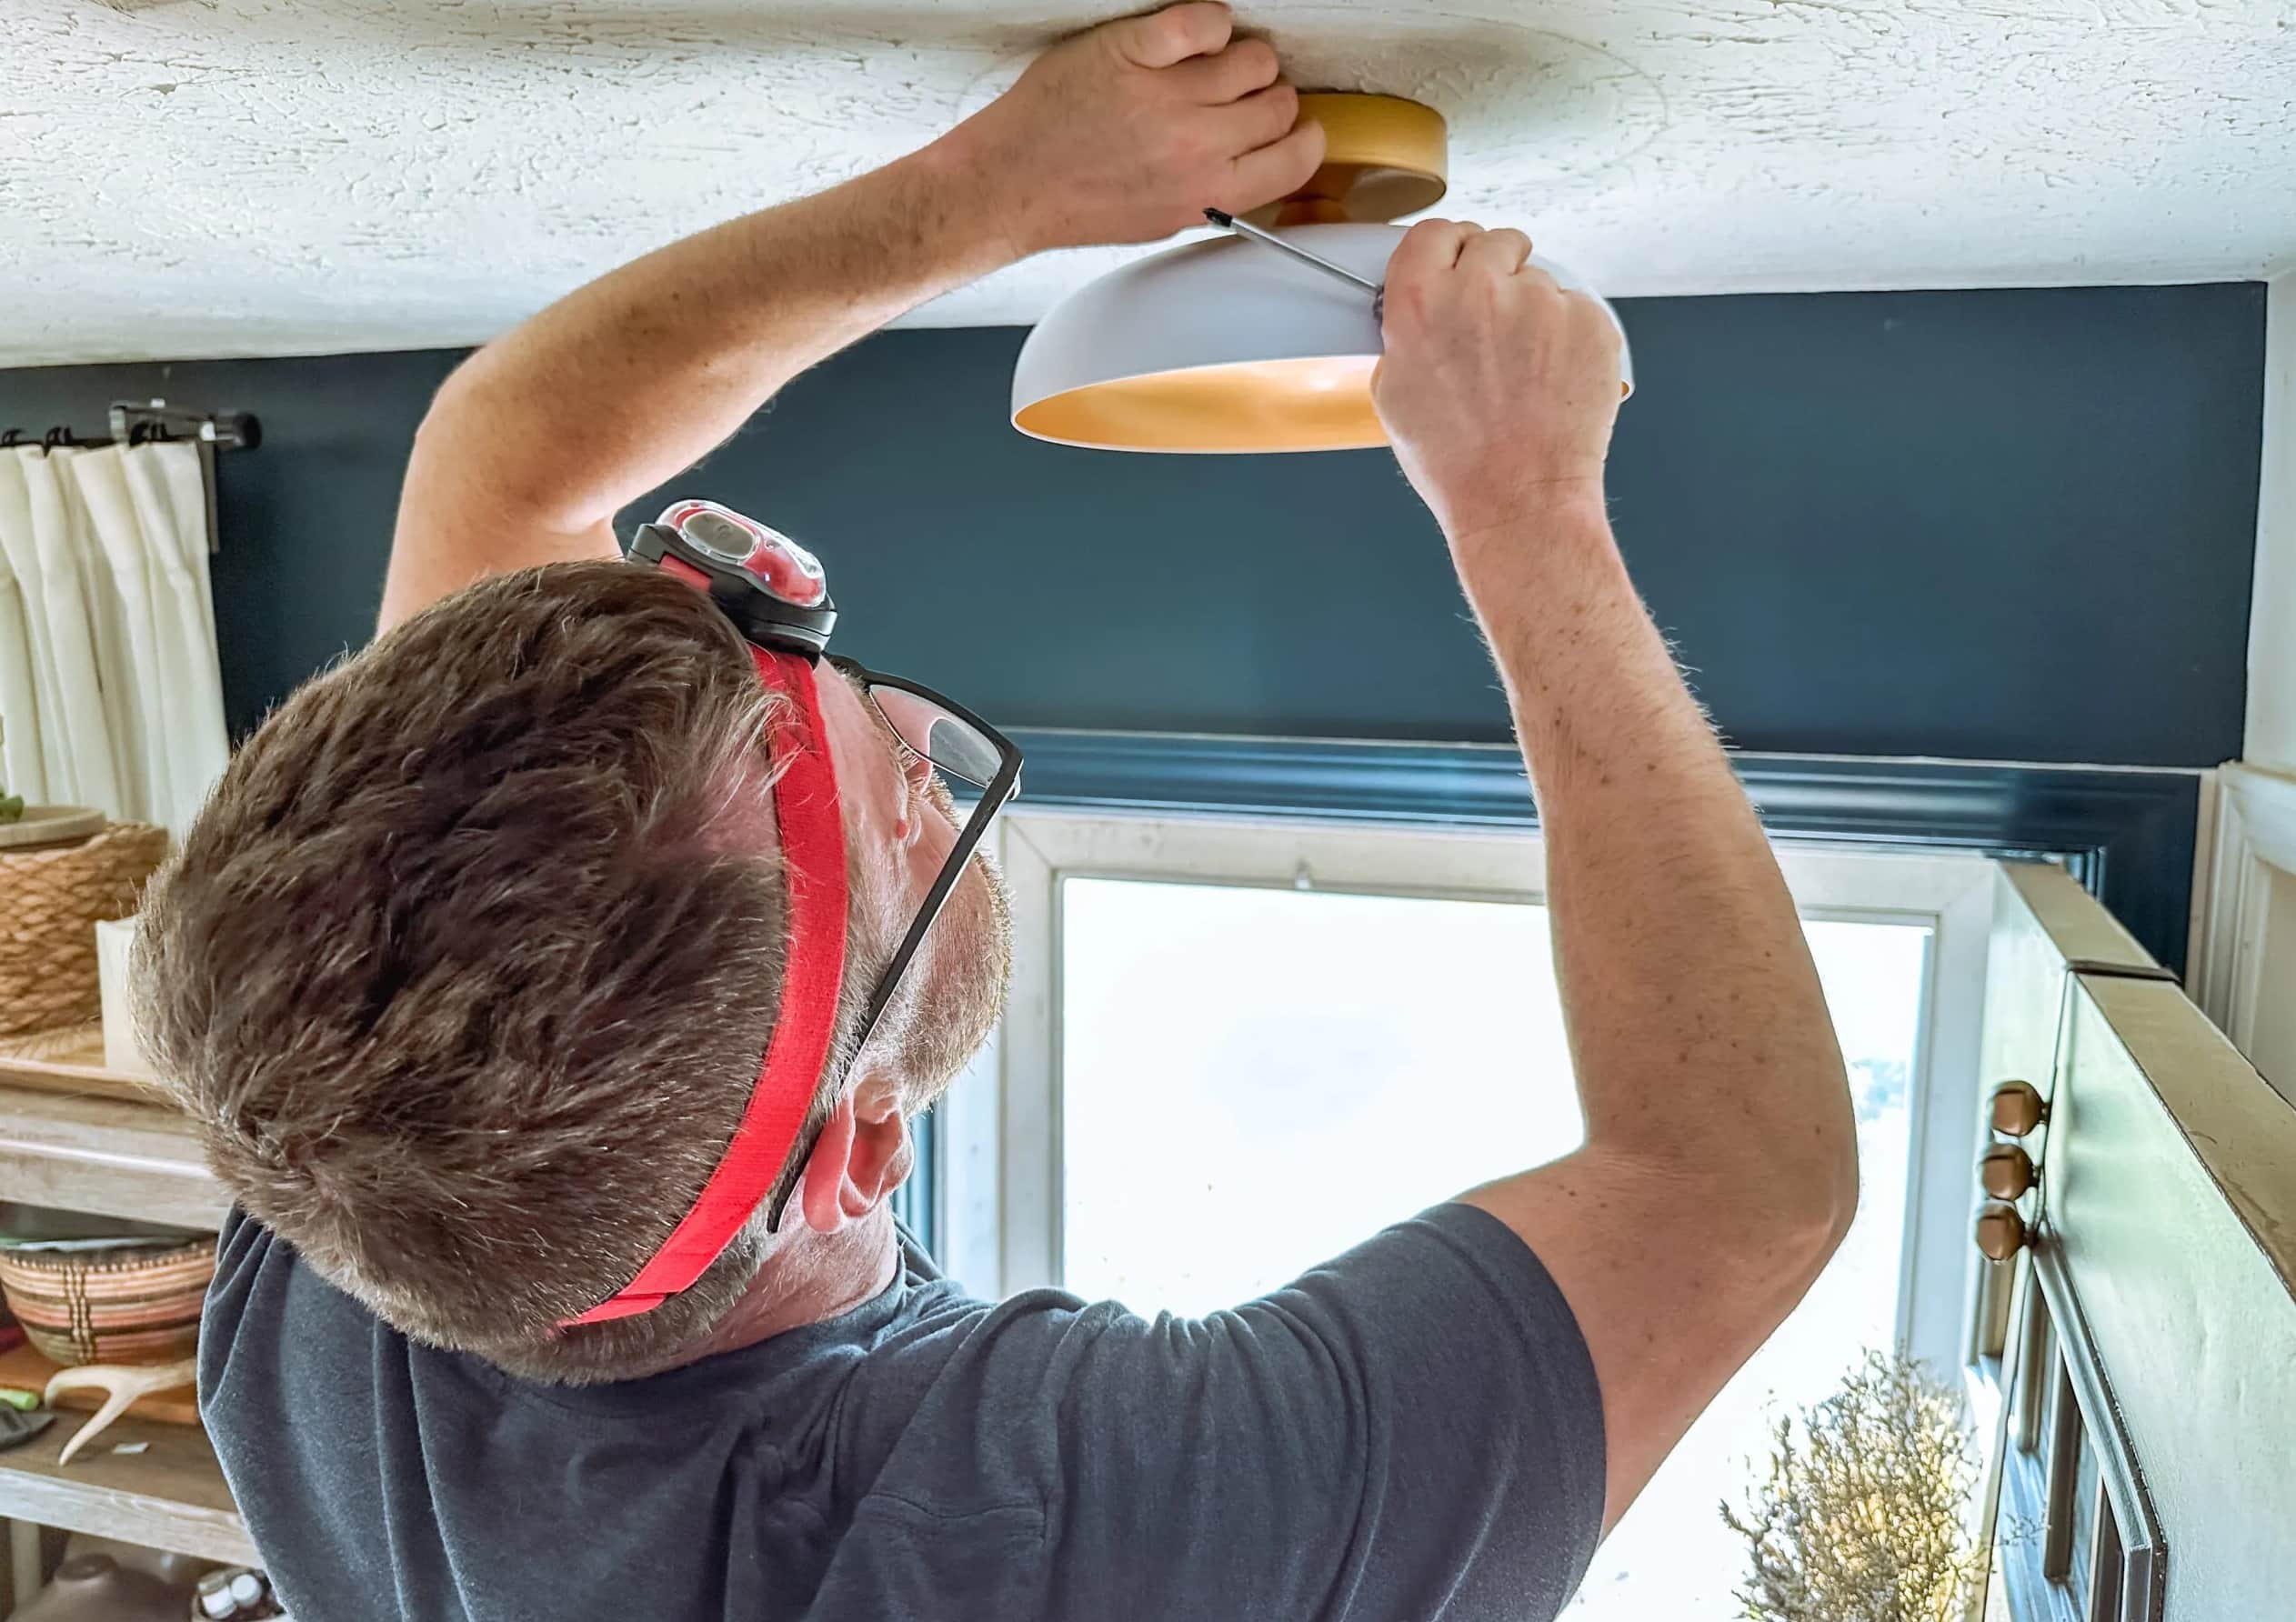
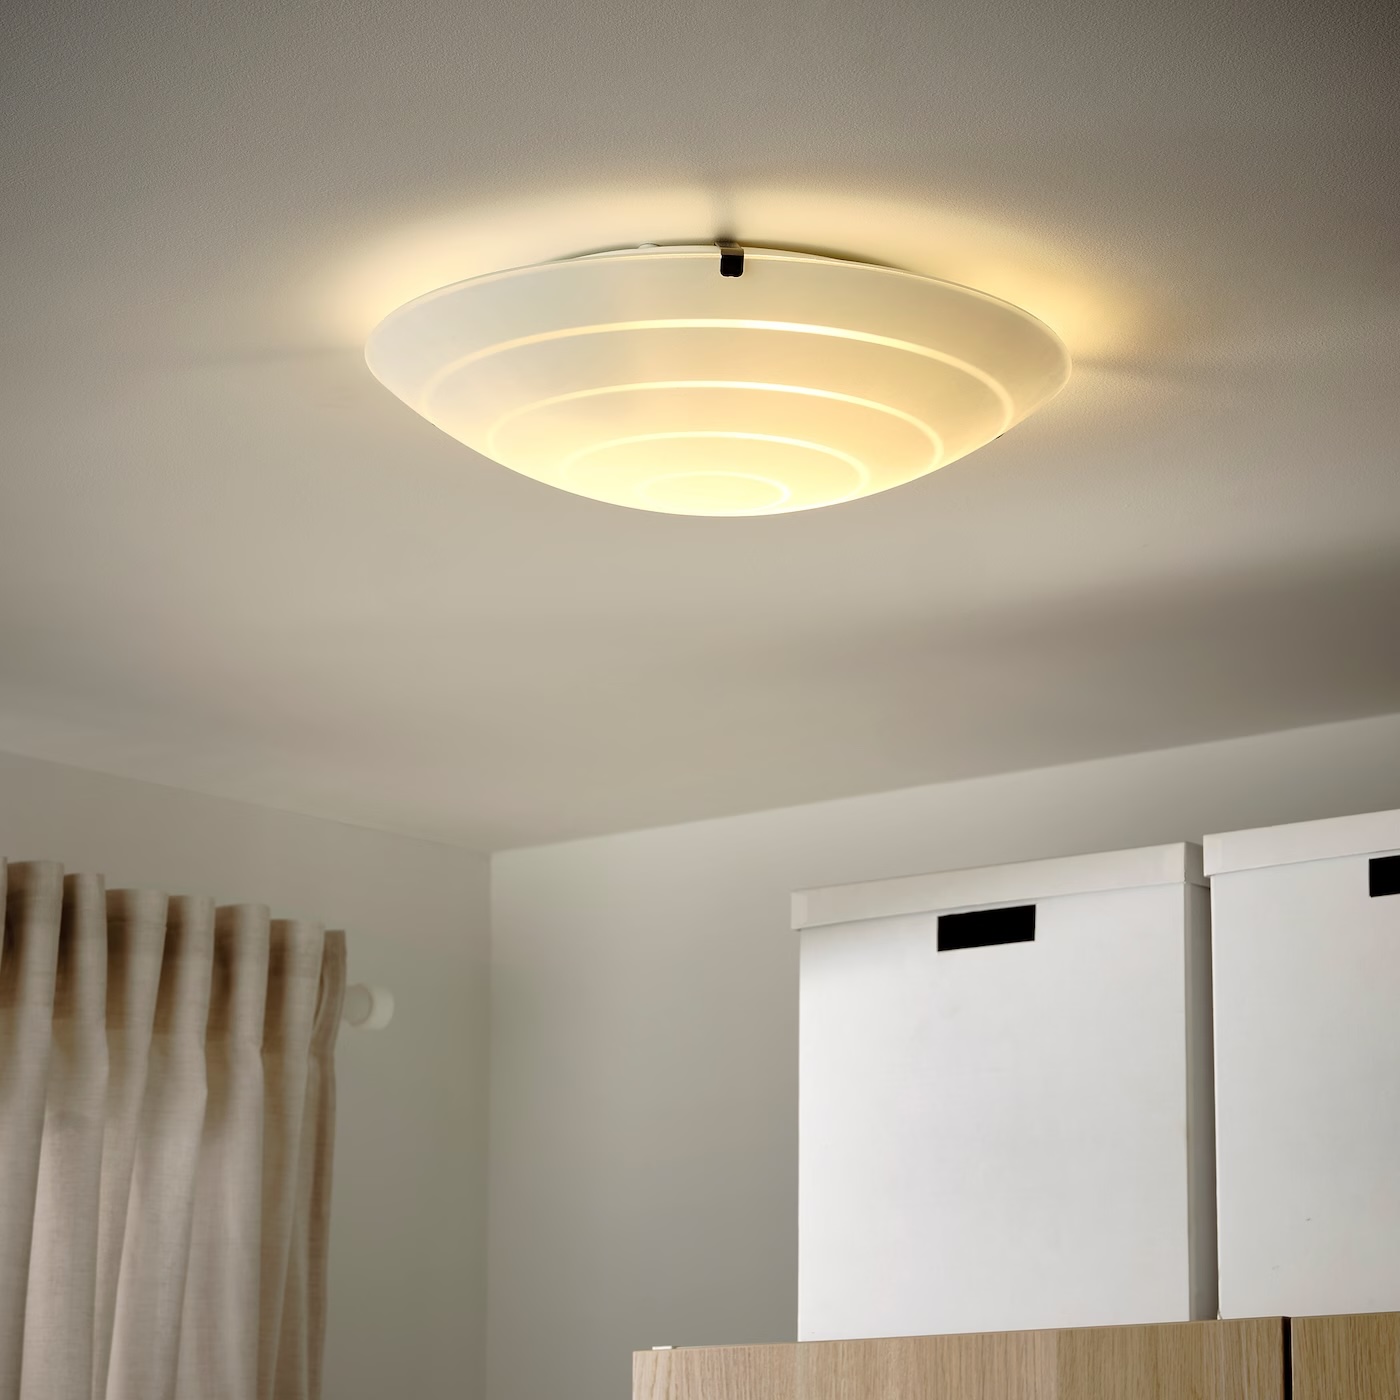
Step 6: Attach Light Fixture
With the mounting bracket securely in place and the wires properly connected, the next pivotal step in the process of attaching a ceiling light is to affix the light fixture to the mounting bracket. This phase brings the installation one step closer to completion, as the fixture is positioned and secured to illuminate the space. Here's a detailed guide on how to effectively attach the light fixture:
-
Position the Fixture: Carefully lift the light fixture and align it with the mounting bracket. Ensure that the fixture is positioned evenly and aligns with any screw holes or fastening points on the bracket. Take a moment to verify that the fixture is level and sits flush against the ceiling for a polished and professional appearance.
-
Secure the Fixture: Once the fixture is properly positioned, use the provided screws or fasteners to secure it to the mounting bracket. Depending on the design of the fixture, there may be multiple attachment points that require securing. Use a screwdriver to tighten the screws, ensuring that the fixture is firmly anchored to the bracket and does not wobble or shift.
-
Attach the Cover or Canopy: If the light fixture includes a cover or canopy, carefully position it over the fixture to conceal the electrical components and mounting hardware. Secure the cover in place using the provided screws, ensuring that it sits snugly against the fixture. This step adds a finishing touch to the installation, creating a seamless and polished look for the ceiling light.
-
Double-Check Stability: Once the fixture and cover are in place, give the fixture a gentle shake to confirm that it is securely fastened and does not exhibit any movement. Ensuring that the fixture is stable and firmly attached to the mounting bracket is essential for safety and longevity.
By following these detailed steps to attach the light fixture, you are bringing the installation to its final stages, positioning the fixture for optimal illumination and visual impact. The careful positioning and secure attachment of the fixture ensure that it will provide reliable and stylish lighting for the space. With the light fixture in place, you're now ready to proceed to the final phase of the installation process, bringing you one step closer to enjoying the enhanced ambiance and functionality of your newly attached ceiling light.
Make sure to turn off the power to the light fixture before starting. Use a voltage tester to double-check. Follow the manufacturer’s instructions for attaching the light to the ceiling, and always use the appropriate tools and materials for the job.
Read more: How To Move Ceiling Light
Step 7: Secure and Test
With the light fixture securely attached and the wiring connections completed, the final step in attaching a ceiling light is to ensure that the fixture is properly secured and to conduct thorough testing to verify its functionality. This critical phase ensures that the installation is safe, reliable, and ready to illuminate the space. Here's a detailed guide on how to effectively secure and test the newly attached ceiling light:
Secure the Fixture and Wiring
-
Tighten Fasteners: Take a moment to inspect the light fixture and verify that all screws and fasteners are securely tightened. This includes the screws that secure the fixture to the mounting bracket and any additional fasteners that contribute to the stability of the fixture. Ensuring that all components are firmly fastened reduces the risk of any potential hazards due to loose parts.
-
Check Wiring Connections: Carefully examine the wiring connections to confirm that they are properly secured and insulated. Verify that the wire nuts are tightened and that the exposed wires are adequately covered with electrical tape. Additionally, ensure that there are no exposed wires or loose connections that could pose a safety risk.
-
Stabilize the Fixture: If the fixture exhibits any wobbling or instability, take the necessary steps to stabilize it. This may involve adjusting the positioning of the fixture or tightening the attachment points to the mounting bracket. A stable and secure fixture is essential for safe and reliable operation.
Test the Functionality
-
Turn On the Power: With the fixture securely attached and the wiring connections verified, it's time to restore power to the fixture. Return to the circuit breaker panel and switch the breaker associated with the ceiling light back to the "on" position. This will supply power to the newly attached fixture, allowing for testing.
-
Operate the Light Switch: Once the power is restored, test the functionality of the ceiling light by operating the light switch associated with the fixture. Verify that the light turns on and off as expected, indicating that the electrical connections are functioning properly. Additionally, observe the stability of the fixture during operation to ensure that it remains secure.
-
Check for Proper Illumination: Assess the quality and brightness of the light emitted by the fixture. Ensure that the illumination is uniform and free from flickering or dimming. If the fixture includes adjustable settings, such as dimmer switches or multiple lighting modes, test each setting to confirm its functionality.
-
Inspect for Any Issues: Take a moment to inspect the fixture and its surroundings for any signs of abnormal operation or potential issues. This includes checking for unusual sounds, excessive heat emission, or any visible defects in the fixture's performance. Address any anomalies promptly to ensure the fixture's safe and reliable operation.
By diligently securing the fixture and conducting thorough testing, you are ensuring that the newly attached ceiling light is safe, functional, and ready to enhance the ambiance of the space. This final phase of the installation process brings the project to its completion, providing you with the assurance of a successful and reliable ceiling light attachment.
Conclusion
Congratulations on successfully attaching your new ceiling light fixture! By following the comprehensive steps outlined in this guide, you have not only enhanced the illumination of your space but also gained valuable insights into the process of installing a ceiling light. As you conclude this project, it's essential to reflect on the journey and celebrate the achievement of a safe and stylish lighting upgrade.
The process began with gathering the necessary tools and materials, setting the stage for a well-prepared and efficient installation. Turning off the power and removing the existing fixture demonstrated a commitment to safety and meticulous attention to detail. Installing the mounting bracket and connecting the wires showcased your technical proficiency and dedication to establishing a reliable electrical connection.
Attaching the light fixture and conducting thorough testing marked the culmination of your efforts, resulting in a beautifully illuminated space that reflects your commitment to quality and craftsmanship. As you admire the newly attached ceiling light, take pride in the knowledge and skills you've acquired throughout this project.
Beyond the tangible outcome of a stunning new fixture, this experience has empowered you with the confidence to tackle future DIY projects and the satisfaction of transforming your living space with your own hands. The sense of accomplishment that comes with successfully completing a home improvement task is invaluable and serves as a testament to your resourcefulness and determination.
As you bask in the warm glow of your newly attached ceiling light, remember the journey that led to this moment. From the initial preparation to the final testing, each step contributed to the overall success of the installation. Embrace the newfound ambiance and functionality that the ceiling light brings to your space, and let it serve as a reminder of your ability to take on and conquer new challenges.
With the completion of this project, you've not only illuminated your home but also illuminated your own capabilities. As you enjoy the enhanced atmosphere created by your new ceiling light, carry forward the knowledge and confidence gained from this experience, knowing that you have the skills to continue brightening your surroundings and embracing the rewards of DIY home improvement.
Frequently Asked Questions about How To Attach A Ceiling Light
Was this page helpful?
At Storables.com, we guarantee accurate and reliable information. Our content, validated by Expert Board Contributors, is crafted following stringent Editorial Policies. We're committed to providing you with well-researched, expert-backed insights for all your informational needs.


0 thoughts on “How To Attach A Ceiling Light”