Home>Home Security and Surveillance>How To Install Wireless Security Cameras Easily
Home Security and Surveillance
How To Install Wireless Security Cameras Easily
Modified: March 21, 2024
Learn how to easily install wireless security cameras for your home. Increase your home security and surveillance with our step-by-step guide.
(Many of the links in this article redirect to a specific reviewed product. Your purchase of these products through affiliate links helps to generate commission for Storables.com, at no extra cost. Learn more)
Introduction
Welcome to the world of home surveillance and security! In today’s rapidly evolving and interconnected world, protecting our homes and loved ones has become a top priority. Wireless security cameras have emerged as a popular and convenient option, providing an effective way to monitor our surroundings and deter potential threats. Whether you want to keep an eye on your property, check in on your kids or pets, or simply have peace of mind, installing wireless security cameras can offer you the peace of mind you deserve.
In this comprehensive guide, we will walk you through the step-by-step process of installing wireless security cameras in your home. We’ll cover everything from choosing the right camera system and gathering the necessary materials, to setting up and configuring your cameras for optimal performance. By the end of this article, you’ll have the knowledge and confidence to install your own wireless security camera system with ease.
Before we dive into the installation process, let’s take a moment to understand the benefits of wireless security cameras and the key factors to consider when choosing the right system for your needs.
Key Takeaways:
- Installing wireless security cameras involves choosing the right camera, gathering materials, setting up the system, installing the cameras, and connecting them to the network. It’s important to adjust, test, and monitor the cameras for optimal performance.
- By carefully selecting the right wireless security cameras, setting them up properly, and actively monitoring and managing the system, you can ensure the safety and security of your home and loved ones. Remember, security is an ongoing process!
Read more: How To Install A Wireless Security Cameras
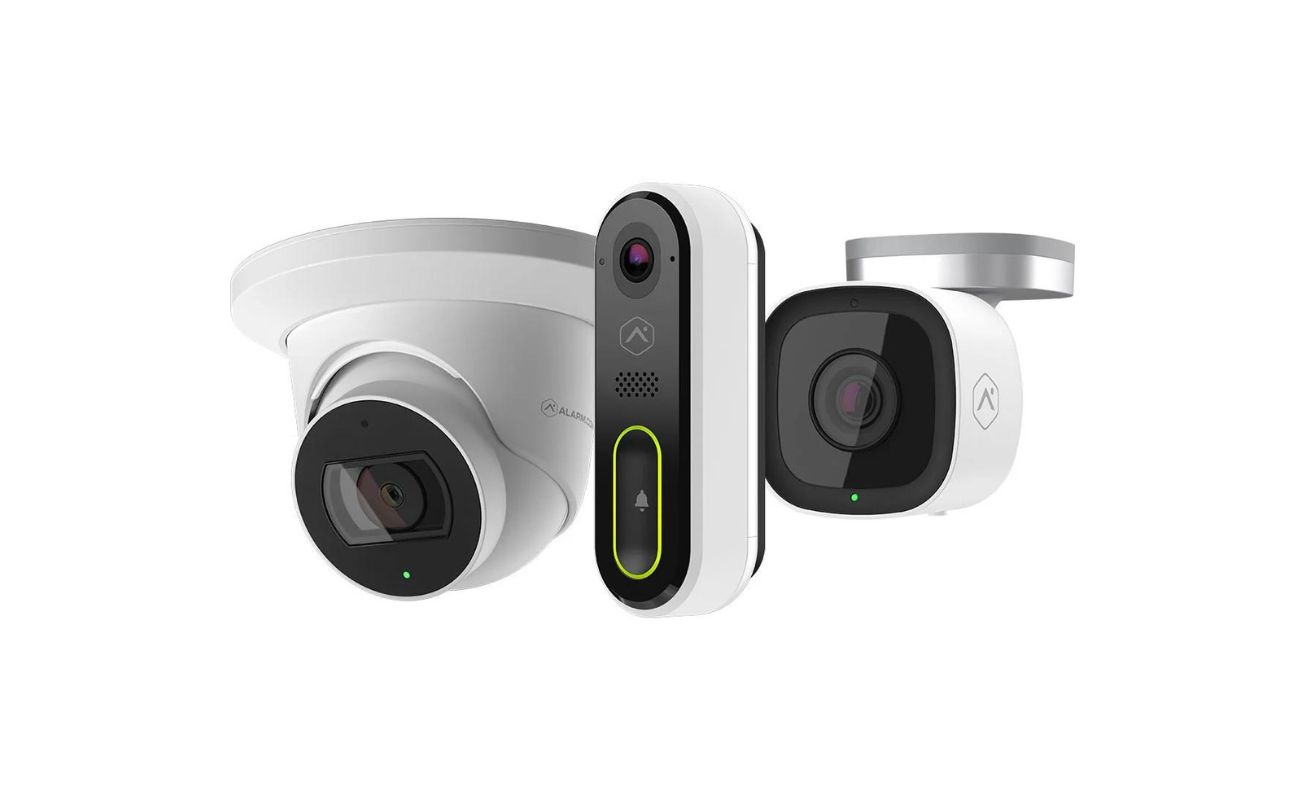
Step 1: Choosing the Right Wireless Security Camera
When it comes to selecting a wireless security camera, there are several factors to consider to ensure you choose the right one for your specific needs. Here are some key considerations to keep in mind:
- Indoor or Outdoor: Determine whether you need cameras for indoor monitoring, outdoor surveillance, or both. Outdoor cameras need to be weatherproof and able to withstand the elements.
- Resolution: The resolution of the camera determines the clarity of the images and videos. Higher resolutions, such as 1080p or 4K, provide sharper details.
- Field of View: The field of view refers to the area that the camera can capture. Consider the size of the area you want to monitor and choose a camera with an appropriate field of view.
- Night Vision: If you need to monitor your property at night or in low-light conditions, look for cameras with infrared LEDs or night vision capabilities.
- Motion Detection: Cameras with motion detection can alert you when there is movement detected within the camera’s field of view. This feature helps conserve storage space and allows you to focus on important events.
- Two-Way Audio: Some cameras come with built-in microphones and speakers, allowing you to listen and communicate with people within the camera’s vicinity.
- Wireless Range: Consider the range at which the camera can connect to your Wi-Fi network. Ensure that the camera’s wireless range is sufficient to cover the area you want to monitor.
- Cloud Storage or Local Storage: Decide whether you want to store your footage in the cloud or locally. Cloud storage offers convenience and accessibility, while local storage provides greater control over your data.
- Budget: Set a budget for your camera system and look for options that fit within your price range. Keep in mind that higher-priced cameras often come with advanced features and better build quality.
Take your time to research and compare different wireless security cameras available in the market. Read reviews, check specifications, and consider your specific requirements. Once you have a clear understanding of what you need, you can move on to the next step: gathering the required materials.
Step 2: Gathering the Required Materials
Before you begin the installation process, it’s important to gather all the necessary materials to ensure a smooth and successful setup of your wireless security camera system. Here are the key materials you’ll need:
- Wireless Security Cameras: Purchase the number of wireless security cameras you need to cover the desired areas of your home. Make sure they are compatible with your chosen camera system.
- Power Cables and Adapters: Each camera will require a power source. Check whether the cameras come with power cables and adapters or if you need to purchase them separately.
- Mounting Hardware: Depending on your preference, you may need mounting brackets, screws, and anchors to securely install the cameras. Ensure the mounting hardware is suitable for both indoor and outdoor installations.
- Network Video Recorder (NVR) or Digital Video Recorder (DVR): This is the central hub where the footage from your cameras will be stored. Make sure you have a compatible NVR or DVR with sufficient storage capacity.
- Hard Drive: If your NVR or DVR doesn’t come with a built-in hard drive, you’ll need to purchase one separately. Make sure it meets the storage requirements for your camera system.
- Monitor or Display: You’ll need a monitor or display to connect to your NVR or DVR, allowing you to view the live feed and recorded footage from your cameras.
- Network Router: A stable and reliable network connection is crucial for your wireless security camera system to function properly. Ensure you have a network router that supports the required bandwidth and provides sufficient coverage.
- Ethernet Cables: These cables will be used to connect your cameras to the NVR or DVR and provide a stable network connection. Make sure you have enough Ethernet cables of the appropriate length.
- Smartphone or Computer: To configure and manage your wireless security camera system, you’ll need a smartphone or computer with internet access.
Double-check the compatibility of the cameras, NVR or DVR, and other components to avoid any compatibility issues during the installation process. Once you have gathered all the required materials, you’re ready to move on to the next step: setting up the camera system.
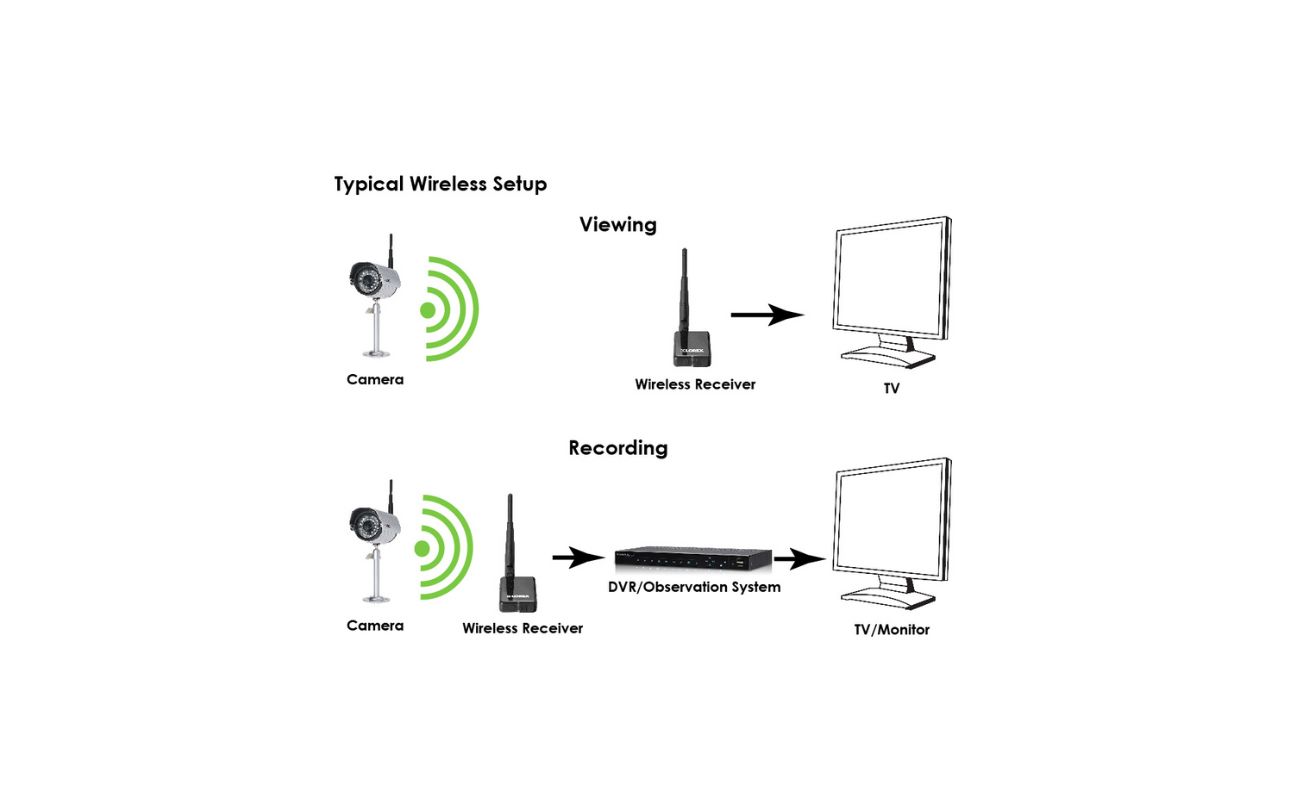
Step 3: Setting Up the Camera System
Now that you have all the materials you need, it’s time to start setting up your wireless security camera system. Follow these steps to ensure a proper and efficient setup:
- Find the Ideal Camera Placement: Before mounting the cameras, carefully consider their placement for optimal coverage. Identify high-risk areas, entry points, and blind spots, and position the cameras accordingly.
- Mount the Cameras: Use the mounting hardware provided or purchased separately to securely install the cameras. Ensure they are placed at the desired angles and heights for optimal viewing and coverage.
- Connect the Cameras to Power: Plug the power cables of the cameras into a power source or use the adapters as needed. Make sure the cameras receive a stable power supply.
- Connect the NVR or DVR to Power: Plug the power cable of the NVR or DVR into a power outlet near your chosen location. Ensure it is easily accessible and provides a stable power source.
- Connect the NVR or DVR to the Monitor: Use an HDMI or VGA cable to connect the NVR or DVR to the monitor or display. Follow the manufacturer’s instructions for the proper connection.
- Connect the NVR or DVR to the Network Router: Use an Ethernet cable to connect the NVR or DVR to your network router. This allows the cameras to communicate with the NVR or DVR and access the network.
- Power on the Cameras, NVR or DVR, and Monitor: Turn on the power for the cameras, NVR or DVR, and monitor. Wait for the devices to power up and initialize.
- Configure the Cameras: Follow the manufacturer’s instructions to access the camera’s settings interface. Configure basic settings such as time and date, resolution, and motion detection as per your preferences.
- Pair the Cameras with the NVR or DVR: Depending on the camera system you have, you may need to pair the cameras with the NVR or DVR. Follow the manufacturer’s instructions to establish the connection.
Following these steps will ensure that your wireless security camera system is properly set up and ready for use. In the next step, we will focus on installing the wireless security cameras in the desired locations.
Step 4: Installing the Wireless Security Cameras
With your camera system set up and running, it’s time to install the wireless security cameras in their designated locations. Follow these steps to ensure a successful installation:
- Prepare the Mounting Location: Clean the area where you will be mounting the cameras, ensuring there is no dust, debris, or obstruction that may affect the camera’s field of view.
- Position the Camera: Mount the camera using the appropriate mounting hardware, ensuring it is securely fastened. Adjust the angle and direction of the camera to achieve the desired field of view.
- Secure the Cable: Once the camera is mounted, carefully route the power cable along the wall or ceiling to keep it hidden and secure. Use cable clips or other cable management solutions to prevent any loose wires.
- Connect the Cable to the Camera: Plug the power cable into the camera’s power input jack. Make sure the connection is secure and tight.
- Check the Camera’s View: Power on the camera and check the live feed on your monitor or smartphone app. Adjust the camera’s position if necessary to ensure the desired coverage and image quality.
- Repeat the Process for Other Cameras: Install and position the remaining wireless security cameras following the same process. Make sure each camera is securely mounted and connected to power.
During the installation process, it’s important to keep safety in mind. Use caution when working at heights or in complex mounting situations. If needed, consider seeking professional assistance for installing cameras in hard-to-reach areas.
Once all the wireless security cameras are successfully installed, move on to the next step: adjusting and testing the cameras to ensure optimal performance.
When installing wireless security cameras, make sure to place them in areas with good Wi-Fi signal strength to ensure reliable connectivity. Avoid obstacles like thick walls or large metal objects that can interfere with the signal.
Step 5: Adjusting and Testing the Cameras
After installing the wireless security cameras, it’s crucial to adjust and test them to ensure they are functioning properly and providing the desired coverage. Follow these steps to calibrate and test your cameras:
- Check the Camera Angles: Verify that the camera angles are set correctly to cover the desired areas. Adjust the camera positions if needed to eliminate any blind spots or unnecessary coverage.
- Verify the Image Quality: Monitor the live feed from each camera to ensure the image quality is clear and in focus. Make any necessary adjustments to the camera settings or positioning to optimize image quality.
- Test the Night Vision: If your cameras have night vision capabilities, test them in low-light conditions or at night. Ensure that the night vision mode provides clear visibility and that the infrared LEDs are functioning correctly.
- Test the Motion Detection: Walk or move within the camera’s field of view to check if the motion detection feature is working as expected. Verify that you receive proper notifications or recordings when motion is detected.
- Check the Camera Coverage: Assess the camera coverage to ensure there are no blind spots or areas without proper surveillance. Adjust the camera positions or add additional cameras if needed to provide complete coverage.
- Test the Recording Functionality: Verify that the cameras are successfully recording footage to the NVR or DVR. Check that the recordings are clear, properly timestamped, and easily accessible for playback.
- Review Internet and Mobile Connectivity: Test the remote access and mobile connectivity features to ensure you can view the camera feeds and manage your system from your smartphone or computer. Ensure the network connection is stable and reliable.
By adjusting and testing your wireless security cameras, you can identify and resolve any issues or limitations before relying on them for surveillance and security. This step ensures that your camera system is set up correctly and functioning optimally.
Once you have confirmed that all the cameras are adjusted and tested, it’s time to move on to the next step: connecting the cameras to your network for remote access and monitoring.
Step 6: Connecting the Cameras to the Network
In order to remotely access and monitor your wireless security cameras, it’s essential to connect them to your home network. Follow these steps to establish network connectivity for your cameras:
- Locate the IP Addresses: Access the settings interface of each camera and note down their respective IP addresses. These addresses will be required to connect the cameras to your network.
- Connect the NVR or DVR to the Router: Use an Ethernet cable to connect the NVR or DVR to one of the available LAN ports on your network router. This establishes a physical connection between the camera system and the network.
- Assign Static IP Addresses: Access the router’s settings interface and assign static IP addresses to each camera based on their respective IP addresses. This ensures that the IP addresses of the cameras remain the same even after power cycling or network restarts.
- Configure Port Forwarding: To enable remote access to your cameras, configure port forwarding on your router. Consult the camera system’s documentation or the manufacturer’s website for specific instructions on port forwarding setup.
- Enable Dynamic DNS: If your internet service provider assigns a dynamic IP address to your router, consider setting up Dynamic DNS (DDNS). DDNS allows you to assign a domain name to your router’s IP address, making it easier to access your cameras remotely.
- Test Remote Access: Use a device connected to a different network (such as a smartphone using mobile data) to test remote access to your cameras. Open a web browser or the camera system’s dedicated app and enter the assigned IP address or domain name to access the camera feeds.
Ensure that the network connection is stable and secure, and that you have set up proper authentication and encryption for remote access. Regularly update your camera system’s firmware and password to enhance security.
By connecting your wireless security cameras to your home network, you can easily monitor and manage your cameras from anywhere with an internet connection. This brings us to the next step: configuring the camera settings to suit your specific needs.
Step 7: Configuring the Camera Settings
Once your wireless security cameras are successfully connected to the network, it’s time to configure the camera settings to customize their behavior and optimize their performance. Follow these steps to configure the camera settings:
- Access the Camera Settings Interface: Open a web browser or the camera system’s dedicated app and enter the assigned IP address or domain name to access the camera’s settings interface. Log in using the appropriate credentials.
- Adjust Image and Video Settings: Fine-tune the image and video settings to suit your preferences. Adjust parameters such as brightness, contrast, saturation, and sharpness to achieve the desired image quality.
- Set Up Motion Detection: Enable and configure the motion detection feature to receive alerts or trigger recordings when motion is detected within the camera’s field of view. Adjust sensitivity and define specific areas of interest.
- Configure Recording Settings: Set up recording preferences, such as continuous recording or scheduled recording, based on your monitoring needs. Define the resolution, frame rate, and compression type for the recorded footage.
- Enable Two-Way Audio: If your cameras support two-way audio, configure the audio settings. Adjust the volume, enable noise reduction, and select the desired audio input and output options.
- Enable Night Vision Settings: Configure the night vision settings to enhance visibility in low-light conditions. Adjust parameters such as infrared sensitivity and the activation of supplemental lighting, if available.
- Set Up Privacy Masking: If you want to protect certain areas from being recorded or viewed, use privacy masking. Define specific areas within the camera’s field of view to be obscured or masked out.
- Configure Network and Remote Access: Ensure that the network and remote access settings are properly configured. Set up authentication methods, adjust network parameters, and confirm proper port forwarding and Dynamic DNS configurations.
- Update Firmware and Password: Regularly check for firmware updates for your cameras and install them to benefit from the latest security patches and performance enhancements. Also, change the default password to strengthen the security of your camera system.
Take your time to explore the various settings and features offered by your wireless security camera system. Adjust them according to your needs and preferences to ensure optimal surveillance and security.
With the camera settings properly configured, you’re ready for the final step: monitoring and managing your wireless security camera system.
Step 8: Monitoring and Managing the Camera System
Once your wireless security camera system is fully set up and configured, it’s time to start monitoring and managing it to ensure the security of your home. Follow these steps to effectively monitor and manage your camera system:
- Access the Camera Feeds: Use a web browser or the camera system’s dedicated app to access the camera feeds. Enter the assigned IP address or domain name, and log in using the appropriate credentials.
- View Live Feeds: Monitor the live feeds from your cameras to keep an eye on your surroundings in real-time. Use the app’s or browser’s interface to switch between camera views and control other features like zoom and pan.
- Review Recordings: Access the recorded footage to review past events and incidents. Use the playback controls to navigate through the timeline and find specific moments of interest.
- Manage Alerts and Notifications: Configure the camera system to send you alerts and notifications when specific events occur, such as motion detection, audio detection, or camera tampering. Adjust the notification settings according to your preferences.
- Backup and Storage: Regularly back up the recorded footage to external storage devices or cloud storage to ensure you have a copy of important events. Manage the storage capacity of the NVR or DVR to avoid running out of space.
- Monitor Mobile Access: Use the dedicated mobile app to access and manage your camera system on the go. Ensure that remote access is working properly and that you can view the camera feeds and receive alerts from your smartphone or tablet.
- Perform Regular Maintenance: Keep your camera system in optimal condition by regularly cleaning the camera lenses, checking for loose connections, and ensuring the cameras are free from obstructions or debris.
- Stay Up to Date with Firmware Updates: Monitor for available firmware updates for your camera system and install them as they become available. These updates often include bug fixes, feature enhancements, and security patches.
- Review and Adjust Camera Settings: Periodically review and adjust the camera settings to ensure they continue to meet your needs. Make any necessary changes to image quality, motion detection sensitivity, and other preferences.
By actively monitoring and managing your wireless security camera system, you can ensure the ongoing security and surveillance of your home. Regularly assess the camera feeds, review recordings, and maintain the system to keep it functioning effectively.
Congratulations! You have successfully completed the installation, configuration, and management of your wireless security camera system. Now you can enjoy the peace of mind that comes with having a reliable and proactive home security solution in place.
Remember, security is an ongoing process, so stay vigilant and explore additional security measures to further enhance the safety of your home and loved ones.
Conclusion
Installing and setting up a wireless security camera system can greatly enhance the security and surveillance capabilities of your home. By following the step-by-step guide outlined in this article, you can confidently install and configure your own camera system with ease.
Throughout the installation process, we covered key steps such as choosing the right wireless security cameras, gathering the required materials, setting up the camera system, installing the cameras in the desired locations, connecting the cameras to the network, configuring the camera settings, and finally monitoring and managing the camera system.
By carefully considering factors such as indoor or outdoor use, resolution, field of view, night vision, motion detection, and budget, you can select the best wireless security cameras for your specific needs. Gathering the necessary materials, including cameras, power cables, mounting hardware, and a network video recorder or digital video recorder, ensures that you have everything required for a successful installation.
Setting up the camera system involves finding ideal camera placements, securely mounting the cameras, connecting them to power, and connecting the NVR or DVR to the network and a monitor. Adjusting and testing the cameras, including checking angles, verifying image quality, testing night vision and motion detection, reviewing camera coverage, and testing recording functionality, helps ensure optimal performance.
Connecting the cameras to the network involves assigning static IP addresses, configuring port forwarding, and enabling dynamic DNS for remote access. And configuring the camera settings, including adjusting image and video settings, setting up motion detection, configuring recording preferences, enabling two-way audio, and updating firmware and passwords, allows you to customize the system to your specific preferences.
Lastly, monitoring and managing your camera system involves accessing camera feeds, reviewing recordings, managing alerts and notifications, backing up and managing storage, monitoring mobile access, performing regular maintenance, staying up to date with firmware updates, and reviewing and adjusting camera settings as needed.
With your wireless security camera system properly installed and configured, you can enjoy the peace of mind that comes from knowing your home and loved ones are well protected. Remember to regularly maintain and update your system, as security is an ongoing process.
Thank you for following this comprehensive guide. Now it’s time to take charge of your home security and enjoy the benefits of your wireless security camera system.
Frequently Asked Questions about How To Install Wireless Security Cameras Easily
Was this page helpful?
At Storables.com, we guarantee accurate and reliable information. Our content, validated by Expert Board Contributors, is crafted following stringent Editorial Policies. We're committed to providing you with well-researched, expert-backed insights for all your informational needs.