Home>Interior Design>Block Printing On Fabric: A Simple Step By Step Guide

Interior Design
Block Printing On Fabric: A Simple Step By Step Guide
Modified: October 18, 2024
Learn how to create stunning block printed designs on fabric with our simple step-by-step guide. Perfect for interior design enthusiasts looking to add a unique touch to their spaces.
(Many of the links in this article redirect to a specific reviewed product. Your purchase of these products through affiliate links helps to generate commission for Storables.com, at no extra cost. Learn more)
Introduction
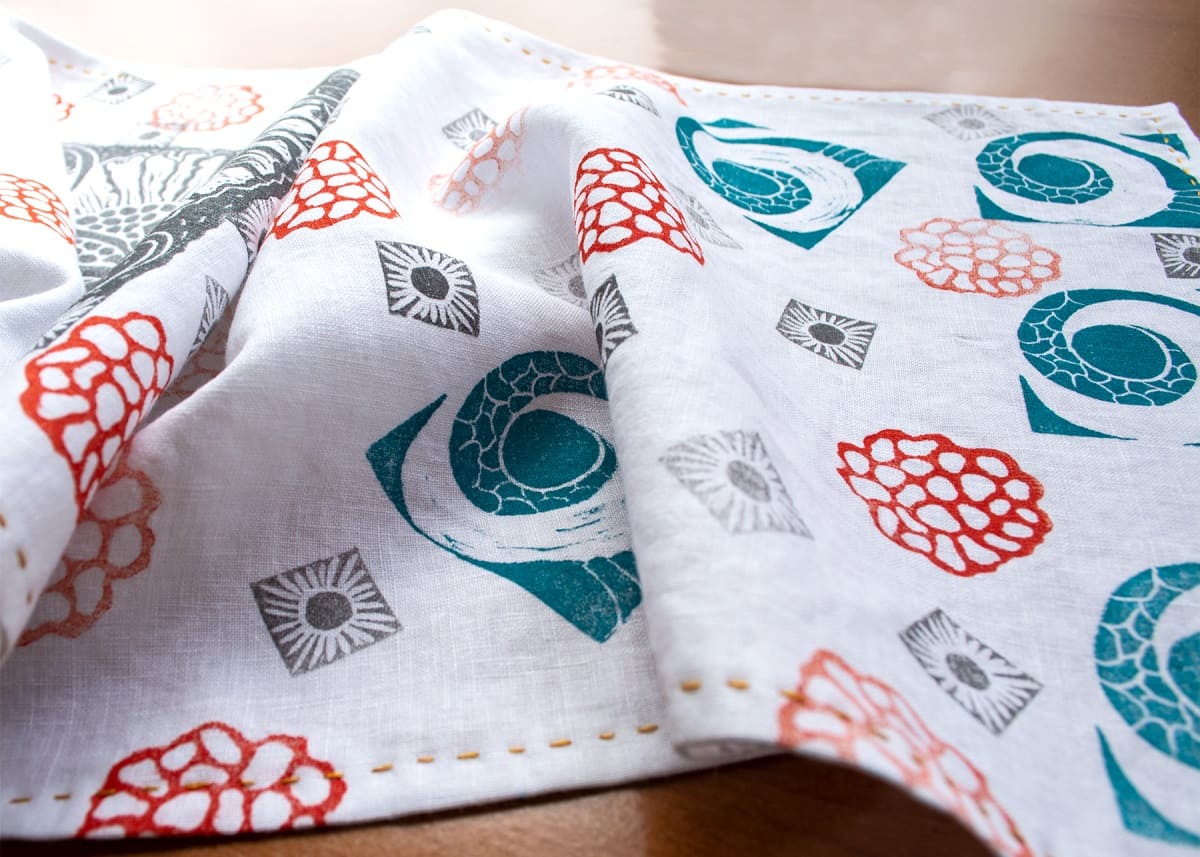
Welcome to this step-by-step guide on block printing on fabric. Block printing is a traditional method of adding patterns and designs to fabric that has been practiced for centuries. It offers a unique and artistic way to personalize your textiles, whether it’s creating your own custom-printed fabrics for home decor, clothing, or DIY projects.
In this guide, we will walk you through the process of block printing on fabric, from preparing the fabric and carving the block to applying ink and creating your prints. We will also provide tips on drying and setting the print, as well as caring for your block printed fabric. So, let’s dive in and explore the exciting world of block printing!
Before we begin, let’s gather the materials you’ll need for this project:
- Fabric: Choose a fabric that is suitable for block printing, such as cotton or linen. Make sure to pre-wash and iron the fabric before starting.
- Block printing blocks: These are handheld wooden blocks with a design carved into them. You can find a variety of pre-made blocks or even carve your own.
- Block printing ink: Opt for fabric-specific block printing ink, available in various colors. Make sure it is water-based and suitable for your chosen fabric.
- Brayer or roller: This tool is used to spread the ink evenly on the block and the fabric.
- Palette or tray: Use a flat surface to pour and mix your ink.
- Fabric paintbrushes: These brushes are used for touch-ups and finer details, if needed.
- Protective covering: Lay down a protective covering, like plastic or old newspapers, to prevent ink from transferring to your working surface.
- Iron and ironing board: These will be used to heat-set your prints, ensuring their longevity.
Now that we have all the necessary materials ready, let’s move on to preparing the fabric for block printing.
Key Takeaways:
- Block printing on fabric is a captivating art form that allows for personalizing textiles with unique designs. With proper preparation, ink application, and care, you can create stunning, long-lasting prints for various projects.
- The step-by-step process of block printing on fabric involves choosing materials, preparing the fabric, carving the block, applying ink, and setting the print. With attention to detail and creativity, you can transform plain fabrics into personalized works of art.
Read more: Step-by-Step Guide To Making A Pillowcase
Materials needed
Before we delve into the world of block printing on fabric, let’s gather all the materials we’ll need for this creative endeavor.
- Fabric: Choose a fabric that is suitable for block printing. Cotton and linen fabrics work well for this technique, as they have a smooth surface that allows the ink to adhere easily.
- Block printing blocks: These are the key tools in this process. You can find a variety of ready-made wooden blocks with intricate designs carved into them, or you can even carve your own design for a more personalized touch.
- Block printing ink: Select fabric-specific block printing ink that is suitable for the type of fabric you are using. These inks are water-based and come in a variety of vibrant colors, allowing you to create stunning prints.
- Brayer or roller: A brayer or roller is used to spread the ink evenly on the block and transfer it onto the fabric. Choose one that is of appropriate size for your block and comfortable to hold.
- Palette or tray: You will need a flat surface like a palette or tray to pour and mix your block printing ink. This will not only make it easier to work with but also prevent any mess.
- Fabric paintbrushes: While not necessary for every project, fabric paintbrushes can be useful for touch-ups or adding finer details to your prints. Keep a set of different brush sizes on hand for versatility.
- Protective covering: Lay down a protective covering, such as plastic sheets or old newspapers, to protect your working surface from accidental ink spills or smudges.
- Iron and ironing board: The final step in block printing is heat-setting the ink to make it permanent. An iron and ironing board are essential for this process, allowing you to securely set your prints on the fabric.
Now that we have all the necessary materials ready, we’re ready to start our block printing adventure. Make sure you have gathered everything before moving on to the next steps.
Preparing the fabric
Before you begin block printing on fabric, it’s important to properly prepare the fabric to ensure the best results. This involves washing and prepping the fabric as well as ironing it to create a smooth surface for printing.
Here are the steps to follow:
Washing and prepping the fabric
Start by washing the fabric to remove any sizing, chemicals, or impurities that might be present. This will help the ink adhere better to the fabric and prevent any unwanted reactions or fading later on. Follow the washing instructions specific to your fabric, taking care to select the appropriate temperature and detergent.
Once the fabric is clean, allow it to air dry or use the dryer if recommended. Avoid using any fabric softeners or dryer sheets as they can leave a residue on the fabric.
Ironing the fabric
After the fabric is dry, it’s time to iron it to remove any wrinkles or creases. Set your iron to the recommended temperature for your fabric. If in doubt, choose a medium heat setting.
Lay the fabric on an ironing board or another flat surface. Start ironing from one end, moving the iron smoothly and evenly across the fabric. Be careful not to apply too much pressure, as this can distort the weave of the fabric.
Take extra care to iron any areas that will be block printed, ensuring they are completely smooth and wrinkle-free. This will ensure that the ink transfers onto the fabric uniformly and creates sharp, crisp prints.
Once you have finished ironing, your fabric is now ready to be block printed. Make sure it is completely dry before moving on to the next steps.
Now that you’ve prepped the fabric, let’s move on to the exciting part: preparing the block printing blocks and applying ink.
Read more: How To Press Flowers: A Step By Step Guide
Preparing the block printing blocks
Now that we have our fabric prepped and ready, let’s move on to preparing the block printing blocks. This involves choosing the design, carving the block, and ensuring it is clean and ready for printing.
Choosing the design
When it comes to block printing, the design of your block is crucial. It determines the pattern that will be transferred onto the fabric. You can explore various sources for design inspiration, such as traditional motifs, nature, geometric patterns, or even create your own unique design.
Once you have chosen your design, it’s time to transfer it onto the block. If you are using a pre-made block, skip to the next step. However, if you are carving your own block, you can use tracing paper or a transfer method to transfer the design from paper onto the block surface.
Carving the block
Now comes the exciting part: carving the block! If you are using a pre-made block, you can skip this step and move on to the next section. However, if you are carving your own block, follow these steps to create your custom design:
- Start by tracing or transferring your chosen design onto the block surface. Use a pencil or a fine-tip marker to ensure accuracy.
- Next, use a carving tool or a set of carving tools to carefully carve away the areas that you want to remain blank, leaving the raised areas that will transfer the ink onto the fabric.
- Take your time and work slowly, ensuring smooth and even cuts. You can use different carving tools to create varying line thicknesses and textures in your design.
- After carving, gently sand the block to smooth any rough edges or surfaces. This will ensure clean and crisp printing.
Cleaning and drying the block
Once you have finished carving your block or unwrapped your pre-made block, it’s essential to clean it. Remove any excess wood particles or debris that may have accumulated during the carving process. Use a soft cloth or brush to gently wipe away any dust or debris.
After cleaning, allow the block to air dry completely before using it for printing. Make sure there is no moisture on the block, as it can affect the ink and result in smudged prints.
Now that we have our block printing blocks ready, it’s time to move on to applying the ink and creating stunning prints on our fabric.
Read more: A Step-By-Step Guide To DIY Walk In Closet
Applying ink to the block
With our block printing blocks prepared, it’s time to move on to the next step: applying ink to the block. This is a crucial process that ensures the ink is evenly distributed and ready for printing onto the fabric.
Squeezing out the ink
Start by squeezing out a small amount of block printing ink onto a palette or tray. It’s best to start with a small amount and add more as needed. Remember, you can always add more ink, but it’s challenging to remove excess ink once applied to the block.
Spread the ink out on the palette, creating a thin layer. This will make it easier to transfer the ink onto the block and ensure an even application.
Spreading the ink with a brayer
Next, take your brayer or roller and roll it over the ink on the palette, covering it with a thin layer of ink. Roll the brayer back and forth, ensuring the ink is evenly distributed on the roller’s surface.
Once the brayer is coated with ink, roll it gently across the surface of the block. Apply light and even pressure to ensure the ink transfers onto the raised areas of the block and not the carved-out areas.
Make sure the entire surface of the block is coated with ink. You can do this by rolling the brayer over the block from different angles, ensuring all the lines and details of your design are covered with ink.
Cleaning the brayer
After you have finished printing with a particular color or want to change the ink color, it’s important to clean the brayer between uses. This prevents any leftover ink from mixing with the new color and affecting your prints.
To clean the brayer, roll it back and forth on a clean piece of scrap fabric. This helps remove the excess ink from the roller’s surface and prepares it for the next color. You can also use soap and water for a more thorough cleaning.
Make sure to dry the brayer completely before applying a new color of ink. A clean and dry brayer ensures that the ink color remains true and doesn’t get diluted or contaminated.
Now that we have applied ink to our block, it’s time for the exciting part – block printing on fabric. In the next section, we will guide you through the process of creating beautiful prints on your fabric.
Block printing on fabric
Now that we have our inked block ready, it’s time to start block printing on the fabric. This is where the real magic happens as you transfer your beautiful design onto the fabric surface.
Testing the print
Before you start printing on your final fabric, it’s a good idea to do a test print on a scrap piece of fabric. This allows you to check the clarity, alignment, and depth of your design, as well as make any adjustments if needed.
Apply even pressure to the inked block and press it firmly onto the fabric. Hold it in place for a few seconds, and then carefully lift the block to reveal your test print. Take note of the result and make any necessary adjustments to the pressure or ink application for your final prints.
Printing the fabric
Now that you’re confident with your test print, it’s time to print on your fabric. Place the fabric on a clean and stable surface, ensuring it is flat and taut. Lay down a protective covering underneath to prevent any ink from transferring to your working area.
Ink your block using the same process we discussed earlier: apply ink to the block using a brayer, ensuring even coverage. Then, carefully position the inked block over the desired area on the fabric and apply firm, even pressure. Hold the block down for a few seconds to allow the ink to transfer completely.
When lifting the block, do it slowly and gently to avoid smudging or smearing the print. Take a moment to admire your printed design before moving on to the next area of the fabric.
Repeating the process
Continue printing your design on the fabric, re-inking the block as needed. Align each print carefully, ensuring consistency in pattern and spacing. You can choose to print a continuous pattern, create borders, or make a scattered arrangement depending on your design and preference.
If you plan to use multiple colors, clean the block between colors using a clean cloth or rinse it under running water. Dry the block thoroughly before applying the next color. This helps to avoid color mixing and ensures vibrant and distinct prints.
Take your time during the printing process, enjoying each print and the unique character it adds to the fabric. The repetition creates a charming and handcrafted look that makes block printing so appealing.
Once you have finished printing the entire fabric, it’s time to move on to the next step: drying and setting the print.
<p>Now that we have our inked block ready, it’s time to start block printing…
Drying and setting the print
After completing the block printing process, it’s important to properly dry and set the print on the fabric. This ensures that the design becomes permanent and can withstand washing and everyday use.
Allowing the print to dry
First and foremost, allow the printed fabric to dry completely before moving or handling it. This usually takes several hours, but the drying time may vary depending on factors such as fabric type, humidity, and ink used. It’s best to follow the manufacturer’s guidelines on drying time.
During this drying period, avoid placing the fabric on a surface where the wet ink might come into contact with any objects or create unwanted smudges. It’s recommended to hang the fabric up or lay it flat on a clean and dry surface, away from direct sunlight or heat sources.
Heat setting the print
Heat setting is the crucial step that ensures the ink bonds with the fabric fibers, making the print permanent and washable. Here’s how to heat set your block printed fabric:
- Set your iron to the appropriate heat setting for your fabric. Check the fabric label for recommended temperatures. Typically, a medium-to-high heat setting works well for cotton and linen fabrics.
- Place a clean piece of fabric or a pressing cloth over the printed area. This protects the print from direct heat and prevents it from sticking to the iron’s surface.
- Gently press the iron on the fabric, applying firm and even pressure. Hold the iron on each area for about 20-30 seconds, ensuring that the heat penetrates the ink and fabric.
- Continue this process, moving the iron across the entire printed area. Pay extra attention to any large or intricate designs, making sure to cover every part of the print.
- Once you have heat set the entire print, let the fabric cool down before handling or washing it. This allows the ink to fully set and bond with the fabric fibers.
By heat setting the print, you create a durable and washable design that can withstand repeated laundering without fading or smudging. It’s important to note that this process may vary depending on the ink and fabric you used, so always refer to the manufacturer’s instructions for the specific products you have.
Now that your print is dry and heat set, your block printed fabric is ready to be used for various projects, whether it’s making garments, home decor items, or DIY crafts. Enjoy the unique beauty of your handmade prints!
Final touches and care instructions
Before we conclude this guide, let’s cover a few final touches and care instructions for your block printed fabric:
Touching up the print
If you notice any areas where the print might be faint or incomplete, you can touch them up using fabric paintbrushes and the same ink used for block printing. Apply a small amount of ink to the brush and carefully fill in any gaps or enhance the design. Allow the touched-up areas to dry, and if needed, heat set them again.
Washing and caring for block printed fabric
When it comes to washing your block printed fabric, follow these general care instructions:
- Turn the fabric inside out before washing to further protect the print.
- Wash the fabric on a gentle cycle with like colors using a mild detergent.
- Avoid using bleach or harsh chemicals as they can fade or damage the print.
- Avoid wringing or twisting the fabric, as this can distort the print. Instead, gently squeeze out excess water and then lay it flat to air dry.
- Iron the fabric on the reverse side or use a pressing cloth to avoid direct heat on the print.
With proper care, your block printed fabric can maintain its beauty and vibrancy for a long time, bringing joy and uniqueness to your projects and home.
So, get creative, explore various designs, and enjoy the art of block printing on fabric. Let your imagination run wild as you add your personal touch to textiles and create stunning pieces that reflect your style and creativity!
Conclusion
Block printing on fabric is a timeless and captivating art form that allows you to add a personal touch to your textiles. With just a few materials and some creativity, you can transform plain fabrics into unique and beautiful pieces that reflect your individual style.
In this comprehensive guide, we have explored the step-by-step process of block printing on fabric. From preparing the fabric and carving the block to applying ink and creating prints, we have covered all the essential techniques and considerations for a successful printing project.
We started by gathering the necessary materials, including fabric, block printing blocks, ink, brayer or roller, palette or tray, fabric paintbrushes, protective covering, and an iron and ironing board. Preparing the fabric by washing and ironing it ensured a smooth and clean surface for printing.
We then delved into preparing the block printing blocks, from choosing the design and carving the block to cleaning and drying it. Applying ink to the block was the next step, with techniques such as squeezing out the ink, spreading it with a brayer, and cleaning the brayer between uses.
With our blocks and ink ready, we moved on to the exciting process of block printing on fabric. Testing the print on a scrap piece of fabric helped ensure the desired outcome. Printing the fabric involved aligning the block and applying even pressure to transfer the inked design onto the fabric. Repeating the process allowed for the creation of continuous patterns and intricate designs.
After completing the printing, we learned about drying and setting the print. Allowing the fabric to dry completely and heat setting the print with an iron ensured its permanence and durability.
Lastly, we discussed final touches and care instructions for your block printed fabric. Touching up the print with fabric paintbrushes and following proper washing and caring techniques help maintain the beauty and longevity of your creations.
Now that you are equipped with the knowledge and techniques of block printing on fabric, it’s time to unleash your creativity and embark on your own printing projects. Whether you’re adding a personal touch to home decor items, designing unique clothing pieces, or creating handmade gifts, the possibilities are endless.
So, gather your materials, choose your designs, and immerse yourself in the art of block printing on fabric. Let your imagination soar as you craft one-of-a-kind textiles that will bring joy and beauty to your life and those around you.
Frequently Asked Questions about Block Printing On Fabric: A Simple Step By Step Guide
Was this page helpful?
At Storables.com, we guarantee accurate and reliable information. Our content, validated by Expert Board Contributors, is crafted following stringent Editorial Policies. We're committed to providing you with well-researched, expert-backed insights for all your informational needs.






0 thoughts on “Block Printing On Fabric: A Simple Step By Step Guide”