Home>Interior Design>How To Fix A Ceiling Leak: A Step-by-step Guide
Interior Design
How To Fix A Ceiling Leak: A Step-by-step Guide
Modified: March 24, 2024
Learn how to fix a ceiling leak in your home with our step-by-step guide. Expert tips and tricks for interior design enthusiasts.
(Many of the links in this article redirect to a specific reviewed product. Your purchase of these products through affiliate links helps to generate commission for Storables.com, at no extra cost. Learn more)
Introduction
Welcome to our comprehensive guide on how to fix a ceiling leak. Dealing with a ceiling leak can be a daunting task, but with the right knowledge and tools, you can tackle the problem effectively and prevent further damage to your home. A ceiling leak not only compromises the structural integrity of your ceiling but can also lead to mold growth and damage to your belongings. Act quickly to identify and repair the source of the leak, and follow our step-by-step guide to ensure a successful and lasting solution.
Before we dive into the details, it’s important to understand that fixing a ceiling leak requires careful inspection, proper preparation, and the right set of tools. It’s also crucial to address the underlying issue causing the leak to prevent future occurrences. In this guide, we’ll walk you through the steps you need to take to fix the leak and restore your ceiling to its former glory.
So, if you’re ready to roll up your sleeves and tackle that pesky ceiling leak, let’s get started!
Key Takeaways:
- Don’t let a ceiling leak dampen your home! Identify, repair, and restore with our step-by-step guide. Prioritize safety, gather tools, and ensure a lasting solution for a leak-free ceiling.
- Take control of ceiling leaks with confidence. From preparation to repair, our guide empowers you to safeguard your home and enjoy a dry, secure ceiling.
Step 1: Identify the source of the leak
The first step in fixing a ceiling leak is to identify the source of the problem. It’s essential to locate where the water is coming from to effectively address the issue. Here’s what you need to do:
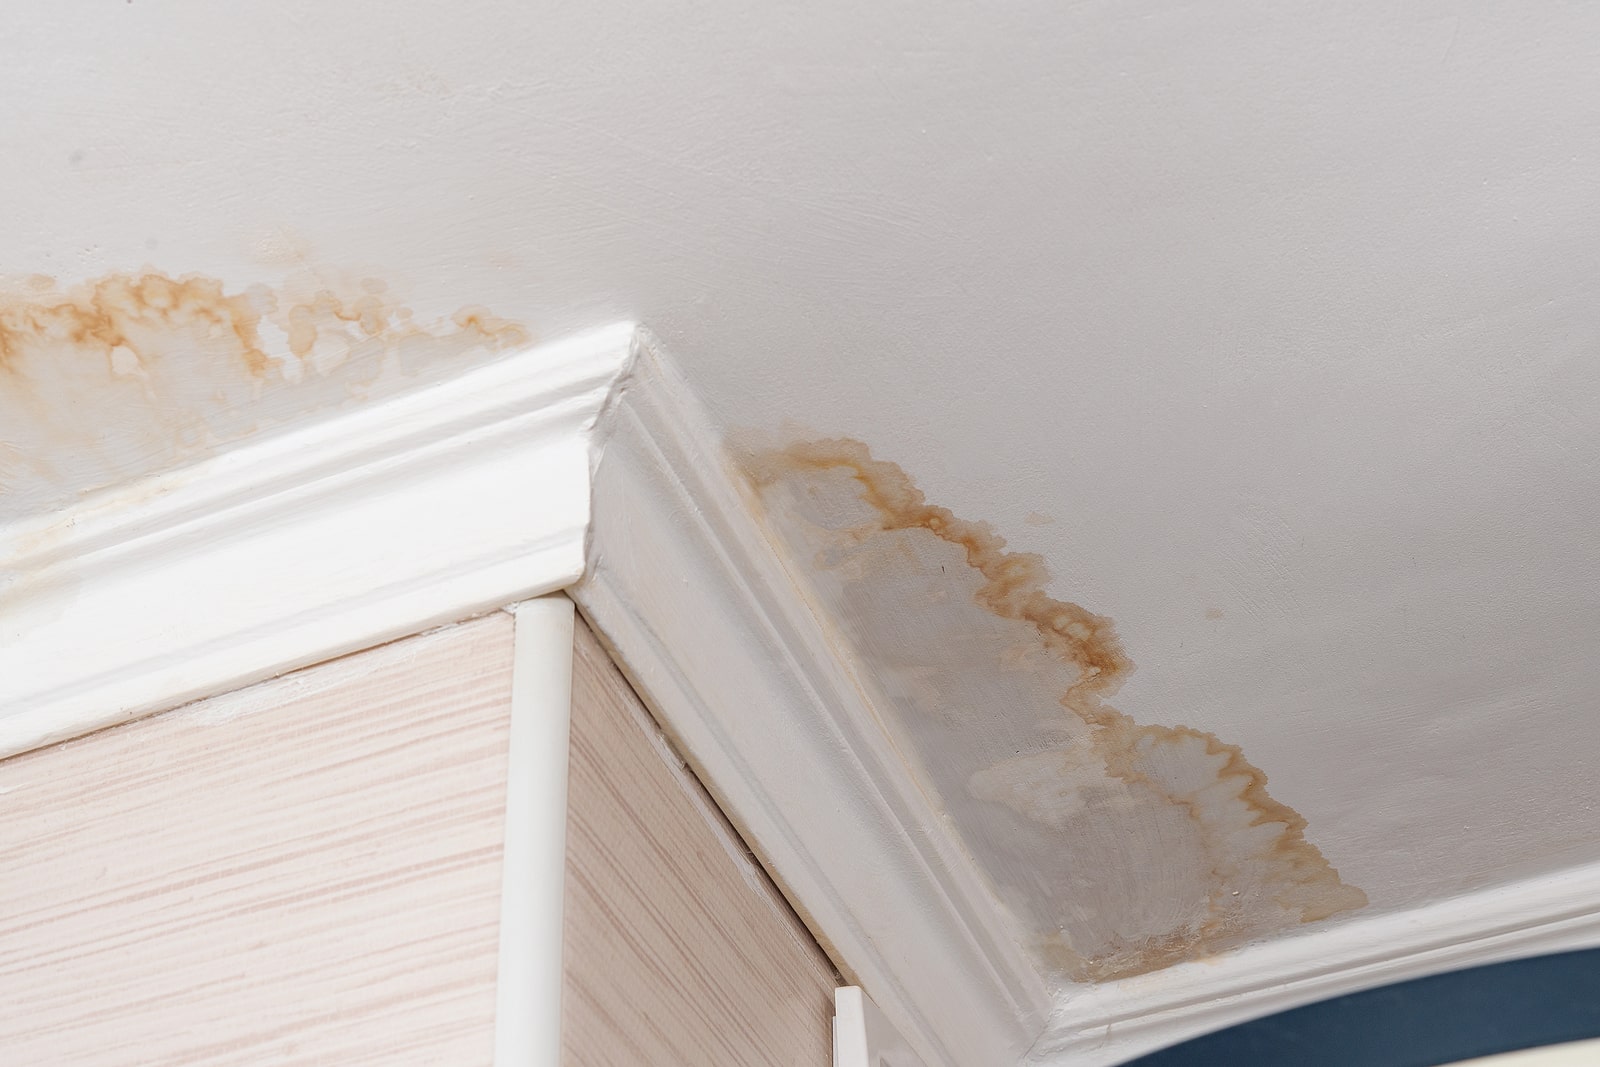
- Look for visible signs: Inspect your ceiling for any visible signs of water stains, discoloration, bulging, or dripping water. These can give you clues about the general area where the leak is occurring.
- Check the floors above: If the leak is coming from an upper floor, inspect the areas directly above the affected ceiling. Look for signs of plumbing leaks, such as dripping or pooling water.
- Inspect the roof: If you have an attic or crawl space, venture up there to inspect for any signs of water intrusion. Look for wet insulation, water stains, or mold growth, as these can indicate a roof leak.
- Examine plumbing fixtures: Check the bathroom, kitchen, or any other areas with plumbing fixtures located above the affected ceiling. Look for leaks or signs of moisture around sinks, toilets, showers, or pipes.
- Consider external factors: Sometimes, the source of the leak can be external. Check for any cracks in the exterior walls or windows that could be allowing water to seep in.
By carefully examining these areas, you should be able to pinpoint the source of the ceiling leak. Remember to take note of any findings or observations to assist you in the repair process. Once you have identified the source, you can move on to the next step: preparing the necessary tools and materials.
Step 2: Prepare the necessary tools and materials
Before you can start fixing the ceiling leak, it’s crucial to gather all the necessary tools and materials. Having everything ready beforehand will help streamline the repair process and ensure that you’re well-equipped to handle the job. Here’s a list of the essential items you’ll need:
- Safety equipment: Prioritize your safety by wearing protective gear such as safety goggles, gloves, and a dust mask.
- Ladder or scaffolding: Depending on the height of the ceiling, you’ll need a stable ladder or scaffolding to access the damaged area.
- Flashlight: A flashlight will come in handy when inspecting dark or enclosed spaces, such as attics or crawl spaces.
- Leak-detection tools: Invest in leak-detection tools like a moisture meter or thermal camera to help locate hidden leaks.
- Waterproof sealant: Depending on the type of leak, you may need waterproof sealant to stop the water from entering the ceiling.
- Patch materials: Prepare patch materials like drywall compound, plaster, or ceiling texture to repair any damage caused by the leak.
- Sanding equipment: Make sure you have sandpaper, a sanding block, or a power sander to smooth out the patched areas.
- Paint and brushes: If you’re planning to repaint the ceiling, gather the appropriate paint color and brushes.
- Tarp or drop cloths: Use tarps or drop cloths to protect your furniture and flooring from any potential damage or debris during the repair process.
- Caulk gun and caulk: These are useful for sealing gaps or cracks in the ceiling or around fixtures.
- Plastic sheeting: In case the leak is severe, plastic sheeting can be used to cover the affected area and prevent water from dripping onto the floor.
Having these tools and materials readily available will save you time and frustration during the repair process. Make a checklist to ensure you haven’t missed anything. With everything prepared, you’re now ready to move on to the next step: clearing the area and protecting your belongings.
Step 3: Clear the area and protect your belongings
Before you start repairing the ceiling leak, it’s important to clear the area and take precautions to protect your belongings from any potential damage. Here’s what you should do:
- Move furniture and valuables: If possible, relocate any furniture, electronics, or other valuable items away from the affected area. This will prevent them from getting damaged during the repair process.
- Cover furniture and flooring: Use plastic sheets or drop cloths to cover any remaining furniture or flooring in the room. This will provide an extra layer of protection against dust, debris, and potential water splashes.
- Create a work zone: Set up a designated work area around the affected ceiling. This will help contain any mess and maintain a clear path for your repair activities.
- Remove loose debris: Before starting the repair, carefully remove any loose debris or fallen pieces from the damaged ceiling. Use a broom or vacuum cleaner to clean the area and ensure a clean working surface.
- Secure electrical connections: If there are any electrical wires or outlets near the affected area, it’s essential to turn off power to those circuits and cover them with plastic or electrical tape to prevent any electrical hazards.
- Wear protective gear: Put on your safety goggles, gloves, and a dust mask to protect yourself from any potential harm or exposure to dust or debris during the repair process.
By taking these precautions and clearing the area, you’ll be able to work efficiently and minimize the risk of damage to your belongings. With the area prepped and secured, you’re now ready to move on to the next step: locating and repairing the leak.
Identify the source of the leak by inspecting the area above the ceiling. Look for any signs of water damage, such as discoloration or sagging. This will help you pinpoint the location that needs to be repaired.
Step 4: Locate and repair the leak
Now that you have prepared the necessary tools and protected your belongings, it’s time to locate and repair the leak causing the ceiling damage. Follow these steps to fix the problem:
- Trace the source: Using the observations made during the initial inspection, carefully trace the path of the leak back to its source. This may involve removing any damaged ceiling materials or opening up access points in the walls or ceiling to reach the plumbing, roof, or other potential sources of the leak.
- Fix plumbing leaks: If the leak is coming from a plumbing fixture or pipe, tighten any loose connections or replace faulty parts. Use plumbers tape or pipe sealant to ensure a watertight seal.
- Repair roof leaks: In the case of a roof leak, it’s recommended to consult a professional roofer who can identify and repair the damaged area. This may involve replacing shingles, repairing flashing, or addressing any other underlying issues causing the leak.
- Seal cracks or gaps: If the leak is due to cracks or gaps in the ceiling, use waterproof sealant or caulk to close them off. Ensure a thorough application and smooth the sealant with a putty knife for a seamless finish.
- Replace damaged materials: If the leak has caused significant damage to the ceiling materials, such as drywall or plaster, remove the affected sections and replace them with new materials. Follow proper installation techniques to ensure a stable and secure repair.
- Test the repair: After completing the necessary repairs, it’s important to test the fix to ensure that the leak has been successfully addressed. Use a hose or simulate the conditions that led to the initial leak and check if there are any new signs of water intrusion.
Remember to take your time during this step to ensure that the repair is thorough and effective. If you are unsure about fixing a complex issue, it’s always best to consult a professional for assistance. Once you are confident that the leak has been repaired, you can proceed to the next step: fixing the ceiling damage caused by the leak.
Read more: How To Press Flowers: A Step By Step Guide
Step 5: Fix the ceiling damage
Now that you have successfully repaired the source of the ceiling leak, it’s time to fix the damage caused by the water intrusion. Follow these steps to restore your ceiling to its pre-damaged condition:
- Inspect the extent of the damage: Carefully assess the affected area to determine the scope of the damage. Look for any sagging, cracks, or discoloration on the ceiling surface, as well as any damaged insulation.
- Remove damaged materials: Start by removing any water-damaged or weakened materials from the ceiling. This may include sections of drywall, plaster, or insulation that have been affected by the leak.
- Dry the area: Ensure that the area is completely dry before proceeding with the repair. Use fans, dehumidifiers, or open windows to facilitate the drying process. This step is crucial to prevent mold growth and ensure the longevity of your repair.
- Repair or replace the ceiling materials: Depending on the extent of the damage, you may need to either repair or replace the ceiling materials. Small cracks and minor damage can be patched using drywall compound or plaster. Larger areas of damage may require the replacement of entire sections of drywall or plaster.
- Apply joint compound or plaster: If you are patching the damaged area, apply a thin layer of joint compound or plaster using a putty knife or trowel. Smooth out the surface and feather the edges to create a seamless blend with the surrounding ceiling.
- Sand and prime: Once the joint compound or plaster has dried, sand the repaired area to achieve a smooth finish. Wipe away any dust, and then apply a coat of primer to the repaired section to ensure proper adhesion of the paint.
- Paint the ceiling: Select a paint color that matches the rest of the ceiling, and apply a fresh coat of paint to the entire ceiling surface or the repaired section. Follow the manufacturer instructions for proper application and drying time.
Remember, proper attention to detail during the repair process will help you achieve a seamless and visually appealing outcome. Take your time to ensure that each step is done correctly. Once the paint has dried, you can move on to the final step: ensuring that the leak is completely fixed and the problem is resolved for good.
Step 6: Ensure the leak is completely fixed
After completing the repairs and restoring the ceiling to its original condition, it’s crucial to ensure that the leak is completely fixed to prevent any future problems. Follow these steps to verify the effectiveness of your repair:
- Perform a final inspection: Carefully inspect the repaired area and the surrounding ceiling for any signs of water stains, discoloration, or dripping water. Look for any new or recurring signs of moisture that may indicate an ongoing or unresolved leak.
- Test different scenarios: Simulate different conditions that could potentially lead to a leak, such as running water fixtures or heavy rains. Check for any water intrusion or signs of leakage.
- Monitor the repaired area: Keep an eye on the repaired section over the next few days or weeks to ensure that there are no recurring signs of water damage. Pay attention to any changes in the ceiling’s appearance or any new signs of moisture.
- Inspect surrounding areas: Don’t forget to inspect the areas surrounding the repaired section. Look for any signs of water damage or leaks in adjacent walls, floors, or other nearby surfaces.
- Seek professional assistance if necessary: If you notice any ongoing leaks or signs of water damage despite your repairs, it’s recommended to consult a professional plumber or roofing contractor. They can provide expert guidance and solutions for more complex or persistent issues.
By carefully monitoring and testing the repaired area, you can ensure that the leak has been completely fixed and that your ceiling will remain free from water damage in the future. Remember, prevention is key, so addressing the underlying cause of the leak is crucial to avoid any potential recurrence.
Congratulations on successfully fixing your ceiling leak! By following this step-by-step guide, you have taken the necessary steps to protect your home and restore your ceiling to its former glory. Remember, early detection and prompt action are key in dealing with ceiling leaks. Regular maintenance and inspections can help prevent future leaks and water damage, so it’s important to stay vigilant in monitoring the condition of your home.
We hope this guide has been helpful in guiding you through the process of fixing a ceiling leak. If you have any further questions or concerns, don’t hesitate to seek professional assistance. Stay proactive and take care of your home to ensure a safe and comfortable living environment for you and your family!
Conclusion
Dealing with a ceiling leak can be a stressful and challenging situation, but with the right knowledge and approach, you can effectively address the issue and restore your ceiling to its former glory. By following the step-by-step guide we have provided, you now have a comprehensive understanding of how to fix a ceiling leak.
From identifying the source of the leak to repairing the damage and ensuring a long-term solution, each step is vital in achieving a successful outcome. By taking the time to properly prepare, gather the necessary tools and materials, and protect your belongings, you are setting yourself up for a smooth and efficient repair process.
Remember, it’s crucial to address the underlying cause of the leak to ensure that the problem does not recur. Whether it’s a plumbing issue, a roof leak, or cracks in the ceiling, identifying and repairing the source is essential for a lasting solution.
Throughout the repair process, it’s important to prioritize safety and take appropriate precautions. Wear protective gear, secure electrical connections, and create a designated work zone to avoid any injuries or additional damage.
Once the repair is complete, be thorough in your inspection to ensure that the leak has been fully resolved. Test the repaired area, monitor for any signs of recurring damage, and seek professional assistance if necessary. By following these steps, you can rest assured that your ceiling is leak-free and your home is protected.
We hope this guide has provided you with valuable insights and guidance on how to fix a ceiling leak. Remember, early detection is key in preventing further damage and costly repairs. Regular maintenance and inspections can help safeguard your home from future leaks and water damage.
Thank you for taking the time to learn about fixing a ceiling leak. By proactively addressing the issue, you are ensuring the well-being and longevity of your home. If you have any further questions or need professional assistance, don’t hesitate to reach out. Take control of the situation and enjoy the comfort of a dry and secure ceiling!
Frequently Asked Questions about How To Fix A Ceiling Leak: A Step-by-step Guide
Was this page helpful?
At Storables.com, we guarantee accurate and reliable information. Our content, validated by Expert Board Contributors, is crafted following stringent Editorial Policies. We're committed to providing you with well-researched, expert-backed insights for all your informational needs.


0 thoughts on “How To Fix A Ceiling Leak: A Step-by-step Guide”