Home>Interior Design>How To Cut Coving Corners For The Perfect Fit
Interior Design
How To Cut Coving Corners For The Perfect Fit
Modified: August 28, 2024
Learn how to perfectly cut coving corners for your interior design project. Create seamless transitions with our step-by-step guide for a flawless finish.
(Many of the links in this article redirect to a specific reviewed product. Your purchase of these products through affiliate links helps to generate commission for Storables.com, at no extra cost. Learn more)
Introduction
Welcome to the world of interior design, where every small detail can make a big difference. If you’re looking to add a touch of elegance and sophistication to your space, coving is the perfect choice. Coving, also known as crown molding, is a decorative feature that is installed along the ceiling and wall junctions. It not only adds visual appeal but also helps to cover up any uneven or unsightly corners.
While installing coving may seem like a daunting task, with the right techniques and tools, you can achieve a perfect fit and professional finish. In this article, we will guide you through the process of cutting coving corners to ensure a seamless and visually pleasing result.
Before we dive into the steps, let’s take a look at the tools and materials you’ll need for this project:
Key Takeaways:
- Achieve a flawless coving installation by mastering precise measurements, careful cutting, and meticulous fitting. Add elegance and sophistication to your space with this DIY interior design project.
- Elevate your room’s aesthetic with perfectly cut coving corners. From measuring to finishing touches, create a seamless and visually appealing result for a touch of refined charm.
Tools and Materials Needed
- Coving (crown molding)
- Measuring tape
- Miter saw
- Backsaw or coping saw
- File
- Sandpaper (fine-grit)
- Adhesive (specifically designed for coving)
- Caulking gun
- Paint and paintbrush (optional)
Now that you have everything ready, let’s get started on cutting those coving corners just right!
Key Takeaways:
- Achieve a flawless coving installation by mastering precise measurements, careful cutting, and meticulous fitting. Add elegance and sophistication to your space with this DIY interior design project.
- Elevate your room’s aesthetic with perfectly cut coving corners. From measuring to finishing touches, create a seamless and visually appealing result for a touch of refined charm.
Tools and Materials Needed
Before you start cutting coving corners, it’s essential to gather all the necessary tools and materials. Here’s a list of what you’ll need:
- Coving (crown molding): This is the decorative feature that will be installed along the ceiling and wall junctions. Make sure to choose a design that matches your interior style.
- Measuring tape: Accurate measurements are crucial for achieving precise cuts. Use a tape measure to measure the length of the walls where the coving will be installed.
- Miter saw: This power tool will be used to make angled cuts on the coving. Invest in a high-quality miter saw to ensure clean and accurate cuts.
- Backsaw or coping saw: A backsaw or coping saw will come in handy when cutting the intricate curves and profiles of the coving. Choose a saw with fine teeth for better control and precision.
- File: After cutting the coving, a file is needed to smooth out any rough edges or imperfections. A flat, half-round, or round file can be used, depending on the shape of the coving’s profile.
- Sandpaper (fine-grit): Sandpaper will help you achieve a smooth and polished finish on the coving. Opt for a fine-grit sandpaper to avoid damaging the delicate details of the molding.
- Adhesive (specifically designed for coving): To secure the coving to the wall, you’ll need a strong adhesive that is specifically formulated for coving installation. Choose an adhesive that is easy to work with and provides a durable bond.
- Caulking gun: A caulking gun is necessary to apply the adhesive evenly and with precision. It will help you control the flow of the adhesive and ensure a neat and professional-looking installation.
- Paint and paintbrush (optional): If desired, you may want to paint the coving to match the color scheme of your room. In that case, you’ll need some paint and a paintbrush to apply the paint evenly.
Having all these tools and materials ready will ensure a smooth and efficient coving installation process. Now that you’re equipped with the necessary supplies, it’s time to move on to the step-by-step guide for cutting coving corners.
Step 1: Measuring the Corner
The first step in cutting coving corners is to accurately measure the corners where the coving will be installed. This is crucial to ensure a precise and seamless fit. Here’s how to do it:
- Take your measuring tape and measure the length of the wall where the coving will be placed. Record this measurement.
- Next, measure the height of the wall from the floor to the ceiling. This will help you determine the angle at which the coving needs to be cut.
- Now, use a protractor or an angle finder tool to measure the angle of the corner. This will allow you to cut the coving at the correct angle to fit seamlessly.
- Once you have all the measurements recorded, it’s time to transfer them onto the coving. Place the coving on a flat surface and mark the measurements using a pencil or a marker.
- Using a miter saw, adjust the angle according to the measurement you obtained earlier. Ensure that the saw is set to cut the coving at the desired angle.
By accurately measuring the corner and transferring the measurements onto the coving, you’ll be able to make precise cuts that fit perfectly into the space. Taking your time with this step will help ensure a professional and visually pleasing outcome.
Once you’ve completed measuring the corner, it’s time to move on to the next step: cutting the coving.
Step 2: Cutting the Coving
Now that you have measured the corner and marked the measurements on the coving, it’s time to move on to cutting the coving. This step requires precision and careful attention to detail. Here’s how to cut the coving:
- Place the marked coving on a work surface, ensuring that it is secure and won’t move during the cutting process.
- Using a miter saw, position the coving against the back fence with the marking facing up. Align the coving with the angle set on the saw to ensure an accurate cut.
- Slowly and steadily, press the coving against the saw’s back fence and make the cut following the marked line. Take care to maintain a steady hand and keep the coving firmly in place against the fence.
- Once the cut is complete, carefully remove the cut piece of coving and set it aside. It’s important to handle the cut coving with care to avoid any damage or breakage.
- Repeat the cutting process for each piece of coving needed for the corner, ensuring that the measurements and angles are consistent.
Cutting the coving requires precision and attention to detail. Take your time to ensure that each cut is accurate and aligns with the marked measurements. Consistency is key in achieving a seamless fit.
Once you have cut all the pieces of coving necessary for the corner, it’s time to move on to the next step: filing and sanding.
Step 3: Filing and Sanding
After cutting the coving pieces for the corner, it’s important to clean up any rough edges and achieve a smooth finish. This is where filing and sanding come into play. Follow these steps to file and sand the cut coving:
- Inspect the cut edges of the coving. If you notice any unevenness or rough spots, use a file to carefully smooth them out. A flat or half-round file works best for this purpose.
- Hold the file at a slight angle and gently move it along the cut edge, applying light pressure. Work in one direction to avoid creating additional rough areas or causing damage to the coving.
- Continue filing until the rough edges are smoothed out and the cut surface feels even to the touch.
- Once the filing is complete, use fine-grit sandpaper to further refine the cut edges. Wrap the sandpaper around a small block or use your fingers to sand the edges in a smooth, circular motion.
- Be careful not to sand too aggressively, as it may damage the delicate profile of the coving. The goal is to achieve a smooth and polished finish.
Filing and sanding the cut edges of the coving will help create a seamless transition between the pieces and ensure a professional-looking result. Take your time with this step to achieve a high-quality finish.
With the filing and sanding complete, it’s time to move on to the next step: applying adhesive to the coving.
When cutting coving corners, always measure and mark the angle accurately before cutting. Use a miter saw for precise 45-degree cuts and ensure the pieces fit snugly together for a seamless finish.
Step 4: Applying Adhesive
With the coving cut, filed, and sanded to perfection, it’s time to move on to the installation process. Applying adhesive is an essential step in securing the coving in place. Follow these steps to apply adhesive to the coving:
- Load the adhesive cartridge into the caulking gun, ensuring it is securely in place.
- Cut the tip of the adhesive cartridge at a 45-degree angle to allow for a controlled and even flow of adhesive.
- Hold the caulking gun at a slight angle and start applying a continuous and even bead of adhesive along the back edge of the coving. Be sure to cover the entire length.
- Avoid going too close to the edge of the coving to prevent excess adhesive from oozing out during installation.
- Once the adhesive is applied, carefully lift the coving and position it against the wall, aligning it with the previously measured and cut corner.
- Press the coving firmly against the wall, ensuring a secure bond with the adhesive. Make any necessary adjustments to ensure proper alignment.
- Use a clean rag or a damp cloth to wipe off any excess adhesive that may have oozed out from the edges of the coving.
Applying adhesive is a crucial step in ensuring that the coving stays in place and creates a seamless appearance. Take your time while applying the adhesive to avoid any mess or excess glue.
With the adhesive applied, it’s time to move on to the next step: fitting the coving into place.
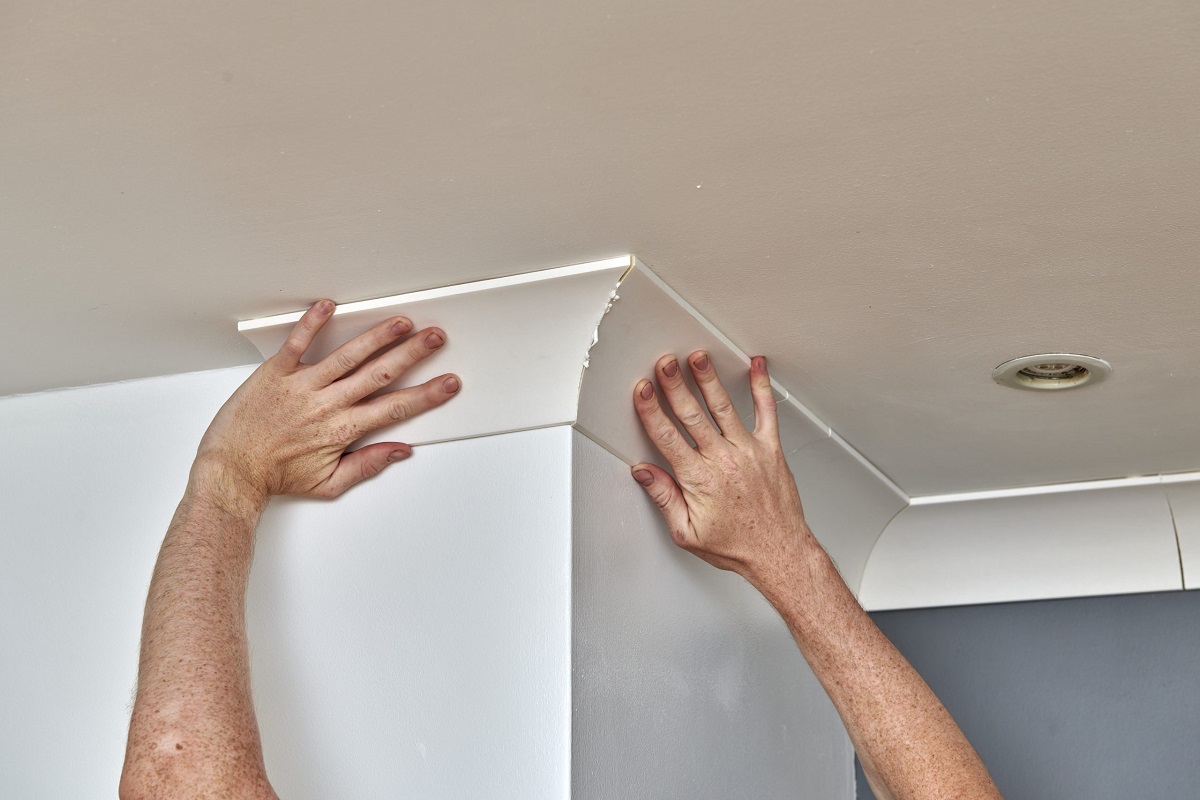
Step 5: Fitting the Coving
Now that the adhesive has been applied, it’s time to fit the coving into place. This step involves carefully positioning and aligning the coving to ensure a perfect fit. Follow these steps to fit the coving:
- Starting from one end of the corner, gently push the coving against the wall, ensuring that it fits snugly and aligns with the adjacent wall.
- Use gentle pressure to press the coving into place, ensuring a tight fit against the ceiling and wall.
- Continue fitting the coving along the length of the corner, adjusting and positioning it as needed to maintain alignment.
- Be mindful of any intricate profiles or designs on the coving, ensuring that they align smoothly with the adjacent pieces.
- Take your time during this step, making any necessary adjustments to achieve a seamless and visually appealing fit.
Fitting the coving requires attention to detail and precision. Take the time to ensure that the coving fits snugly and aligns properly with the walls and ceiling. This will contribute to a professional and polished finish.
With the coving fitted into place, it’s time to move on to the next step: securing the coving.
Step 6: Securing the Coving
Now that the coving is in position, it’s time to secure it in place to ensure a long-lasting installation. This step involves attaching the coving securely to the wall using appropriate methods. Follow these steps to properly secure the coving:
- Using small panel pins or finishing nails, secure the coving to the wall at regular intervals. Place the nails or pins along the length of the coving, keeping them hidden within the curve or profile whenever possible.
- Avoid placing the nails or pins too close to the edge of the coving to prevent splitting or damaging the molding.
- Use a hammer to carefully drive the nails or pins into the wall, ensuring that they are flush with the surface of the coving.
- Continue securing the coving along its entire length, making sure it remains aligned and properly positioned.
- Check for any gaps between the coving and the wall. If necessary, use a small amount of adhesive to fill in any noticeable gaps and ensure a seamless appearance.
Securing the coving will ensure its stability and prevent it from coming loose over time. By using small panel pins or finishing nails, you can discreetly secure the coving while maintaining its aesthetic appeal.
With the coving securely in place, it’s time for the final step: adding the finishing touches.
Read more: What Is A Cove Ceiling
Step 7: Finishing Touches
Congratulations! You’re almost done with the coving installation process. The final step involves adding the finishing touches to ensure a seamless and visually appealing result. Here are some steps to consider for those finishing touches:
- Inspect the coving installation for any visible gaps or imperfections. Use a small amount of caulk or filler to fill in any gaps or cracks along the edges or joints of the coving.
- Smooth out the caulk or filler using a caulk smoothing tool or your finger, ensuring a clean and neat finish. Wipe away any excess caulk or filler using a damp cloth.
- If desired, you can paint the coving to match the room’s color scheme. Use a high-quality paint and a narrow brush to carefully apply the paint, ensuring even coverage.
- Allow the paint or caulk to dry completely before moving on to any further decorating or styling in the room.
- Take a step back and admire your beautifully installed coving. Appreciate how it adds elegance and a touch of sophistication to the room.
These finishing touches might seem small, but they contribute to the overall aesthetic and professional look of the coving installation. By paying attention to the details, you’ll achieve a seamless and visually appealing result that enhances the beauty of your space.
With the finishing touches complete, you have successfully cut coving corners and installed them for a perfect fit. Stand back and enjoy the fruits of your labor, knowing that you’ve added a beautiful and refined touch to your interior design.
Thank you for following along with our step-by-step guide. We hope this has been helpful in achieving your desired results. Happy decorating!
Conclusion
Adding coving to your space can transform the look and feel of a room, adding elegance and sophistication to any interior design. By following the steps outlined in this guide, you have learned how to cut coving corners for the perfect fit. From measuring and cutting the coving to filing, sanding, and securing it in place, each step plays a crucial role in achieving a seamless and professional installation.
Remember to take your time and pay attention to detail throughout the process. Accurate measurements, precise cuts, and careful fitting are key to achieving a flawless result. Additionally, the finishing touches, such as filling gaps and painting, add that final touch of polish and refinement to your coving installation.
As with any DIY project, practice and patience are important. Don’t be discouraged if it takes a few attempts to get the hang of cutting and fitting the coving. With each try, you’ll gain more confidence and improve your skills.
Now that you have completed the installation of your coving, take a step back and appreciate the transformation it has brought to your room. The added charm and elegance of coving can completely elevate the look and feel of the space.
We hope this guide has been informative and helpful in your coving installation journey. Enjoy your newly decorated space, and may it bring you joy and inspiration for years to come.
Frequently Asked Questions about How To Cut Coving Corners For The Perfect Fit
Was this page helpful?
At Storables.com, we guarantee accurate and reliable information. Our content, validated by Expert Board Contributors, is crafted following stringent Editorial Policies. We're committed to providing you with well-researched, expert-backed insights for all your informational needs.


0 thoughts on “How To Cut Coving Corners For The Perfect Fit”