
Articles
How To Miter Corners On A Quilt
Modified: December 7, 2023
Learn how to miter corners on a quilt with step-by-step articles. Discover techniques to create beautifully finished corners for your quilting projects.
(Many of the links in this article redirect to a specific reviewed product. Your purchase of these products through affiliate links helps to generate commission for Storables.com, at no extra cost. Learn more)
Introduction
Welcome to the wonderful world of quilting, where fabric and thread come together to create beautiful works of art. When it comes to quilting, one of the techniques that can elevate the look of your quilt is mitering the corners. Mitered corners give your quilt a polished and professional finish, making it stand out from the rest.
But what exactly is a mitered corner? In simple terms, it is a corner where the fabric is folded at a 45-degree angle, creating a neat and seamless transition from one side of the quilt to the other. Mitered corners are often used in quilts with borders or binding strips, as they create a clean and elegant look.
In this article, we will guide you through the step-by-step process of mitering corners on a quilt. Whether you’re a beginner or an experienced quilter, this technique can be easily mastered with practice. So grab your quilting supplies and let’s get started!
Key Takeaways:
- Elevate your quilting with mitered corners, creating a polished and professional finish that adds sophistication and attention to detail to your quilt.
- Master the art of mitered corners with precision cutting, marking, folding, and sewing, and enjoy the satisfaction of creating stunning quilts with seamless transitions and clean lines.
Read more: How To Miter Corners On Quilt Binding
What is a Mitered Corner?
A mitered corner is a technique used in quilting to create a clean and professional finish on the corners of a quilt. It involves folding and sewing the fabric at a 45-degree angle, resulting in a seamless transition from one side of the quilt to the other.
Mitered corners are commonly used in quilts with borders or binding strips. They provide a polished look by eliminating the abrupt interruption of the fabric pattern or design at the corners. This technique adds a level of sophistication and attention to detail that can elevate the overall appearance of your quilt.
The process of creating mitered corners involves precise cutting, marking, folding, and sewing. When done correctly, the corners will have no visible seams and the fabric will flow smoothly around the quilt. Mitered corners are a sign of skilled craftsmanship and are often seen in quilts showcased at exhibitions and competitions.
In addition to their visual appeal, mitered corners also have practical benefits. They reduce the bulk and eliminate excess fabric at the corners, making the quilt easier to lay flat and fold. This is particularly advantageous if you plan to use the quilt on a bed or as a decorative throw.
While mitered corners may seem complex, once you understand the process and practice it a few times, it becomes easier to master. It’s important to take your time and be patient as you work through each step. With practice and attention to detail, you’ll soon be creating beautiful mitered corners that will wow anyone who sees your quilt.
Materials Needed
Before you begin the process of mitering corners on your quilt, gather the following materials:
- Fabric: Choose the fabric for your quilt top and borders. Make sure it coordinates well and complements the overall design of your quilt.
- Sewing machine: Having a reliable sewing machine with a straight stitch capability is essential for sewing the quilt borders and mitered corners.
- Thread: Select a high-quality thread that matches the color of your fabric. This thread will be used for both piecing the quilt and sewing the mitered corners.
- Scissors: Have a pair of sharp fabric scissors for cutting the fabric accurately.
- Ruler: Use a clear quilting ruler with measurements marked in both inches and centimeters. This will help you make precise cuts and measurements.
- Marking tool: Choose a fabric marking pen, pencil, or chalk that is easily visible on your fabric but will not permanently stain or damage it.
- Pins: Use straight pins to secure the fabric pieces in place when sewing.
- Iron and ironing board: Keep an iron and ironing board handy for pressing the fabric and seams as you work through each step.
These basic materials are essential for successfully mitering the corners of your quilt. Once you have them all gathered, you’ll be ready to embark on the journey of creating beautifully mitered corners that will enhance the overall look of your quilt.
Step 1: Cutting and Sewing the Borders
The first step in mitering corners on a quilt is to cut and sew the borders. The borders will frame the quilt and provide a foundation for creating the mitered corners.
- Measure and cut the border fabric: Measure the length of each side of your quilt to determine the length of the borders. Add an extra inch or two to allow for seam allowances. Cut the border fabric into strips according to your measurements.
- Pin and sew the borders: Lay the quilt top flat and place the border strips along each side, right sides together. Pin the borders in place, matching the raw edges. Sew the borders to the quilt using a ¼-inch seam allowance.
- Press the seams: After sewing, press the seam allowances towards the border fabric using an iron. This will help the borders lie flat and give your quilt a neat appearance.
- Continue sewing the remaining borders: Repeat the process for the remaining sides of the quilt, measuring, cutting, pinning, sewing, and pressing the borders in the same manner.
By cutting and sewing the borders first, you create a solid framework for working on the mitered corners. The borders will act as a guide and facilitate the folding and sewing process in the subsequent steps.
Once you have completed Step 1, you can proceed to the next step, which involves marking the mitered corners on your quilt. Take your time and ensure your borders are sewn securely and evenly before moving on.
Step 2: Marking the Mitered Corners
Now that you have sewn the borders onto your quilt, it’s time to mark the mitered corners. Properly marking the corners will ensure precise folding and sewing, resulting in clean and professional-looking mitered corners.
- Start with the first corner: Begin by selecting one corner of your quilt to mark. This will serve as your starting point. Measure and mark a point ¼ inch from both edges of the border fabric, creating a small “X” or dot on the wrong side of the fabric.
- Mark the mitering angle: From the marked point, measure and mark a diagonal line towards the corner of the quilt top. This line should make a 45-degree angle with the edge of the quilt top. Use a ruler or a quilting square to ensure accuracy.
- Repeat for remaining corners: Continue marking the mitered corners in the same manner for the remaining three corners of your quilt. Take your time to ensure that the markings are precise and consistent.
Properly marking the mitered corners is crucial for creating the desired angled fold. The markings will guide you in folding the fabric at the correct angle and ensure that your corners align seamlessly. Pay attention to accuracy and take extra care when marking.
Once you have completed Step 2, you are ready to move on to the next step, which involves folding and pressing the fabric to prepare for sewing the mitered corners. Double-check your markings before proceeding to ensure that they are clear and defined.
When mitering corners on a quilt, be sure to press the seams open before folding the corner to create a clean, sharp point. This will help the mitered corner lay flat and look professional.
Read more: How To Miter Corners On A Quilt Border
Step 3: Folding and Pressing
After marking the mitered corners on your quilt, it’s time to fold and press the fabric to create the precise angles needed for the mitered corners. Folding and pressing will ensure that the fabric lies smoothly and neatly along the corners, giving your quilt a professional finish.
- Start with the first corner: Begin by folding the fabric at the marked diagonal line towards the wrong side of the quilt. The fold should align with the border fabric and create a 45-degree angle at the corner.
- Press the fold: Use an iron set to the appropriate temperature for your fabric to press the folded fabric. Press firmly but be careful not to stretch or distort the fabric. The heat will help set the crease and make it easier to sew the mitered corner.
- Repeat for remaining corners: Continue folding and pressing the fabric for the remaining three corners of your quilt. Take your time to ensure that the folds are crisp and the angles are consistent.
By folding and pressing the fabric at the marked lines, you are setting the stage for sewing the mitered corners. The precise folds will allow the fabric to seamlessly transition from one side of the quilt to the other, creating a clean and professional look.
Once you have completed Step 3, you can move on to the next step, which involves sewing the mitered corners and bringing your quilt one step closer to completion. Take a moment to admire the neatly folded corners before continuing.
Step 4: Sewing the Mitered Corners
Now that you have folded and pressed the fabric to create precise mitered corners on your quilt, it’s time to sew them. Sewing the mitered corners will secure the folded fabric in place and give your quilt a finished and professional appearance.
- Start with the first corner: Begin by positioning the folded fabric of one corner under the presser foot of your sewing machine. Start sewing from the outer edge of the quilt, using a ¼-inch seam allowance. Sew along the folded edge, ensuring that your stitches are straight and secure.
- Continue sewing: Sew along the folded edge until you reach the opposite edge of the quilt. Take your time and sew slowly to maintain control and accuracy. Backstitch at the start and end of the seam to reinforce the stitches and prevent them from unraveling.
- Repeat for remaining corners: Repeat the sewing process for the remaining three corners of your quilt. Position the folded fabric under the presser foot, sew along the folded edge, and continue until you reach the opposite edge of the quilt. Remember to backstitch at the beginning and end of each seam.
As you sew the mitered corners, be mindful of maintaining a consistent seam allowance and keeping your stitches straight. Take your time and sew at a pace that you are comfortable with, ensuring that the fabric lies flat and the transitions between sides are smooth.
Once you have completed Step 4, you are one step closer to finishing your quilt. The mitered corners will add a professional touch to your quilt, showcasing your skills and attention to detail. Take a moment to admire your work before moving on to the final step.
Step 5: Finishing the Quilt
Congratulations! You’ve made it to the final step of mitering corners on your quilt. In this step, we will focus on finishing touches that will complete your quilt and give it a polished look.
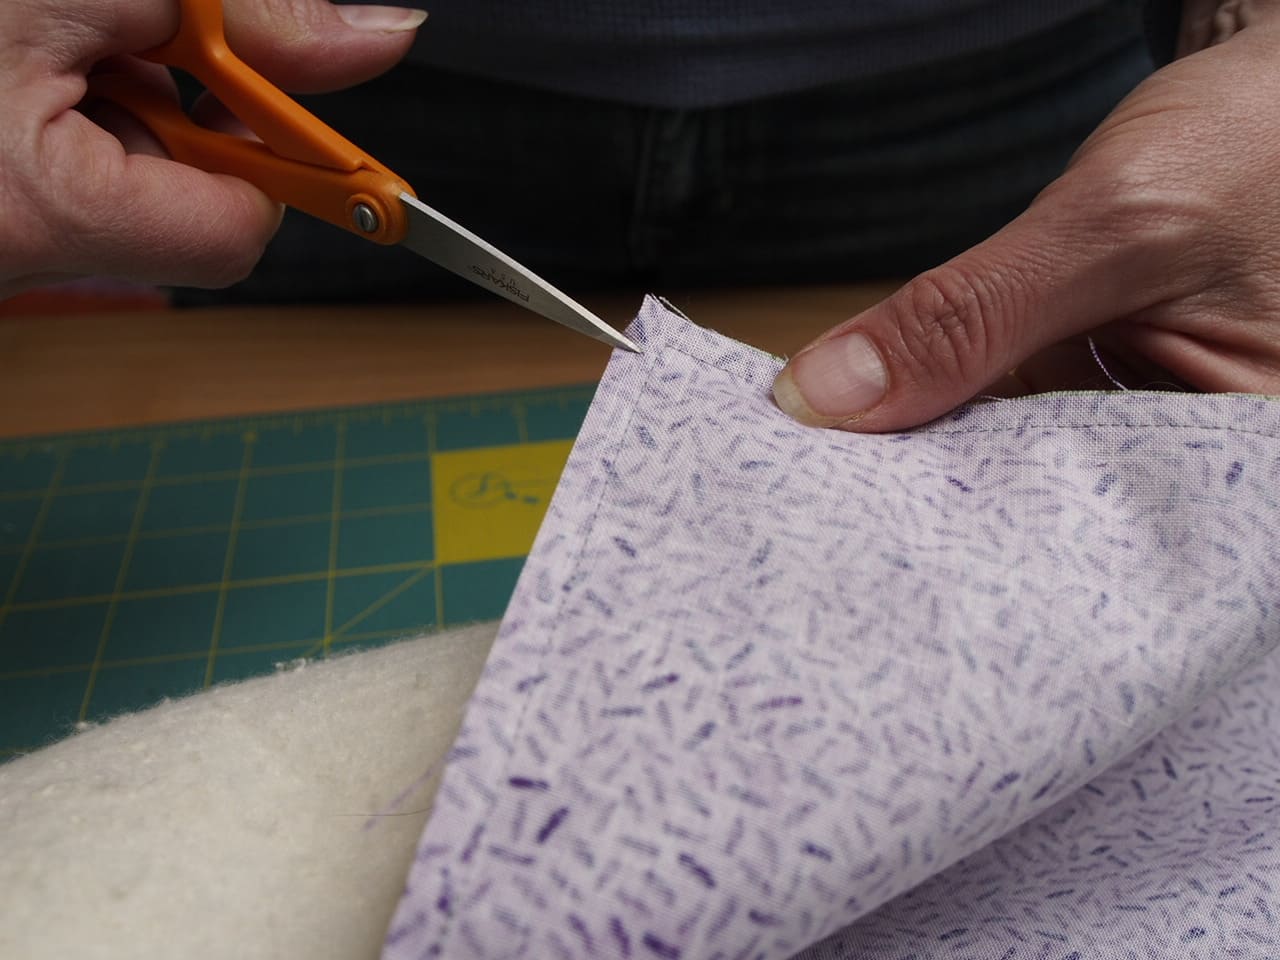
- Trim any excess fabric: Carefully trim any excess fabric from the mitered corners, ensuring that there are no bulky or uneven edges. This will help the quilt lay flat and maintain a clean appearance.
- Press the quilt: Use an iron to press the entire quilt, including the mitered corners, to set the seams and give the quilt a smooth and professional finish. Pay attention to the borders and corners to ensure they lie flat and have an even appearance.
- Add binding (optional): If desired, you can add binding to your quilt to further enhance its edges and create a finished look. Cut binding strips from fabric and sew them around the edges of the quilt, covering the raw edges and securing them in place.
- Finishing touches: Give your quilt a final inspection and make any necessary adjustments. Check for loose threads, uneven stitches, or any imperfections that may need to be addressed. Trim and secure any loose threads, making sure your quilt looks clean and well-crafted.
After completing these steps, stand back and marvel at your beautiful quilt with perfectly mitered corners. The time and effort you put into mastering this technique have certainly paid off, resulting in a stunning quilt that will be cherished for years to come.
Remember, practice makes perfect. The more you work on mitering corners, the more confident and skilled you will become. So don’t be afraid to experiment and perfect your technique with each quilt you make.
Enjoy the satisfaction of completing your quilt and the joy it will bring to yourself or the lucky recipient. Happy quilting!
Conclusion
Congratulations on reaching the end of this comprehensive guide on mitering corners on a quilt! By following the steps outlined in this article, you have learned the techniques to create clean, precise, and professional-looking mitered corners that add a touch of elegance to your quilt.
Remember, mastering the art of mitered corners takes practice and attention to detail. Don’t be discouraged if your first attempts are not perfect. With each project, you will gain more experience and refine your skills.
As you continue on your quilting journey, explore different fabric combinations, patterns, and designs to create unique quilts that showcase your creativity and personal style. Mitered corners offer endless possibilities, allowing you to add a distinctive touch to your quilts.
Whether you’re creating quilts for yourself, loved ones, or as gifts, mitered corners can elevate your quilting projects to new heights. The clean lines and seamless transitions will leave a lasting impression and showcase your quilting expertise.
So go ahead, gather your materials, follow the steps outlined in this guide, and dive into the wonderful world of mitering corners on quilts. Enjoy the process, embrace your creativity, and create beautiful quilts that will be cherished for generations to come.
Happy quilting!
Frequently Asked Questions about How To Miter Corners On A Quilt
Was this page helpful?
At Storables.com, we guarantee accurate and reliable information. Our content, validated by Expert Board Contributors, is crafted following stringent Editorial Policies. We're committed to providing you with well-researched, expert-backed insights for all your informational needs.


0 thoughts on “How To Miter Corners On A Quilt”