Home>Renovation & DIY>Home Renovation Guides>How To Build A Deck: Home Improvements

Home Renovation Guides
How To Build A Deck: Home Improvements
Modified: August 27, 2024
Learn how to build a deck and enhance your home with our comprehensive home renovation guides. Find expert tips and advice for your DIY project.
(Many of the links in this article redirect to a specific reviewed product. Your purchase of these products through affiliate links helps to generate commission for Storables.com, at no extra cost. Learn more)
Introduction
So, you've decided to take on the exciting challenge of building a deck to enhance your home's outdoor living space. Congratulations! A well-designed and expertly constructed deck not only adds value to your property but also provides a versatile area for relaxation, entertainment, and enjoying the natural beauty of your surroundings. Whether you envision hosting lively gatherings, basking in the sun with a good book, or simply savoring a cup of coffee in the fresh air, a carefully crafted deck can transform your outdoor experience.
In this comprehensive guide, we will walk you through the step-by-step process of building a deck, from the initial planning stages to the finishing touches. By the end of this journey, you will have the knowledge and confidence to create a stunning and functional deck that complements your home and lifestyle. So, roll up your sleeves, gather your tools, and let's embark on this rewarding home improvement project together.
Before we dive into the nitty-gritty details of deck construction, it's essential to emphasize the importance of safety and adherence to local building codes. Building a deck involves working with heavy materials, power tools, and elevated surfaces, so prioritizing safety measures throughout the project is non-negotiable. Additionally, familiarizing yourself with the specific regulations and permit requirements in your area is crucial to ensure that your deck is not only aesthetically pleasing but also compliant with legal standards.
Now that we've set the stage for our deck-building journey, let's move on to the crucial first step: planning and designing your dream deck.
Key Takeaways:
- Planning and designing your dream deck is crucial. Consider the space, layout, and materials to create a functional and visually appealing outdoor oasis that suits your lifestyle and enhances your home.
- Building a deck requires meticulous attention to detail and adherence to safety measures. From obtaining permits to selecting materials and tools, each step contributes to the success of your home improvement project.
Read more: The ABCs Of Deck Building
Planning and Designing Your Deck
Before you break ground and start swinging hammers, it’s essential to lay a solid foundation for your deck project through meticulous planning and thoughtful design. This phase is where your creativity takes center stage, allowing you to envision the size, shape, and layout of your future outdoor oasis. Consider how you intend to use the space – whether it’s for hosting al fresco dinner parties, lounging in the sun, or creating a cozy nook for morning coffee – and let these aspirations guide your design decisions.
Begin by surveying your outdoor space and evaluating the existing architectural features of your home. Take note of any obstructions, such as trees, utility lines, or uneven terrain, that may impact the placement and design of your deck. Additionally, consider the orientation of your deck in relation to the sun and prevailing winds, as these factors can influence the comfort and usability of the space throughout the day and across different seasons.
Next, think about the dimensions and shape of your deck. Will it be a modest platform just off the back door, or do you envision a multi-tiered structure with designated areas for dining, lounging, and grilling? Sketching out a rough layout on graph paper or using a digital design tool can help you visualize different configurations and ensure that your deck will harmonize with your outdoor environment and lifestyle.
As you brainstorm the aesthetics of your deck, also consider the practical aspects of its construction. Will the deck require stairs to access the yard or connect to another outdoor area? Do you want to incorporate built-in seating, planters, or a pergola for added charm and functionality? These design elements not only contribute to the visual appeal of your deck but also influence its usability and comfort.
Furthermore, explore the various material options for your deck surface, railing, and structural components. From classic wood to low-maintenance composite decking, the market offers a wide array of choices to suit different preferences and budgets. Understanding the characteristics and maintenance requirements of each material will empower you to make informed decisions that align with your vision for the perfect outdoor retreat.
By investing time and creativity in the planning and design phase, you set the stage for a successful and satisfying deck-building experience. With a clear vision and a well-thought-out plan in hand, you’re ready to move forward to the next crucial step: obtaining the necessary permits.
Obtaining Necessary Permits
Before you delve into the exciting realm of deck construction, it’s imperative to navigate the regulatory landscape and secure the required permits for your project. While the prospect of obtaining permits may seem daunting, especially for first-time DIY enthusiasts, adhering to local building codes and regulations is essential for ensuring the safety, structural integrity, and compliance of your deck.
Start by researching the specific permit requirements in your area, as these can vary based on factors such as the size of the deck, its proximity to property lines, and local zoning ordinances. Contact your municipal building department or visit their website to access the necessary forms, guidelines, and information pertaining to deck construction permits. It’s also advisable to inquire about any design restrictions, setback requirements, or environmental considerations that may impact your deck project.
When preparing your permit application, you will likely need to provide detailed plans and specifications for your deck, including its dimensions, elevation, structural details, and proposed materials. These documents not only demonstrate your commitment to building a safe and compliant structure but also serve as a valuable reference throughout the construction process.
Once you’ve gathered the required documentation, submit your permit application to the relevant authorities and be prepared to pay the associated fees. While the permitting process may introduce a brief waiting period, it’s a crucial step that ensures your deck meets the necessary standards and contributes to the overall safety and aesthetics of your property.
While navigating the permit process may seem like a bureaucratic hurdle, viewing it as an opportunity to engage with local building officials and gain valuable insights can alleviate some of the stress. Building a positive rapport with the authorities responsible for reviewing and approving your permit can foster a collaborative and supportive environment, potentially leading to helpful guidance and a smoother approval process.
By obtaining the necessary permits and embracing the regulatory aspects of deck construction, you demonstrate a commitment to responsible and high-quality home improvement. With the permit in hand, you can proceed with confidence to the next phase of your deck-building journey: choosing the right materials.
Choosing the Right Materials
When it comes to building a deck that seamlessly blends durability, aesthetics, and maintenance considerations, the choice of materials plays a pivotal role. From traditional wood to modern composite options, the market offers a diverse array of decking materials, each with its own unique characteristics, benefits, and maintenance requirements.
Wood remains a timeless and popular choice for decking, exuding natural warmth and charm. Cedar and redwood, renowned for their natural resistance to decay and insects, are favored for their rich hues and distinct grain patterns. Pressure-treated lumber, treated with preservatives to enhance its durability, presents a cost-effective and versatile option for deck construction. However, it’s important to note that wood decks require regular maintenance, including staining or sealing, to preserve their appearance and structural integrity over time.
For homeowners seeking a low-maintenance alternative to traditional wood, composite decking emerges as a compelling option. Composed of a blend of wood fibers and recycled plastic, composite decking offers exceptional resistance to fading, staining, and rot. Furthermore, it eliminates the need for annual staining or sealing, making it an attractive choice for those desiring a hassle-free outdoor living space. With a wide spectrum of colors, textures, and finishes available, composite decking allows you to achieve the desired aesthetic while enjoying long-term durability and minimal upkeep.
Another material gaining traction in the decking industry is PVC (polyvinyl chloride) decking, recognized for its exceptional resistance to moisture, mold, and fading. PVC decking delivers outstanding durability and requires minimal maintenance, making it an appealing option for homeowners seeking a long-lasting and weather-resistant deck surface. Additionally, PVC decking is available in an array of colors and textures, enabling you to customize your deck to suit your personal style and preferences.
As you weigh the merits of different decking materials, consider factors such as cost, longevity, environmental impact, and visual appeal. Additionally, evaluate the potential for customization, such as integrating contrasting colors or incorporating unique design elements, to create a truly personalized outdoor retreat.
By carefully evaluating the characteristics and requirements of various decking materials, you can make an informed decision that aligns with your vision for the perfect deck. Armed with this knowledge, you’re ready to embark on the next stage of your deck-building endeavor: exploring the essential tools and equipment required for the construction process.
Tools and Equipment Required
As you prepare to bring your vision of a stunning deck to life, equipping yourself with the right tools and equipment is essential for a smooth and efficient construction process. From precise measurements to sturdy fastenings, the tools you select can significantly impact the quality and precision of your deck installation. Here’s a comprehensive overview of the essential tools and equipment you’ll need to execute your deck-building project with confidence:
- Tape Measure: A reliable tape measure is indispensable for accurately determining dimensions, ensuring precise cuts, and maintaining consistency throughout the construction process.
- Level: Whether it’s a traditional spirit level or a laser level, this tool is critical for confirming that your deck’s structural elements are perfectly aligned and plumb.
- Square: A framing square enables you to confirm the accuracy of right angles, ensuring the structural integrity and stability of your deck frame.
- Power Drill: A versatile power drill equipped with a range of drill bits and screwdriver attachments is essential for driving screws, pre-drilling holes, and assembling various components of your deck.
- Saw: Depending on your preferences and the materials you’re working with, a circular saw, miter saw, or jigsaw may be necessary for making precise cuts in decking boards, framing lumber, and railing components.
- Hammer: A sturdy hammer is indispensable for tasks such as driving nails, adjusting framing members, and ensuring a secure connection between structural elements.
- Post Hole Digger: If your deck design includes posts for support or railings, a post hole digger facilitates the excavation of stable and uniform holes for secure installations.
- String Line: Utilized for establishing straight and level layout lines, a string line is invaluable for ensuring the accuracy and alignment of your deck’s structural elements.
- Work Gloves and Safety Gear: Prioritize safety by equipping yourself with sturdy work gloves, eye protection, and appropriate footwear to safeguard against potential hazards during construction.
Additionally, depending on the scope and complexity of your deck project, you may require specialized tools such as a pneumatic nail gun, a post level for precise post installation, and a joist hanger nailer for efficient attachment of joist hangers. By assembling a comprehensive array of tools and equipment tailored to your specific project requirements, you’ll be well-prepared to tackle the construction process with precision and confidence.
Armed with the necessary tools and equipment, you’re now poised to transition from the planning and preparation phase to the hands-on execution of your deck construction. The next stage of our journey will delve into the crucial steps involved in preparing the site for the installation of your dream deck.
Read more: How To Build A Decking
Preparing the Site
As you embark on the physical realization of your deck construction project, the preparatory phase of site readiness assumes paramount importance. Proper site preparation lays the groundwork for a stable, long-lasting deck that seamlessly integrates with its surroundings and enhances the overall appeal of your outdoor space. Here’s a comprehensive guide to the essential steps involved in preparing the site for the installation of your dream deck:
- Clearing and Excavation: Begin by clearing the designated area of any vegetation, debris, or obstructions that may impede the construction process. If your deck design involves a raised platform or requires footings, excavate the soil to the specified depth to accommodate the foundation elements.
- Grading and Leveling: Ensure that the site is graded and leveled to provide a stable and uniform base for your deck. Use a transit or laser level to verify the evenness of the ground, making any necessary adjustments to achieve the desired slope and elevation for proper drainage.
- Marking Layout and Footprint: Using stakes, string lines, or marking paint, outline the precise dimensions and configuration of your deck on the prepared site. This step enables you to visualize the footprint of the deck and confirm that it aligns with your initial design and layout plans.
- Locating and Installing Footings: If your deck design necessitates footings for support, accurately position and install the footings according to the predetermined layout and spacing requirements. Ensure that the footings are securely anchored and aligned to support the weight and structure of your deck.
- Verifying Compliance and Safety: Prior to proceeding with the construction phase, confirm that the site preparation and initial foundation work comply with local building codes, zoning regulations, and safety standards. This proactive approach mitigates potential setbacks and ensures a smooth progression to the subsequent stages of deck construction.
By meticulously executing these site preparation steps, you establish a solid foundation for the forthcoming phases of deck construction. The thoroughness and attention to detail invested in this preparatory stage set the stage for a seamless and successful transition to the next pivotal step: building the foundation of your deck.
With the site meticulously prepared and the foundation framework poised for construction, you’re ready to channel your efforts and enthusiasm into the foundational phase of your deck-building journey. The subsequent section will delve into the essential steps involved in building the foundation that will support and stabilize your dream deck.
When building a deck, make sure to use pressure-treated lumber to prevent rot and decay. It’s also important to properly space the deck boards to allow for water drainage and expansion.
Building the Foundation
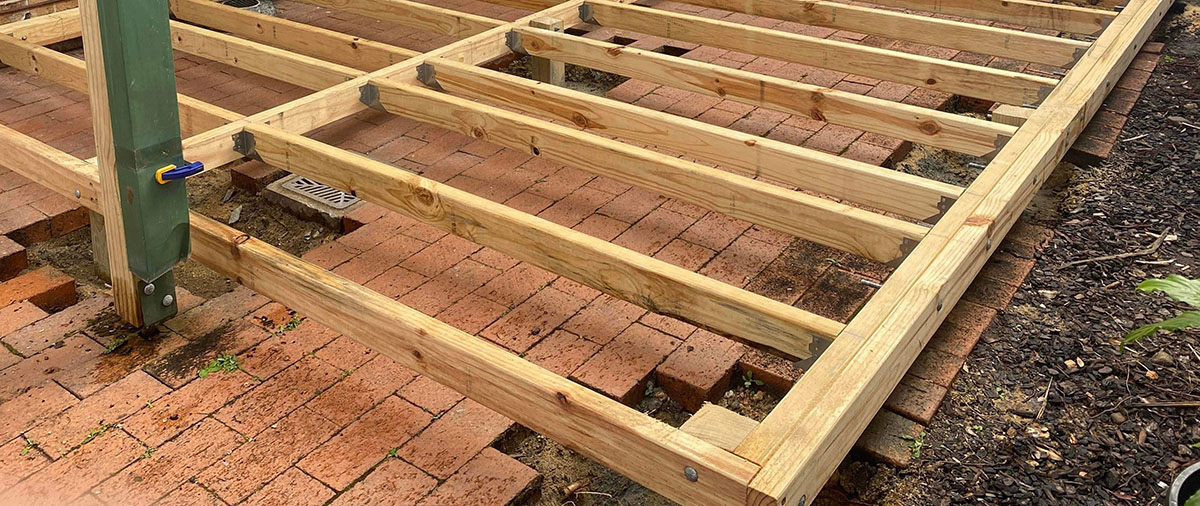
As you transition from the preparatory phase to the tangible construction of your deck, the foundational elements take center stage, providing the structural support and stability essential for a secure and enduring outdoor living space. Building the foundation involves a series of critical steps that form the backbone of your deck’s structural integrity. Here’s a comprehensive overview of the essential components and procedures involved in constructing the foundation for your dream deck:
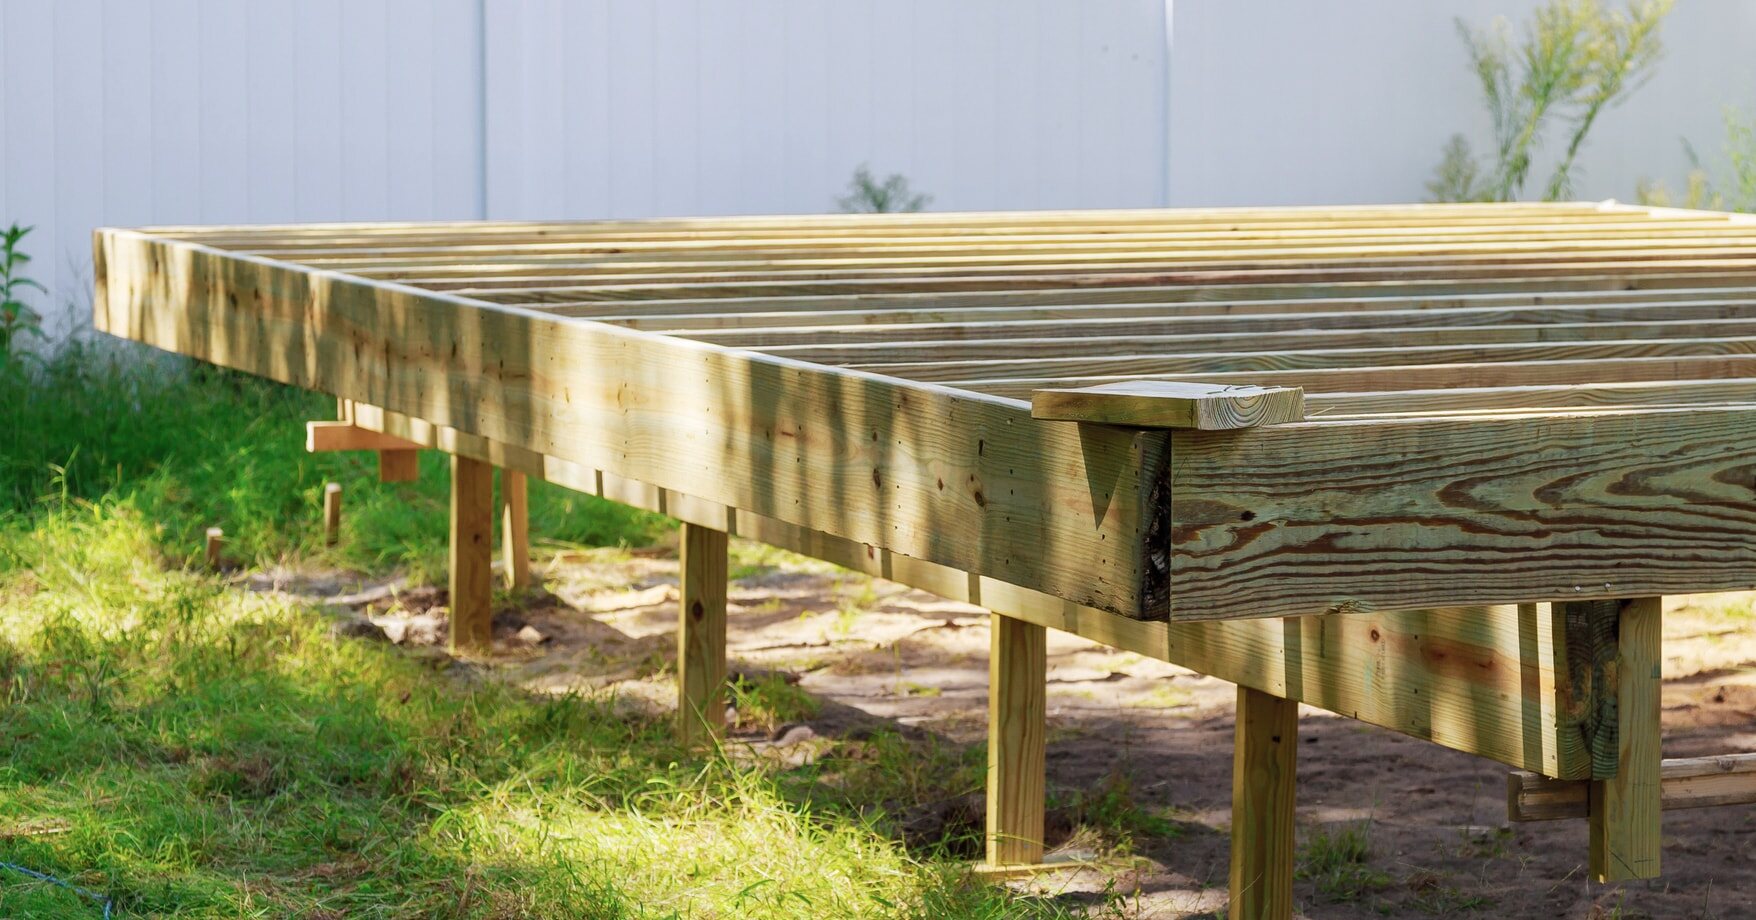
- Installing Support Posts: If your deck design incorporates elevated platforms or requires support posts, carefully position and secure the posts in accordance with the predetermined layout and spacing. Utilize post anchors or concrete footings to ensure a solid connection between the posts and the ground, mitigating the risk of settling or shifting over time.
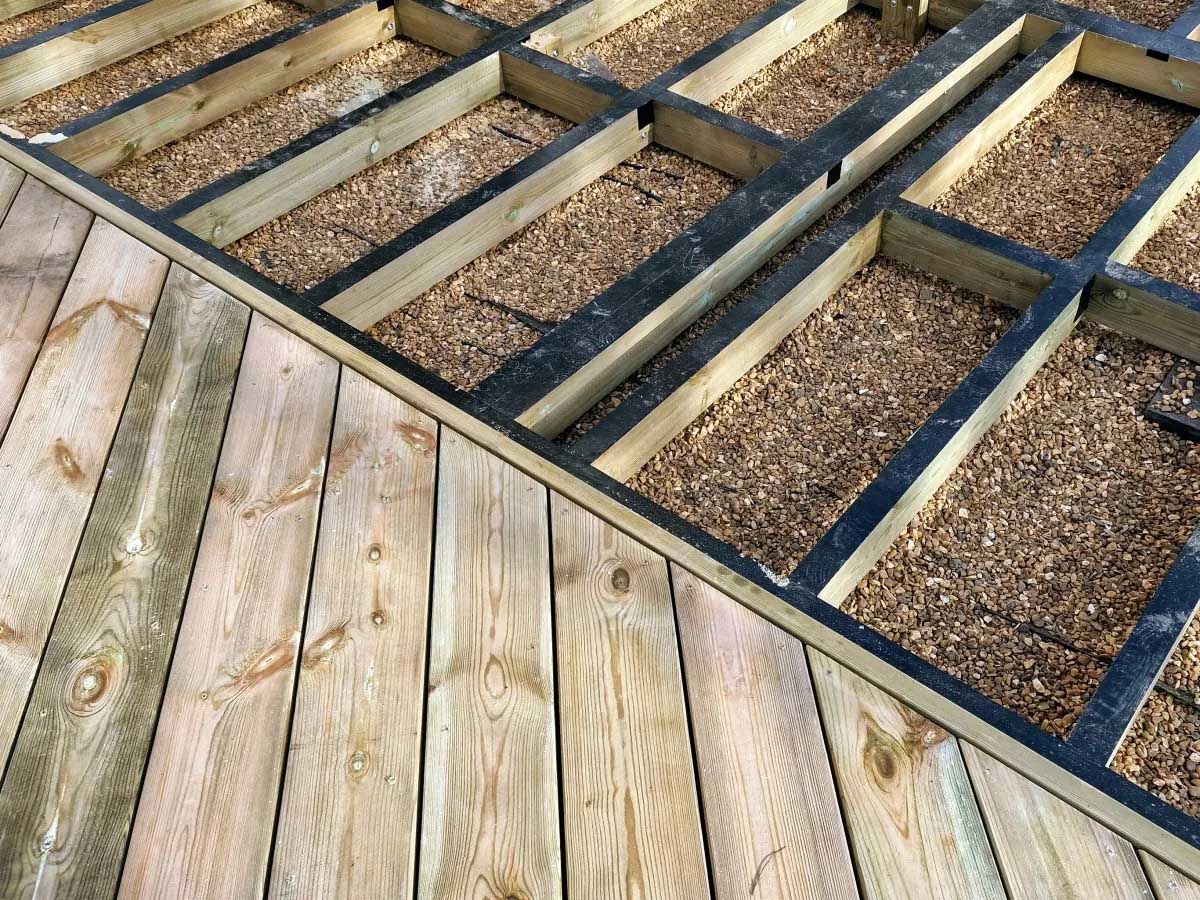
- Attaching Beams and Joists: Once the support posts are in place, attach the beams horizontally to the posts to form the framework that supports the deck’s structure. Subsequently, install the joists perpendicular to the beams, ensuring uniform spacing and alignment to accommodate the decking material and provide a stable platform for the deck surface.
- Implementing Bracing and Cross-Bracing: To enhance the rigidity and stability of the deck’s foundation, incorporate diagonal bracing and cross-bracing between support posts and beams. By strategically reinforcing the structural framework, you minimize the risk of lateral movement and ensure the overall resilience of the deck’s foundation.
- Verifying Level and Alignment: Throughout the foundation construction process, meticulously verify the levelness and alignment of the support posts, beams, and joists. Utilize a level, string lines, or laser tools to confirm the accuracy and uniformity of the structural elements, rectifying any discrepancies to establish a solid and balanced foundation.
- Consulting Structural Plans and Specifications: Refer to your detailed deck plans and structural specifications to ensure that the foundation construction aligns with the prescribed dimensions, load-bearing requirements, and design parameters. Adhering to the prescribed guidelines and engineering principles is instrumental in establishing a foundation that upholds the safety and longevity of your deck.
By methodically executing these foundational construction steps, you lay the groundwork for a robust and dependable support system that forms the backbone of your deck’s structural framework. With the foundation in place, you’re poised to progress to the next pivotal phase of your deck-building journey: constructing the deck frame that will serve as the canvas for your outdoor retreat.
With the foundation firmly established, you’re ready to elevate your deck construction project to the next level by embarking on the construction of the deck frame. The subsequent section will delve into the essential steps involved in constructing the framework that will provide the basis for your dream deck’s structural integrity and functionality.
Constructing the Deck Frame
As you progress to the pivotal phase of constructing the deck frame, you embark on the transformative process of shaping the structural skeleton that will underpin your outdoor haven. The deck frame forms the framework upon which the decking boards will be secured, providing the essential support and stability for your outdoor retreat. Here’s a comprehensive guide to the essential steps and considerations involved in constructing the deck frame:
- Attaching Ledger Board: If your deck is attached to the house, the ledger board is affixed to the exterior wall to provide crucial support for the deck frame. Ensure that the ledger board is securely fastened to the house framing, employing appropriate flashing to prevent water intrusion and safeguard the structural integrity of your home.
- Positioning and Securing Joists: Install the joists perpendicular to the ledger board or support beams, ensuring uniform spacing and alignment to accommodate the decking material. Utilize joist hangers or appropriate fasteners to secure the joists to the ledger board and beams, maintaining structural stability and load-bearing capacity.
- Integrating Beam Connections: Where multiple beams or support posts intersect with the joists, implement sturdy beam connections to establish a robust and cohesive framework. Utilize approved hardware and fastening methods to ensure secure and reliable connections that withstand the anticipated loads and environmental factors.
- Verifying Level and Square: Throughout the deck frame construction process, meticulously verify the levelness and squareness of the joists and beams. Utilize a level, framing square, or string lines to confirm the accuracy and alignment of the structural elements, rectifying any deviations to establish a stable and well-aligned deck frame.
- Consulting Structural Plans and Specifications: Refer to your detailed deck plans and structural specifications to ensure that the deck frame construction aligns with the prescribed dimensions, load-bearing requirements, and design parameters. Adhering to the prescribed guidelines and engineering principles is instrumental in establishing a frame that upholds the safety and longevity of your deck.
By methodically executing these deck frame construction steps, you establish a sturdy and precisely engineered framework that forms the backbone of your deck’s structural integrity. With the deck frame in place, you’re poised to transition to the next vital phase of your deck-building journey: installing the decking boards that will define the aesthetic and functional character of your outdoor retreat.
With the deck frame meticulously assembled and the structural foundation solidified, you’re ready to infuse your outdoor living space with character and charm by installing the decking boards. The subsequent section will delve into the essential steps involved in this transformative phase of your deck construction journey.
Installing Decking Boards
As you approach the transformative phase of installing decking boards, you embark on the visually impactful process of establishing the surface that will define the character and functionality of your deck. The decking boards serve as the platform for relaxation, entertainment, and outdoor enjoyment, making their installation a pivotal step in your deck-building journey. Here’s a comprehensive guide to the essential steps and considerations involved in installing decking boards:
- Selecting Decking Material: Whether you’ve opted for traditional wood, composite decking, or alternative materials, carefully select and procure the decking boards that align with your aesthetic preferences, maintenance expectations, and desired longevity for your outdoor space.
- Commencing Installation: Begin the installation process by determining the optimal orientation and starting point for laying the decking boards. Depending on the design and layout of your deck, consider factors such as traffic flow, visual appeal, and efficient material utilization when establishing the initial placement of the boards.
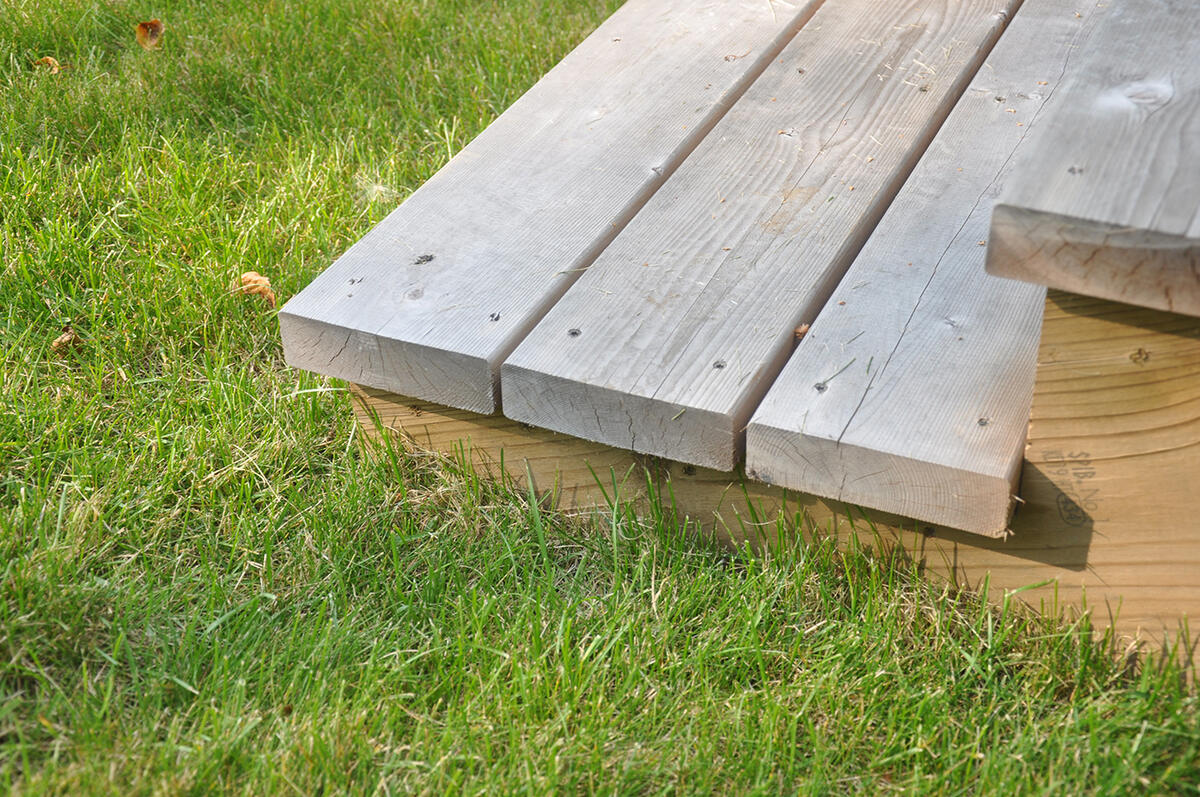
- Securing the Boards: Utilize appropriate fastening methods, such as screws or hidden fasteners, to secure the decking boards to the underlying joists. Maintain consistent spacing between the boards to facilitate drainage, expansion, and contraction while ensuring a uniform and visually pleasing surface.
- Implementing Proper Fastening Techniques: Follow manufacturer recommendations and best practices for fastening the decking boards, ensuring that each board is securely attached to the underlying structure. Pay attention to end joints and butt joints, employing approved fastening methods to promote stability and minimize potential movement or warping over time.
- Verifying Alignment and Levelness: Throughout the installation process, meticulously verify the alignment and levelness of the decking boards, making any necessary adjustments to achieve a smooth and uniform surface. Utilize a straight edge or level to confirm the evenness of the boards, rectifying any irregularities to achieve a visually appealing and structurally sound deck surface.
By methodically executing these decking board installation steps, you establish a visually striking and functional surface that forms the focal point of your outdoor living space. With the decking boards in place, you’re poised to transition to the next critical phase of your deck-building journey: adding railings and stairs that enhance the safety, accessibility, and aesthetic appeal of your deck.
With the decking boards meticulously installed and the surface of your deck taking shape, you’re ready to elevate the functionality and visual allure of your outdoor retreat by incorporating railings and stairs. The subsequent section will delve into the essential steps involved in this pivotal phase of your deck construction journey.
Adding Railings and Stairs
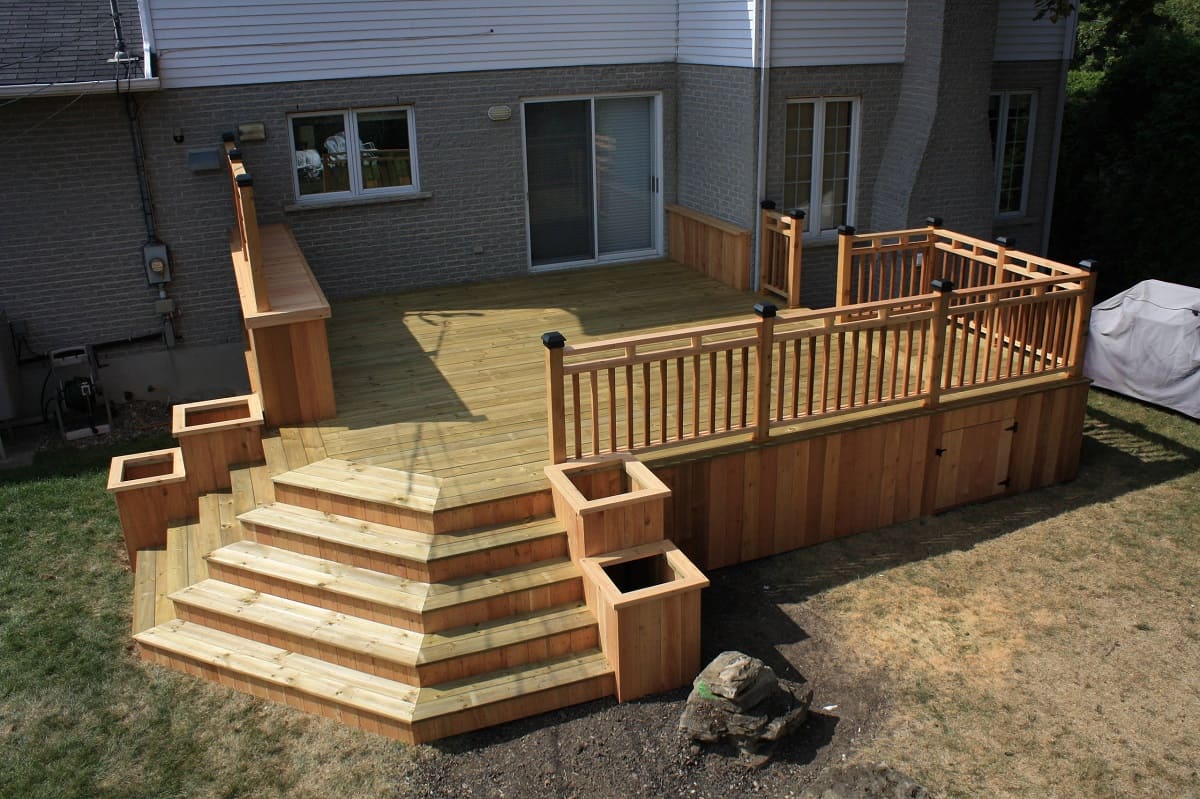
As you progress to the pivotal phase of adding railings and stairs, you embark on the transformative process of enhancing the safety, accessibility, and visual appeal of your deck. Railings provide essential support and delineate the boundaries of your outdoor space, while stairs facilitate seamless transitions between different levels, elevating the functionality and aesthetics of your deck. Here’s a comprehensive guide to the essential steps and considerations involved in adding railings and stairs to your deck:
- Choosing Railing Styles: Select railing components that complement the design aesthetic of your deck while meeting safety requirements. Whether you opt for classic wood railings, sleek metal balusters, or low-maintenance composite systems, ensure that the chosen railing style harmonizes with the overall ambiance of your outdoor retreat.
- Measuring and Planning: Accurately measure the intended railing and stair locations, considering factors such as code-compliant railing height, baluster spacing, and the optimal placement of stairs to ensure safe and convenient access to your deck from different vantage points.
- Installing Railings: Secure the railing posts to the deck frame or surface, ensuring a sturdy and level connection that withstands the anticipated loads and provides a secure boundary for the deck. Subsequently, install the railing sections or balusters, maintaining uniform spacing and alignment to achieve an aesthetically pleasing and structurally sound railing system.
- Constructing Stair Framework: If your deck design incorporates multiple levels or requires access to the surrounding landscape, construct the stair framework with meticulous attention to structural integrity and safety. Ensure that the stair stringers, treads, and risers are securely installed, providing a stable and comfortable means of transitioning between different elevations.
- Applying Finishing Touches: Once the basic framework of the railings and stairs is in place, attend to finishing details such as post caps, handrails, and trim elements that enhance the visual appeal and functionality of the railing system. Additionally, consider lighting options for the stairs and railings to illuminate and accentuate the architectural features of your deck during evening hours.
By methodically executing these railing and stair installation steps, you elevate the safety, accessibility, and visual allure of your deck, creating a welcoming and secure outdoor environment. With the railings and stairs in place, you’re poised to transition to the final phase of your deck-building journey: applying finishing touches that elevate the comfort and ambiance of your outdoor retreat.
With the railings and stairs seamlessly integrated into the structure of your deck, you’re ready to infuse your outdoor living space with personalized details and amenities that enhance its comfort and visual appeal. The subsequent section will delve into the essential steps involved in this culminating phase of your deck construction journey.
Applying Finishing Touches
As you approach the culminating phase of your deck construction journey, the application of finishing touches serves as the defining moment where functionality meets aesthetics, elevating your outdoor retreat to its full potential. From personalized accents to practical amenities, these final details infuse your deck with comfort, style, and individuality, creating a welcoming and harmonious outdoor living space. Here’s a comprehensive guide to the essential steps and considerations involved in applying finishing touches to your deck:
- Staining or Sealing: If your deck features natural wood surfaces, consider applying a protective stain or sealant to enhance its durability and weather resistance while accentuating the natural beauty of the wood grain. Select a finish that complements the overall design aesthetic of your deck and provides long-lasting protection against the elements.
- Furnishing and Decor: Introduce outdoor furniture, accessories, and decorative elements that reflect your personal style and cater to the intended uses of your deck. Whether it’s a cozy seating area, a dining ensemble, or potted plants and greenery, the right furnishings and decor infuse your deck with warmth and character.
- Lighting Solutions: Consider incorporating lighting elements such as pathway lights, deck post cap lights, or string lights to extend the functionality and ambiance of your deck into the evening hours. Thoughtfully placed lighting enhances safety, accentuates architectural features, and creates a captivating atmosphere for nighttime gatherings.
- Outdoor Amenities: Explore the integration of practical amenities that enhance the comfort and convenience of your deck, such as built-in benches, storage solutions, or a dedicated grilling area. By customizing your deck with amenities tailored to your lifestyle, you create a versatile and inviting outdoor space.
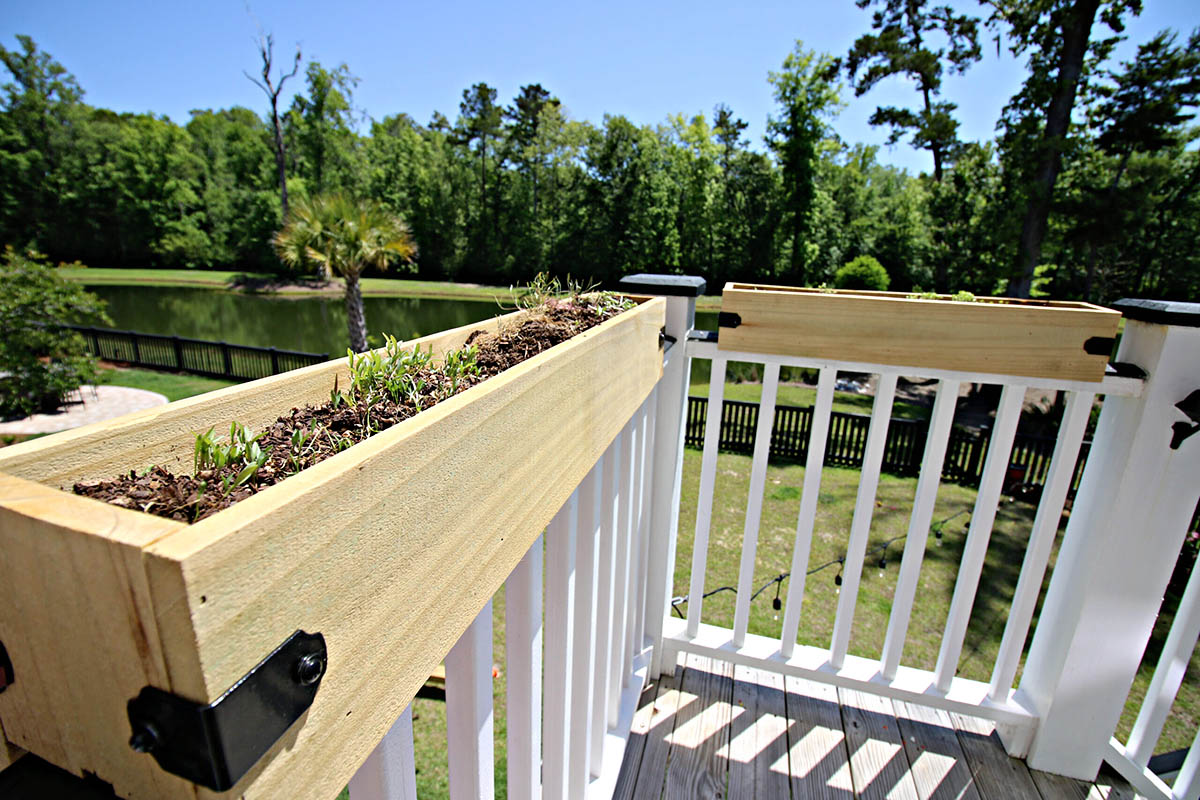
- Landscaping Integration: Seamlessly blend your deck with the surrounding landscape by incorporating planters, trellises, or integrated greenery that softens the transition between the built environment and the natural elements. Thoughtful landscaping integration adds depth and visual interest to your outdoor retreat.
By methodically attending to these finishing touches, you transform your deck into a personalized sanctuary that reflects your preferences and enhances your outdoor living experience. With the finishing touches in place, you’ve brought your vision of the perfect deck to fruition, creating a captivating and functional extension of your home.
With the finishing touches thoughtfully integrated into the fabric of your deck, you’ve completed a transformative journey of envisioning, planning, and constructing a space that enriches your lifestyle and connects you with the beauty of the outdoors. Whether it’s a tranquil retreat for solitary contemplation or a vibrant setting for joyful gatherings, your deck stands as a testament to your creativity, craftsmanship, and dedication to home improvement.
Congratulations on completing your deck construction project, and may your newly crafted outdoor oasis bring you endless moments of relaxation, connection, and inspiration.
Conclusion
Congratulations on successfully navigating the exhilarating journey of building your dream deck! From the initial spark of inspiration to the meticulous planning, hands-on construction, and thoughtful finishing touches, you’ve embarked on a transformative endeavor that has enriched your home and lifestyle. As you stand on the threshold of your newly crafted outdoor haven, it’s essential to reflect on the significance of this achievement and the enduring impact it will have on your daily life.
Your deck is more than a mere extension of your home – it’s a dynamic canvas for creating cherished memories, fostering connections, and savoring the beauty of the great outdoors. Whether it’s a tranquil retreat for solitude and reflection, a vibrant stage for festive gatherings, or a versatile space for everyday relaxation, your deck embodies the essence of outdoor living at its finest.
Throughout this journey, you’ve not only honed your skills as a DIY enthusiast but also cultivated a deep appreciation for the artistry and craftsmanship that define your home. Every cut, fastening, and finishing detail bears the imprint of your dedication and vision, transforming raw materials into a functional and captivating sanctuary.
As you bask in the satisfaction of a project well executed, remember that your deck is a living testament to your creativity, resourcefulness, and unwavering commitment to enhancing your living environment. It stands as a beacon of pride and a testament to the transformative power of home improvement.
Now, as you envision the countless moments of joy, relaxation, and connection that await you on your newly constructed deck, take a moment to savor the sense of accomplishment and fulfillment that accompanies this milestone. Whether it’s the first sip of morning coffee amidst the gentle rustle of leaves or the laughter of loved ones gathered under the evening sky, your deck is poised to become the backdrop for countless cherished experiences.
As you embark on this new chapter of outdoor living, may your deck be a source of inspiration, rejuvenation, and boundless enjoyment. Embrace the beauty of your surroundings, create lasting memories, and revel in the transformative power of a space that you’ve envisioned and brought to life.
With your deck standing as a testament to your ingenuity and passion, may it serve as a vibrant stage for the countless stories, moments, and connections that will unfold in the embrace of its inviting ambiance.
Frequently Asked Questions about How To Build A Deck: Home Improvements
Was this page helpful?
At Storables.com, we guarantee accurate and reliable information. Our content, validated by Expert Board Contributors, is crafted following stringent Editorial Policies. We're committed to providing you with well-researched, expert-backed insights for all your informational needs.


0 thoughts on “How To Build A Deck: Home Improvements”