Home>Renovation & DIY>Home Renovation Guides>How To Install A Storm Door Chain
Home Renovation Guides
How To Install A Storm Door Chain
Modified: August 27, 2024
Learn how to install a storm door chain with our comprehensive home renovation guide. Follow our step-by-step instructions for a hassle-free installation.
(Many of the links in this article redirect to a specific reviewed product. Your purchase of these products through affiliate links helps to generate commission for Storables.com, at no extra cost. Learn more)
Introduction
Welcome to our comprehensive guide on how to install a storm door chain. Storm doors not only provide an additional layer of protection for your home but also offer ventilation during pleasant weather. However, to ensure the door remains secure and functional, installing a storm door chain is crucial. This simple yet effective device prevents the door from swinging open too far, protecting the hinges and the door itself. Whether you're a seasoned DIY enthusiast or a novice looking to tackle your first home improvement project, this step-by-step guide will walk you through the process of installing a storm door chain with ease.
In this guide, we'll cover the essential tools and materials you'll need, the preparatory steps for ensuring a smooth installation, the actual process of installing the door chain, and finally, how to adjust and test the chain to guarantee optimal functionality. By the end of this tutorial, you'll have the knowledge and confidence to enhance the security and longevity of your storm door. So, grab your tools and let's get started on this rewarding home improvement endeavor!
Key Takeaways:
- Attention to Detail:
Taking the time to measure, align, and test each component ensures a successful installation and optimal functionality of the storm door chain. Attention to detail is key for a job well done! - Enhanced Security:
Installing a storm door chain adds an extra layer of security to your home. The controlled movement of the storm door prevents potential damage, offering peace of mind and protection for your property.
Read more: Installing A Storm Door
Tools and Materials
Before embarking on the installation of a storm door chain, it’s essential to gather the necessary tools and materials. Here’s a comprehensive list to ensure you have everything at your disposal:
Tools:
- Power drill
- Drill bits
- Screwdriver
- Tape measure
- Pencil
- Level
- Adjustable wrench
- Hammer
- Safety goggles
- Gloves
Materials:
- Storm door chain kit (includes chain, brackets, screws, and other necessary components)
- Wood shims
- Painter's tape
- Silicone lubricant
Having these tools and materials readily available will streamline the installation process and ensure that you’re fully equipped to tackle any challenges that may arise. Now that you’re prepared with the essentials, let’s move on to the next steps in preparing the door for the installation of the storm door chain.
Preparing the Door
Before diving into the installation of the storm door chain, it’s crucial to prepare the door and its surroundings to ensure a seamless and effective installation process. Here’s a step-by-step guide to preparing the door for the installation:
Read more: How To Install A Larson Storm Door
1. Remove the Storm Door:
If there’s an existing storm door in place, carefully remove it from the door frame. This may involve unscrewing hinges and any other hardware securing the door in place. Ensure that the area around the door is clear of any obstructions to allow for easy access and maneuverability during the installation process.
2. Clean and Inspect the Door Frame:
Thoroughly clean the door frame and surrounding areas to remove any dirt, debris, or old adhesive from the previous door installation. Inspect the frame for any signs of damage, such as rot or warping, and address any issues before proceeding with the installation of the storm door chain.
3. Measure and Mark the Installation Points:
Using a tape measure and pencil, carefully mark the precise points where the brackets for the storm door chain will be installed. Ensure that the markings are level and symmetrical to guarantee the proper alignment of the chain once installed.
4. Apply Lubricant:
Apply a small amount of silicone lubricant to the hinges and moving parts of the storm door to ensure smooth operation once the chain is installed. This will help prevent any unnecessary friction and ensure the longevity of the door and the newly installed chain.
Read more: How To Install A Door Closer On A Storm Door
5. Check for Proper Alignment:
Using a level, check the alignment of the door frame to ensure that it is plumb and square. Making any necessary adjustments at this stage will contribute to a more straightforward installation process and a well-functioning storm door chain.
By following these preparatory steps, you’ll set the stage for a successful installation of the storm door chain. With the door and its surroundings properly prepared, you’re now ready to proceed with the actual installation of the door chain.
Installing the Door Chain
With the door and its surroundings properly prepared, it’s time to embark on the installation of the storm door chain. Follow these step-by-step instructions to ensure a smooth and effective installation:
1. Position the Brackets:
Begin by positioning the brackets for the storm door chain at the marked installation points on the door frame. Use a tape measure and level to ensure that the brackets are aligned and symmetrical. Once satisfied with the positioning, use a pencil to mark the screw holes for the brackets.
2. Pre-drill Screw Holes:
Using a power drill and the appropriate drill bit, pre-drill the screw holes at the marked points for the brackets. This will prevent the wood from splitting and facilitate the insertion of the screws during the installation process.
Read more: How To Install A Dog Door In A Storm Door
3. Attach the Brackets:
Secure the brackets to the door frame using the provided screws and a screwdriver. Ensure that the brackets are firmly attached and level to provide a stable foundation for the storm door chain.
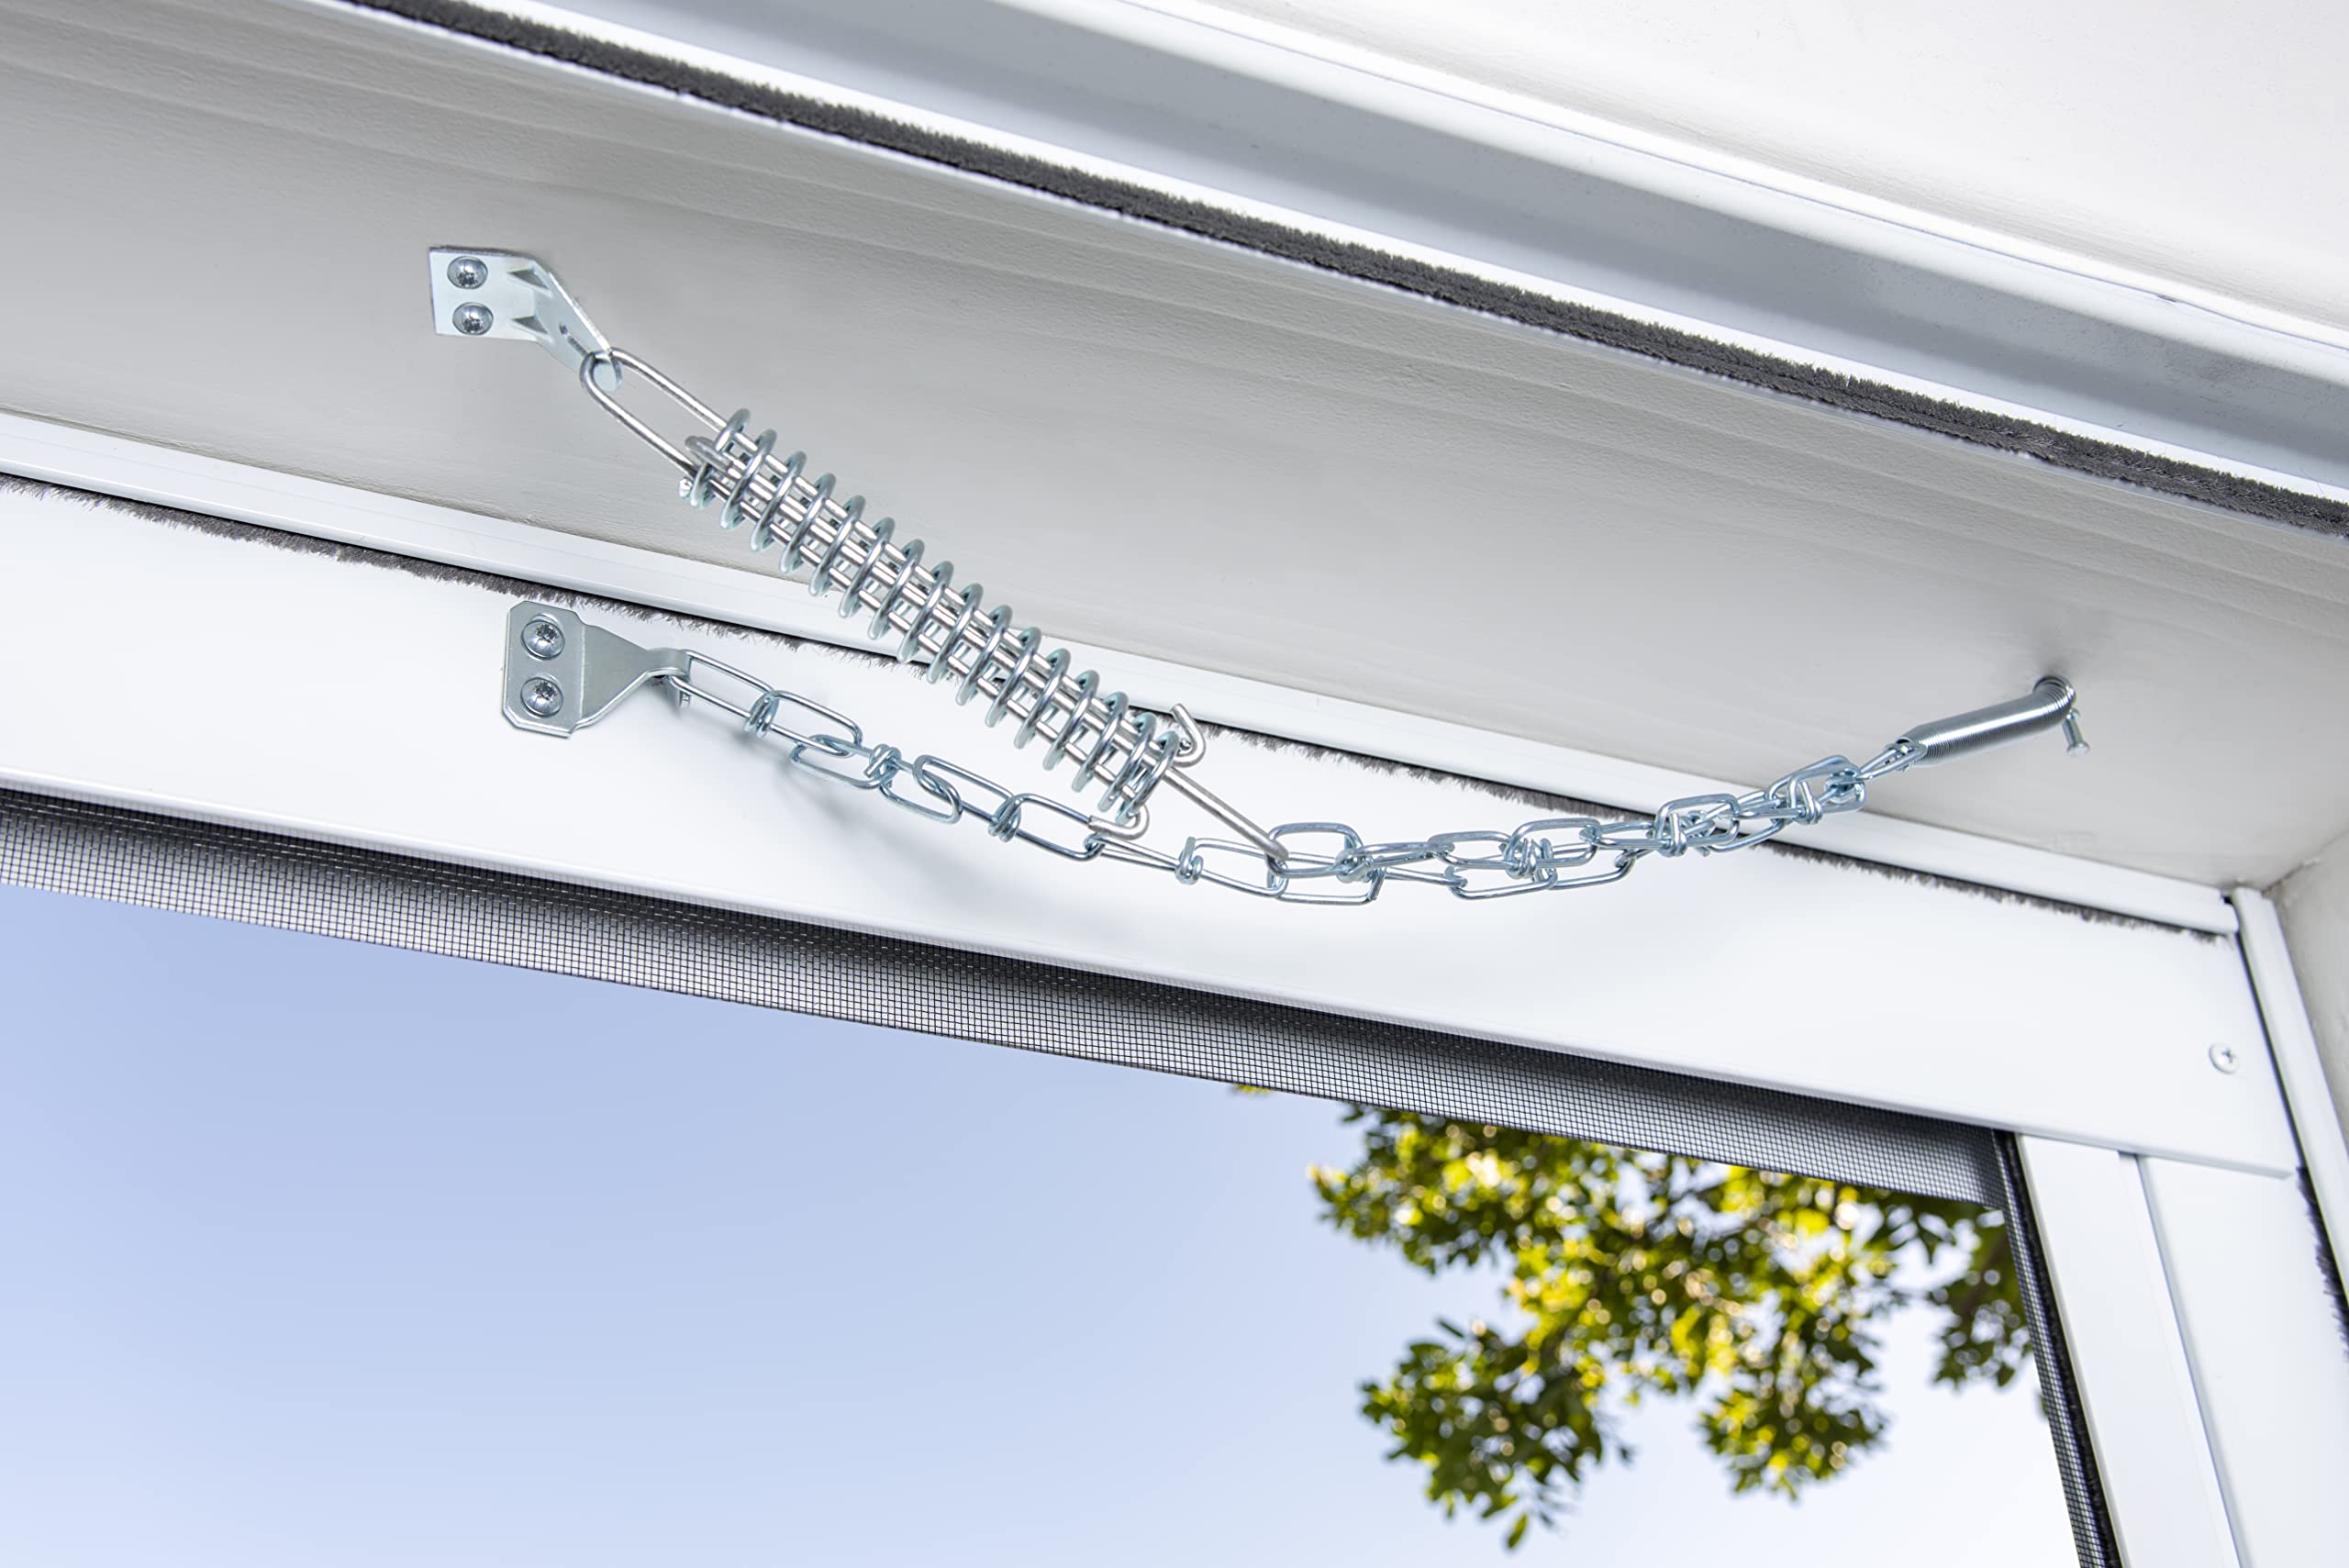
4. Install the Chain:
With the brackets in place, it’s time to install the chain. Attach one end of the chain to the bracket on the door frame and the other end to the corresponding bracket on the storm door. Depending on the specific design of the chain, this may involve using included hardware or simply looping the chain around the designated attachment points.
5. Test the Operation:
Once the chain is securely attached, test the operation of the storm door by opening and closing it to ensure that the chain functions as intended. The door should open smoothly and come to a controlled stop when the chain reaches its full extension, preventing it from swinging too far open and potentially causing damage.
By following these steps, you’ll successfully install a storm door chain, enhancing the security and functionality of your storm door. With the chain in place, the next crucial step is to adjust and test its functionality to ensure optimal performance.
Adjusting and Testing the Chain
After installing the storm door chain, it’s essential to adjust and test its functionality to ensure that it operates smoothly and effectively. Follow these steps to make any necessary adjustments and thoroughly test the chain:
Read more: How Long To Install A Storm Door
1. Check the Chain Tension:
Assess the tension of the chain to ensure that it provides the desired level of resistance when the door is opened. The chain should allow the door to open comfortably while preventing it from swinging too far open and causing damage. If the tension is too loose or too tight, adjustments may be necessary.
2. Adjust the Chain Length:
If the tension of the chain needs to be modified, adjust the chain length accordingly. This may involve repositioning the attachment points on the brackets or utilizing any included adjustment mechanisms provided with the storm door chain kit.
3. Test the Door Operation:
Open and close the storm door multiple times to test the functionality of the chain. Pay close attention to how the door behaves when it reaches the maximum extension allowed by the chain. Ensure that the door comes to a controlled stop without excessive force or resistance, indicating that the chain is functioning as intended.
4. Make Fine Adjustments:
If necessary, make fine adjustments to the chain tension or length to achieve the optimal balance between allowing the door to open freely and providing the necessary restriction to prevent overextension. This may involve minor tweaks to the chain attachment points or tensioning mechanisms.
Read more: DIY Guide: Installing A Storm Door
5. Lubricate Moving Parts:
Apply a small amount of silicone lubricant to the moving parts of the chain and any pivot points to ensure smooth operation and minimize wear and tear over time. This simple maintenance step can contribute to the longevity and effectiveness of the storm door chain.
By carefully adjusting and testing the storm door chain, you’ll ensure that it functions seamlessly and provides the necessary security and protection for your storm door. With the chain in place and optimized for performance, you can enjoy the peace of mind that comes with a well-maintained and secure storm door.
Conclusion
Congratulations! You’ve successfully navigated the process of installing a storm door chain, enhancing the security and functionality of your storm door. By following the steps outlined in this guide, you’ve not only gained valuable DIY skills but also contributed to the long-term maintenance of your home. As you wrap up this project, here are a few key takeaways to keep in mind:
Attention to Detail:
From preparing the door and its surroundings to adjusting and testing the chain, attention to detail is crucial. Taking the time to measure, align, and test each component ensures a successful installation and optimal functionality.
Maintaining Functionality:
Regularly testing and adjusting the storm door chain, as well as performing routine maintenance such as lubrication, will help maintain its functionality over time. This proactive approach contributes to the longevity of your storm door and its components.
Read more: How To Paint A Storm Door
Enhanced Security:
By installing a storm door chain, you’ve added an extra layer of security to your home. The controlled movement of the storm door prevents potential damage to the hinges and door frame, offering peace of mind and protection for your property.
As you reflect on your successful installation, take pride in the knowledge and skills you’ve gained. Whether you’re a seasoned DIY enthusiast or a beginner exploring the world of home improvement, this project serves as a testament to your capability and resourcefulness. With your storm door now equipped with a reliable chain, you can confidently welcome the benefits of enhanced security and functionality into your home.
Thank you for joining us on this home improvement journey. Stay tuned for more insightful guides and tips to elevate your living space and embark on fulfilling DIY projects.
Now that you've mastered installing a storm door chain, why stop there? Dive into our guide on DIY home improvement if you're itching to tackle more projects with your own hands. Ready for routine upkeep? Our home maintenance checklist ensures your space stays in tip-top shape, avoiding costly repairs down the line. Both guides offer practical advice, ensuring you keep your home fresh and functional.
Frequently Asked Questions about How To Install A Storm Door Chain
Was this page helpful?
At Storables.com, we guarantee accurate and reliable information. Our content, validated by Expert Board Contributors, is crafted following stringent Editorial Policies. We're committed to providing you with well-researched, expert-backed insights for all your informational needs.


0 thoughts on “How To Install A Storm Door Chain”