Home>Renovation & DIY>Home Renovation Guides>How To Replace A Storm Door Handle
Home Renovation Guides
How To Replace A Storm Door Handle
Modified: March 5, 2024
Learn how to replace a storm door handle with our comprehensive home renovation guide. Upgrade your door with ease and confidence.
(Many of the links in this article redirect to a specific reviewed product. Your purchase of these products through affiliate links helps to generate commission for Storables.com, at no extra cost. Learn more)
Introduction
Replacing a storm door handle may seem like a daunting task, but with the right guidance and tools, it can be a straightforward and rewarding home improvement project. A storm door not only adds an extra layer of protection to your home but also enhances its curb appeal. Over time, the handle of a storm door may wear out due to frequent use or exposure to the elements, prompting the need for a replacement.
In this comprehensive guide, we will walk you through the step-by-step process of replacing a storm door handle. Whether you are a seasoned DIY enthusiast or a novice homeowner looking to tackle your first home repair project, this guide will equip you with the knowledge and confidence to successfully complete the task.
By following these instructions, you can restore the functionality and aesthetic appeal of your storm door, ensuring that it continues to serve its purpose effectively. So, gather your tools, roll up your sleeves, and let's embark on this home improvement journey together.
Key Takeaways:
- Replacing a storm door handle is a manageable DIY project that can enhance your home’s security and appearance. With the right tools and steps, you can confidently tackle this task and enjoy a functional and stylish entryway.
- After replacing the storm door handle, adjusting and testing its operation ensures smooth functionality and reliable security. By following these steps, you can take pride in your DIY accomplishment and enjoy a welcoming and secure home.
Read more: How To Remove A Larson Storm Door Handle
Tools and Materials Needed
Before diving into the replacement process, it’s essential to gather the necessary tools and materials. Having the right equipment at your disposal will streamline the project and minimize any potential interruptions. Here’s a comprehensive list of what you’ll need:
Tools:
- Phillips-head screwdriver
- Flat-head screwdriver
- Tape measure
- Drill with bits
- Center punch
- Hammer
- Adjustable wrench
- Utility knife
- Safety goggles
- Gloves
Materials:
- New storm door handle set
- Screws
- Replacement strike plate (if needed)
- Lock lubricant (graphite or silicone-based)
Ensure that the new storm door handle set matches the specifications of your existing door and complements its design. Additionally, it’s advisable to have the replacement strike plate on hand, as it may be required based on the new handle’s dimensions.
By preparing the designated tools and materials in advance, you can approach the replacement process with confidence and efficiency, setting the stage for a successful outcome.
Removing the Old Handle
Before installing the new storm door handle, it’s crucial to properly remove the old one. This process involves careful disassembly and attention to detail to ensure a seamless transition to the replacement handle. Here’s a step-by-step guide to removing the old handle:
Read more: How To Replace Glass In Storm Door
Step 1: Inspect the Existing Handle
Begin by examining the current handle to understand its components and how it is attached to the door. Look for any visible screws, covers, or decorative elements that may conceal the fastening mechanisms.
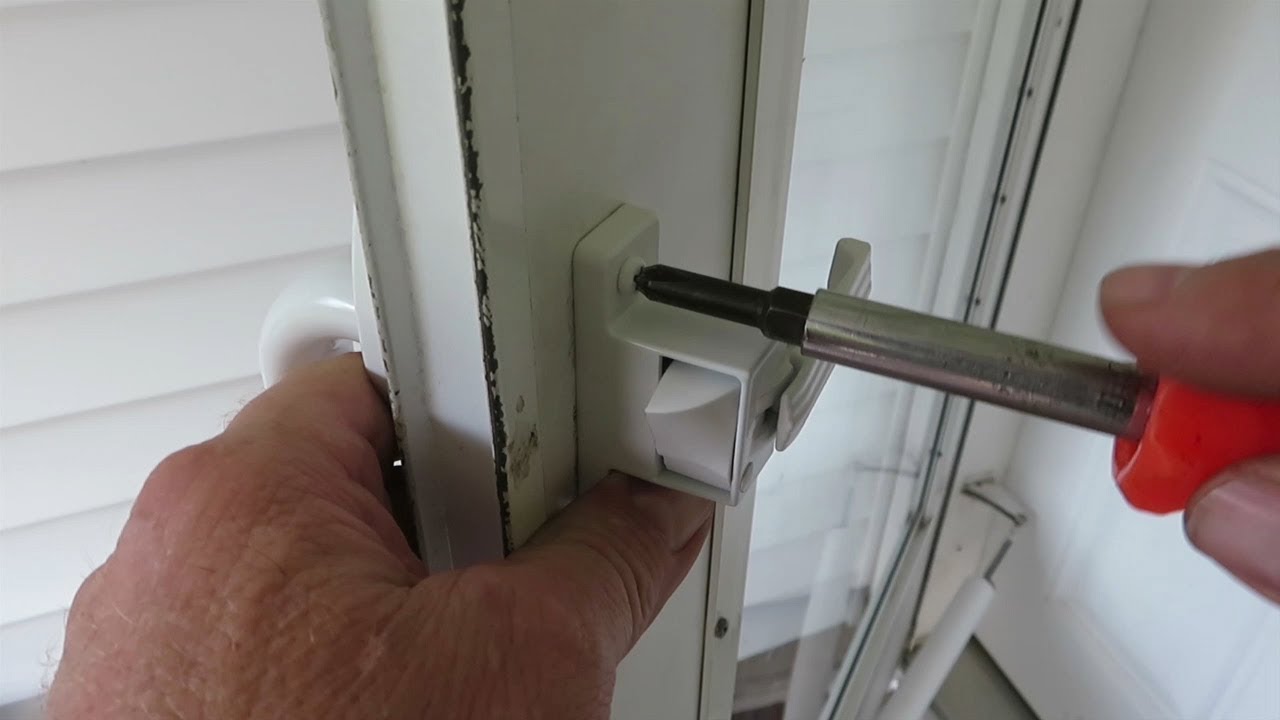
Step 2: Unscrew and Remove the Handle
Using a suitable screwdriver, carefully unscrew and remove the fasteners securing the handle to the door. Keep track of the screws and any accompanying hardware, as these will be needed when installing the new handle.
Step 3: Detach the Latch Mechanism
Once the handle is removed, detach the latch mechanism from the door. This may involve unscrewing additional components and carefully maneuvering the mechanism out of its housing.
Step 4: Remove the Strike Plate (if necessary)
Inspect the strike plate on the door frame. If the new handle set includes a replacement strike plate or if the existing one is damaged, unscrew and remove it from the frame using a screwdriver.
Step 5: Clean and Prepare the Door Surface
With the old handle and hardware removed, take the opportunity to clean the door surface and remove any debris or residue. This will provide a clean canvas for installing the new handle.
By following these steps, you can safely and methodically remove the old storm door handle, paving the way for the installation of its replacement. Take care to keep the removed components organized and readily accessible for the subsequent installation process.
Installing the New Handle
With the old handle successfully removed, it’s time to install the new storm door handle. This phase of the process requires precision and attention to detail to ensure that the new handle is securely and functionally integrated into the door. Follow these steps to install the new handle:
Step 1: Prepare the New Handle Set
Carefully unpack the new storm door handle set and familiarize yourself with its components. Ensure that all the necessary parts, including screws and any additional hardware, are accounted for before proceeding with the installation.
Step 2: Align and Attach the New Handle
Position the exterior handle on the outside of the door, aligning it with the pre-existing holes or marks left by the previous handle. Secure the handle in place using the provided screws, ensuring a snug fit without over-tightening.
Read more: How To Paint A Storm Door
Step 3: Install the Interior Handle
On the interior side of the door, affix the interior handle using the corresponding screws and fasteners. Ensure that the handle is aligned with the exterior component and functions smoothly when operated.
Step 4: Attach the Latch Mechanism
Insert the latch mechanism into the edge of the door, ensuring that it aligns with the strike plate on the door frame. Secure it in place using the provided screws, adjusting its positioning if necessary to ensure proper functionality.
Step 5: Install the Strike Plate
If a new strike plate is included with the handle set or if the existing one was removed, position it on the door frame and secure it using the designated screws. Verify that the latch mechanism aligns with the strike plate and operates smoothly.
Step 6: Test the Handle’s Operation
Before finalizing the installation, test the newly installed handle to ensure that it operates smoothly and securely. Verify that the latch engages properly and that the door can be opened and closed without any impediments.
By following these steps, you can effectively install the new storm door handle, restoring the door's functionality and enhancing its overall appearance. With the handle securely in place, the next crucial step is to adjust and test its operation to ensure optimal performance.
Read more: Installing A Storm Door
Adjusting and Testing the New Handle
After installing the new storm door handle, it’s essential to fine-tune its operation and conduct thorough testing to guarantee its functionality and security. Proper adjustment ensures that the handle operates smoothly and securely, providing peace of mind for you and your household. Follow these steps to adjust and test the new handle:
Step 1: Verify Proper Latch Alignment
Check the alignment of the latch with the strike plate on the door frame. The latch should smoothly and securely engage with the strike plate when the door is closed, ensuring a tight seal and effective security.
Step 2: Adjust the Latch Mechanism if Necessary
If the latch does not align properly with the strike plate or encounters resistance when closing, use a screwdriver to adjust the position of the latch mechanism. Make incremental changes and test the door’s closure after each adjustment to achieve optimal alignment.
Step 3: Lubricate Moving Parts
Apply a small amount of lock lubricant, such as graphite or silicone-based lubricant, to the moving parts of the handle and latch mechanism. This lubrication minimizes friction and ensures smooth operation, particularly in areas prone to wear and resistance.
Step 4: Test the Handle’s Operation
Open and close the door multiple times, testing the handle’s functionality and the latch’s engagement. Pay attention to any signs of sticking, grinding, or misalignment, and make further adjustments as necessary to achieve seamless operation.
Step 5: Verify Locking Mechanism (if applicable)
If the new handle includes a locking mechanism, test its functionality to ensure that it securely locks and unlocks the door as intended. Confirm that the key or thumb turn operates smoothly without any obstructions.
Step 6: Conduct a Final Inspection
Inspect the installed handle, latch, and strike plate, ensuring that all components are securely fastened and aligned. Verify that the door closes snugly and that the handle operates effortlessly without any signs of strain or misalignment.
By diligently adjusting and testing the new storm door handle, you can ensure that it functions optimally, providing reliable security and effortless operation for years to come. With the handle successfully installed, adjusted, and tested, your storm door is now ready to serve its purpose effectively, enhancing the comfort and security of your home.
Conclusion
Congratulations! By following this comprehensive guide, you have successfully replaced your storm door handle, revitalizing the functionality and aesthetic appeal of your entryway. This home improvement endeavor not only enhances the security and convenience of your home but also showcases your DIY prowess.
Throughout this process, you have demonstrated the ability to tackle a practical home repair project with confidence and precision. By carefully removing the old handle, installing the new one, and adjusting its operation, you have ensured that your storm door is equipped with a reliable and visually appealing handle.
Remember, the successful replacement of a storm door handle not only elevates the curb appeal of your home but also contributes to its overall security and comfort. With the new handle securely in place and functioning optimally, you can enjoy peace of mind and convenience every time you enter or exit your home.
As you reflect on this accomplishment, take pride in your ability to enhance your living space through practical and hands-on solutions. Your dedication to maintaining and improving your home is a testament to your resourcefulness and commitment to creating a welcoming and secure environment for you and your loved ones.
Whether this project marks the beginning of your DIY journey or adds to your repertoire of home improvement achievements, the knowledge and skills you’ve gained will undoubtedly serve you well in future endeavors. As you admire the newly installed storm door handle, may it serve as a reminder of your capability to take on new challenges and transform your living space according to your vision.
With the storm door handle replacement project successfully completed, you can look forward to enjoying a renewed sense of pride in your home’s appearance and functionality. As you embark on future home improvement projects, may the confidence and expertise gained from this experience empower you to continue enhancing your living environment with creativity and skill.
Frequently Asked Questions about How To Replace A Storm Door Handle
Was this page helpful?
At Storables.com, we guarantee accurate and reliable information. Our content, validated by Expert Board Contributors, is crafted following stringent Editorial Policies. We're committed to providing you with well-researched, expert-backed insights for all your informational needs.


0 thoughts on “How To Replace A Storm Door Handle”