Home>Storage Ideas>Bedroom Storage>How To Clean A Washing Machine Filter

Bedroom Storage
How To Clean A Washing Machine Filter
Modified: December 7, 2023
Learn how to clean a washing machine filter and keep your bedroom storage space tidy with these simple steps.
(Many of the links in this article redirect to a specific reviewed product. Your purchase of these products through affiliate links helps to generate commission for Storables.com, at no extra cost. Learn more)
Introduction
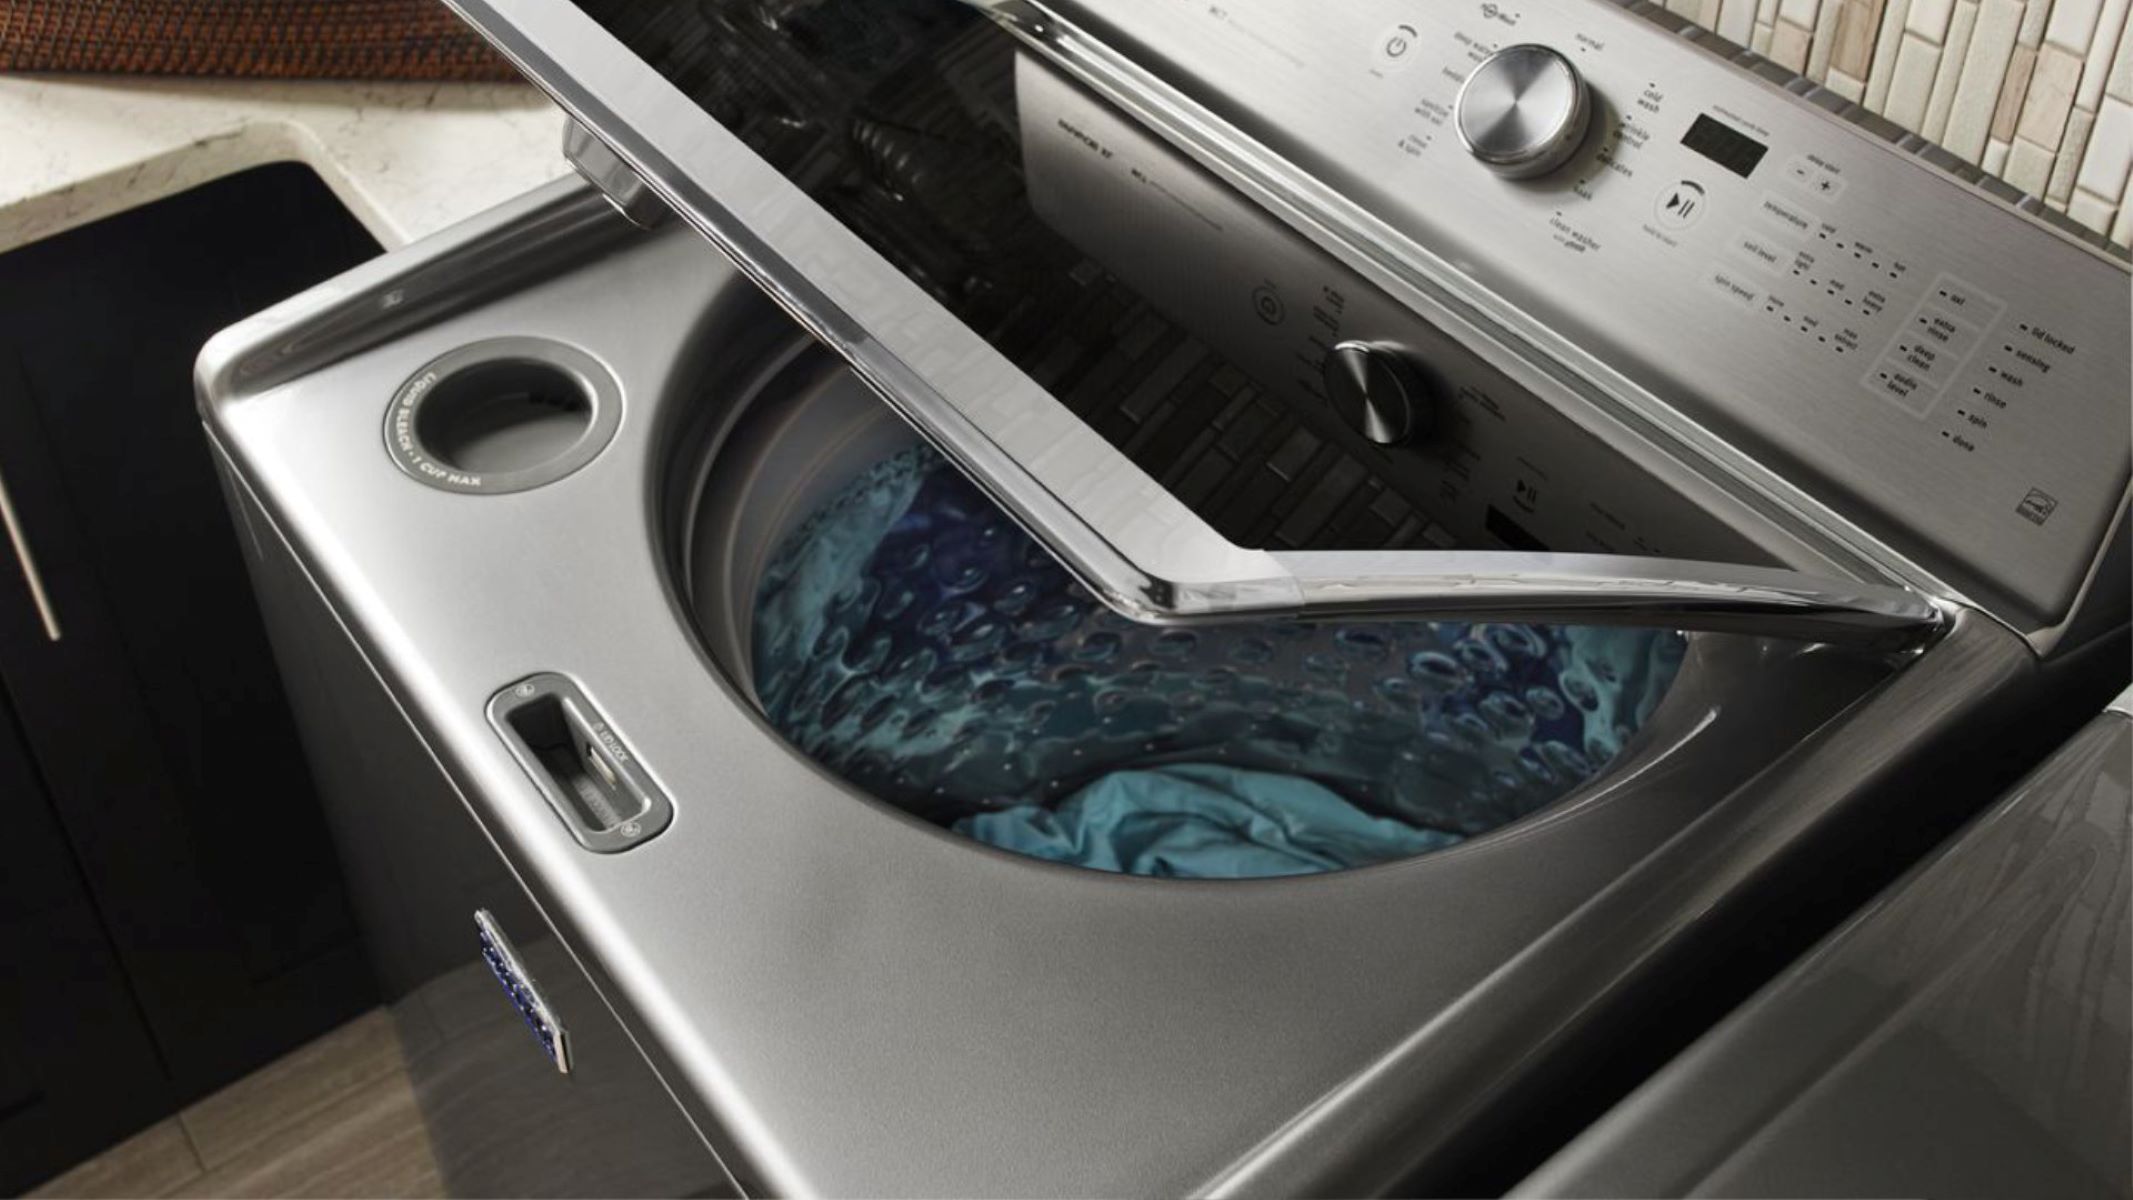
Welcome to our comprehensive guide on how to clean a washing machine filter. While most people are diligent about regularly cleaning the exterior and interior of their washing machines, the filter is often overlooked. However, cleaning the washing machine filter is an essential maintenance task that should not be neglected. A dirty or clogged filter can impact the performance of your washing machine and can lead to various issues such as poor cleaning results, unpleasant odors, and even damage to the machine itself.
In this article, we will walk you through the step-by-step process of cleaning your washing machine filter. We will also discuss the importance of regular filter maintenance and highlight the signs that indicate your filter needs cleaning. By following our guidelines, you can ensure that your washing machine continues to operate efficiently, prolong its lifespan, and keep your clothes looking fresh and clean.
Before we delve into the cleaning process, let’s understand why cleaning the washing machine filter is crucial for maintaining optimal performance.
Key Takeaways:
- Regularly cleaning your washing machine filter is crucial for optimal performance, preventing drain blockages, reducing odors, and extending the machine’s lifespan. It also ensures clean and fresh-smelling laundry.
- Signs that your washing machine filter needs cleaning include slow drainage, excessive lint on clothes, unpleasant odors, visible debris, water leaks, unusual noises, and reduced cleaning performance. Regular maintenance and proper reassembly are essential for a smoothly running washing machine.
Read more: How To Clean Whirlpool Washer Filter
Why Clean a Washing Machine Filter?
The purpose of a washing machine filter is to trap lint, hair, and other debris that may be present in your laundry. Over time, these particles can accumulate and clog the filter, impeding water flow and reducing the efficiency of your washing machine.
Cleaning the washing machine filter regularly offers several benefits:
- Improved cleaning performance: A clean filter allows water to flow freely, ensuring that detergent and rinse water can effectively penetrate your clothes. This leads to better cleaning results, as trapped dirt and stains are more easily removed.
- Prevention of drain blockages: A clogged filter can prevent water from draining properly, leading to blockages in your plumbing system. This can cause water backup and potential damage to your washing machine or other appliances.
- Reduction of unpleasant odors: When debris accumulates in the filter, it can become a breeding ground for bacteria and mold. This can result in foul odors that can transfer to your clothes and impact their freshness.
- Increased energy efficiency: A clean filter allows the washing machine to operate more efficiently, reducing energy consumption. This can result in lower utility bills and contribute to a more eco-friendly laundry routine.
- Extended lifespan of your washing machine: By regularly cleaning the filter, you can prevent unnecessary strain on the washing machine’s components. This can help extend its lifespan and save you from costly repairs or the need for a replacement.
Now that you understand the importance of cleaning your washing machine filter, let’s explore the telltale signs that indicate your filter needs attention.
Signs that Your Washing Machine Filter Needs Cleaning
Knowing when to clean your washing machine filter is crucial for maintaining its performance and efficiency. Here are some signs that indicate it’s time to give your filter some attention:
- Slow drainage: If you notice that your washing machine takes longer than usual to drain water after a cycle, it may be a sign that the filter is clogged. A dirty filter restricts water flow, causing drainage issues.
- Excessive lint on clothes: A clogged filter can lead to lint buildup on your clothes, even after they’ve been through a full wash cycle. If you find excessive lint or debris on your laundry, it’s a strong indication that the filter needs cleaning.
- Unpleasant odors: Lingering odors, despite using detergent and fabric softener, can be a sign that bacteria or mold is thriving in a dirty filter. Cleaning the filter will help eliminate these unpleasant smells and ensure fresh-smelling laundry.
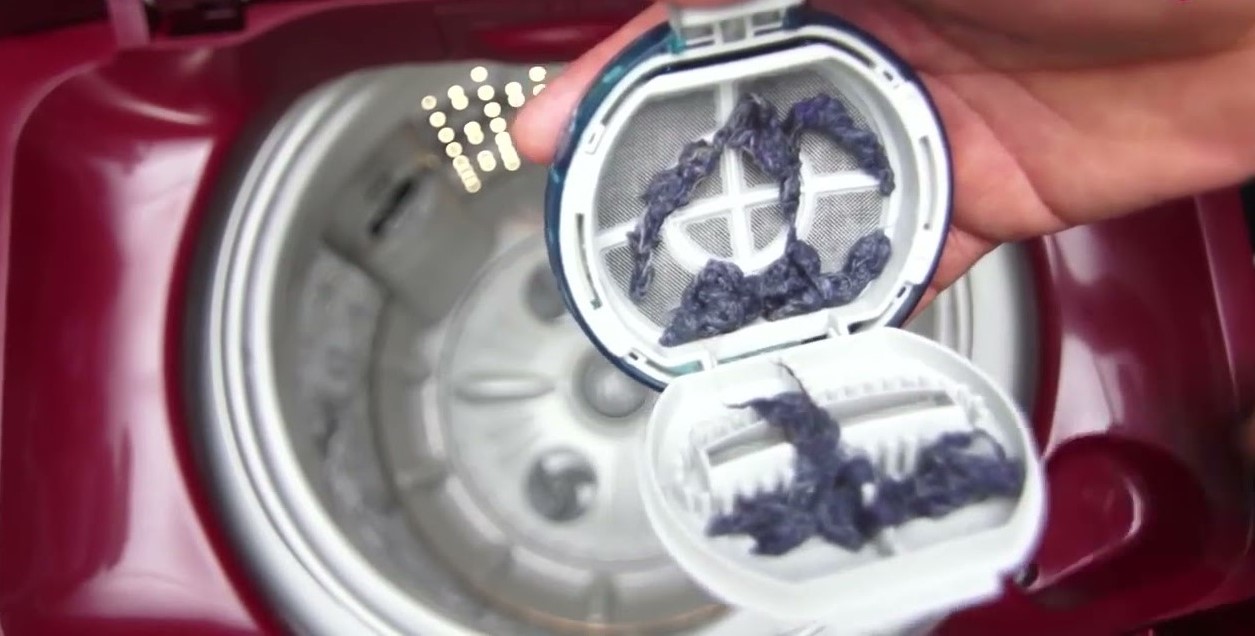
- Visible debris: If you can see visible debris or lint on the filter, it’s a clear indication that it needs cleaning. Don’t ignore this warning sign, as ignoring it can lead to further damage to your washing machine.
- Water leaks: A clogged filter can cause water to back up in the washing machine, leading to leaks or overflow. If you notice any water leakage during or after a wash cycle, inspecting and cleaning the filter should be a priority.
- Unusual noises: A dirty filter may cause the washing machine to make unusual or loud noises during operation. This could be due to water struggling to pass through a clogged filter, putting stress on the machine’s components.
- Reduced cleaning performance: If your clothes are not coming out as clean as they used to, the filter may be the culprit. A clogged filter can prevent adequate water circulation, resulting in ineffective cleaning.
If you observe any of these signs, it’s time to roll up your sleeves and clean your washing machine filter. Next, we will guide you through the step-by-step process of cleaning the filter.
Step-by-Step Guide to Clean a Washing Machine Filter
Now that you’ve recognized the signs that your washing machine filter needs cleaning, let’s walk through the step-by-step process to get your filter squeaky clean:
- Turn off the washing machine: Before starting the cleaning process, make sure your washing machine is turned off and unplugged to ensure safety.
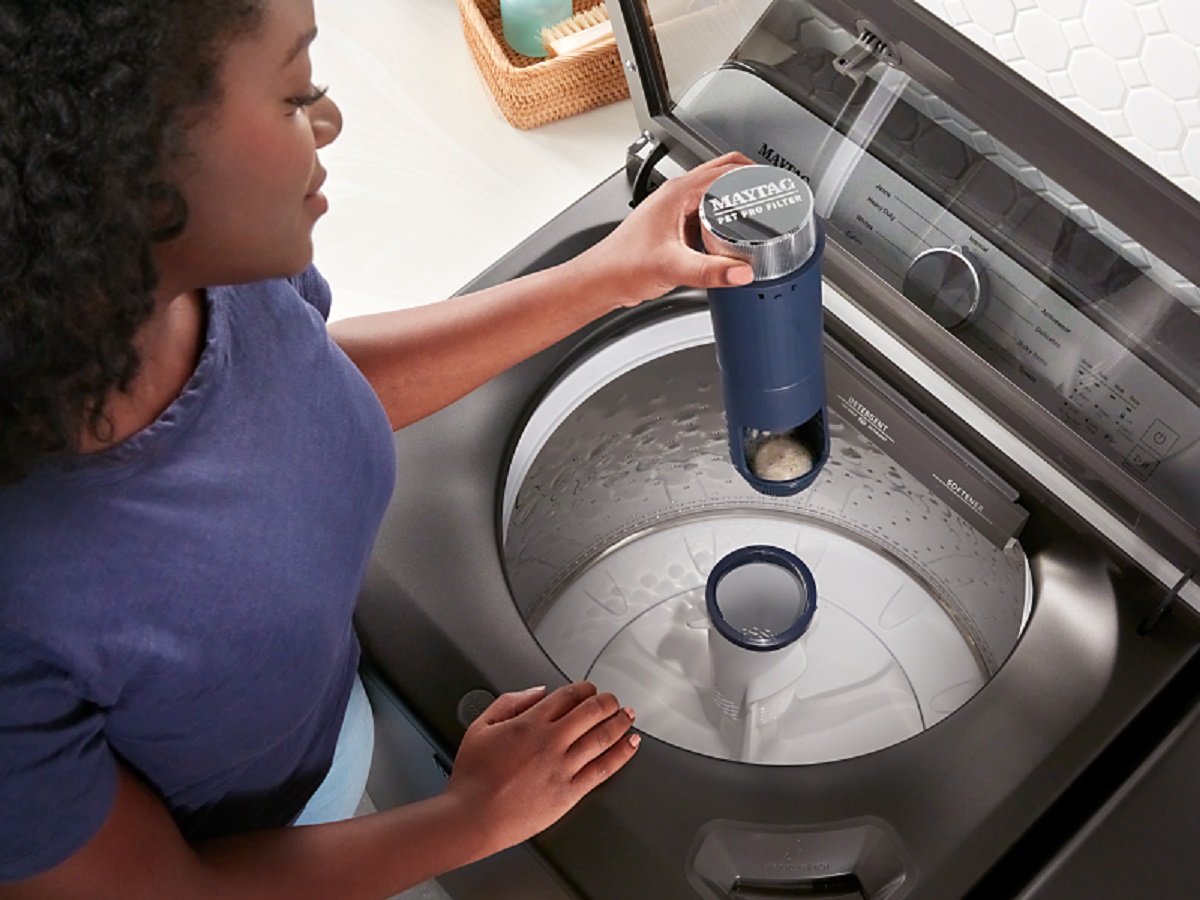
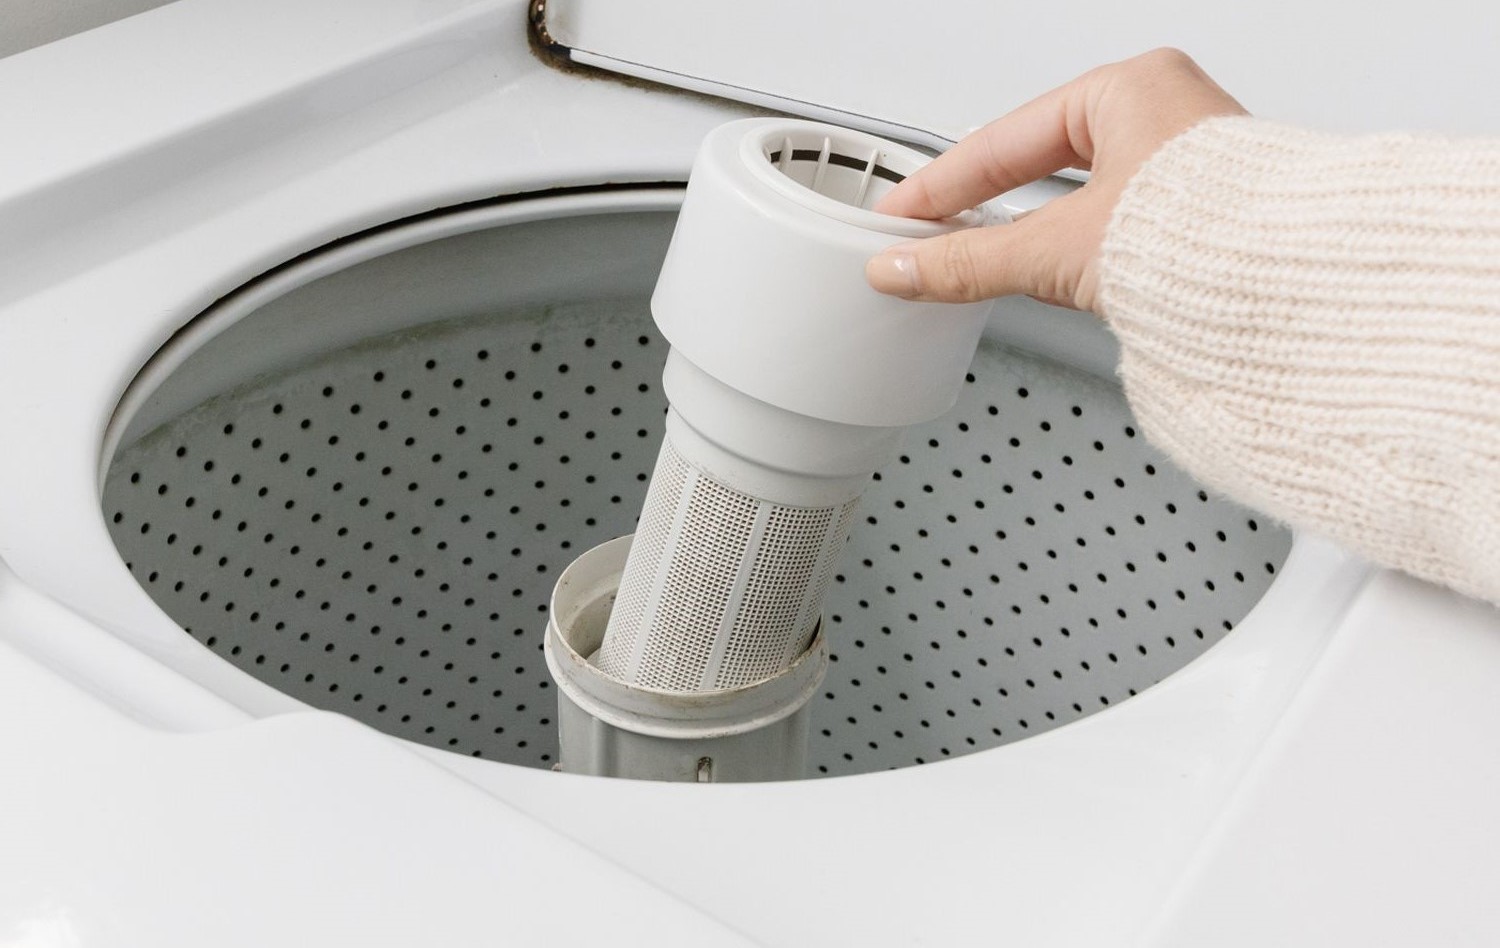
- Locate the filter: The filter is typically located near the bottom front of the washing machine. Consult your washing machine’s manual if you’re having trouble finding it.
- Prepare the area: Place a towel or a shallow tray beneath the filter area to catch any water or debris that may spill out during the cleaning process.
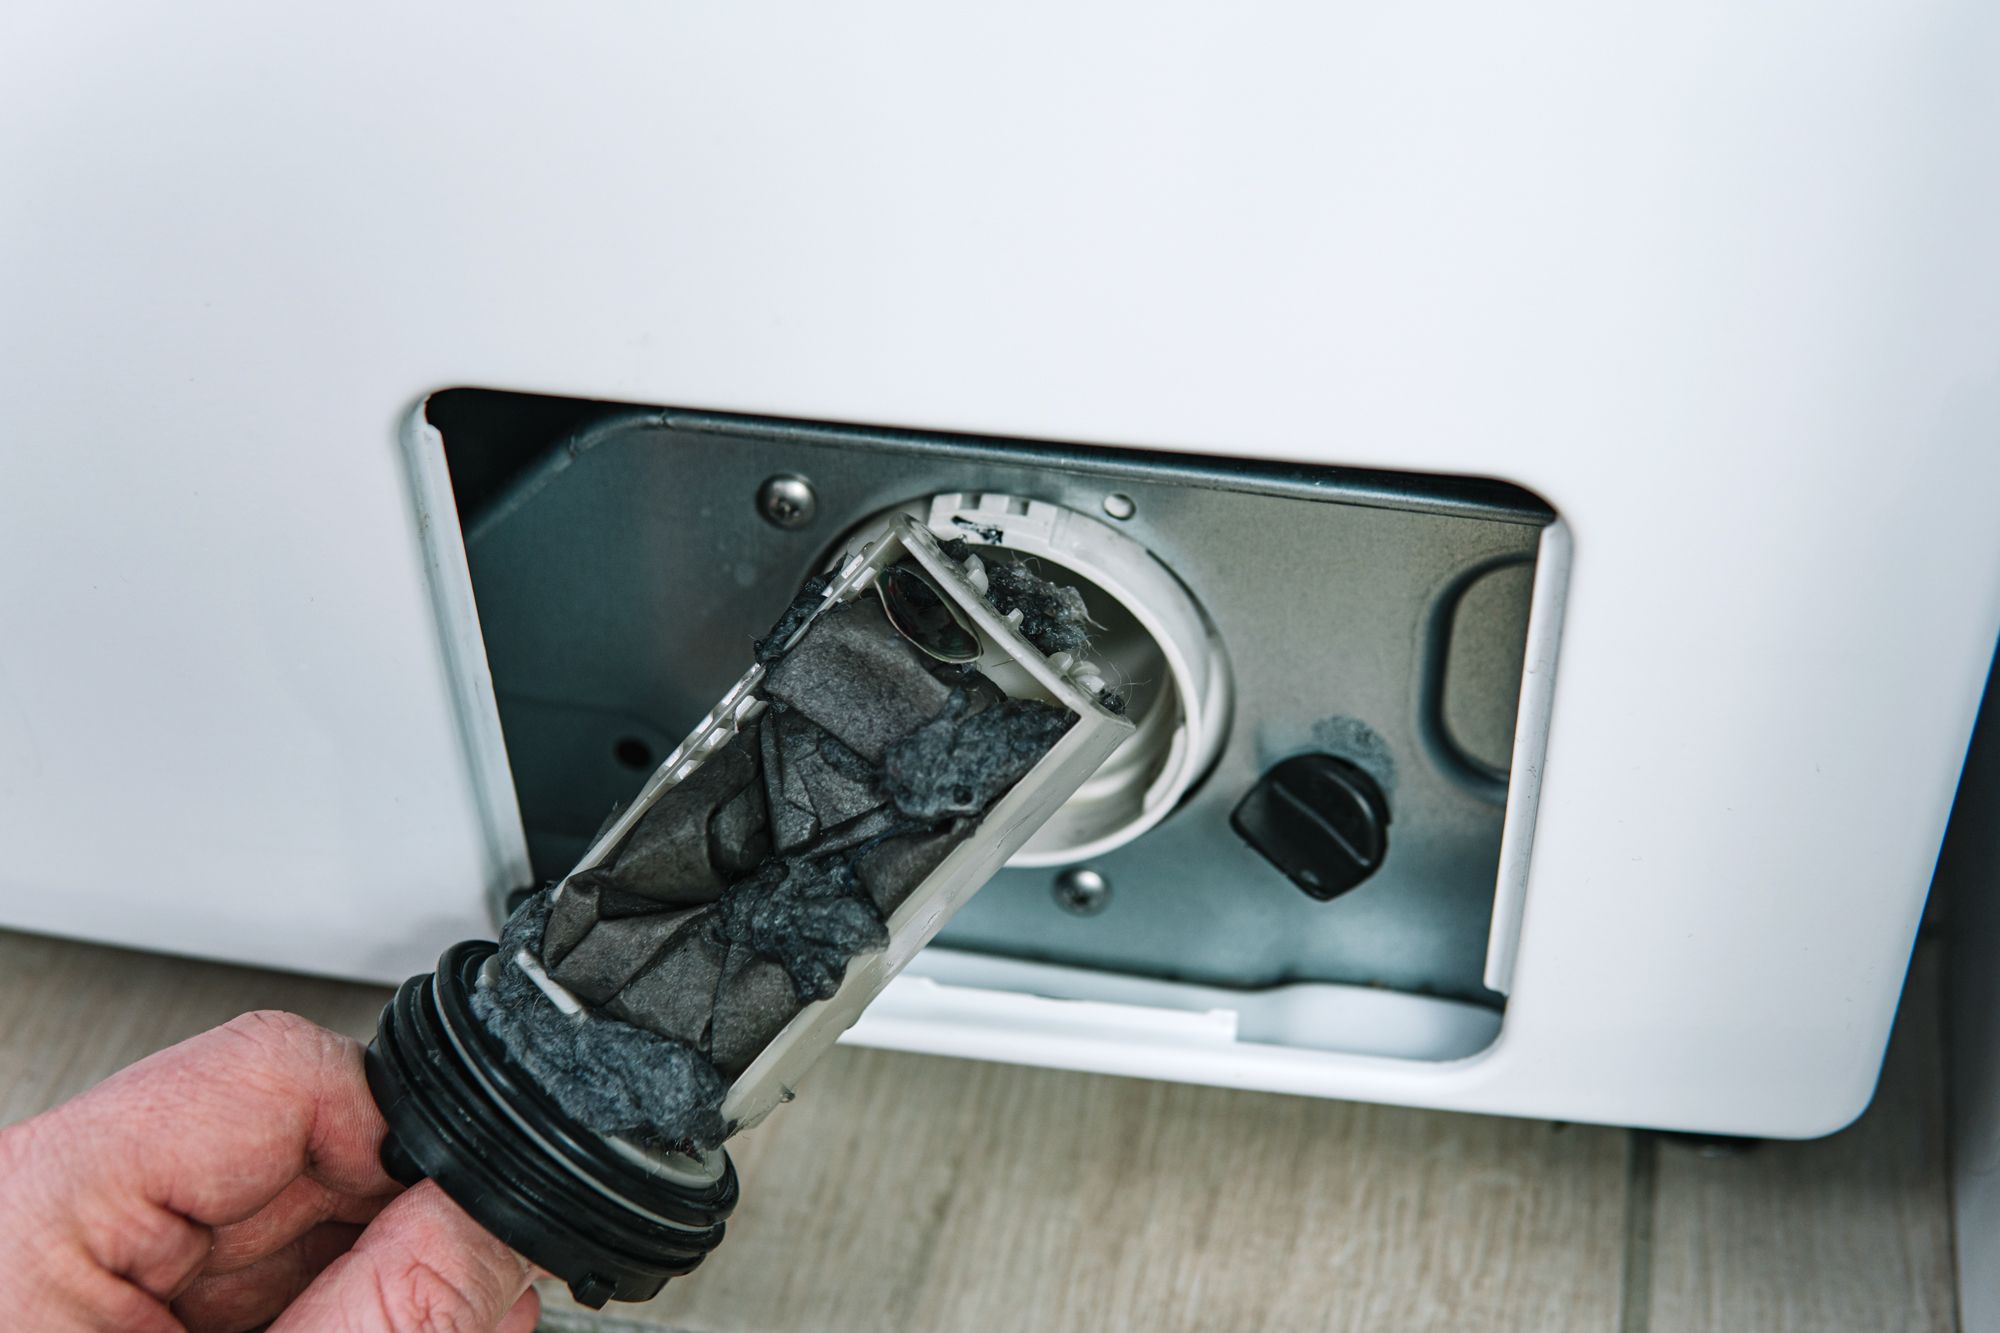
- Remove the filter: Depending on the type of washing machine, you may need to use a screwdriver or simply twist the filter counterclockwise to remove it. Follow the instructions provided in your washing machine’s manual.
- Clean the filter: Rinse the filter under running water to remove any visible debris or lint. Use a soft brush or toothbrush to gently scrub away stubborn dirt or buildup. For more thorough cleaning, you can soak the filter in warm soapy water for a few minutes.
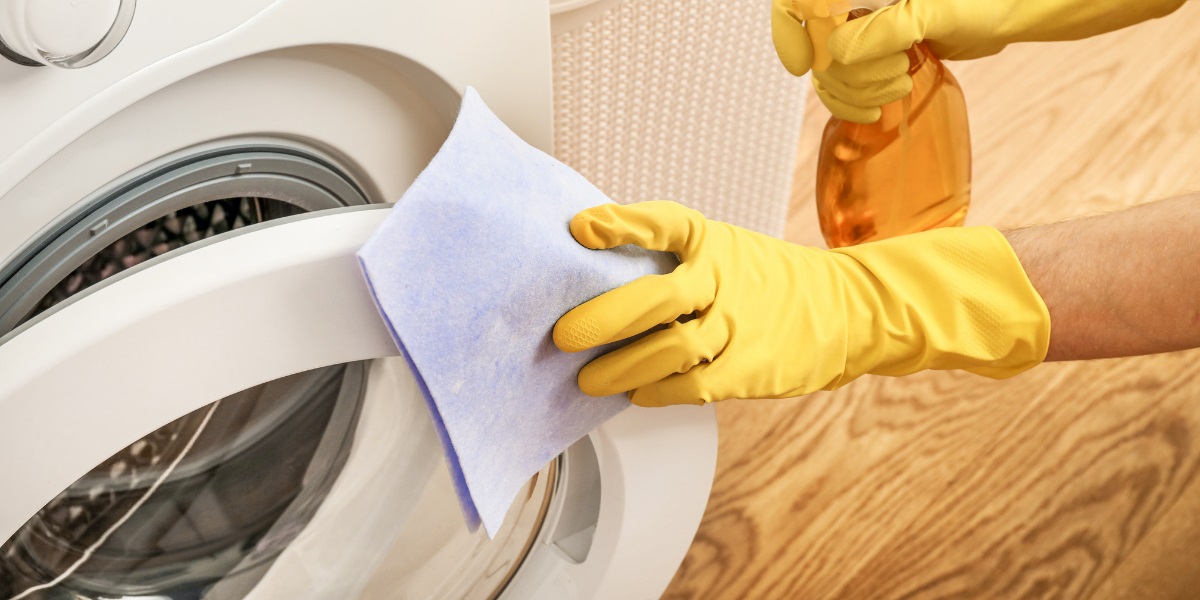
- Check and clean the filter housing: While the filter is out, inspect the filter housing for any clogs or obstructions. Use a damp cloth or a pipe cleaner to remove any trapped debris.
- Dry and reassemble: Allow the filter to air dry completely before reassembling it. Make sure it is securely fitted back into the filter housing.
- Run a test cycle: Once the filter is back in place, run a test cycle without any laundry to ensure proper water flow and functionality.
It’s important to note that these steps may vary slightly depending on the make and model of your washing machine. Always consult your washing machine’s manual for specific instructions and guidelines tailored to your machine.
Now that you know how to clean your washing machine filter, let’s discuss the tools and materials you’ll need for the task.
Tools and Materials Required
Before you begin cleaning your washing machine filter, gather the following tools and materials:
- Screwdriver: Depending on your washing machine, you may need a screwdriver to remove the filter. Check your machine’s manual to determine the type of screwdriver required.
- Soft brush or toothbrush: Use a soft-bristle brush or an old toothbrush to scrub away dirt and debris from the filter.
- Shallow tray or towel: Place a shallow tray or towel beneath the filter area to catch any water or debris that may spill out during the cleaning process.
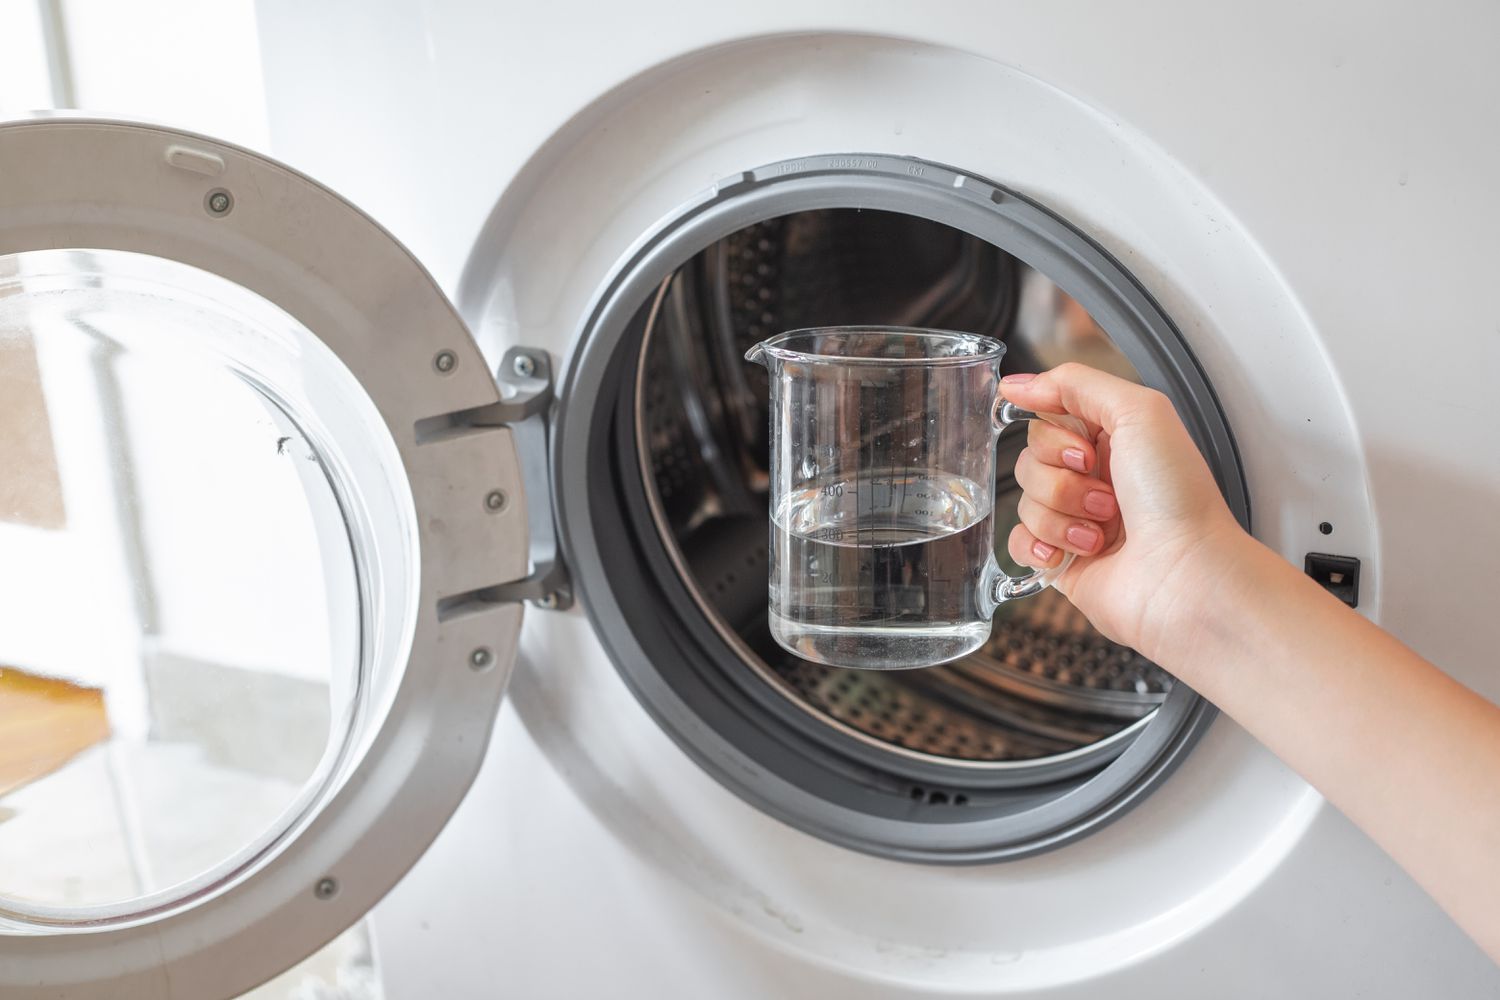
- Warm soapy water: Fill a basin or sink with warm water and add a small amount of mild detergent to soak the filter for a more thorough cleaning, if necessary.
- Cloth or pipe cleaner: Use a damp cloth or a pipe cleaner to clean the filter housing and remove any trapped debris.
Make sure you have these tools and materials readily available before you start cleaning your washing machine filter. Having everything on hand will help streamline the cleaning process and ensure that you can effectively remove any dirt or debris.
Now that you’re prepared with the necessary tools, it’s important to take some precautions before diving into the cleaning process. Let’s discuss these precautions next.
Regularly clean the washing machine filter by removing it and rinsing it under running water to remove any lint, debris, or residue that may have accumulated. This will help maintain the machine’s efficiency and prevent clogs.
Read more: How to Clean Filter on LG Top Load Washer
Precautions to Take Before Cleaning the Filter
Before you begin cleaning your washing machine filter, it’s important to take some precautions to ensure your safety and the proper functioning of the machine:
- Turn off and unplug the washing machine: Before attempting any maintenance tasks, make sure to turn off the washing machine and unplug it from the power source. This will prevent any accidental power supply and reduce the risk of electrical shocks.
- Refer to the manufacturer’s manual: Different washing machine models may have specific instructions and guidelines for filter cleaning. It’s essential to consult your manufacturer’s manual to understand the proper procedure for your specific machine.
- Take note of the water level: Ensure that there is no water left in the washing machine before removing the filter. If there is any standing water, drain it manually or run a quick drain cycle to empty the machine.
- Protect your hands: Wear gloves while handling the filter to protect your hands from sharp edges or potential exposure to bacteria or mold.
- Work in a well-ventilated area: Cleaning the filter may release unpleasant odors or dust particles. Open windows or ensure adequate ventilation in the laundry area to minimize any discomfort or exposure.
- Follow safety instructions: If your washing machine has a specific safety lock or mechanism in place, ensure that you follow the instructions to unlock or disable it before attempting to remove the filter.
By taking these precautions, you can ensure your safety and the smooth execution of the cleaning process. Now, let’s move on to the detailed steps for cleaning the filter.
Cleaning the Filter
Now that you’ve taken the necessary precautions, you’re ready to clean your washing machine filter. Follow these steps to ensure a thorough cleaning:
- Locate the filter: Consult your washing machine’s manual to find the location of the filter. In most cases, it will be located near the bottom front of the machine.
- Prepare the area: Place a shallow tray or towel beneath the filter area to catch any water or debris that may spill out during the cleaning process.
- Remove the filter: Depending on your machine, you may need to use a screwdriver or simply twist the filter counterclockwise to remove it. Carefully pull out the filter from its housing.
- Rinse the filter: Hold the filter under running water to remove any visible debris or lint. Use your fingers to dislodge any stubborn particles.
- Scrub the filter: If there is persistent dirt or buildup on the filter, use a soft brush or an old toothbrush to gently scrub it. Pay attention to the corners and crevices to ensure a thorough clean.
- Soak the filter (optional): If the filter is particularly dirty or has stubborn stains, you can soak it in warm soapy water for a few minutes to help loosen the grime. Make sure to fully submerge the filter and agitate it gently.
- Clean the filter housing: While the filter is out, take a damp cloth or a pipe cleaner and wipe the inside of the filter housing. Remove any trapped debris, ensuring that the housing is clean and free from obstructions.
- Allow the filter to dry: After cleaning, place the filter in a well-ventilated area and allow it to air dry completely. Make sure there is no moisture remaining before reassembling the filter.
Remember to refer to your washing machine’s manual for any specific cleaning recommendations or guidelines tailored to your machine’s design. Once the filter is dry, you can proceed to reassemble it in your washing machine.
Continue reading to learn how to reassemble the filter properly.
Reassembling the Filter
After cleaning and drying the filter, it’s time to reassemble it in your washing machine. Follow these steps to ensure proper reassembly:
- Check for proper fit: Before inserting the filter back into its housing, make sure it is clean and free from any debris. Inspect the filter and the housing for any signs of damage or wear that may affect its performance.
- Align and insert the filter: Align the filter with the housing and carefully insert it back into place. Follow any specific instructions in your washing machine’s manual regarding the orientation of the filter.
- Secure the filter: Depending on your machine, you may need to twist the filter clockwise or use a screwdriver to secure it in place. Make sure the filter is securely fastened and does not wobble or come loose.
- Double-check for proper installation: Take a final look to ensure that the filter is properly installed and there are no gaps or misalignments. This will prevent any water or debris from bypassing the filter during operation.
After reassembling the filter, you can proceed to run a test cycle to ensure everything is functioning correctly. Run the washing machine without any laundry, and observe the water flow and drainage to verify that there are no leaks or issues.
By following these steps, you can properly reassemble the filter and keep your washing machine running smoothly. Now, let’s wrap up with some final thoughts and additional tips for maintaining a clean washing machine.
Final Thoughts and Tips
Congratulations! You have successfully cleaned and reassembled your washing machine filter. By incorporating regular filter maintenance into your laundry routine, you can ensure that your washing machine operates efficiently and continues to provide you with clean clothes. Here are some final thoughts and tips to keep in mind:
- Frequency of cleaning: Cleaning the filter once every three to six months is generally recommended. However, if you notice any of the signs mentioned earlier, it’s crucial to clean it immediately to prevent further issues.
- Regular maintenance: In addition to cleaning the filter, remember to perform other regular maintenance tasks, such as wiping down the drum, cleaning the detergent dispenser, and checking for any worn hoses or belts.
- Use high-quality detergents and laundry products: Using good-quality detergents and laundry products can help reduce the buildup of residue and minimize the chances of clogging the filter.
- Remove lint from clothes: Before putting your clothes in the washing machine, make it a habit to remove lint and excess debris. This will help minimize the amount of lint that accumulates in the filter.
- Keep the area around the washing machine clean: Regularly wipe down the exterior of your washing machine and keep the surrounding area clean to prevent dust and dirt from entering the machine and potentially clogging the filter.
- Consult your manufacturer’s manual: Each washing machine may have unique specifications and maintenance requirements. Always refer to the manufacturer’s manual for specific instructions and guidelines relevant to your machine.
Remember that proper filter maintenance is not only essential for efficient cleaning but also for the overall longevity of your washing machine. By taking the time to clean the filter regularly, you can prevent breakdowns, improve performance, and enjoy clean and fresh laundry.
With the knowledge and steps provided in this guide, you can confidently maintain a clean and properly functioning washing machine. Happy laundering!
Frequently Asked Questions about How To Clean A Washing Machine Filter
Was this page helpful?
At Storables.com, we guarantee accurate and reliable information. Our content, validated by Expert Board Contributors, is crafted following stringent Editorial Policies. We're committed to providing you with well-researched, expert-backed insights for all your informational needs.


0 thoughts on “How To Clean A Washing Machine Filter”