Home>Storage Ideas>Storage Baskets>How To Make Reed Baskets
Storage Baskets
How To Make Reed Baskets
Modified: January 9, 2024
Learn how to make beautiful reed baskets for all your storage needs with our step-by-step guide. Create unique storage baskets with our easy-to-follow instructions and elevate your home organization.
(Many of the links in this article redirect to a specific reviewed product. Your purchase of these products through affiliate links helps to generate commission for Storables.com, at no extra cost. Learn more)
Introduction
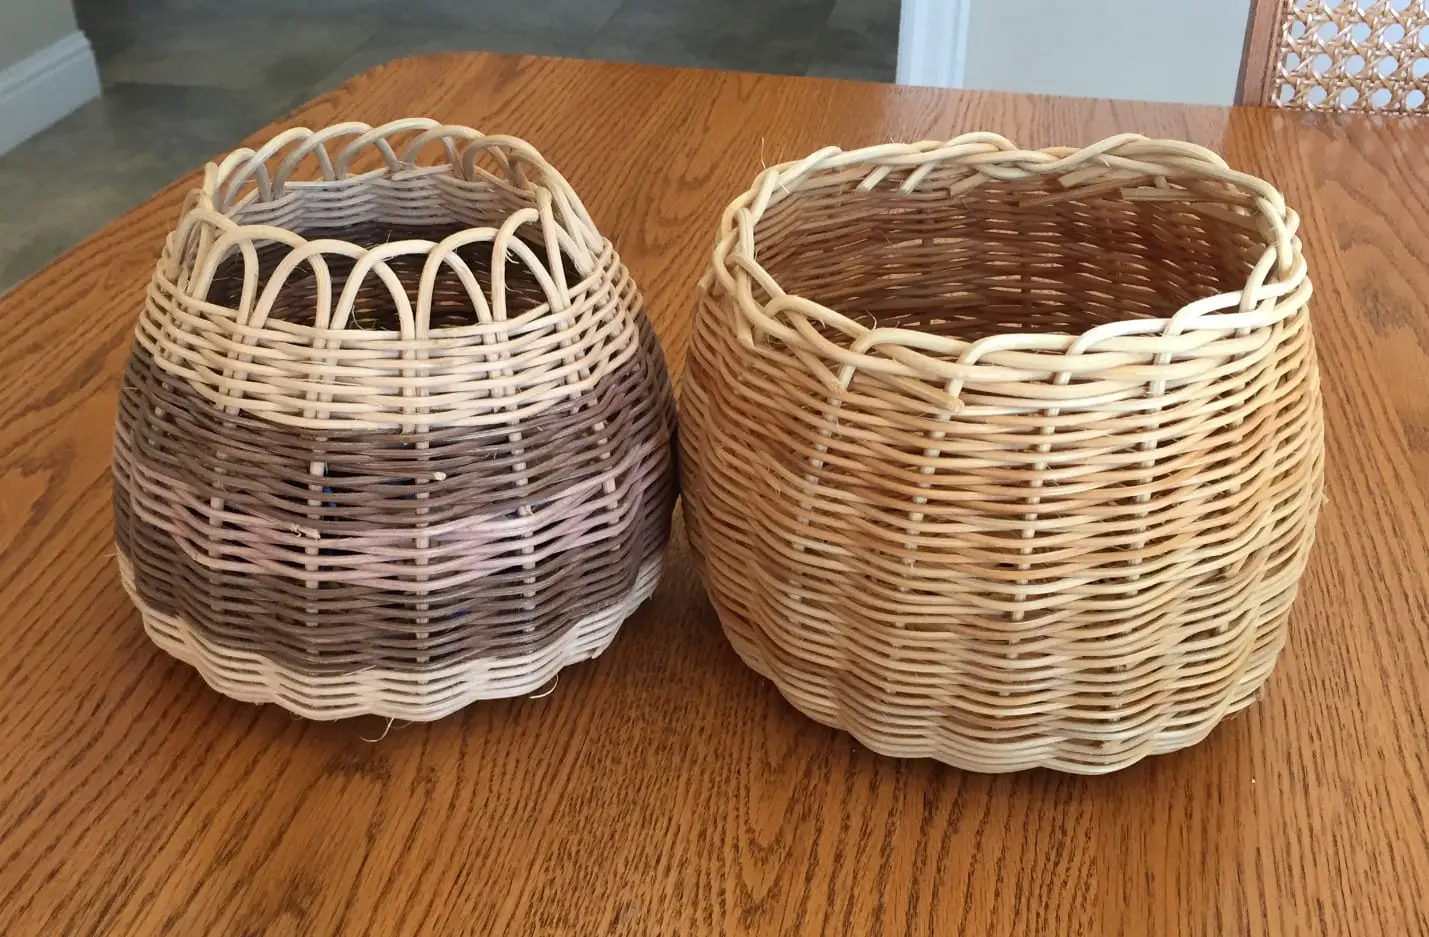
Welcome to the world of reed basket making! Reed baskets have been used for centuries as versatile storage solutions. They are not only practical but also visually appealing, making them a popular choice for both functional and decorative purposes. If you have ever been intrigued by the art of basket weaving, this article will guide you through the process of making your own reed basket from start to finish.
In this comprehensive guide, we will cover everything you need to know about making reed baskets. From gathering the necessary materials to the step-by-step process of weaving, you will learn the techniques and skills required to create your own beautiful and functional storage baskets.
Reed baskets are typically made using natural materials, with reed being the primary material of choice. Reed is a versatile plant that grows in wetland areas, and its long, thin strands are perfect for weaving intricate patterns. Along with reed, you will need a few basic tools and supplies to get started on this project.
Whether you are a beginner looking for a new hobby or an experienced crafter seeking a new challenge, this guide will provide you with all the information you need to make your own reed basket. So let’s dive in and explore the fascinating world of this ancient craft!
Key Takeaways:
- Reed basket making is a versatile and rewarding craft that combines practicality with creativity. From gathering reed to adding finishing touches, this ancient art offers endless possibilities for personalized designs.
- By following step-by-step instructions and experimenting with different materials and weaving patterns, you can create unique and functional storage baskets. Enjoy the process and let your creativity flow!
Materials Needed
Before you begin making your reed basket, it’s important to gather all the necessary materials. Having everything at hand will ensure a smooth and uninterrupted weaving process. Here is a list of the materials you’ll need:
1. Reed: This is the primary material for making the basket. Look for long, flexible reed strands that are free from knots and blemishes. You can find reed in craft stores or online suppliers specializing in basket weaving materials.
2. Scissors: A pair of sharp scissors will be used for cutting the reed to the desired lengths.
3. Measuring Tape: This will come in handy for measuring the length of the reed strands and ensuring consistency in size.
4. Clothespins: These will be used to hold the reed in place while weaving, allowing for a secure and stable structure.
5. Water: Soaking the reed in water helps to make it more pliable and easier to work with. Have a container of water nearby for this purpose.
6. Awl or Bodkin: This tool is used for poking holes in the reed and creating space for weaving and attaching various elements of the basket.
7. Dyes or Stain (optional): If you wish to add a splash of color to your reed basket, you can use dyes or stains specifically designed for natural materials like reed.
8. Handle Materials (optional): If you want to add handles to your basket, gather materials such as wooden dowels, leather strips, or rope.
9. Safety Equipment: It’s always a good idea to wear protective gloves and eye goggles to ensure your safety while working with sharp tools.
Once you have gathered all these materials, you’ll be ready to embark on your reed basket-making journey. Make sure to set up a comfortable and well-lit workspace before you begin the weaving process. So let’s move on to the next step, where we’ll learn how to gather the necessary reed for your basket.
Step 1: Gathering Reed
The first step in making a reed basket is gathering the reed itself. Reed is a type of wetland plant that grows in marshy areas and is known for its long, flexible strands that are perfect for weaving. Here’s how to gather reed for your basket:
1. Identify a Suitable Location: Look for wetland areas such as marshes, swamps, or riverbanks where reed plants commonly grow. Make sure to obtain permission if you plan to gather reed from private property or protected areas.
2. Choose the Right Season: Reed is best harvested during the late summer or early autumn when it has reached its peak growth and maturity. At this time, the reed will be strong and flexible, making it ideal for weaving.
3. Select Healthy Stalks: When gathering reed, look for long, straight stalks that are free from damage, mold, or discoloration. Avoid selecting reed that has brittle or weak stems, as they may not be suitable for weaving.
4. Cut the Reed: To harvest the reed, use a sharp pair of scissors or pruning shears to cut the stalks close to the base. Aim for stalks that are approximately the same length, around 3 to 4 feet, to ensure consistent-sized strands for weaving.
5. Bundle the Reed: After cutting the reed stalks, bundle them together with twine or rubber bands. This will make it easier to transport and store the reed until you’re ready to start weaving.
6. Store Properly: Place the bundled reed in a dry and well-ventilated area to prevent mold or mildew growth. Avoid direct sunlight, as it can cause the reed to dry out too quickly. Ideally, store the reed in a cool and dark place until you’re ready to use it.
Remember to always harvest reed responsibly and in accordance with local regulations. Be mindful of the environment and only gather what you need for your project. Now that you have gathered your reed, let’s move on to the next step to prepare the reed strands for weaving.
Step 2: Preparing the Reed
Once you have gathered the reed for your basket, the next step is to prepare the reed strands for weaving. Properly preparing the reed will ensure that it is pliable and ready to be fashioned into a sturdy and beautiful basket. Here’s how to prepare the reed:
1. Soak the Reed: Fill a container with water and submerge the reed strands in it. Allow the reed to soak for at least 30 minutes or until it becomes pliable and flexible. Soaking the reed will make it easier to weave and prevent it from breaking or splitting.
2. Trim the Ends: Once the reed has soaked, remove it from the water and gently pat it dry with a towel. Trim off any frayed or uneven ends of the reed strands using a pair of sharp scissors. This will ensure clean and precise weaving.
3. Sort the Reed: As you prepare to weave your basket, sort the reed strands by length and thickness. This will make it easier to find the right pieces when you need them during the weaving process.
4. Optional: Dye or Stain the Reed (if desired): If you want to add color to your reed basket, now is the time to dye or stain the reed. Follow the instructions on the dye or stain product and apply it evenly to the reed strands. Allow the reed to dry completely before proceeding with weaving.
5. Organize Your Workspace: Before you start weaving, set up a comfortable and well-lit workspace. Clear any clutter and arrange your materials, including the soaked and trimmed reed, in an easily accessible manner. This will help you stay organized and focused during the weaving process.
Preparing the reed is an essential step in ensuring a successful basket-making experience. By soaking, trimming, and sorting the reed, you will have the necessary materials ready for weaving. Now that your reed is prepared, it’s time to move on to the next step: creating the base of your reed basket.
When making reed baskets, soak the reeds in water for at least 30 minutes before weaving to make them more flexible and easier to work with.
Step 3: Creating the Basket Base
Now that you have prepared the reed strands, it’s time to begin weaving your reed basket. The first step in the weaving process is creating the base, which serves as the foundation for the entire basket. Here’s how to create the basket base:
1. Determine the Base Size: Decide how large you want the base of your basket to be. Measure the desired diameter or use a circular template as a guide. Keep in mind that the base will determine the overall size of your basket.
2. Prepare the Base Spokes: Select several reed strands of equal length, around 12 to 18 inches long, to serve as the base spokes. The number of spokes will depend on the size of the base you want. For a small basket, start with 4 to 6 spokes; for a larger basket, use 8 to 12 spokes.
3. Create the Center Hub: Take one reed spoke and fold it in half. This will be the center hub of your base. Place it on your workspace horizontally, with the folded end in the center and the two ends pointing outward.
4. Begin Weaving: Take another reed spoke and place it vertically on top of the center hub, forming a “+” shape. Position the bottom end of the spoke under the center hub and the top end over it. This will create the first layer of weaving.
5. Continue Weaving: Take another reed spoke and place it horizontally over the vertical spoke, weaving it over and under the vertical spoke and the center hub. Add more spokes around the center hub, evenly spacing them apart, and weaving them in an over-under pattern with the vertical spoke.
6. Secure the Weave: As you add more spokes and weave around the center hub, use clothespins to hold them in place. This will help maintain the shape of the base and prevent the spokes from shifting or loosening.
7. Increase the Base Size: To increase the size of the base, continue adding more reed spokes and weaving them in the over-under pattern. As you progress, gently push the woven rows outward to create a rounded or flat base shape, depending on your design preference.
8. Complete the Base: Keep adding and weaving spokes until you achieve the desired size for your basket’s base. Finish the weaving process by tucking the ends of the reed spokes under the existing weave to secure them in place.
Creating the basket base is an important step in building a sturdy foundation for your reed basket. Once the base is complete, you can move on to weaving the sides of the basket. So let’s move on to the next step and learn how to weave the basket sides.
Read more: What Is Reeded Glass
Step 4: Weaving the Basket Sides
After creating the base of your reed basket, it’s time to move on to weaving the sides. This step will give your basket height and shape, turning it into a functional storage container. Here’s how to weave the basket sides:
1. Prepare the Uprights: Select reed strands of equal length, around 12 to 18 inches, to serve as the uprights for the basket sides. These will be woven vertically between the spokes of the base to create the sides of the basket. Cut the uprights to the desired length.
2. Soak the Uprights: Place the uprights in water to soak for a few minutes. This will make them more pliable and easier to weave.
3. Start Weaving: Take one soaked upright and begin weaving it in an over-under pattern between the spokes of the base. Start at one spoke and weave it around the base, going over one spoke and under the next. Repeat this process until you have woven around the entire base, securing the uprights in place.
4. Add More Uprights: As you continue weaving, add more soaked uprights around the basket base, spacing them evenly apart. Weave them in the same over-under pattern, creating vertical strands that will form the sides of the basket.
5. Push Upwards: As you add more rows of weaving, gently push them upwards to create the desired height for your basket. This will gradually shape the sides and create a sturdy structure.
6. Secure the Weave: As you weave each row, use clothespins to hold the uprights in place. This will prevent them from sliding or unraveling during the weaving process.
7. Optional: Add Decorative Elements: If you want to add decorative elements to your basket, such as different colored reed strands or intricate patterns, you can incorporate them into the weaving as you go. This will add a personalized touch to your basket design.
8. Continue Weaving: Repeat the weaving process, adding more rows until you reach the desired height for your basket. Always maintain the over-under pattern and ensure the uprights are tightly woven together for a strong and sturdy result.
By following these steps, you will gradually weave the sides of your reed basket, creating a functional and visually appealing storage container. Once you have completed weaving the sides, it’s time to add the finishing touches to your basket.
Step 5: Finishing Touches
After weaving the sides of your reed basket, it’s time to add the finishing touches that will complete the look and functionality of your creation. Here are some final steps to add those perfect finishing touches:
1. Trim Excess Reed: Once you have finished weaving the sides, trim any excess reed from the top of the basket. Use a pair of sharp scissors to cut the reed strands neatly, ensuring a clean and polished look.
2. Secure the Top Rows: To secure the top rows of weaving, gently press them down against the sides of the basket. This will create a smooth and finished edge.
3. Optional: Add Handles: If you wish to add handles to your basket, now is the time to do so. Cut pieces of sturdy material such as wooden dowels, leather strips, or rope to your desired handle length. Attach the handles to opposite sides of the basket using a weaving technique or by drilling holes and threading the handles through.
4. Optional: Apply a Finish: If you want to protect and enhance the appearance of your reed basket, you can apply a finish such as a clear varnish or sealant. This will help protect the reed from moisture and add a glossy or matte finish, depending on your preference.
5. Inspect and Adjust: Take a moment to inspect your finished basket. Ensure that all the weaving is secure and tight. Check for any loose ends or gaps that may need to be tightened or filled in. Make any necessary adjustments to ensure a well-crafted and sturdy basket.
6. Use and Enjoy: Your reed basket is now complete and ready to be used! Whether you use it for storing household items, organizing your craft supplies, or as a decorative piece, your handmade basket is sure to add functionality and beauty to any space.
Remember, as you continue to make more reed baskets, you can experiment with different weaving patterns, colors, and shapes to create unique and personalized designs. The possibilities are endless!
Congratulations on completing your reed basket with these finishing touches. Now you can sit back, relax, and admire your handiwork or start using it to organize and declutter your surroundings.
Conclusion
Congratulations on successfully completing your reed basket! You have now learned how to gather reed, prepare it for weaving, create a sturdy base, weave the sides, and add those final finishing touches. By following these steps, you’ve embarked on a journey into the ancient art of basket making.
Making reed baskets is not only a practical skill but also a creative and rewarding process. These versatile storage containers can be used in various ways, such as organizing household items, showcasing decorative pieces, or even as unique gift baskets.
Throughout this guide, we have explored the materials needed, step-by-step instructions, and important tips to ensure a successful outcome. Remember that practice makes perfect, so don’t be discouraged if your first attempt doesn’t meet your expectations. With each basket you create, you will refine your skills and develop your own unique style.
Keep in mind that basket making is not limited to reed alone. You can also experiment with other natural materials like bamboo, willow, or even fabric strips to create different textures and designs. The possibilities for creativity and customization are endless.
Now that you have the knowledge and skills to make your own reed baskets, don’t hesitate to share your creations with friends and family or even consider selling them if you wish. Handmade items are always appreciated and valued for their artistic touch and uniqueness.
Lastly, remember to enjoy the process of basket making. Allow yourself to get lost in the rhythmic weaving, taking pleasure in the artistry and craftsmanship of each piece. It is not only the end result that matters but also the journey and fulfillment of creating something beautiful with your own hands.
So gather your materials, find a peaceful place to work, and let your creativity flow as you embark on this rewarding craft of reed basket making. Happy weaving!
Frequently Asked Questions about How To Make Reed Baskets
Was this page helpful?
At Storables.com, we guarantee accurate and reliable information. Our content, validated by Expert Board Contributors, is crafted following stringent Editorial Policies. We're committed to providing you with well-researched, expert-backed insights for all your informational needs.


0 thoughts on “How To Make Reed Baskets”