Articles
How To Adjust Garage Door Cable
Modified: October 28, 2024
Discover expert articles on how to adjust garage door cable, providing step-by-step guidance and useful tips for a seamless garage door operation.
(Many of the links in this article redirect to a specific reviewed product. Your purchase of these products through affiliate links helps to generate commission for Storables.com, at no extra cost. Learn more)
Introduction
Welcome to our comprehensive guide on how to adjust garage door cables. Your garage door cables play a crucial role in the smooth operation of your garage door. They help to balance the weight of the door, ensuring that it can be opened and closed safely and effectively.
Over time, garage door cables can become loose or misaligned, leading to issues such as a door that won’t open or close properly, uneven movements, or excessive strain on the motor. In these situations, adjusting the garage door cables can often solve the problem and restore the functionality of your garage door.
In this article, we will provide you with a step-by-step guide on how to adjust garage door cables. We will also discuss the different types of garage door cables and the tools and materials you will need for this task. It is important to note that adjusting garage door cables requires some basic knowledge of garage door mechanics and safety precautions. If you are unsure about any aspect of the process, it is recommended to consult a professional.
Before we dive into the details, let’s take a moment to understand the role of garage door cables and the types of cables you may encounter.
Key Takeaways:
- Prioritize safety and follow proper precautions when adjusting garage door cables. Disconnect power, wear safety gear, and seek professional help if unsure. Regular maintenance ensures smooth and safe operation.
- Inspect, identify, and adjust garage door cables with precision. Follow the step-by-step guide to address common issues and enjoy a well-maintained garage door system. Remember, safety first!
Read more: How To Adjust Garage Door Tracks
Understanding Garage Door Cables
Garage door cables are an essential component of the garage door system. They work in conjunction with the springs to support the weight of the door and facilitate its smooth and controlled movement. Understanding the different types of garage door cables and their role is crucial in effectively adjusting them.
Types of Garage Door Cables
There are two main types of garage door cables that you may come across: torsion cables and extension cables.
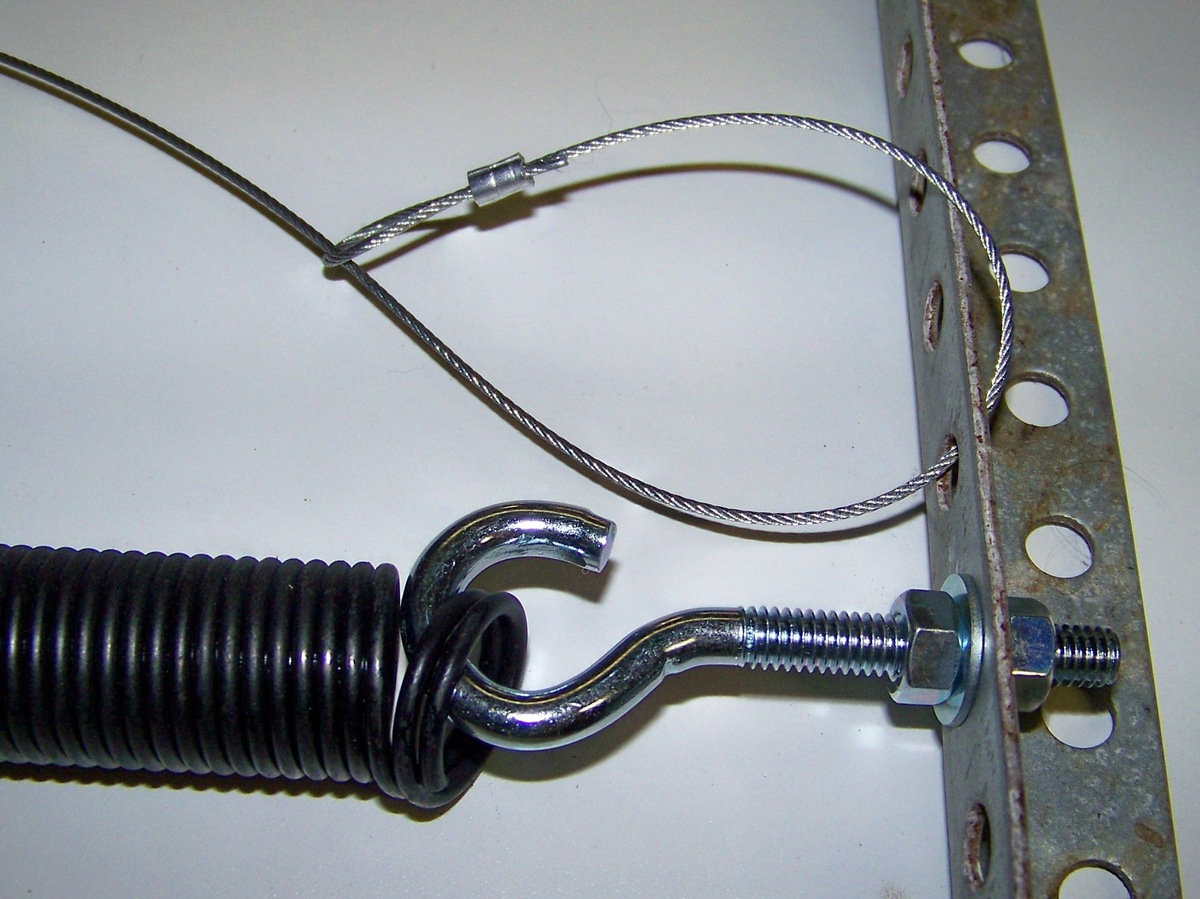
Torsion Cables: Torsion cables are most commonly found on sectional garage doors that operate with torsion springs. These cables are attached to the bottom corners of the door and wind around the torsion spring shaft. Torsion cables help to balance the weight of the door and assist with the lifting and lowering mechanism.
Extension Cables: Extension cables are typically used on single-piece tilt-up garage doors or older style sectional doors. These cables are attached to the bottom corners of the door and extend along the horizontal tracks. Extension cables provide support and tension to the door as it opens and closes.
The Role of Garage Door Cables
Garage door cables play a crucial role in the safe and efficient operation of your garage door. Here are the key functions of garage door cables:
- Counterbalance the weight: Garage doors can be quite heavy, and the cables work in tandem with the springs to counterbalance this weight. They help to distribute the weight evenly, reducing the strain on other components of the door system.
- Facilitate the lifting and lowering: When the door is opened, the cables, along with the springs, help to lift the door smoothly. Similarly, when the door is closed, the cables guide it down in a controlled manner. This ensures that the door moves evenly and prevents any sudden drops or jerky movements.
- Maintain the door’s balance: Properly tensioned cables are crucial for maintaining the balance of the door. If the cables become loose or misaligned, it can cause the door to become uneven, leading to issues such as the door getting stuck during operation or excessive strain on the motor.
Now that you have a better understanding of the different types of garage door cables and their role in the system, let’s move on to the tools and materials you will need to adjust them.
Tools and Materials Needed
Before you begin adjusting your garage door cables, it’s important to gather the necessary tools and materials. Having the right equipment will make the task easier and ensure that you can properly adjust the cables. Here are the tools and materials you will need:
Read more: How To Adjust Garage Door Opener
Tools:
- Adjustable wrench
- Pliers
- Cable cutters
- Safety glasses
- Tape measure
- Safety gloves
- Step ladder
Materials:
- Replacement cables (if necessary)
- Cable fasteners
- Lubricant spray
- Rags or cleaning cloths
- Penetrating oil
- Garage door lubricant
These tools and materials are essential for safely adjusting your garage door cables. The adjustable wrench and pliers will help you loosen and tighten the cable tension, while the cable cutters come in handy if you need to replace any damaged cables. Safety glasses and gloves are important for protecting your eyes and hands during the process.
A tape measure is useful for taking accurate measurements, and a step ladder will allow you to reach the high parts of the garage door easily. Additionally, having replacement cables, cable fasteners, lubricant spray, rags or cleaning cloths, penetrating oil, and garage door lubricant on hand will ensure that you have everything you need to address any issues that may arise.
Now that you have gathered the necessary tools and materials, it’s time to move on to the next important step: safety precautions. Ensuring your safety and the safety of others is paramount when working on garage doors. Let’s take a look at the essential safety measures you should follow.
Safety Precautions
Working on garage door cables can be potentially dangerous if proper safety precautions are not followed. It is important to prioritize safety to prevent accidents or injuries. Here are some essential safety precautions to keep in mind when adjusting your garage door cables:
- Disconnect the power: Before starting any work on your garage door, make sure to disconnect the power to the door opener. This can be done by unplugging it from the electrical outlet or flipping the circuit breaker associated with the garage door.
- Wear safety gear: Protect yourself by wearing safety glasses and gloves throughout the process. Safety glasses will prevent any debris or particles from getting into your eyes, while gloves will provide a barrier between your hands and any sharp edges or moving parts.
- Secure the door: Ensure that the garage door is fully closed and locked in place before attempting to adjust the cables. This will prevent any unwanted movement or accidents while you work.
- Use a stable ladder: If you need to access the higher parts of the garage door, always use a sturdy and stable ladder. Make sure the ladder is on level ground, and do not overreach or lean too far to maintain your balance.
- Be cautious of tension: Garage door cables are under high tension and can cause serious injuries if mishandled. Avoid standing directly in front of the cables while adjusting them, and never attempt to remove or adjust the cables without proper knowledge and equipment.
- Follow manufacturer instructions: Refer to the manufacturer’s instructions for your specific garage door model. These instructions provide valuable guidance and safety information, including recommended maintenance and adjustment procedures.
- Seek professional help if unsure: If you are unsure about any aspect of adjusting your garage door cables, it is always better to seek professional help. Garage doors can be complex systems, and a professional technician will have the expertise and experience to handle the job safely and effectively.
By following these safety precautions, you can minimize the risk of accidents or injuries while working on your garage door cables. Now that you are familiar with the safety measures, let’s proceed to the step-by-step guide on how to adjust the garage door cables.
Step-by-Step Guide to Adjusting Garage Door Cables
Adjusting garage door cables is a task that requires attention to detail and precision. By following these step-by-step instructions, you can effectively adjust your garage door cables and restore the smooth and safe operation of your garage door.
Read more: How To Adjust Garage Door Chain
Step 1: Inspecting the Cables
Start by inspecting the cables for any signs of damage or wear. Look for frayed strands, rust, or kinks in the cables. If you notice any issues, such as broken or severely damaged cables, they will need to be replaced before proceeding with the adjustment. Ensure that the cables are securely fastened to the bottom brackets and the drum.
Step 2: Identify the Problem
Determine the specific problem you are experiencing with your garage door. This could include uneven door movement, a door that won’t open or close fully, or excessive strain on the motor. Identifying the problem will help guide you in adjusting the cables effectively.
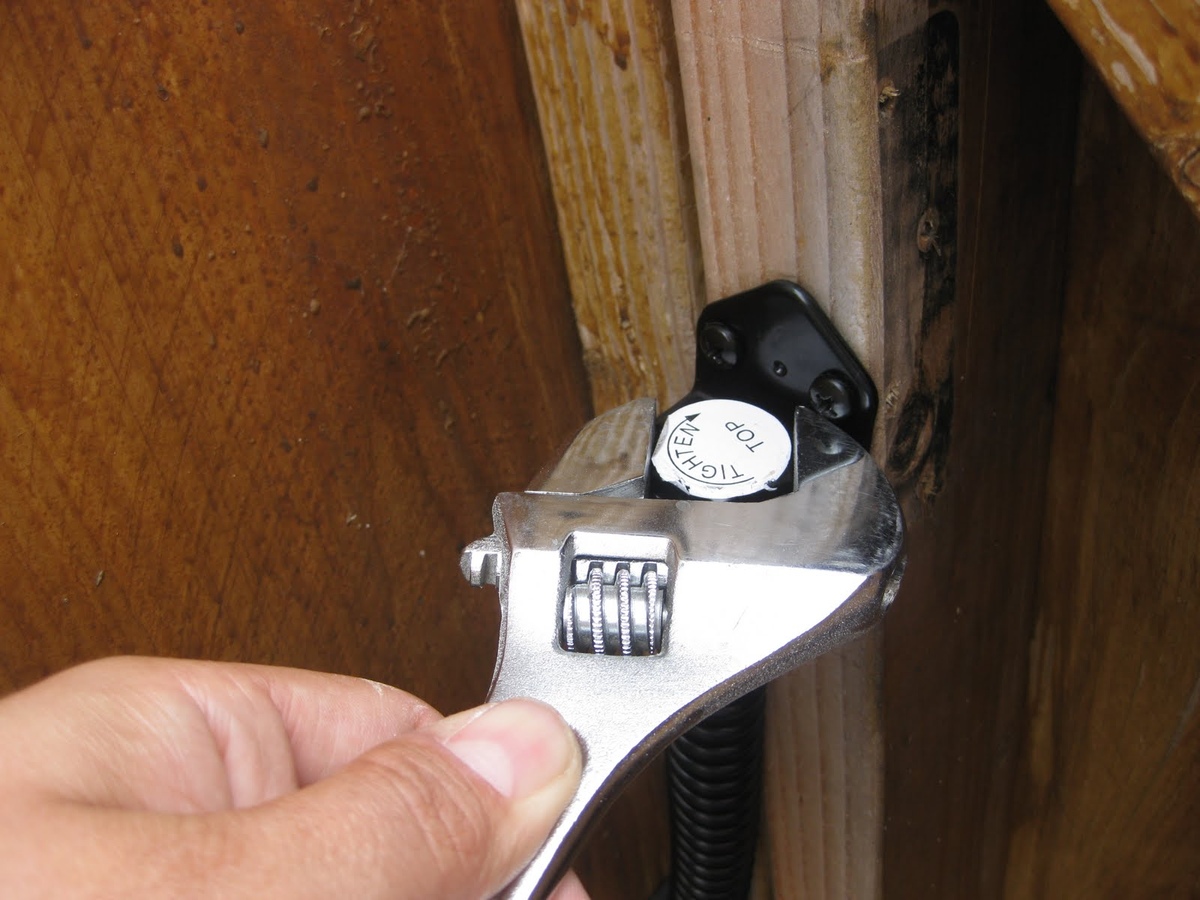
Step 3: Loosening the Cable Tension
Using an adjustable wrench and pliers, loosen the cable tension on both sides of the garage door. Begin by disengaging the garage door opener so that you can work on the cables manually. Locate the cable adjustment nuts on the bottom brackets and turn them counterclockwise to loosen the tension. Loosen the nuts gradually, making small adjustments at a time.
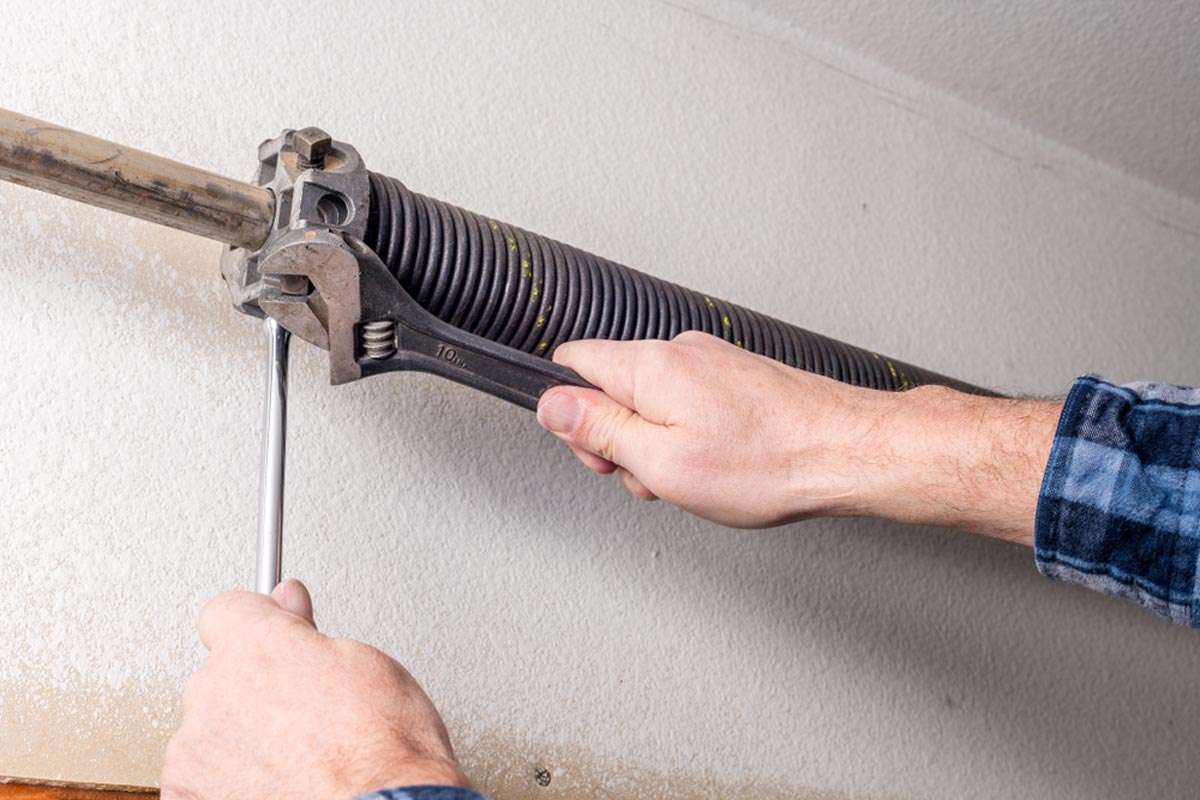
Step 4: Adjusting the Cable Tension
Once you have loosened the cable tension, you can now fine-tune and adjust the tension to the appropriate level. This will depend on the specific problem you are trying to address and the manufacturer’s recommendations. Use the adjustable wrench and pliers to turn the cable adjustment nuts clockwise or counterclockwise as needed to achieve the desired tension on both sides of the garage door. Avoid overtightening the cables, as this can put excessive strain on components and cause further issues.
Read more: How To Adjust Liftmaster Garage Door
Step 5: Testing the Door
After adjusting the cable tension, it’s important to test the garage door to ensure that it operates smoothly and effectively. Re-engage the garage door opener and operate the door several times to check for any improvements in its movement and alignment. Pay attention to any unusual sounds, jerky movements, or resistance during the testing process. If the problem persists or worsens, it may be necessary to consult a professional for further inspection and adjustments.
By following these step-by-step instructions, you can successfully adjust your garage door cables and address common issues that may arise. Remember to exercise caution and prioritize safety throughout the process.
Now that you have completed the adjustment process, you can enjoy the improved functionality of your garage door. Regular maintenance and periodic cable inspections will help prevent future issues and ensure the longevity of your garage door system.
As a final note, please remember that adjusting garage door cables can be complex, and if you ever feel unsure or uncomfortable performing these tasks yourself, it is always best to seek the assistance of a professional garage door technician.
Conclusion
Adjusting garage door cables is an essential maintenance task that can help restore the functionality and smooth operation of your garage door. By following the step-by-step guide we have provided, you can effectively adjust the tension of your garage door cables and address common problems such as uneven movement, doors that won’t open or close properly, or excessive strain on the motor.
Throughout the process, it is important to prioritize safety and follow proper precautions. Disconnecting the power, wearing safety gear, securing the door, and using stable equipment are key to preventing accidents or injuries during the adjustment process. Remember, if you are unsure or uncomfortable performing these tasks yourself, it is best to contact a professional garage door technician who can help you with the adjustment.
Regular inspections and maintenance of your garage door cables are crucial to prevent future issues. By visually inspecting the cables for damage, taking appropriate measures to address any issues, and ensuring proper tension, you can prolong the lifespan of your garage door system and avoid costly repairs.
Remember, a well-maintained garage door not only enhances the curb appeal of your home but also provides convenience and security. Taking the time to adjust your garage door cables will help you enjoy a smoother and more reliable operation every time you enter or exit your garage.
We hope this comprehensive guide has provided you with the necessary knowledge and confidence to adjust your garage door cables effectively. If you have any further questions or concerns, don’t hesitate to reach out to a professional for assistance. Happy garage door adjusting!
Frequently Asked Questions about How To Adjust Garage Door Cable
Was this page helpful?
At Storables.com, we guarantee accurate and reliable information. Our content, validated by Expert Board Contributors, is crafted following stringent Editorial Policies. We're committed to providing you with well-researched, expert-backed insights for all your informational needs.


0 thoughts on “How To Adjust Garage Door Cable”