Articles
How To Draw Plans For Woodworking
Modified: August 28, 2024
Learn the art of woodworking with our informative articles on how to draw plans for your next project. Gain valuable tips and techniques from experienced woodworkers.
(Many of the links in this article redirect to a specific reviewed product. Your purchase of these products through affiliate links helps to generate commission for Storables.com, at no extra cost. Learn more)
Introduction
When it comes to woodworking, having a well-thought-out and detailed plan is essential. Whether you are a beginner or an experienced woodworker, drawing plans is an integral part of the process. Not only does it help you visualize the project, but it also serves as a guide throughout the construction process.
In this article, we will take you through the step-by-step process of drawing plans for woodworking. From gathering materials to finalizing the plan, you will learn the necessary skills to create detailed and accurate woodworking plans.
Before we dive into the steps, let’s explore the importance of having a plan in the first place. A woodworking plan acts as a blueprint for your project. It allows you to carefully consider the design, dimensions, and materials needed, ensuring that all aspects of the project are well-planned and executed.
By having a plan, you can avoid costly mistakes, reduce material waste, and streamline the construction process. It also helps you estimate the time and effort required for each step, keeping you organized and focused on completing the project.
Now that we understand the significance of drawing plans, let’s move on to the step-by-step process of creating woodworking plans.
Key Takeaways:
- Careful planning is essential in woodworking. From gathering materials to finalizing the plan, attention to detail and precision in measurements are crucial for successful project execution.
- Drawing plans for woodworking not only helps visualize the project but also guides the construction process, reduces mistakes, and streamlines the overall project. Flexibility and creativity are key in the planning process.
Read more: How To Draw A Shed Plan
Step 1: Gathering Materials
Before you begin drawing plans for your woodworking project, it’s important to gather all the necessary materials. Having everything you need at hand will ensure a smooth and uninterrupted planning process. Here are the materials you will need:
- Graph paper or a drawing software: You can choose to draw your plans on graph paper or use a digital drawing software. Graph paper provides a grid structure that makes it easier to create precise measurements and scale models. On the other hand, drawing software allows for more flexibility and the ability to easily modify your designs.
- Measuring tools: Accurate measurements are crucial in woodworking plans. Make sure you have measuring tools such as a tape measure, ruler, and a combination square to ensure precise dimensions.
- Drawing tools: Depending on your preference, you can use pencils, erasers, pens, or markers to draft your plans. Choose tools that are comfortable for you to work with.
- Reference materials: If you are working on a specific type of woodworking project, it’s useful to have reference materials such as books, magazines, or online resources. They can provide inspiration and guidance for your design.
Once you have gathered all the necessary materials, you are ready to move on to the next step: measuring and sketching.
Step 2: Measuring and Sketching
With your materials ready, it’s time to dive into the exciting process of measuring and sketching your woodworking plans. This step is crucial as it lays the foundation for the overall design and dimensions of your project. Here’s what you need to do:
- Measure the space: If your woodworking project is intended for a specific area, start by measuring the available space. This will help you determine the maximum dimensions for your project and ensure that it fits perfectly in its intended location.
- Sketch the basic shape: Begin by sketching the basic shape of your project. Use your graph paper or drawing software to create an outline of the project’s overall structure. Keep in mind the dimensions and proportionality as you sketch. You can use a pencil or a light color on the software to create the initial rough sketch.
- Add details: Once you have the basic shape, start adding more details to your sketch. Consider the various elements of your woodworking project, such as shelves, drawers, or intricate designs. Take your time to think about the functionality and aesthetics of each component.
- Consider ergonomics: If your project is meant to be used, consider the ergonomics and user experience. For example, if you are designing a chair, ensure that the dimensions and angles provide comfort and support.
- Revise and refine: Sketches are an iterative process, so don’t be afraid to revise and refine your design. As you progress, you may come up with new ideas or realize the need to make adjustments. Use erasers or the digital editing tools to make changes as needed.
Remember, this step is all about getting your initial ideas onto paper or screen. It doesn’t have to be perfect at this stage, but rather a starting point for further development.
Once you have completed the measuring and sketching process, you are ready to move on to the next step: creating a scale model of your project.
Step 3: Creating a Scale Model
Creating a scale model is an essential step in the woodworking planning process. It allows you to visualize your project in three dimensions and test the feasibility of your design. Follow these steps to create an accurate scale model:
- Determine the scale: Decide on the scale you want to use for your model. Common scales in woodworking plans range from 1:10 to 1:100. For example, if you choose a 1:10 scale, every 1 inch on your model represents 10 inches in real life.
- Measure and mark dimensions: Use your measuring tools to determine the dimensions of each component in your project. Scale these measurements down according to the chosen scale. Mark these dimensions on your model, using a ruler or a scale ruler specifically designed for the chosen scale.
- Cut and shape materials: Use appropriate materials, such as cardboard, foam board, or wood, to create the components of your scale model. Use a sharp utility knife or a saw to cut and shape the materials accurately. Pay attention to the details and maintain the proportions as per your sketch.
- Assemble the components: Once you have all the components cut and shaped, assemble them together using glue, tape, or other suitable methods. Take your time to align the pieces properly and ensure structural integrity.
- Review and refine: Step back and take a look at your scale model. Evaluate the proportions, functionality, and overall design. Pay attention to any flaws or areas that need improvement. This is your opportunity to make adjustments and refine your design further.
A scale model serves as a tangible representation of your project, allowing you to see how different elements come together. It can also help you identify any potential issues before moving on to the construction phase.
Once you are satisfied with your scale model, you can proceed to the next step: detailing the design of your woodworking project.
When drawing plans for woodworking, be sure to include precise measurements and detailed drawings of each component. This will help ensure accuracy and efficiency during the construction process.
Step 4: Detailing the Design
With the scale model completed, it’s time to move on to detailing the design of your woodworking project. This step involves adding finer details, refining the aesthetics, and addressing any functional considerations. Follow these guidelines to bring your project to life:
- Consider joinery: Determine the joinery techniques you will use to connect different components. Whether it’s mortise and tenon, dovetail, or pocket-hole joinery, ensure that your design includes appropriate and sturdy connections.
- Add decorative elements: If desired, incorporate decorative elements such as carvings, inlays, or ornamental details. These embellishments can add character and enhance the visual appeal of your project.
- Include materials and finishes: Specify the materials you intend to use for each component of your project. Consider factors such as the type of wood, the finish you plan to apply, and any additional accents or hardware.
- Account for movement: Wood is a natural material that can expand or contract with changes in humidity and temperature. Make sure to account for this movement by leaving adequate space and using appropriate joinery techniques.
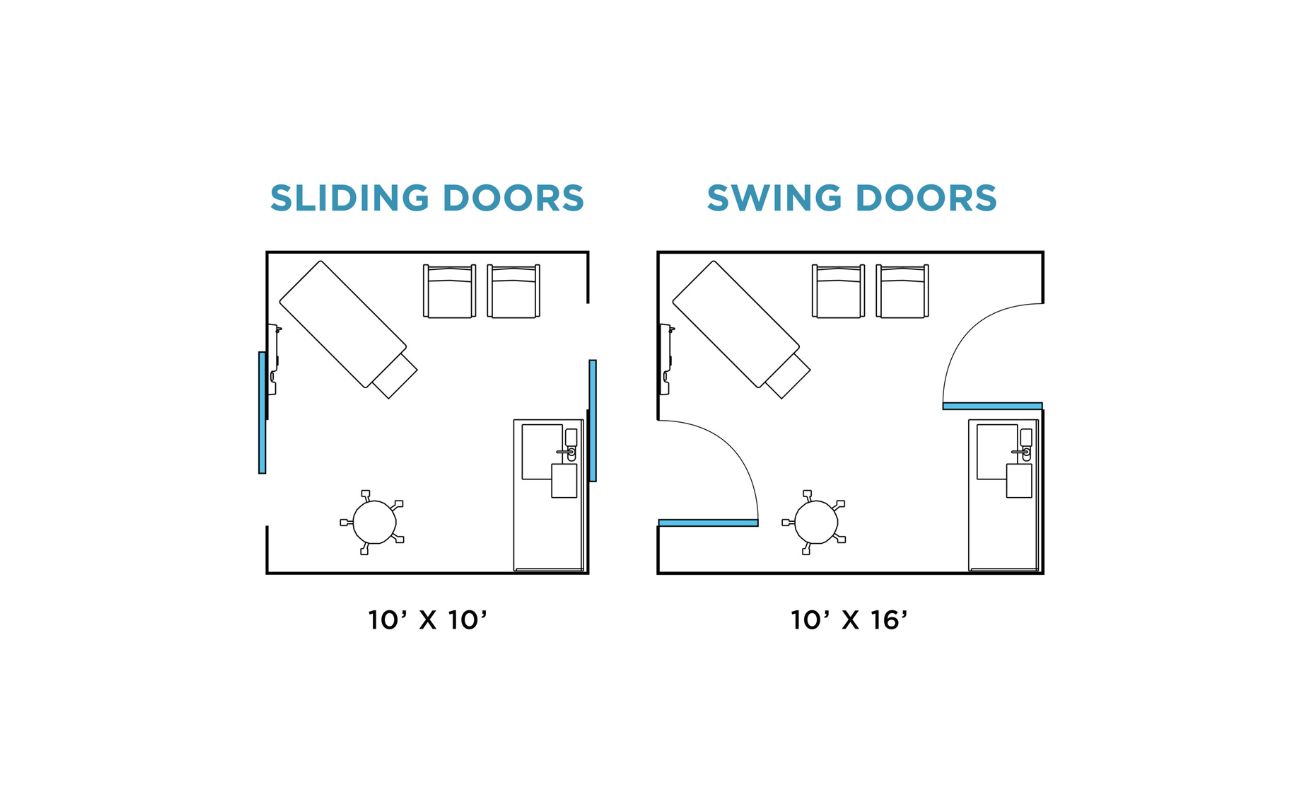
- Address functionality: Consider the intended use of your project and make any necessary adjustments to ensure optimal functionality. This could include features such as adjustable shelves, smooth drawer glides, or ergonomic handles.
During the detailing stage, it’s important to pay attention to both the function and aesthetics of your design. This will result in a woodworking project that not only looks great but also functions effectively.
Once you have detailed the design, you are ready to proceed to the next step: adding dimensions and labels to your woodworking plan.
Read more: How To Draw An Evacuation Floor Plan
Step 5: Adding Dimensions and Labels
Adding dimensions and labels to your woodworking plan is crucial for understanding the size and placement of various components. It provides clarity and ensures that anyone reading your plan can recreate the project accurately. Follow these steps to accurately label and dimension your plan:
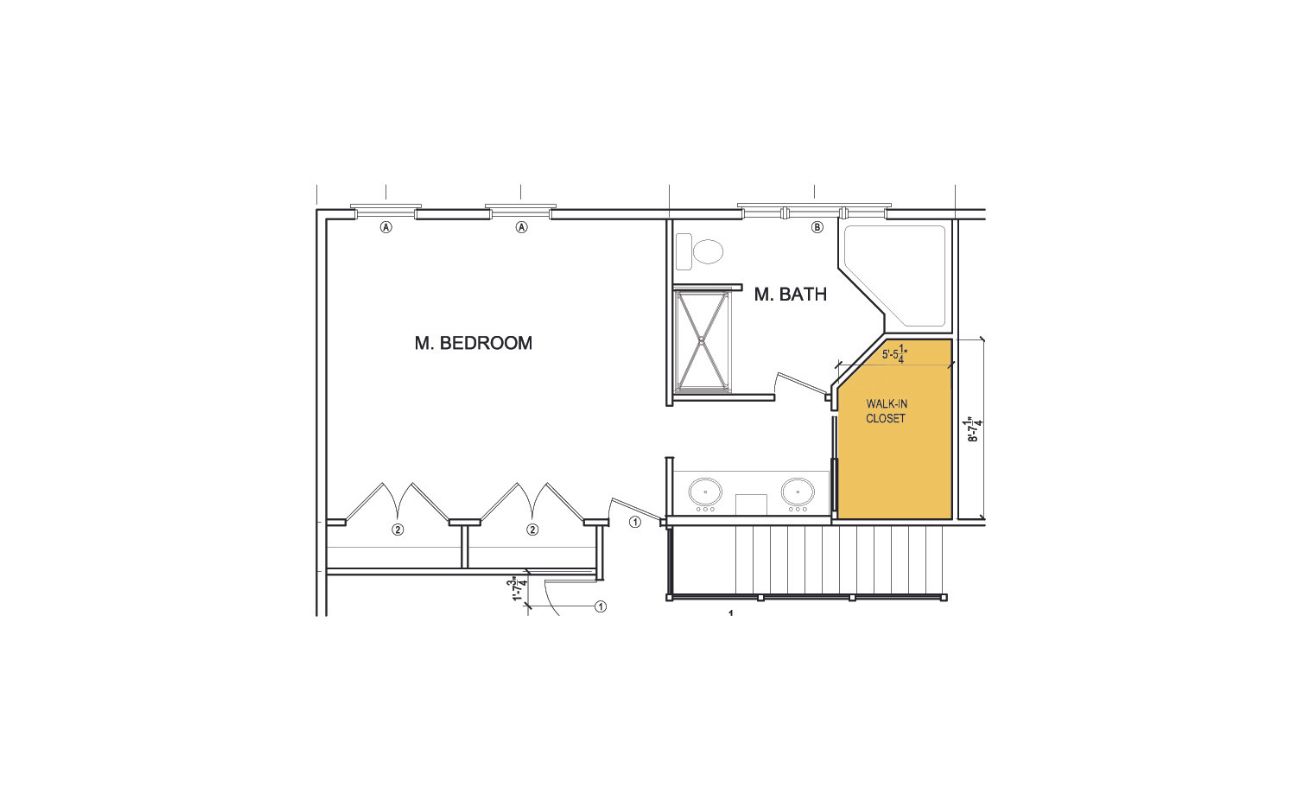
- Measure and mark dimensions: Use your measuring tools to determine the precise dimensions of each component in your design. Measure the length, width, and height of each piece, as well as any additional dimensions required for joinery or assembly.
- Add dimensions to your plan: Transfer the measurements from your scale model or sketch onto your woodworking plan. Use arrows and lines to indicate the lengths and widths of each component. Consider using a ruler or a scale ruler to keep the dimensions consistent.
- Add labels and annotations: Label each component on your plan, using clear and descriptive terms. This will help you identify each part of the project and understand its purpose. Include any important notes or instructions that are relevant to the construction process.
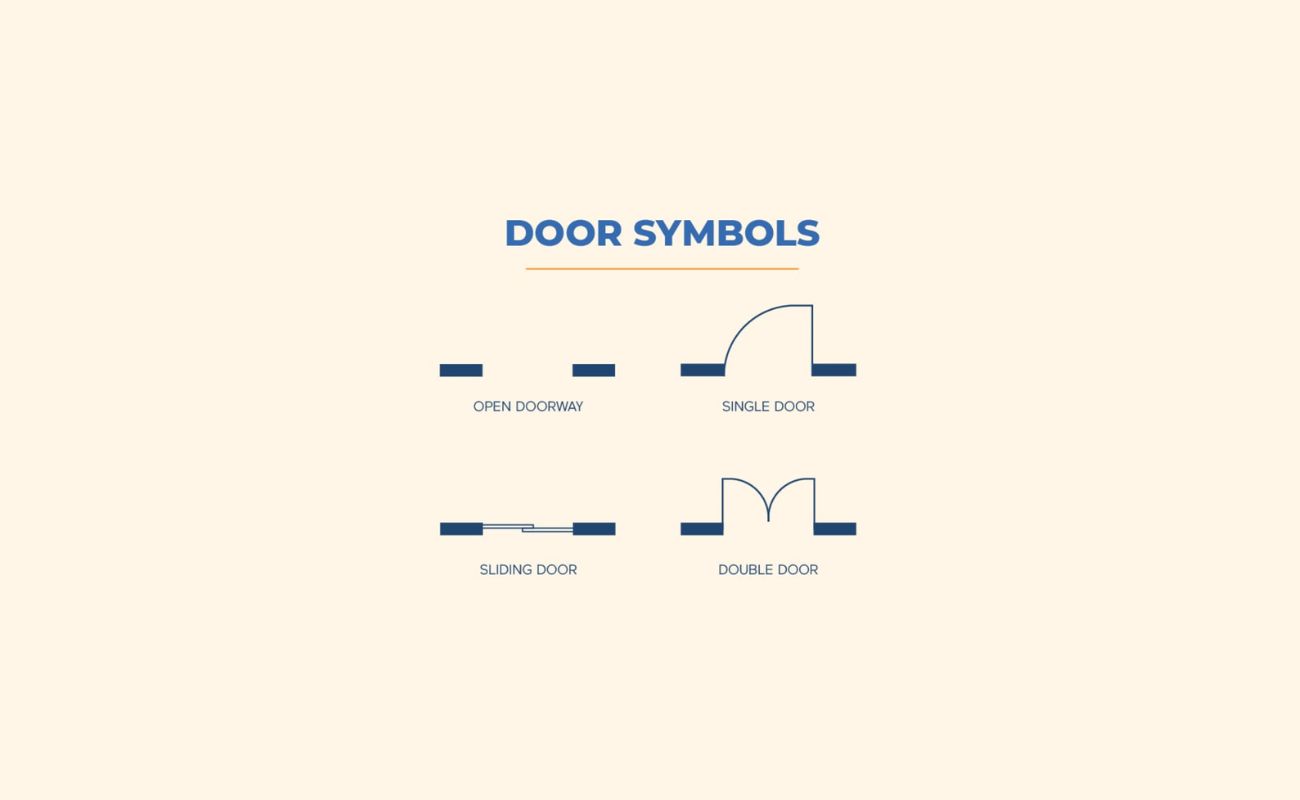
- Indicate joinery and connections: Use appropriate symbols or notations to indicate the type of joinery or connections for each component. This will guide you during the assembly stage and ensure that the project is constructed correctly.
- Include a legend or key: Create a legend or key that explains the symbols, abbreviations, or notations used in your plan. This will make it easier for others to interpret your woodworking plan and understand the various elements.
Adding dimensions and labels to your woodworking plan brings clarity and precision to the construction process. It allows you and others to accurately recreate the project and ensures that all the necessary information is conveyed.
Once you have added dimensions and labels, you are ready to move on to the final step: finalizing the plan.
Step 6: Finalizing the Plan
After putting in the effort to gather materials, measure and sketch, create a scale model, detail the design, and add dimensions and labels, it’s time to finalize your woodworking plan. This step involves reviewing and refining your plan to ensure accuracy and completeness. Follow these guidelines to complete the process:
- Review your plan: Take a close look at your woodworking plan and carefully review every aspect. Check for any missing dimensions, unclear annotations, or inconsistencies in the design. Make sure all the necessary information is included and conveyed effectively.
- Make final adjustments: If you find any errors or areas that need improvement during the review process, make the necessary adjustments. Refine your design, update dimensions, or clarify labels to ensure the plan is accurate and easy to understand.
- Validate the measurements: Double-check all the measurements and calculations to ensure they are correct. This step is crucial to ensure that your project will be built to the intended specifications and proportions.
- Get feedback: If possible, seek feedback from other woodworkers or professionals in the field. They can provide valuable insights and help you identify any potential issues or areas for improvement in your plan.
- Create a final, clean copy: Once you are satisfied with the revisions and feedback, create a final, clean copy of your woodworking plan. Use a neat handwriting, or if using a digital software, ensure that the plan is properly formatted, organized, and easy to read.
By finalizing your woodworking plan, you are ensuring that all the necessary information is present and accurate. It becomes a comprehensive guide for yourself or others to follow during the construction process.
With the plan now complete, you can confidently proceed to the next stage: bringing your woodworking project to life.
Overall, the process of drawing plans for woodworking requires careful attention to detail, precision in measurements, and a creative mindset. By following these steps, you will be able to create comprehensive and accurate plans that help you successfully execute your woodworking projects.
Conclusion
Drawing plans for woodworking is a crucial step in the woodworking process. It allows you to visualize your project, make accurate measurements, and guide you through the construction process. By following the step-by-step process outlined in this article, you can create comprehensive and detailed plans for your woodworking projects.
Starting with gathering materials, you ensure that you have everything you need to begin the planning process. Measuring and sketching the basic shape of your project provides a foundation for further development. Creating a scale model helps you visualize the project in three dimensions and test its feasibility. Detailing the design involves adding joinery techniques, decorative elements, and materials and finishes to enhance both function and aesthetics.
Adding dimensions and labels is essential for guiding the construction process and ensuring accuracy. Finalizing the plan involves reviewing and refining it to address any errors or inconsistencies. By completing these steps, you are left with a comprehensive woodworking plan that serves as a blueprint for your project.
It is important to emphasize the critical role that planning plays in successful woodworking projects. By investing time and effort into drawing plans, you can avoid costly mistakes, streamline the construction process, and achieve the desired results.
Remember, the plan is not set in stone and can be adjusted as needed. Don’t be afraid to seek feedback from others, make revisions, and improve your plan as you gain more experience and insights.
With your detailed woodworking plan in hand, you are ready to move forward with confidence and embark on your woodworking journey. Enjoy the process, stay patient, and let your creativity flow as you bring your project to life!
Frequently Asked Questions about How To Draw Plans For Woodworking
Was this page helpful?
At Storables.com, we guarantee accurate and reliable information. Our content, validated by Expert Board Contributors, is crafted following stringent Editorial Policies. We're committed to providing you with well-researched, expert-backed insights for all your informational needs.


0 thoughts on “How To Draw Plans For Woodworking”