Articles
How To Change Spool In Ryobi Weed Wacker
Modified: December 7, 2023
Learn how to change the spool in your Ryobi weed wacker with our informative articles. Upgrade your gardening tools with ease.
(Many of the links in this article redirect to a specific reviewed product. Your purchase of these products through affiliate links helps to generate commission for Storables.com, at no extra cost. Learn more)
Introduction
Welcome to our guide on how to change the spool in a Ryobi weed wacker. Whether you’re a seasoned gardener or a DIY enthusiast, properly maintaining your gardening tools is essential to ensure their optimal performance. One important aspect of maintenance for a weed wacker is regularly changing the spool, which holds the cutting line.
The cutting line, also known as the trimmer line or string, deteriorates over time as it repeatedly comes into contact with grass, weeds, and other vegetation. Eventually, it becomes necessary to replace the old line with a new one to maintain the weed wacker’s cutting efficiency.
In this article, we’ll take you through a step-by-step process on how to change the spool in your Ryobi weed wacker. But before we get started, it’s important to note that different models might have slight variations in the process. So, it’s always a good idea to consult your user manual for specific instructions pertaining to your weed wacker model.
Now, let’s gather the necessary tools and materials before we begin the spool replacement process.
Key Takeaways:
- Regularly changing the spool in your Ryobi weed wacker is crucial for maintaining its cutting efficiency and ensuring optimal performance, prolonging its lifespan and providing better results for tackling overgrown grass and weeds in your garden or yard.
- Prioritize safety by powering off the weed wacker, carefully removing the cutting head and old spool, preparing and securely installing the new spool, and testing the weed wacker’s operation to ensure smooth and effective cutting performance.
Read more: How To Fix Ryobi Weed Wacker
Step 1: Gather necessary tools and materials
Before you start changing the spool in your Ryobi weed wacker, gather the following tools and materials:
- Screwdriver or Allen wrench (depending on your weed wacker model)
- Replacement spool (make sure it is compatible with your Ryobi weed wacker)
- Protective gloves
- Clean cloth
Having these tools and materials ready will ensure a smooth and efficient spool replacement process. Once you have them, you’re ready to move on to the next step.
Step 2: Power off the weed wacker
Before you begin any maintenance task on your weed wacker, it’s crucial to ensure your safety. Start by turning off the power to the weed wacker. If it’s a corded electric model, unplug it from the power source. If it’s a battery-powered or gas-powered model, remove the battery or disconnect the spark plug wire to prevent accidental activation.
This step is vital because it eliminates the risk of the weed wacker accidentally starting while you’re working on it, which could lead to injuries. Take a moment to double-check that the power is completely off before proceeding to the next step.
Once you’ve confirmed that the power is off, you can proceed with confidence to remove the cutting head from the weed wacker.
Step 3: Remove the cutting head
With the power off, it’s time to remove the cutting head from your Ryobi weed wacker. The cutting head houses the spool and cutting line, so it needs to be removed in order to access and replace the spool.
The process of removing the cutting head may vary slightly depending on the model of your Ryobi weed wacker. However, here is a general guideline:
- Locate the locking mechanism or release button on the cutting head. This is usually located near the base where it attaches to the shaft of the weed wacker.
- Press and hold the locking mechanism or release button to unlock the cutting head.
- While holding down the locking mechanism or release button, twist the cutting head counterclockwise to loosen it.
- Continue twisting the cutting head until it comes off completely from the weed wacker.
Once you’ve successfully removed the cutting head, set it aside in a safe place. Take a moment to inspect the cutting head for any debris or built-up grass clippings. If you notice any, use a clean cloth to wipe them away before proceeding to the next step.
Now that the cutting head is detached, you’re ready to remove the old spool from your Ryobi weed wacker.
Step 4: Remove the old spool
Now that the cutting head is detached from your Ryobi weed wacker, it’s time to remove the old spool. The spool holds the cutting line, and over time, the line wears down and needs to be replaced for optimal cutting performance.
Follow these steps to remove the old spool:
- Inspect the spool to locate any clips, tabs, or locking mechanisms that are holding it in place.
- Depending on the design of your weed wacker, you may need to press in on the tabs or unlock the clips to release the spool.
- Once the clips or tabs are released, carefully lift the old spool out of the cutting head.
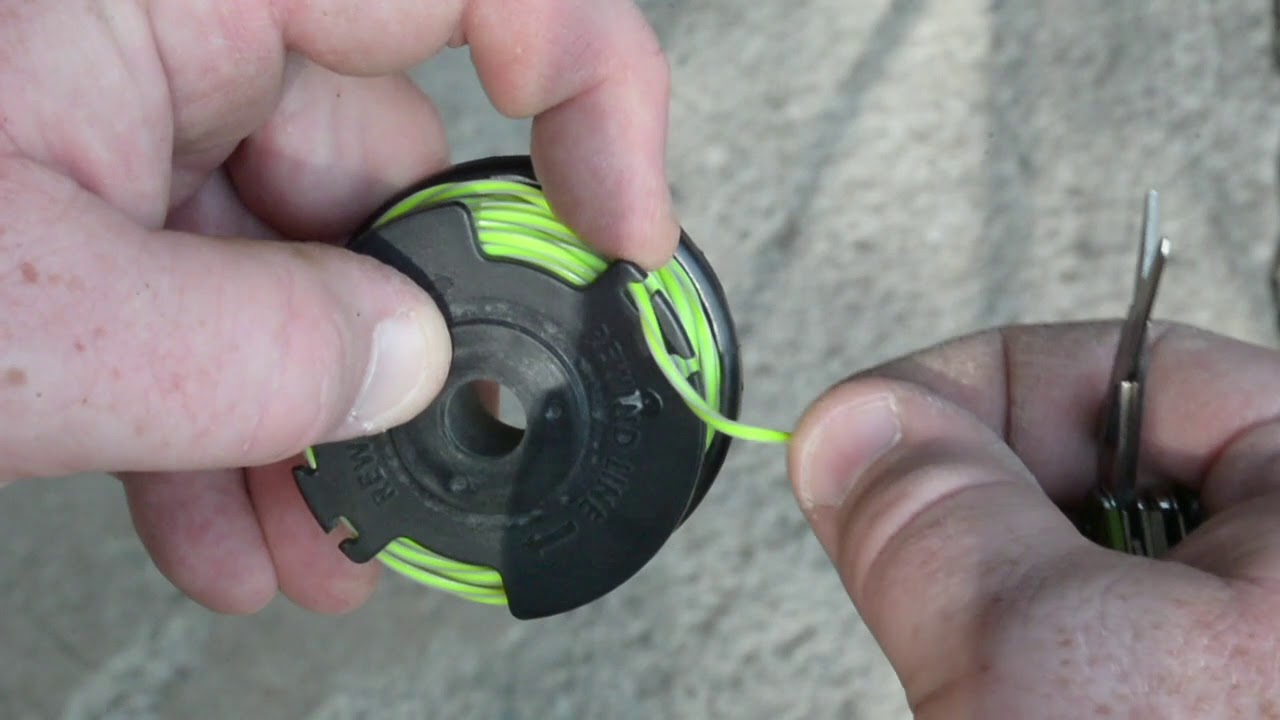
- Take note of the orientation of the spool and how the cutting line is wound on it. This will be helpful when installing the new spool later.
After removing the old spool, take a moment to inspect the cutting head and remove any debris or grass clippings that may have accumulated. A clean cutting head will ensure smooth operation and prevent any blockages during use.
Now that the old spool is removed, it’s time to prepare the new spool for installation.
When changing the spool in a Ryobi weed wacker, make sure to turn off the engine and disconnect the spark plug. Then, remove the spool by pressing the tabs and pulling it out. Finally, replace it with a new spool and reassemble the weed wacker.
Read more: How To Start Ryobi Weed Wacker
Step 5: Prepare the new spool
Now that you have removed the old spool from your Ryobi weed wacker, it’s time to prepare the new spool for installation. Preparing the new spool involves a few simple steps to ensure that it is ready to be loaded into the cutting head.
Follow these steps to prepare the new spool:
- Take out the new spool from its packaging and inspect it for any defects or damage. Ensure that it is the correct size and compatible with your Ryobi weed wacker.
- If the new spool is empty, you will need to wind the cutting line onto it. Follow the manufacturer’s instructions or the markings on the spool for guidance on the proper length and direction of winding.
- If the new spool comes pre-wound with cutting line, ensure that it is securely wound and there are no tangles or snags.
- Trim any excess cutting line, leaving a small amount sticking out to allow for proper cutting operation.
By properly preparing the new spool, you ensure that it is ready for installation and will provide optimal cutting performance for your Ryobi weed wacker.
Now that the new spool is prepared, it’s time to move on to the next step: installing the new spool into the cutting head.
Step 6: Install the new spool
With the new spool prepared, it’s time to install it into the cutting head of your Ryobi weed wacker. The proper installation of the new spool is essential to ensure efficient cutting and smooth operation of your weed wacker.
Follow these steps to install the new spool:
- Insert the new spool into the cutting head, making sure it fits securely.
- Ensure that the spool is aligned properly with any tabs, slots, or grooves in the cutting head.
- Press the spool down firmly, making sure it is seated correctly in the cutting head.
- If there are any locking mechanisms or clips, follow the manufacturer’s instructions to secure the spool in place.
- Give the new spool a gentle tug to ensure it is securely installed in the cutting head.
Once the new spool is properly installed, take a moment to inspect the cutting head and make sure it is clean and free from any debris or grass clippings. Keeping the cutting head clean will help maintain optimal cutting performance.
Now that the new spool is installed, we’re ready to move on to the next step: reinstalling the cutting head onto the weed wacker.
Step 7: Reinstall the cutting head
With the new spool securely installed in the cutting head of your Ryobi weed wacker, it’s time to reinstall the cutting head onto the weed wacker. Properly reinstalling the cutting head ensures that it is securely attached and ready for use.
Follow these steps to reinstall the cutting head:
- Align the cutting head with the shaft of the weed wacker.
- Insert the cutting head onto the shaft, making sure it slides into place smoothly.
- Twist the cutting head clockwise to tighten it onto the shaft.
- Continue twisting until the cutting head is securely attached to the weed wacker.
Be sure to check if there are any locking mechanisms or buttons that need to be engaged to properly secure the cutting head.
Once the cutting head is reinstalled, give it a gentle tug to ensure that it is securely attached to the weed wacker. A loose cutting head can affect the performance and safety of the weed wacker.
Now that the cutting head is securely attached, we’re ready for the final step: testing the weed wacker’s operation.
Step 8: Test the weed wacker’s operation
After successfully reinstalling the cutting head on your Ryobi weed wacker, it’s important to test the weed wacker’s operation to ensure that the new spool is functioning correctly. Testing the weed wacker allows you to verify that the cutting line is feeding properly and that the weed wacker is working smoothly.
Follow these steps to test the weed wacker’s operation:
- Put on your protective gloves and safety gear.
- Power on the weed wacker according to the manufacturer’s instructions. This may involve plugging it in, reinserting the battery, or reconnecting the spark plug wire.
- Hold the weed wacker in a comfortable position, ensuring a firm grip on the handle.
- Engage the cutting head by squeezing the trigger or activating the power switch.
- Listen for any unusual noises or vibrations. If you notice anything out of the ordinary, immediately power off the weed wacker and inspect the cutting head and spool for any issues.
- Begin cutting through some light vegetation to test the cutting performance. Pay attention to how the cutting line is feeding from the spool and if it is smoothly cutting through the vegetation.
- If there are any problems such as line jamming or insufficient cutting, power off the weed wacker and troubleshoot the issue. Consult the user manual for specific troubleshooting steps or seek assistance from a professional if needed.
By testing the weed wacker’s operation, you can ensure that the new spool is working correctly and that your Ryobi weed wacker is ready for use.
Congratulations! You have successfully changed the spool in your Ryobi weed wacker. Regularly maintaining and replacing the spool will help keep your weed wacker in top shape and ensure efficient cutting performance.
Remember to consult your user manual for any specific instructions or precautions related to your particular Ryobi weed wacker model. With proper maintenance and care, your weed wacker will continue to serve you well for years to come!
Read more: How To Load Ryobi Weed Wacker
Conclusion
Changing the spool in your Ryobi weed wacker is a necessary task for maintaining its cutting efficiency and ensuring optimal performance. By following the step-by-step guide we’ve provided, you can easily replace the old spool with a new one and have your weed wacker ready for the next gardening task.
Remember to gather the necessary tools and materials before starting and always prioritize your safety by powering off the weed wacker. Carefully remove the cutting head and old spool, preparing the new one with the proper winding and trimming of the cutting line. Install the new spool securely into the cutting head and reattach it to the weed wacker.
Once everything is in place, test the weed wacker’s operation and listen for any unusual noises or vibrations. If any issues arise, promptly address them to ensure smooth and effective cutting performance.
Maintaining your Ryobi weed wacker by regularly changing the spool will prolong its lifespan and provide better results when tackling overgrown grass and weeds in your garden or yard.
Remember to consult your user manual for specific instructions and always prioritize safety. If you encounter any difficulties or are unsure about any steps, it’s best to seek guidance from a professional or contact the manufacturer for assistance.
By following these instructions, you can confidently change the spool in your Ryobi weed wacker and continue to enjoy its reliable performance for all your gardening needs.
Happy gardening!
Frequently Asked Questions about How To Change Spool In Ryobi Weed Wacker
Was this page helpful?
At Storables.com, we guarantee accurate and reliable information. Our content, validated by Expert Board Contributors, is crafted following stringent Editorial Policies. We're committed to providing you with well-researched, expert-backed insights for all your informational needs.


0 thoughts on “How To Change Spool In Ryobi Weed Wacker”