Home>Articles>How To Change The Electrical Cord On A Kirby G4
Articles
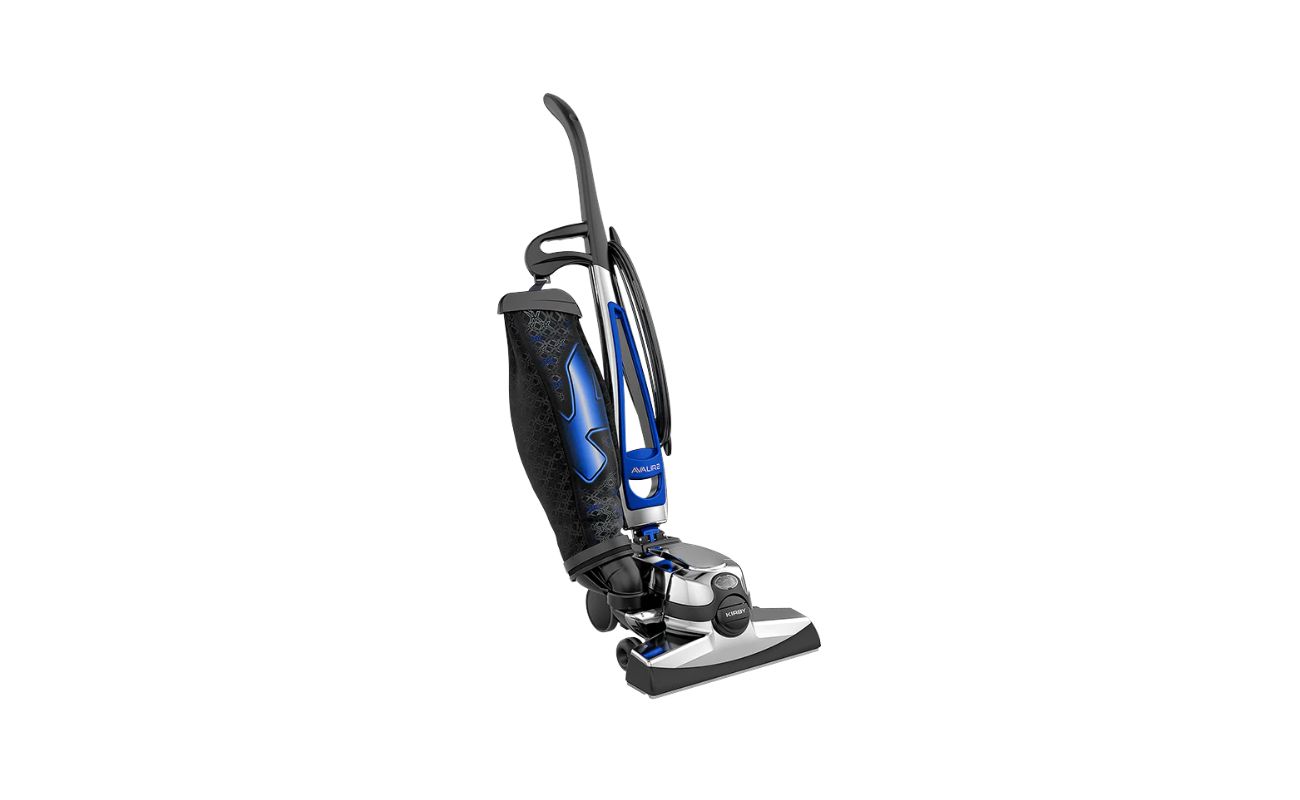
How To Change The Electrical Cord On A Kirby G4
Modified: August 20, 2024
Learn how to change the electrical cord on a Kirby G4 with this informative article. Discover step-by-step instructions and valuable tips to ensure a successful replacement.
(Many of the links in this article redirect to a specific reviewed product. Your purchase of these products through affiliate links helps to generate commission for Storables.com, at no extra cost. Learn more)
Introduction
Changing the electrical cord on a Kirby G4 vacuum cleaner is a relatively simple task that you can do yourself, saving both time and money. Over time, the cord may become frayed or damaged, limiting the performance of your vacuum and posing a safety risk. By replacing the electrical cord, you can ensure that your Kirby G4 continues to operate effectively and safely.
In this article, we will guide you through the step-by-step process of changing the electrical cord on a Kirby G4. We will also provide you with important safety precautions to follow during the procedure. With the right tools and materials, you’ll be able to successfully replace the cord and have your Kirby G4 back in action in no time.
Key Takeaways:
- Safety First
When replacing the electrical cord on a Kirby G4, prioritize safety by following crucial precautions such as turning off and unplugging the vacuum, working in a well-lit area, and wearing safety gloves. - DIY Cord Replacement
With the right tools and step-by-step guidance, changing the electrical cord on a Kirby G4 can be a manageable DIY task, saving time and ensuring the continued functionality of the vacuum.
Read also: 15 Best G4 LED Bulb for 2025
Safety Precautions
Before you begin replacing the electrical cord on your Kirby G4, it is crucial to prioritize your safety. Be sure to follow these important safety precautions:
- Turn off and unplug the Kirby G4: Before working on any electrical component, always ensure that the device is powered off and disconnected from the power source. This will minimize the risk of electrical shock.
- Work in a well-lit area: Choose a well-lit workspace to ensure clear visibility. This will help you avoid any accidental mishaps during the cord replacement.
- Wear safety gloves: Protect your hands by wearing a pair of sturdy work gloves. This will help prevent any cuts or injuries while handling tools or working with the cord.
- Keep the cord away from water: Ensure that the electrical cord and components are kept dry throughout the process. Water and electricity do not mix and can lead to serious electrical hazards.
- Do not pull the cord forcefully: Avoid pulling or tugging on the cord excessively. This could damage the cord or the internal wiring of the vacuum, compromising its safety and functionality.
- Use appropriate tools: Use only the right tools for the job. Using improper tools can present safety risks and may damage the vacuum or the new cord.
- Consult the user manual: Refer to the user manual provided with the Kirby G4 for specific safety instructions and guidelines related to your device.
By following these safety precautions, you can ensure a safe working environment and minimize the risk of accidents or injuries while replacing the electrical cord on your Kirby G4.
Tools and Materials Needed
Before you start replacing the electrical cord on your Kirby G4 vacuum cleaner, gather the following tools and materials:
- Flathead screwdriver: Needed to remove the screws securing the back cover of the Kirby G4.
- Wire cutters: Used to safely cut and remove the old electrical cord from the vacuum cleaner.
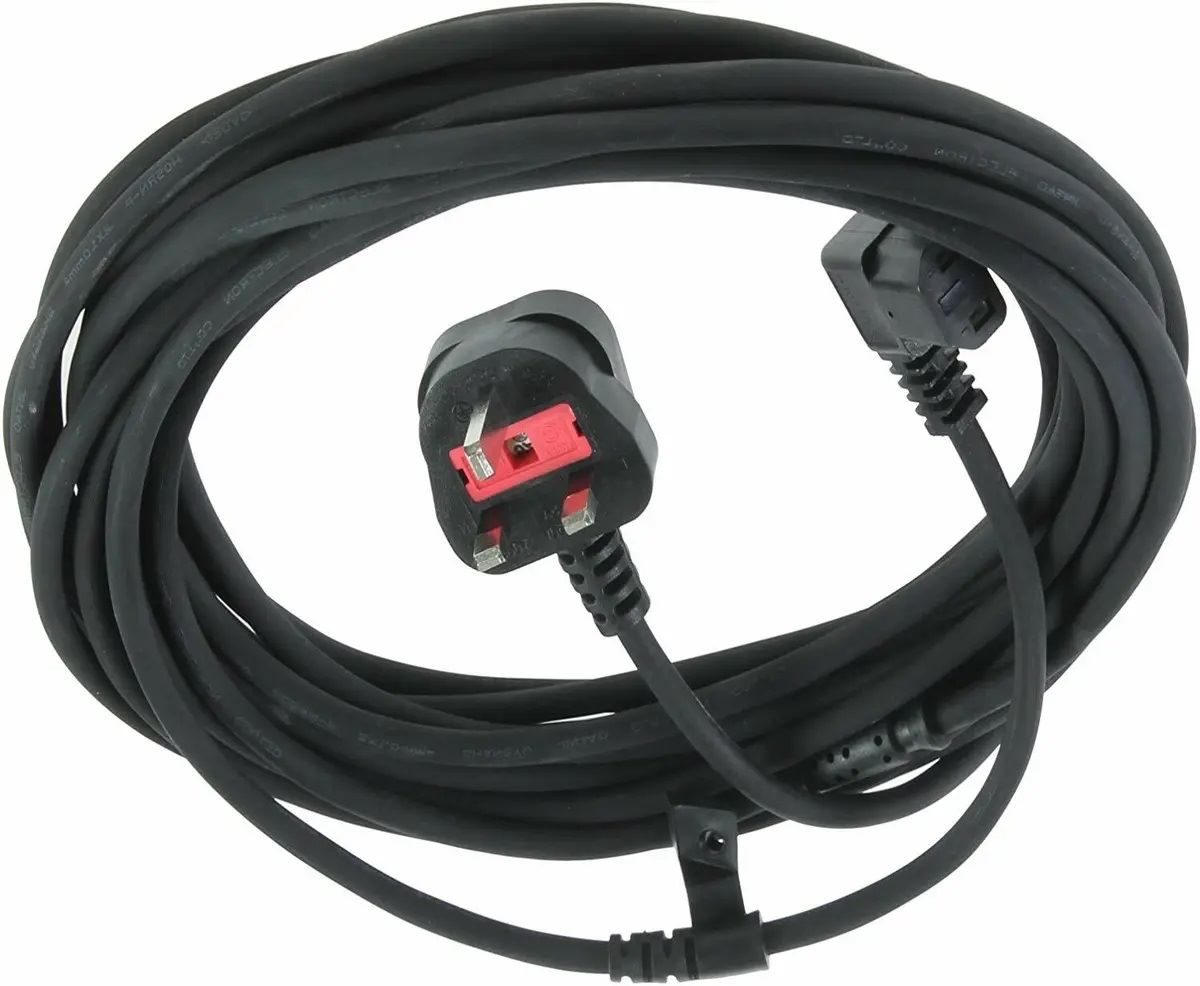
- New electrical cord: Purchase a replacement cord that is compatible with the Kirby G4 model. Ensure that it is the appropriate length and gauge for your vacuum cleaner.
- Wire strippers: Required to strip the insulation off the ends of the new electrical cord.
- Wire nuts: Used to secure the connections between the new electrical cord and the vacuum cleaner’s wiring.
- Electrical tape: Used to insulate and secure the wire connections for added safety.
- Marker or label maker: Optional but recommended for labeling the wires to ensure correct reconnection.
Make sure to gather all the necessary tools and materials before you begin the cord replacement process. This will help ensure a smoother and more efficient repair process.
Step 1: Turn off and unplug the Kirby G4
The first step in replacing the electrical cord on your Kirby G4 vacuum cleaner is to turn off the device and unplug it from the power source. This is crucial to ensure your safety and prevent any electrical shock during the cord replacement process.
Locate the power switch on your Kirby G4 and switch it to the “off” position. Once the vacuum is powered off, unplug it from the wall socket or disconnect it from the power outlet.
Give the vacuum cleaner a few moments to fully power down and ensure that all electrical components have been properly shut off. This will minimize the risk of electrical shock when working with the cord and internal parts of the vacuum cleaner.
Remember, safety should always be your top priority when working with electrical devices. Take the necessary precautions and ensure the Kirby G4 is completely powered off and unplugged before proceeding to the next steps.
Step 2: Locate and remove the screws on the back of the Kirby G4
Once the Kirby G4 is turned off and unplugged, you can begin removing the back cover to access the electrical cord. To do this, you’ll need to locate and remove the screws that secure the back cover in place.
Take a close look at the back of your Kirby G4 and locate the screws that are holding the back cover in place. Typically, these screws are located along the edges or corners of the back panel.
Using a flathead screwdriver, carefully unscrew each of the screws counterclockwise. Make sure to place the screws in a safe location where they won’t get lost.
As you remove the screws, be mindful that the back cover may still be attached by clips or tabs. Gently pry open the back cover, starting from one corner and working your way around, until it separates from the main body of the vacuum cleaner.
Set the back cover aside in a safe place, as you will need it again later to close up the vacuum once the new electrical cord is installed.
By removing the screws and separating the back cover, you have now gained access to the internal components of the Kirby G4, including the electrical cord.
Proceed to the next step to continue with the cord replacement process.
Read also: 14 Amazing G4 Halogen Bulb for 2025
Step 3: Open the back cover and access the electrical cord
With the back cover of the Kirby G4 removed, you can now access the electrical cord and prepare to replace it. Take a moment to familiarize yourself with the internal layout and components of the vacuum cleaner.
Look for the area where the electrical cord connects to the vacuum’s motor or power source. This is typically located near the bottom or rear of the vacuum, but the exact placement may vary slightly depending on the specific model of your Kirby G4.
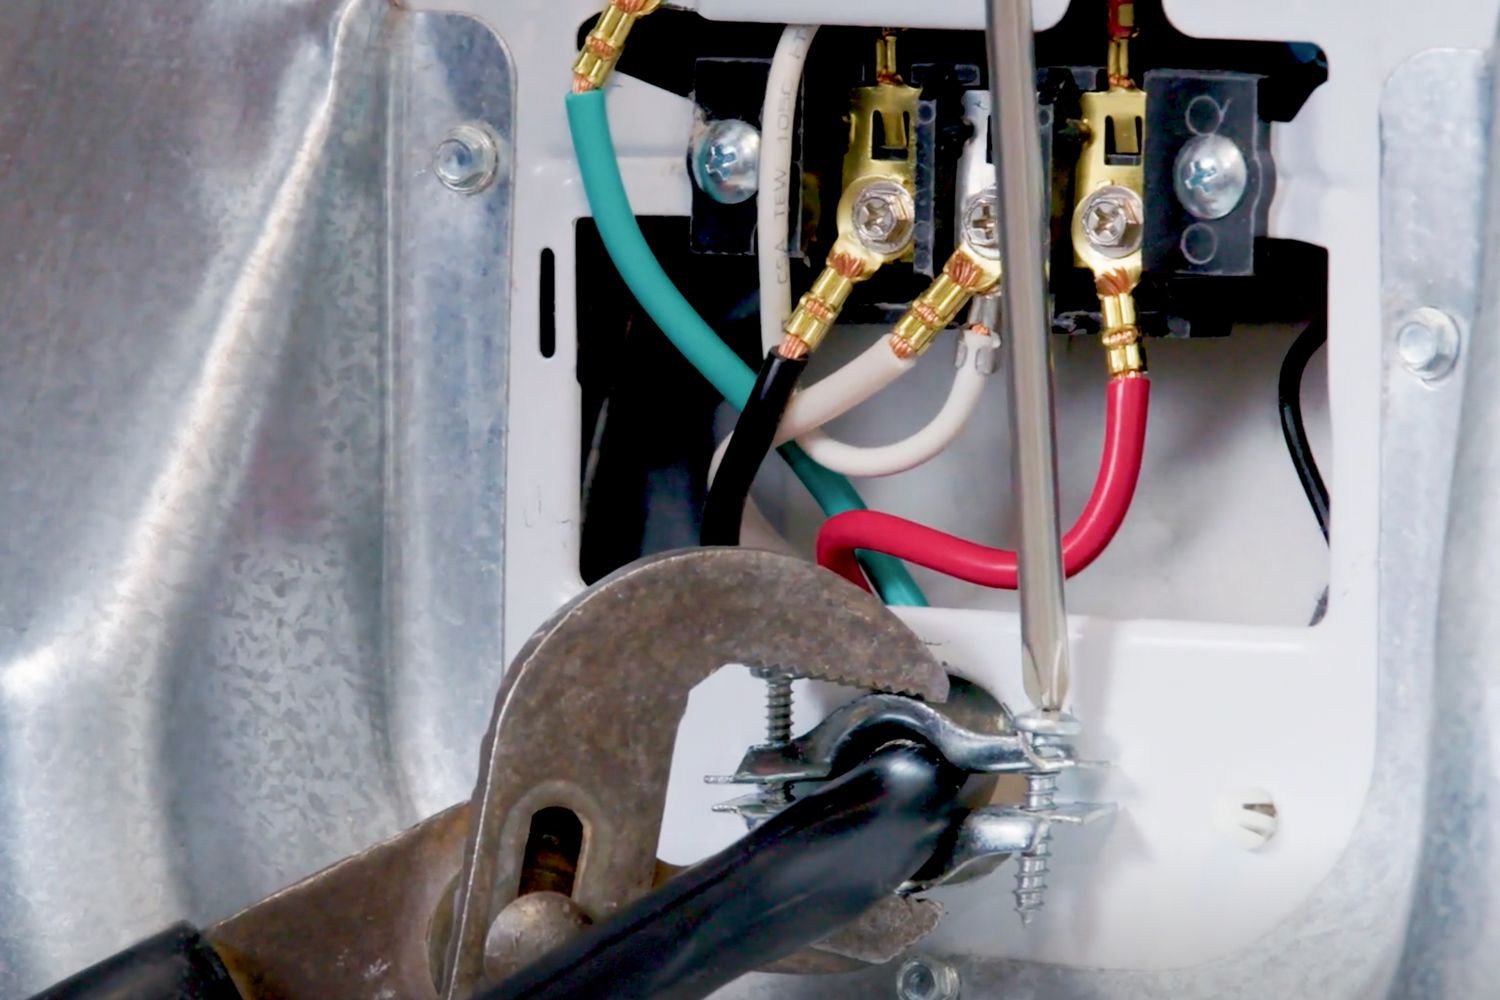
Identify the two connecting points where the old electrical cord is attached. One end will be connected to the motor or power source, while the other end will be connected to a terminal or junction box.
Inspect the area around the electrical cord for any clips, wires, or other components that may be holding it in place. Carefully detach any clips or wires to free up the old cord.
Once you have a clear view of the electrical cord and its connection points, you are ready to proceed to the next step: disconnecting the old cord from the Kirby G4.
Remember to handle the internal components of the vacuum with care and avoid excessive pulling or tugging on the wires to prevent any damage.
Continue with the subsequent steps to successfully complete the replacement of the electrical cord on your Kirby G4 vacuum cleaner.
When changing the electrical cord on a Kirby G4, make sure to unplug the vacuum and remove the outer bag. Then, carefully remove the old cord and replace it with the new one, making sure to secure it properly before reassembling the vacuum.
Step 4: Disconnect the old electrical cord from the Kirby G4
With the back cover removed and access to the electrical cord, you can now proceed to disconnect the old cord from the Kirby G4. Follow these steps to safely disconnect the old cord:
- Identify the connection points: Locate the specific points where the old electrical cord is attached to the vacuum cleaner. This typically includes a terminal or junction box near the cord entry point and a connection to the motor or power source.
- Label the wires (optional): Before disconnecting the old cord, it is a good practice to label the wires for easy identification during the installation of the new cord. Use a marker or label maker to mark the wires or take a clear photo for reference.
- Disconnect the wires: Use wire cutters to carefully cut and remove any electrical tape or wire nuts securing the connections. Slowly and gently wiggle the wires to release them from the terminals or connection points, being careful not to damage any surrounding components.
- Remove the old cord: Once the wires are disconnected, gently pull the old cord through the cord entry point, taking care not to pull too forcefully or damage any internal wiring or components. Dispose of the old cord properly.
By following these steps, you have successfully disconnected the old electrical cord from the Kirby G4 vacuum cleaner. Now, you are ready to prepare the new electrical cord for installation.
Proceed to the next step to learn how to prepare the new electrical cord to ensure a secure and reliable connection with your Kirby G4.
Step 5: Prepare the new electrical cord
Now that the old electrical cord has been removed, it’s time to prepare the new cord for installation in your Kirby G4 vacuum cleaner. Follow these steps to properly prepare the new electrical cord:
- Inspect the new cord: Before beginning any modifications, inspect the new electrical cord for any damages or defects. Ensure that the cord is the correct length and gauge for your Kirby G4.
- Strip the cord ends: Using wire strippers, carefully strip off approximately half an inch of insulation from both ends of the new electrical cord. This will expose the inner wires for proper connection.
- Separate the wires: Once the ends of the cord are stripped, separate the individual wires. Typically, there will be two or three wires: a hot wire (usually colored black), a neutral wire (usually colored white), and possibly a ground wire (usually colored green or bare copper).
- Trim the wires (if necessary): If the wires are too long, trim them to a suitable length using wire cutters. Leave a little extra length for easier handling during the connection process.
- Twist the wire strands: Take each individual wire and twist the strands tightly together to prevent fraying and ensure a secure connection. This will help maintain a consistent flow of electricity throughout the cord.
By following these steps, you have successfully prepared the new electrical cord for installation on your Kirby G4 vacuum cleaner. Now, you can move on to the next step and learn how to attach the new electrical cord to the vacuum.
Step 6: Attach the new electrical cord to the Kirby G4
With the new electrical cord prepared, you are now ready to attach it to your Kirby G4 vacuum cleaner. Follow these steps to properly connect the new cord:
- Identify the connection points: Refer to the previous steps and locate the specific connection points where the old cord was attached. Make sure to match the wire colors of the new cord with the corresponding terminals or junction box.
- Connect the wires: Starting with the ground wire (if present), insert the end of the wire into the appropriate terminal or connection point. Ensure a secure connection by firmly tightening any existing screws or using wire nuts to secure the connection.
- Repeat the process for the remaining wires: Connect the hot wire (usually black) and the neutral wire (usually white), one at a time, following the same procedure as the ground wire.
- Double-check the connections: After connecting all the wires, carefully inspect the connections to ensure they are secure and properly seated. Check for any loose wires or gaps in the connections.
- Tape the connections: Use electrical tape to insulate and secure the wire connections. Wrap the tape tightly around each individual connection, covering the exposed wires and terminals.
By following these steps, you have successfully attached the new electrical cord to your Kirby G4 vacuum cleaner. Take a moment to ensure that all connections are securely fastened and properly insulated.
Continue to the next step to learn how to close the back cover of the vacuum and complete the installation process.
Read also: 8 Best G4 LED Bulb 12V for 2025
Step 7: Close the back cover and secure it with screws
With the new electrical cord attached to your Kirby G4, it’s time to close the back cover of the vacuum and secure it with screws. Follow these steps:
- Align the back cover: Carefully align the back cover of the vacuum with the main body, ensuring that all the tabs and clips line up correctly.
- Gently press the back cover: Apply even pressure along the edges of the back cover to snap it back into place. Make sure it fits securely and sits flush with the rest of the vacuum.
- Insert the screws: Using a flathead screwdriver, insert and tighten the screws into their respective holes. Start with one screw and then proceed to the others, ensuring that each screw is securely fastened.
- Tighten the screws: Take care not to overtighten the screws, as this can damage the back cover or strip the screw threads. Tighten them just enough to ensure a snug fit.
By following these steps, you have successfully closed the back cover of your Kirby G4 and secured it with screws. The vacuum cleaner should now be fully assembled and ready for use.
However, before you plug in and test the vacuum, make sure to review the final step: conducting a test to ensure that the new electrical cord is functioning properly.
Step 8: Test the Kirby G4 with the new electrical cord
With the back cover securely fastened, it’s time to test your Kirby G4 vacuum cleaner with the newly installed electrical cord. Follow these steps to ensure that everything is functioning properly:
- Plug in the vacuum: Carefully plug the vacuum into a power outlet.
- Turn on the vacuum: Locate the power switch on your Kirby G4 and switch it to the “on” position.
- Listen for motor sound: Pay close attention to the sound of the vacuum’s motor. If you hear any unusual noises or if the motor does not start, turn off the vacuum immediately and double-check the connections and wiring.
- Test the suction power: Place your hand over the vacuum’s nozzle or attachment to check if the suction power is working properly. Ensure that the vacuum is picking up debris as expected.
- Check for any electrical issues: Keep a close eye on the new electrical cord during the test. Look for any signs of overheating, sparking, or other electrical issues. If you notice any abnormalities, unplug the vacuum immediately and inspect the connections again.
It’s important to conduct a thorough test to ensure that the new electrical cord is installed correctly and that the vacuum is functioning as expected. If you encounter any issues during the test, it may be necessary to revisit the previous steps to troubleshoot and resolve any problems.
Congratulations! You have successfully replaced the electrical cord on your Kirby G4 vacuum cleaner. By following this step-by-step guide, you have restored your vacuum’s functionality and can now enjoy its efficient cleaning power once again.
Remember, if you don’t feel comfortable or confident performing these steps yourself, it’s always best to seek the assistance of a professional or contact Kirby customer service for further guidance and support.
Conclusion
Replacing the electrical cord on your Kirby G4 vacuum cleaner is a task that can be accomplished with a few simple steps and the right tools. By following the instructions outlined in this guide, you can safely and effectively replace the cord, ensuring the continued functionality and safety of your vacuum.
Throughout the process, it is essential to prioritize safety by following the recommended safety precautions. Remember to always turn off and unplug the vacuum before starting any maintenance or repair work. Additionally, use appropriate tools and handle the internal components with care to avoid any potential accidents or damage.
With the new electrical cord properly installed, be sure to conduct a thorough test to ensure that the vacuum is operating as expected. Pay attention to the vacuum’s motor sound and suction power, and inspect the cord for any signs of overheating or electrical issues.
If you encounter any difficulties or concerns during the cord replacement process, it is recommended to seek professional assistance or consult the manufacturer’s customer service.
By taking the time to change the electrical cord on your Kirby G4, you are prolonging the lifespan of your vacuum and ensuring its optimal performance. Now, with a reliable electrical cord in place, you can continue to enjoy the convenience of a clean and well-maintained home.
Remember, proper maintenance and regular inspections are key to keeping your Kirby G4 in top condition. If you notice any further issues or if your vacuum requires additional maintenance, refer to the user manual or contact Kirby customer service for further assistance.
Thank you for following this guide, and we hope that it has been helpful in successfully changing the electrical cord on your Kirby G4 vacuum cleaner.
Frequently Asked Questions about How To Change The Electrical Cord On A Kirby G4
Was this page helpful?
At Storables.com, we guarantee accurate and reliable information. Our content, validated by Expert Board Contributors, is crafted following stringent Editorial Policies. We're committed to providing you with well-researched, expert-backed insights for all your informational needs.


0 thoughts on “How To Change The Electrical Cord On A Kirby G4”