Articles
How To Change Electrical Cord On A Dryer
Modified: August 17, 2024
Learn how to change the electrical cord on a dryer with our informative articles. Ensure a safe and proper installation with step-by-step instructions and expert tips.
(Many of the links in this article redirect to a specific reviewed product. Your purchase of these products through affiliate links helps to generate commission for Storables.com, at no extra cost. Learn more)
Introduction
Changing the electrical cord on a dryer may seem like a daunting task, but with the right tools and a little guidance, it can be easily accomplished. Whether you need to replace a damaged cord or upgrade to a newer one, this article will walk you through the step-by-step process. By following these instructions, you’ll be able to safely and effectively change the electrical cord on your dryer, ensuring that it operates smoothly and efficiently.
Before we dive into the details, it’s important to note that working with electricity can be dangerous. Always prioritize your safety and take the necessary precautions. Make sure to disconnect the power source before starting any electrical work. If you are uncertain or uncomfortable with the process, it’s always best to consult a professional electrician.
In order to successfully change the electrical cord on your dryer, you will need a few tools and materials. Gather the following items before you begin:
- New electrical cord: Make sure to choose a cord that is compatible with your dryer model. Refer to the manufacturer’s instructions or consult a professional if needed.
- Wire cutters/strippers: These tools will be used to cut and strip the wires.
- Socket wrench: You’ll need this tool to remove the back panel of your dryer.
- Electrical tape: This will be used to secure the wire connections.
- Marker or label: This will help you identify the correct wires and terminals.
- Safety goggles and gloves: Always prioritize your safety by wearing protective gear.
Now that you have gathered the necessary tools and materials, let’s dive into the step-by-step process of changing the electrical cord on your dryer.
Key Takeaways:
- Prioritize safety and gather the necessary tools before changing the electrical cord on your dryer. Follow the step-by-step guide to ensure a safe and efficient replacement process.
- Securely connect the new cord, insulate wire connections with electrical tape, and conduct a functionality test to ensure proper operation. If in doubt, consult a professional electrician for assistance.
Safety Precautions
Before starting any electrical work, it is crucial to prioritize safety to avoid any accidents or injuries. Here are some safety precautions to keep in mind when changing the electrical cord on your dryer:
- Disconnect the power: Before attempting any electrical work, always make sure the dryer is completely disconnected from the power source. Unplug the dryer from the wall outlet or turn off the circuit breaker that supplies power to it. This will help prevent any electrical shocks or accidents.
- Wear protective gear: Working with electricity can be hazardous, so it’s essential to protect yourself. Wear safety goggles to shield your eyes from sparks and debris, and use gloves to protect your hands from any potential injuries or electrical shocks.
- Work in a well-ventilated area: Ensure that the area where you are working is well-ventilated. Dryers can accumulate lint and dust, which could potentially ignite if exposed to sparks or heat. Working in a properly ventilated area minimizes the risk of fire.
- Work with a partner: If possible, have a helper nearby while you work on changing the electrical cord. They can assist you in holding or supporting the dryer, ensuring your safety and making the task easier.
- Double-check the connections: After completing the installation, double-check that all the wire connections are secure and properly insulated with electrical tape. Loose or exposed wires can be hazardous and may cause electrical malfunctions or even fires.
- Consult a professional if unsure: If you are uncertain about any part of the process or feel uncomfortable working with electricity, it is always best to consult a professional electrician. They have the knowledge, experience, and tools to ensure a safe and proper installation.
By following these safety precautions, you can minimize the risks associated with changing the electrical cord on your dryer. Remember, your safety should always be your top priority. Now that you’re aware of the precautions, let’s proceed to the step-by-step process of changing the cord.
Tools and Materials Needed
Before you begin changing the electrical cord on your dryer, it is important to gather all the necessary tools and materials. Here is a list of what you will need:
- New electrical cord: Make sure to choose a replacement cord that is specifically designed for your dryer model. Refer to the manufacturer’s instructions or consult a professional to ensure compatibility.
- Wire cutters/strippers: These tools are essential for cutting and stripping the wires. They will allow you to remove the old cord and prepare the new one for installation.
- Socket wrench: You will need a socket wrench or a suitable wrench size to remove the screws holding the back panel of your dryer in place.
- Electrical tape: Electrical tape is necessary for securely insulating the wire connections. It helps protect against electrical shocks and prevents any exposed wires from coming into contact with other surfaces.
- Marker or label: Using a marker or label will help you identify the correct wires and terminals. This step is crucial to ensure that the wires are connected correctly and prevent any wiring errors.
- Safety goggles and gloves: Always prioritize your safety by wearing safety goggles to protect your eyes from sparks or debris. Additionally, wear gloves to protect your hands while working with electrical components.
It’s important to have all these tools and materials readily available before starting the cord replacement process. Having everything at hand will make the task more efficient and help ensure a successful installation.
Once you have gathered all the necessary tools and materials, you are now ready to proceed with the step-by-step guide to change the electrical cord on your dryer. Let’s move on to the first step!
Step 1: Unplug the Dryer
The first and most important step in changing the electrical cord on your dryer is to unplug it from the power source. This ensures your safety and prevents any electrical hazards during the process.
Locate the power cord connection at the back of the dryer. This is usually located near the bottom of the machine. Carefully pull the plug out from the wall outlet to disconnect the dryer from the power supply. If your dryer is hardwired into the electrical system, turn off the circuit breaker that supplies power to the dryer.
Once the dryer is unplugged or disconnected, it is a good practice to wait for a few minutes to allow any residual electrical charge to dissipate. This step helps minimize the risk of electric shock when working with the electrical components of the dryer.
Remember, electricity can be dangerous, so always prioritize your safety when handling electrical appliances. Unplugging the dryer is a crucial first step before proceeding further with the cord replacement process.
With the dryer safely disconnected from the power source, we can now move on to the next step: removing the back panel. This step will provide access to the electrical components within the dryer, making it easier to replace the electrical cord.
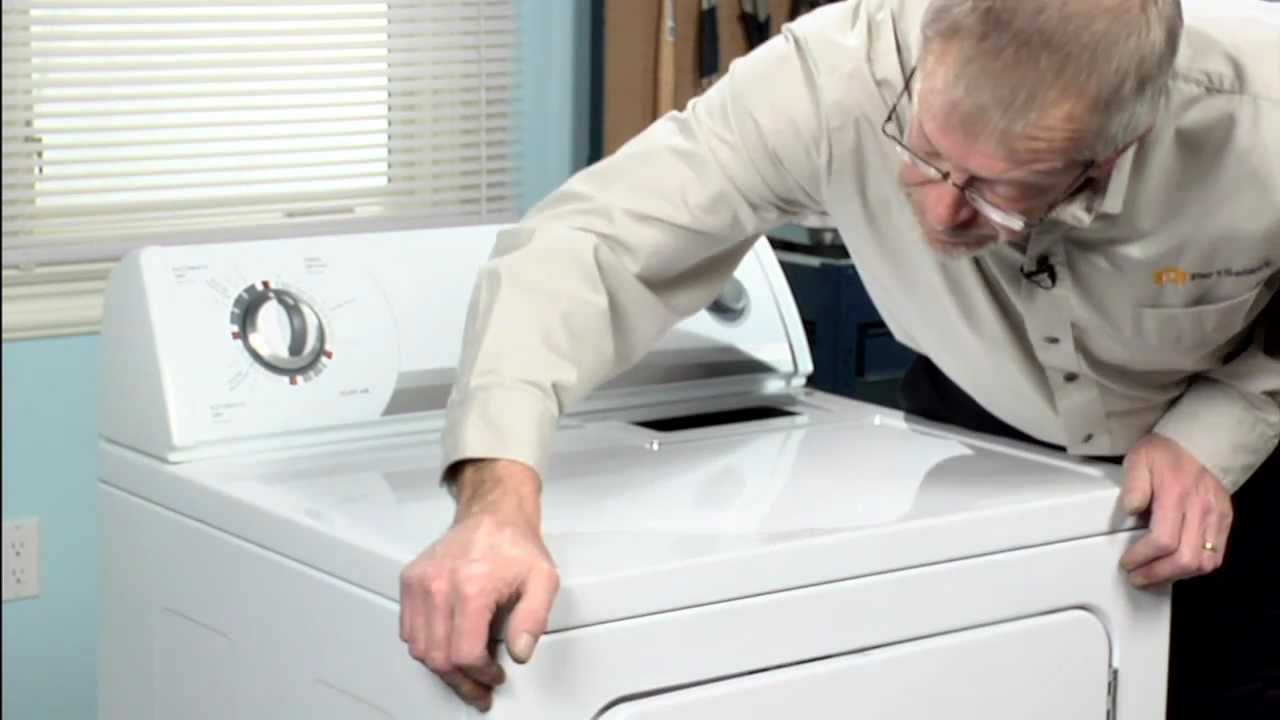
Step 2: Remove the Back Panel
Now that the dryer is safely unplugged, the next step is to remove the back panel. This will allow you to access the electrical connections and remove the old cord.
Start by locating the screws that secure the back panel to the dryer. They are typically located along the edges of the panel. Use a socket wrench or a suitable wrench size to loosen and remove these screws. Set them aside in a safe place, as you will need them later to reattach the panel.
Once the screws are removed, gently pull the back panel away from the dryer. Be cautious not to force it or damage any wires that may be attached to the panel. Some dryers may have additional clips or fasteners that need to be released before the panel can be fully removed. Take note of these and carefully detach them if necessary.
With the back panel removed, you will now have clear access to the dryer’s electrical connections. Take a moment to familiarize yourself with the layout and arrangement of the wires and terminals.
Remember, safety is of utmost importance. Avoid touching any exposed wires or electrical components until you are ready to proceed with the cord replacement. If you are unsure about any specific part of the process, refer to the manufacturer’s instructions or consult a professional electrician.
Now that you have successfully removed the back panel, we can proceed to the next step: disconnecting the old electrical cord from the dryer.
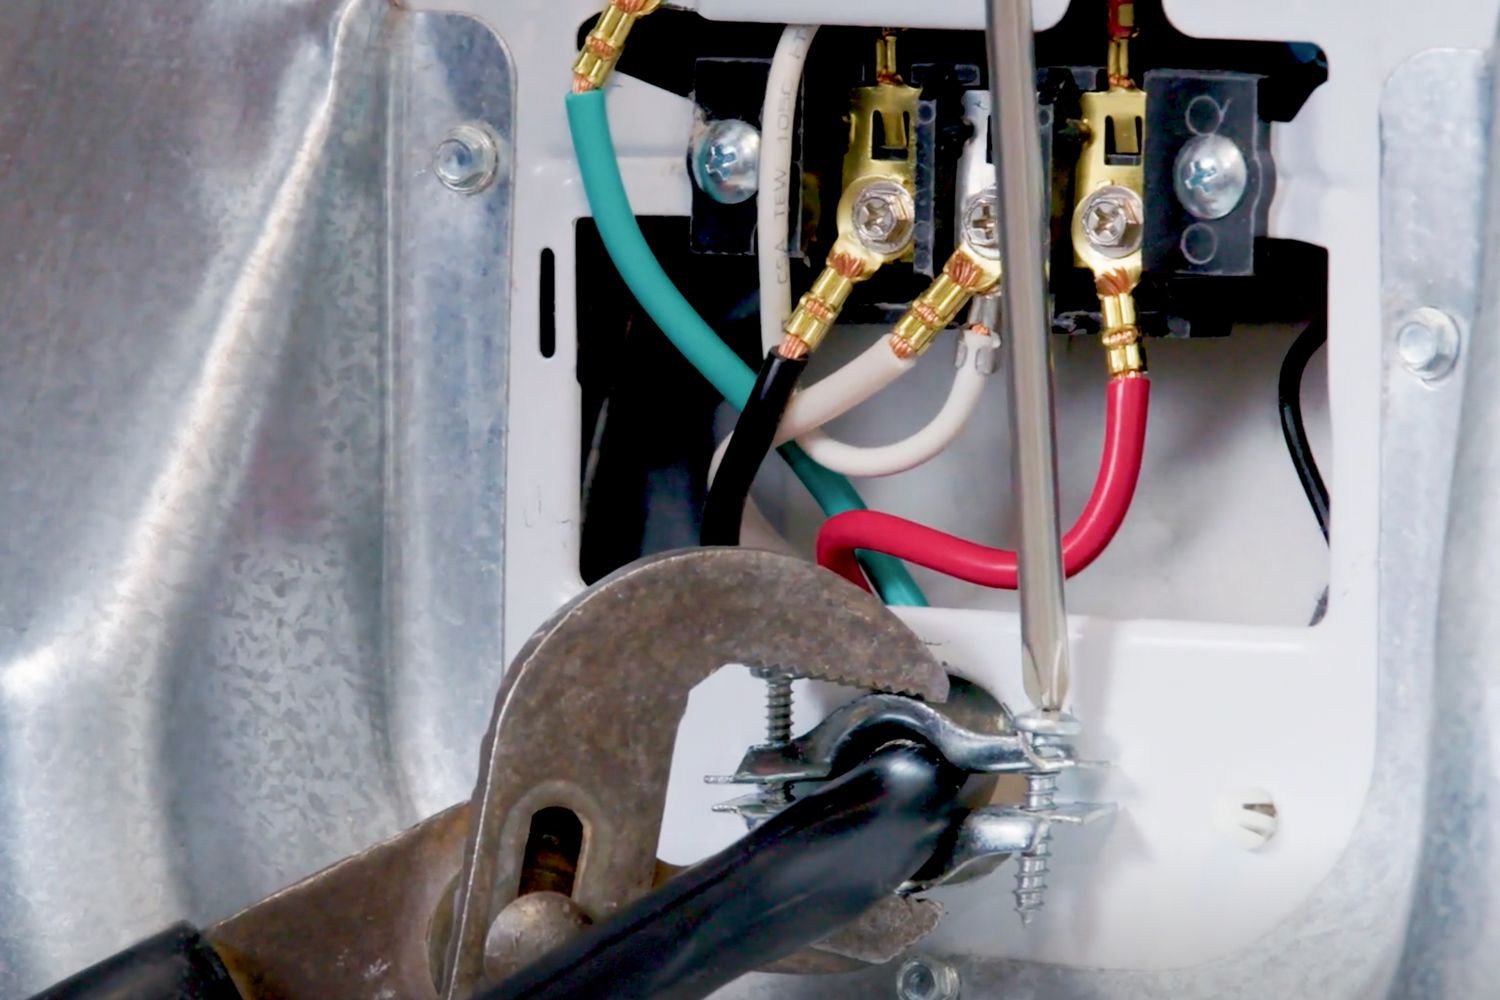
Step 3: Disconnect the Old Cord
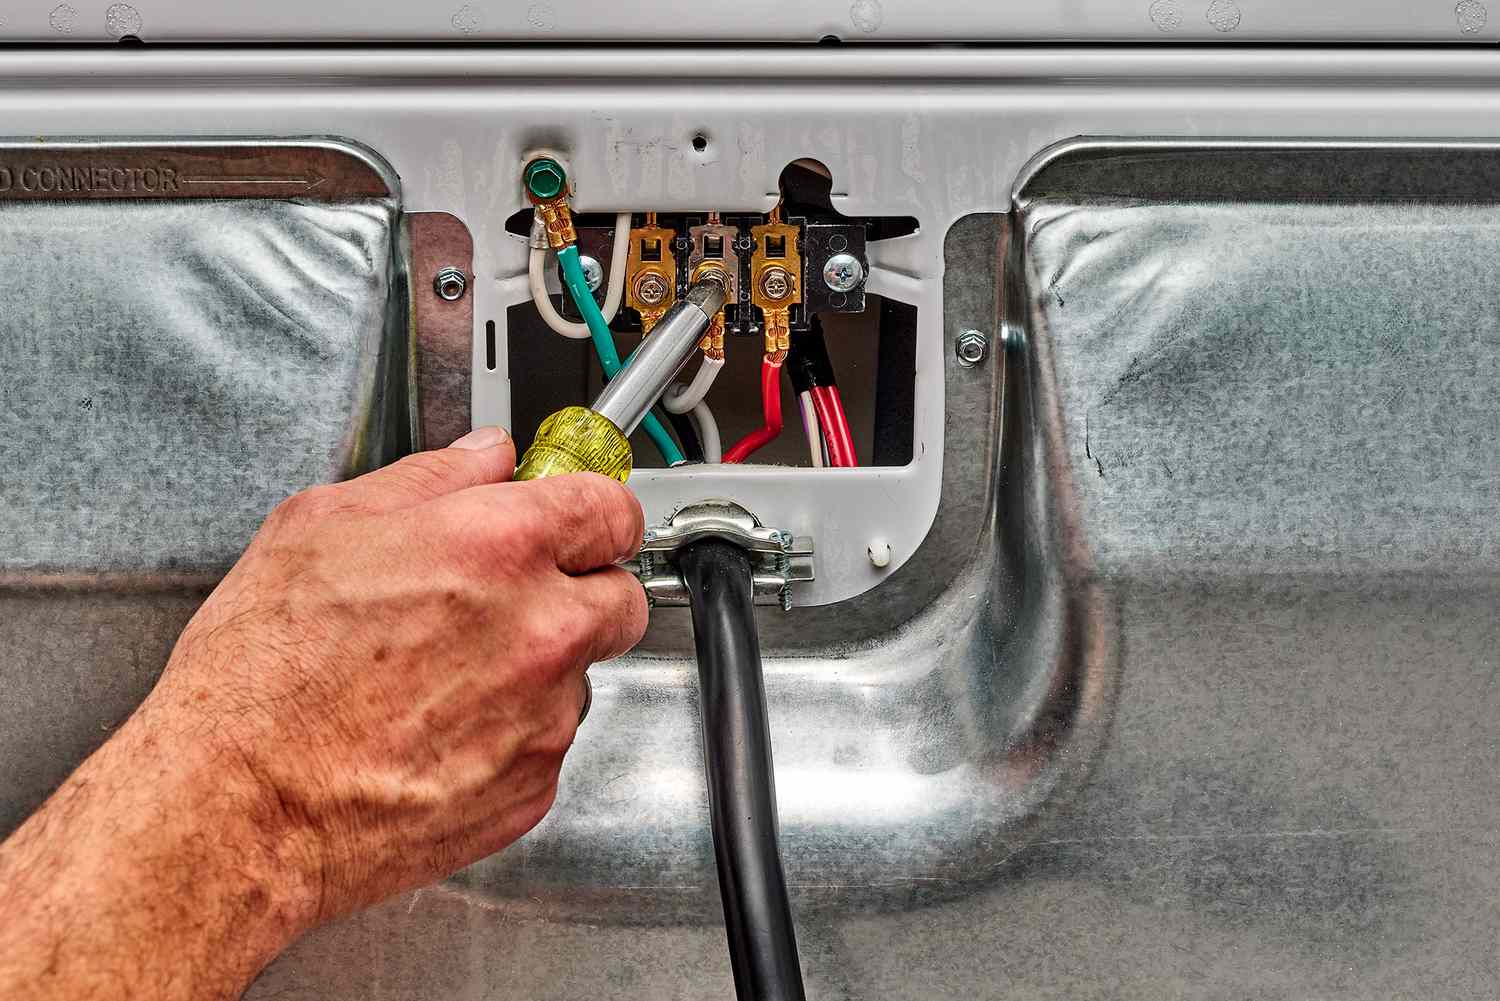
With the back panel removed, you can now proceed to disconnect the old electrical cord from the dryer. Take note of how the cord is connected to the terminal block and wires before disconnecting anything. This will help you properly connect the new cord later.
First, locate the terminal block, which is typically located near the bottom of the dryer. The terminal block is where the electrical cord connects to the dryer’s wiring. It consists of metal screws or bolts that secure the wires in place.
Identify the wires connected to the terminal block. There are usually three wires: black (or hot), white (or neutral), and green (or ground). Use a marker or label to make a note of which wire is connected to each terminal. This labeling will help ensure the correct connection of the new cord later on.
To disconnect the old cord, loosen the screws or bolts on the terminal block. Carefully remove the wires from their respective terminals by pulling them straight out. Avoid pulling on the wires themselves, as this can damage the insulation or connections.
Once the wires are disconnected from the terminal block, carefully remove the old cord from the dryer. Take note of any clips or guides that might be holding the cord in place and detach them if necessary.
It’s important to inspect the old cord for any signs of damage or wear. If you notice any frayed wires, exposed insulation, or other signs of deterioration, it’s essential to replace the cord with a new one.
Now that the old cord has been disconnected and removed, you can proceed to the next step: preparing the new cord.
When changing the electrical cord on a dryer, always make sure to disconnect the power supply and follow the manufacturer’s instructions. Use a screwdriver to remove the access panel and carefully replace the cord, ensuring all connections are secure before testing the dryer.
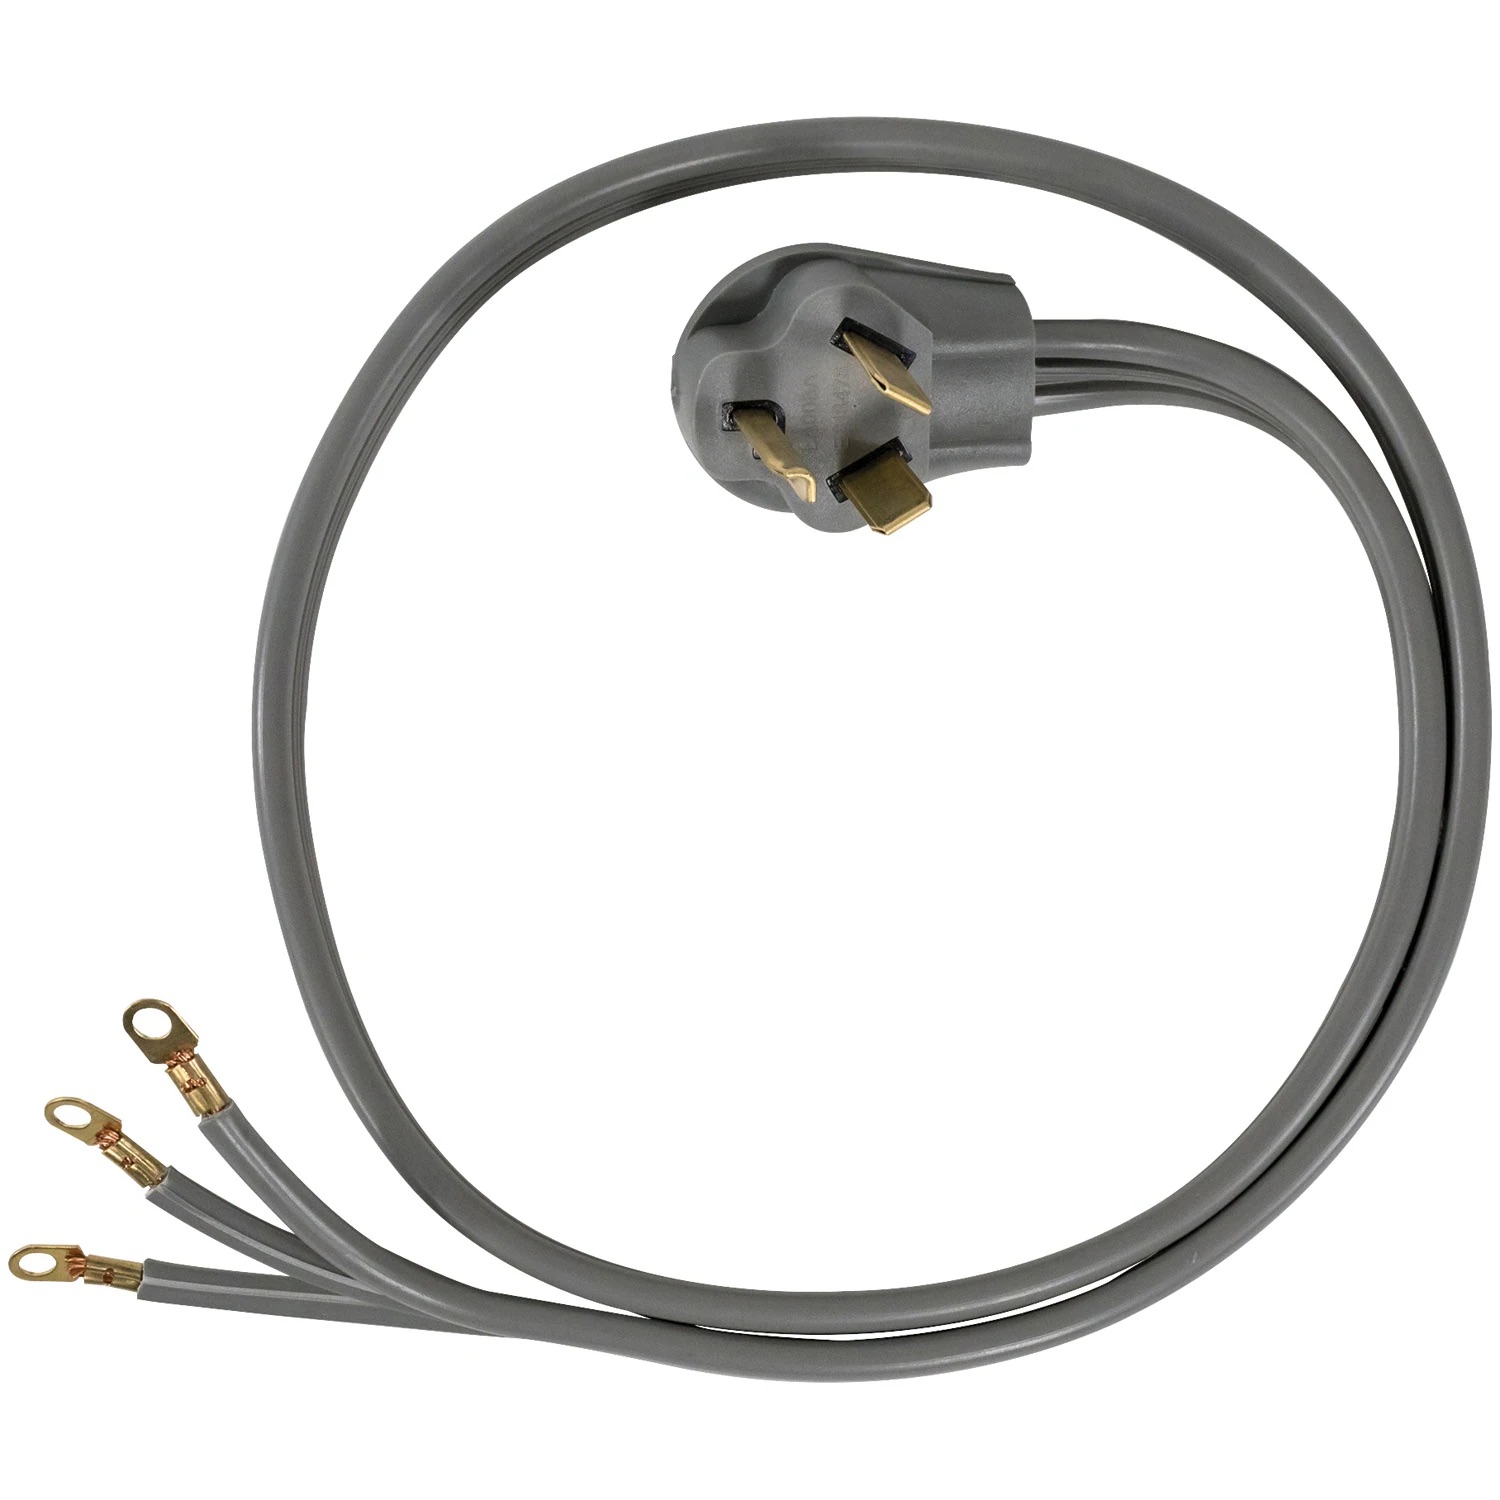
Step 4: Prepare the New Cord
Now that you have removed the old cord, it’s time to prepare the new electrical cord for installation. Properly preparing the new cord ensures that it is ready to be connected to the dryer’s terminal block.
Start by carefully unwrapping the new cord and inspecting it for any damage or defects. Ensure that the cord is the correct length and that the prongs at the end are in good condition.
Next, identify the wires on the new cord. The three wires will typically be color-coded: black (or hot), white (or neutral), and green (or ground). It’s essential to verify the color coding before proceeding.
Using wire strippers or cutters, carefully strip the insulation from the ends of the three wires on the new cord. Take care not to cut too deeply and damage the wire strands inside. The stripped portion should be long enough to make a secure connection to the terminal block.
After stripping the wires, twist the strands slightly with your fingers to ensure they are tightly together. This will make it easier to insert the wires into the terminal block and create a solid connection.
If necessary, refer to the notes or labels you made earlier to identify which wire corresponds to each terminal on the dryer’s terminal block. Double-check to ensure accurate identification before proceeding.
Lastly, double-check the length of the cord to make sure it reaches the terminal block without any tension or strain. It’s important to have sufficient length to avoid any stress on the wires when the cord is connected.
With the new cord prepared and ready, you are now set to move on to the next step: connecting the new cord to the dryer.
Step 5: Connect the New Cord
Now that you have prepared the new electrical cord, it’s time to connect it to the dryer’s terminal block. Properly connecting the new cord ensures a secure and safe electrical connection for your dryer.
Start by positioning the new cord near the terminal block. Identify the three wires (black, white, and green) and match them to their respective terminals on the terminal block.
Insert the stripped end of the black wire into the terminal labeled “Hot” or “L1” on the terminal block. Ensure that the wire is securely inserted and that no bare wire is exposed outside the terminal.
Next, insert the stripped end of the white wire into the terminal labeled “Neutral” or “N” on the terminal block. Again, ensure that the wire is securely inserted and that no bare wire is exposed outside the terminal.
Finally, insert the stripped end of the green wire into the terminal labeled “Ground” or “G” on the terminal block. As before, ensure the wire is securely inserted and that no bare wire is exposed.
Once all the wires are properly inserted into their respective terminals, use a screwdriver or wrench to tighten the screws or bolts on the terminal block. This will secure the wires in place and ensure a tight connection.
Double-check all the wire connections to ensure they are secure and properly seated in the terminal block. Verify that there are no loose wires or exposed insulation.
After connecting the new cord, you can use electrical tape to wrap around the base of the terminal block and the wire connections. This helps provide additional insulation and protection against accidental contact.
Now that the new cord is securely connected to the dryer’s terminal block, we can move on to the next step: securing the cord connections.
Step 6: Secure the Connections
Once you have connected the new cord to the dryer’s terminal block, it’s important to secure the wire connections properly. This ensures that the connections are stable and reduces the risk of electrical hazards or malfunctions.
Start by carefully inspecting each wire connection. Verify that the wires are tightly secured within their respective terminals on the terminal block. Make sure there are no loose or exposed wires.
Using electrical tape, wrap each wire connection individually. Begin by wrapping the tape around the base of the wire near the terminal. Then, extend the tape to cover the terminal itself, making sure to wrap it in a tight, spiral motion. This will provide an extra layer of insulation and protection.
Continue wrapping the tape a few inches along the wire to secure it further. Repeat this process for each wire connection, including the black (hot), white (neutral), and green (ground) wires.
After securing the individual wire connections, you can also use electrical tape to wrap around all three wires together. This will help bundle the wires and provide added protection.
Ensure that the tape is tightly wrapped, with no exposed wires or gaps. Gently tug on the wires to make sure they are securely held in place and that the tape is properly adhered.
Additionally, inspect the area around the terminal block for any other loose wires or connections. If you notice any loose screws or clips, tighten them to ensure everything is secure.
Once you have secured all the wire connections with electrical tape and checked for any other loose components, you can proceed to the next step: replacing the back panel of the dryer.
By taking the time to securely fasten the wire connections, you ensure a reliable and safe electrical connection for your dryer.
Step 7: Replace the Back Panel
After securing the wire connections, it’s time to replace the back panel of your dryer. Reattaching the back panel will protect the internal components and provide a neat and finished appearance to your appliance.
Start by aligning the back panel with the openings on the back of the dryer. Take care to guide any wires or cables through the designated slots or clips, ensuring they are not pinched or twisted.
Gently push the back panel into place, making sure it fits snugly against the body of the dryer. Align the screw holes on the panel with the corresponding holes on the dryer.
Retrieve the screws that were removed earlier and use a socket wrench or suitable wrench size to tighten them securely. Start with one corner of the panel and work your way around, gradually tightening each screw until all are securely in place.
Take care not to over-tighten the screws, as this may cause damage to the panel or the dryer itself. Tighten them just enough to ensure a firm and secure attachment.
Once all the screws are securely tightened, give the back panel a gentle wiggle to ensure it is properly seated and there are no loose parts. Make sure it is flush with the sides and top of the dryer.
With the back panel successfully replaced, you have completed a significant step in changing the electrical cord on your dryer. The next and final step is to plug in the dryer and test its functionality.
Before proceeding, take a moment to admire your handiwork and ensure that everything looks intact and as it should be. Now, let’s move on to the last step!
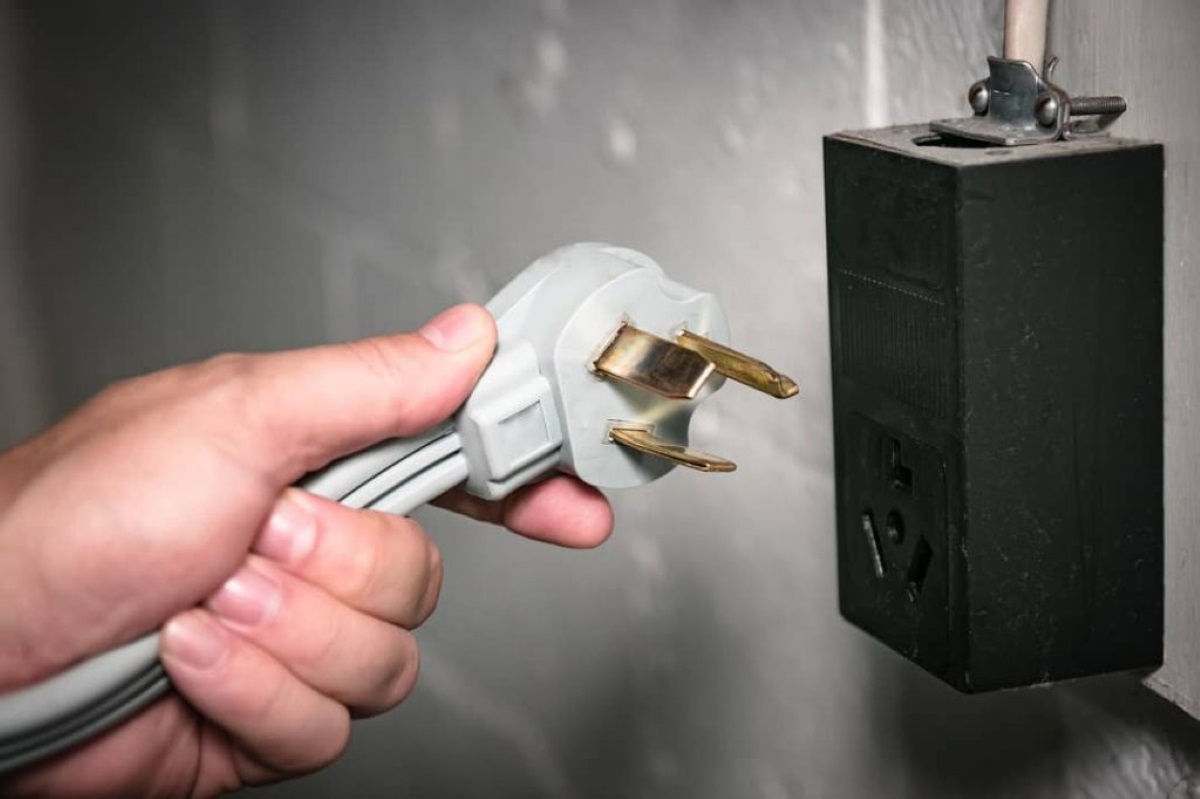
Step 8: Plug in the Dryer and Test
Now that you have replaced the back panel, it’s time to plug in your dryer and test its functionality. This final step ensures that the new electrical cord is properly connected and that everything is in working order.
Carefully align the plug of the new cord with the wall outlet or power source. Ensure that it is inserted fully and securely. If your dryer is hardwired, turn on the circuit breaker that supplies power to the dryer.
Before turning on the dryer, take a moment to double-check that all wire connections are secure and insulated with electrical tape. Verify that there are no exposed wires or loose connections.
Once you are confident that everything is in order, turn on the dryer by rotating the control knob or pressing the power button. Listen for any unusual sounds or observe any warnings or error messages on the display.
Allow the dryer to run for a few minutes, ensuring that it is heating up properly and that the drum is rotating smoothly. Monitor the dryer closely during this initial test run to identify any potential issues.
If the dryer operates as expected and there are no visible issues, congratulations! You have successfully changed the electrical cord on your dryer. Give yourself a pat on the back for completing this task.
However, if you encounter any problems during the testing phase, such as no power, strange noises, or malfunctioning components, immediately turn off the dryer and unplug it. Revisit the previous steps to ensure that all wire connections are correct and secure. If you are unable to troubleshoot the issue, it may be best to consult a professional.
Remember, safety is paramount. If at any point you feel uncomfortable or unsure during the testing phase, it’s always best to seek assistance from a qualified electrician.
With the dryer successfully tested and operating correctly, you can now enjoy its efficient and safe performance. The process of changing the electrical cord on your dryer is complete, and you can feel accomplished in your DIY accomplishment.
Thank you for following this step-by-step guide, and happy drying!
Conclusion
Changing the electrical cord on a dryer may seem like a daunting task, but with the right tools, knowledge, and safety precautions, it can be easily accomplished. By following the step-by-step guide outlined in this article, you can successfully replace the electrical cord on your dryer and ensure its safe and efficient operation.
We began by emphasizing the importance of safety and the need to disconnect the dryer from the power source before starting any electrical work. We also discussed the tools and materials you will need, including a new electrical cord, wire cutters/strippers, a socket wrench, electrical tape, a marker or label, and safety goggles and gloves.
We then walked through each step of the process, from unplugging the dryer and removing the back panel to disconnecting the old cord, preparing the new cord, and connecting it to the dryer’s terminal block. We highlighted the significance of securing the wire connections and properly insulating them with electrical tape.
After successfully connecting the new cord, we instructed you on how to replace the back panel, ensuring a secure and neat fit. Finally, we concluded with the important step of plugging in the dryer and conducting a proper functionality test to ensure everything is working as it should.
Remember, if at any point during the process you feel unsure or uncomfortable, it’s always best to consult a professional electrician. Your safety is of utmost importance.
By following the instructions in this article, you have successfully completed the process of changing the electrical cord on your dryer. Now you can enjoy the peace of mind knowing that your dryer is equipped with a properly functioning and efficient electrical cord.
Thank you for taking the time to read this comprehensive guide. We hope it has been helpful in guiding you through the process. Happy drying!
Frequently Asked Questions about How To Change Electrical Cord On A Dryer
Was this page helpful?
At Storables.com, we guarantee accurate and reliable information. Our content, validated by Expert Board Contributors, is crafted following stringent Editorial Policies. We're committed to providing you with well-researched, expert-backed insights for all your informational needs.


0 thoughts on “How To Change Electrical Cord On A Dryer”