Articles
How To Fix A Leaking Toilet
Modified: October 20, 2024
Learn how to fix a leaking toilet with our comprehensive articles. Stop wasting water and money by taking care of this common household problem.
(Many of the links in this article redirect to a specific reviewed product. Your purchase of these products through affiliate links helps to generate commission for Storables.com, at no extra cost. Learn more)
Introduction
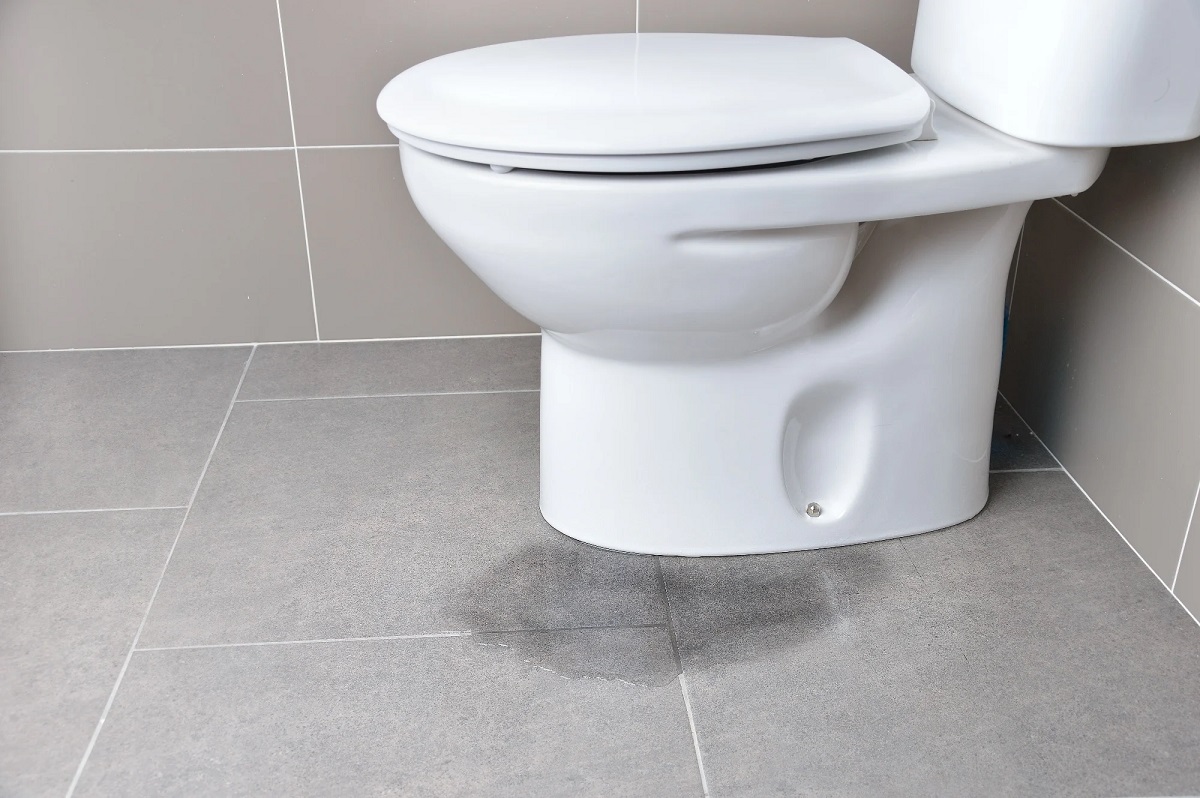
A leaking toilet can be a frustrating and inconvenient problem to deal with. Not only can it waste a significant amount of water, but it can also lead to water damage and increased utility bills. If you notice water pooling around the base of your toilet or hear a constant sound of running water, it’s important to take immediate action to fix the leak.
In this guide, we will walk you through the steps to assess and fix a leaking toilet. Whether it’s a faulty wax seal, a malfunctioning fill valve, or a crack in the tank, we will provide you with the information you need to tackle the issue and restore the functionality of your toilet.
Please note that before attempting any repairs, it’s important to turn off the water supply to the toilet. This can usually be done by turning the shut-off valve clockwise until it is fully closed. Additionally, if you are not confident in your DIY skills or if the leak persists after attempting the fixes mentioned in this article, it’s recommended to consult a professional plumber.
Now, let’s dive into the process of assessing and fixing a leaking toilet, starting with how to identify the source of the leak.
Key Takeaways:
- Don’t let a leaking toilet dampen your day! From fixing a leaky wax seal to adjusting the flush valve, this guide empowers you to tackle toilet leaks with confidence and restore functionality.
- Prioritize safety and proper maintenance to prevent water wastage and potential damage. If in doubt, consult a professional plumber to ensure a long-lasting and reliable repair.
Read more: How To Fix A Leaking Toilet Valve
Assessing the Leak
Before you can fix a leaking toilet, it’s important to determine the source of the leak. This will help you determine the appropriate repair method and ensure that you address the root cause of the problem.
Start by visually inspecting the area around the toilet. Look for any signs of water pooling or dampness around the base of the toilet or on the floor. This could indicate a leak in the wax seal, which is the seal that connects the toilet to the floor. A faulty wax seal can allow water to seep out and cause water damage.
If there is no visible water around the base of the toilet, but you hear a constant sound of running water, the leak may be coming from the inside of the toilet tank. Remove the tank lid and inspect the components inside. Look for any signs of water dripping or pooling in the tank, which may indicate a faulty fill valve, flapper valve, or cracked tank.
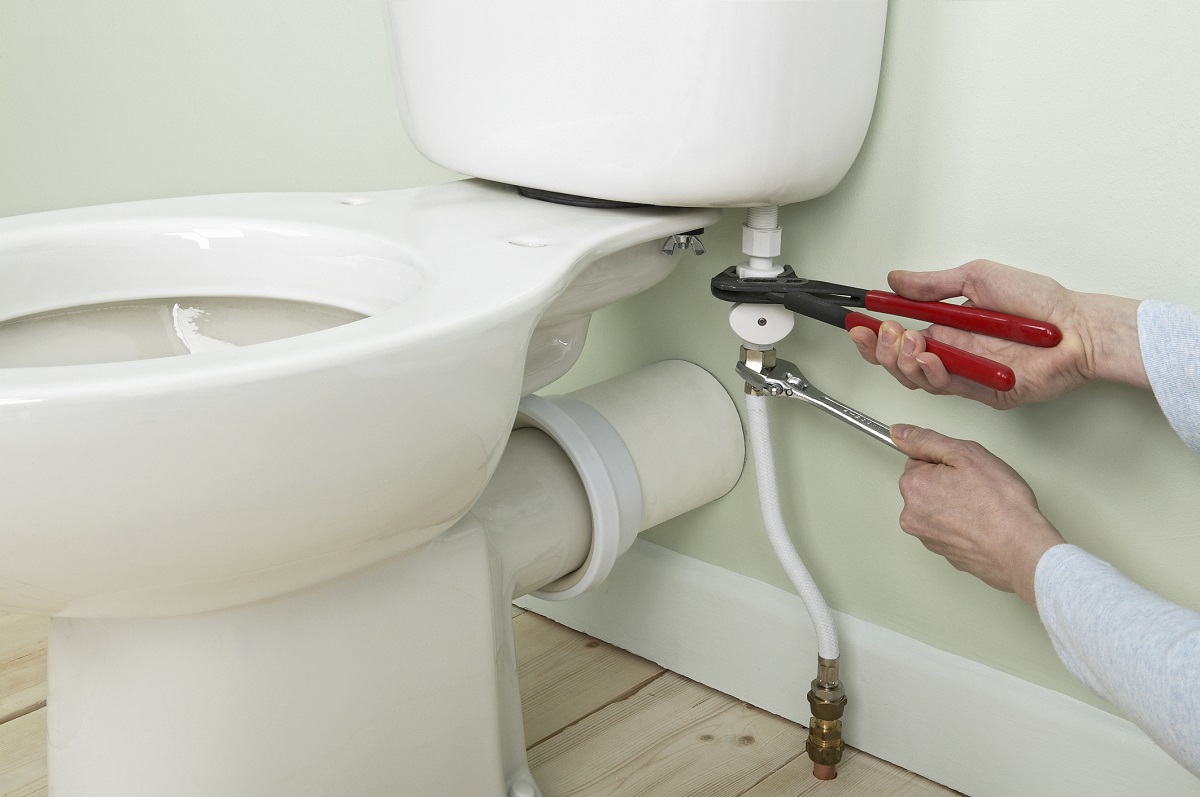
Another potential source of a toilet leak is the water supply line. Check the supply line for any signs of water dripping or leakage. Inspect the connections between the supply line, shut-off valve, and the toilet tank to ensure they are tight and secure.
By assessing the leak and identifying the source, you will be better equipped to proceed with the appropriate repair method. Next, we will discuss how to shut off the water supply to the toilet, which is an essential step before making any repairs.
Shutting Off the Water Supply
Before you begin fixing a leaking toilet, it is crucial to shut off the water supply to prevent any further water damage or flooding. Here’s how to do it:
- Locate the shut-off valve. The shut-off valve is typically located on the wall behind the toilet. It is usually a silver or bronze-colored valve connected to a small pipe.
- Turn the valve clockwise (to the right) to close it. This will stop the flow of water to the toilet.
- Once the valve is fully closed, flush the toilet to drain any remaining water from the tank and bowl.
- Make sure to check that the water supply is successfully shut off by attempting to flush the toilet again. If no water fills the tank and bowl, you have successfully shut off the water supply.
Shutting off the water supply is essential to ensure the safety and effectiveness of the repair process. It prevents any water from entering the toilet while you work on fixing the leak. Now that the water supply is secure, we can move on to the specific repair methods depending on the source of the leak.
Fixing a Leaky Wax Seal
If you notice water pooling around the base of your toilet, the culprit may be a faulty wax seal. The wax seal is a ring-shaped gasket that sits between the bottom of the toilet and the flange, creating a watertight seal. Here’s how you can fix a leaky wax seal:
- Start by removing the toilet. Begin by turning off the water supply and flushing the toilet to drain the water from the tank and bowl.
- Disconnect the water supply line from the bottom of the toilet tank.
- Remove the nuts securing the toilet to the floor. There are usually two nuts located on either side of the base. Use a wrench to loosen and remove them.
- Gently rock the toilet back and forth to break the seal between the wax ring and the flange. Lift the toilet and set it aside.
- Inspect the wax seal for any signs of damage or wear. If it appears cracked, dried out, or flattened, it needs to be replaced.
- Remove the old wax seal and clean the flange and toilet base with a rag or scraper.
- Place a new wax seal onto the flange, making sure it is centered and level.
- Carefully lower the toilet onto the wax seal, aligning the bolts with the holes in the base.
- Gently press down on the toilet to compress the wax seal and create a tight seal.
- Secure the toilet to the floor by tightening the nuts back onto the bolts. Be careful not to overtighten, as it can crack the toilet.
- Reconnect the water supply line to the bottom of the toilet tank.
- Turn on the water supply and check for any leaks. If everything looks good, flush the toilet to ensure it is working properly.
Fixing a leaky wax seal requires some basic plumbing knowledge and careful handling of the toilet. If you feel unsure or uncomfortable with the process, it is best to consult a professional plumber. Taking the time to fix a leaky wax seal will help prevent water damage and restore the functionality of your toilet.
Adjusting the Flush Valve
If the leaking toilet is caused by a faulty flush valve, adjusting it can often solve the problem. The flush valve is responsible for allowing water to enter the toilet bowl during the flushing process. Here’s how you can adjust the flush valve:
- Start by turning off the water supply to the toilet. Locate the shut-off valve near the base of the toilet and turn it clockwise to close it.
- Flush the toilet to drain any remaining water from the tank and bowl.
- Remove the toilet tank lid to gain access to the inside components.
- Inspect the flush valve for any signs of damage or wear. Look for cracks, corrosion, or build-up that could be causing a faulty seal.
- Check the positioning of the flush valve. It should be centered and sealed properly.
- If the flush valve is misaligned, adjust it by gently rotating it clockwise or counterclockwise until it sits properly in place.
- Inspect the rubber gasket or flapper attached to the flush valve. If it appears worn or damaged, it may need to be replaced.
- If the gasket or flapper needs to be replaced, follow the manufacturer’s instructions to remove the old one and install a new one.
- Ensure that the gasket or flapper is properly sealed against the flush valve seat.
- Once the adjustments are made and any necessary replacements are done, turn the water supply back on and let the tank refill.
- Observe the flushing process to check for any leaks. If the toilet is no longer leaking, the flush valve adjustment was successful.
By adjusting the flush valve, you can often fix a leaking toilet without the need for major repairs. However, if the issue persists or if you are unsure about performing the adjustments yourself, it is best to seek assistance from a professional plumber. Taking the time to properly adjust the flush valve will help restore the functionality of your toilet and prevent any water waste.
Check the toilet flapper for damage or wear and tear. If it’s not sealing properly, it could be causing the leak. Replace the flapper if necessary.
Read more: How To Fix A Leaking Washer
Fixing a Leaky Fill Valve
If you hear a continuous sound of running water in your toilet, the culprit may be a leaky fill valve. The fill valve is responsible for refilling the toilet tank with water after each flush. Here’s how you can fix a leaky fill valve:
- Start by turning off the water supply to the toilet. Locate the shut-off valve near the base of the toilet and turn it clockwise to close it.
- Flush the toilet to drain any remaining water from the tank and bowl.
- Remove the toilet tank lid to gain access to the inside components.
- Locate the fill valve, which is usually a plastic or metal rod connected to a refill tube.
- Inspect the fill valve for any signs of leaks, such as water dripping or pooling around the valve.
- If the fill valve is leaking, you can try tightening the connection between the valve and the refill tube. Use a wrench or pliers to tighten the nut connecting the two.
- If tightening the connection doesn’t solve the issue, the fill valve may need to be replaced. Follow the manufacturer’s instructions to remove the old fill valve and install a new one.
- Before installing the new fill valve, make sure to adjust the height to the appropriate level. Most fill valves have an adjustable mechanism that allows you to set the water level in the tank.
- Install the new fill valve according to the manufacturer’s instructions, making sure all connections are secure.
- Turn the water supply back on and let the tank refill.
- Observe the filling process to check for any leaks. If the toilet is no longer leaking and the tank fills to the desired level, the fill valve repair was successful.
If you are not confident in your DIY plumbing skills or if the leak persists after attempting these fixes, it is advisable to seek assistance from a professional plumber. Fixing a leaky fill valve can help eliminate the sound of running water in your toilet and prevent water waste.
Replacing the Flapper Valve
If your toilet is constantly running, the flapper valve might be the cause. The flapper valve is a rubber or plastic component that controls the flow of water from the tank to the bowl during flushing. Over time, the flapper valve can wear out or become warped, leading to a continuous leak. Here’s how you can replace the flapper valve:
- Start by turning off the water supply to the toilet. Locate the shut-off valve near the base of the toilet and turn it clockwise to close it.
- Flush the toilet to drain any remaining water from the tank and bowl.
- Remove the toilet tank lid to gain access to the inside components.
- Identify the flapper valve, which is typically located at the bottom of the tank and connected to the flush handle by a chain or rod.
- Inspect the flapper valve for any signs of damage, such as cracks or deterioration. If the flapper valve appears worn out, it’s time to replace it.
- Detach the chain or rod from the flush handle and remove the old flapper valve from its seat.
- Bring the old flapper valve to a hardware store or home improvement center to find an exact replacement.
- Install the new flapper valve by placing it into the seat and reattaching the chain or rod to the flush handle.
- Adjust the chain length, ensuring that there is enough slack for the flapper valve to fully open and close during flushing.
- Turn the water supply back on and let the tank refill.
- Observe the flushing process to check for any leaks. If the toilet no longer runs constantly and there are no water leaks, the flapper valve replacement was successful.
Replacing the flapper valve is a relatively simple and cost-effective solution to fix a running toilet. However, if you encounter any difficulties during the process or if the leak persists, it’s advisable to consult a professional plumber for assistance. Properly functioning flapper valve ensures efficient flushing and prevents water waste.
Tightening Connections
If you notice water leaking from the connections between the various components of your toilet, such as the supply line or the tank bolts, tightening these connections can often solve the problem. Here’s how to tighten the connections:
- Start by turning off the water supply to the toilet. Locate the shut-off valve near the base of the toilet and turn it clockwise to close it.
- Flush the toilet to drain any remaining water from the tank and bowl.
- Inspect the water supply line that connects the shut-off valve to the toilet tank. Check for any signs of water dripping or leakage.
- If the supply line connection is loose, use a wrench or pliers to tighten the nut connecting the line to the shut-off valve or the toilet fill valve.
- Ensure that the connection is snug, but be careful not to overtighten, as it can cause damage.
- Next, check the tank bolts that secure the toilet tank to the bowl. If you notice water leaking from these bolts, they may need to be tightened.
- Use a wrench to gently tighten the nuts on the tank bolts. Start with a quarter turn at a time and check for any leaks.
- Continue tightening the nuts until they are secure, but again, be cautious not to overtighten and crack the tank.
- Once all the connections are tightened, turn the water supply back on and let the tank refill.
- Observe the flushing process and check for any leaks. If the connections are tightened properly, there should be no water leakage.
Tightening the connections is a simple and effective solution for fixing leaks in your toilet. However, if the problem persists even after tightening the connections or if you are unsure about performing the repairs yourself, it’s best to consult a professional plumber to avoid any further damage. Ensuring that all connections are tight can prevent water wastage and keep your toilet functioning properly.
Fixing Crack or Hole in the Tank
If you identify a crack or hole in your toilet tank, it is crucial to address the issue promptly. Ignoring it can lead to significant water leakage and potential damage to your bathroom. Here’s how you can fix a crack or hole in the tank:
- Start by turning off the water supply to the toilet. Locate the shut-off valve near the base of the toilet and turn it clockwise to close it.
- Flush the toilet to drain any remaining water from the tank and bowl.
- Dry the affected area on the tank with a towel or cloth to ensure it is clean and free of moisture.
- Use a sandpaper or abrasive pad to roughen the surface around the crack or hole. This will help the repair material adhere better.
- Apply a layer of epoxy-based putty or waterproof silicone sealant over the crack or hole. Make sure to cover the area thoroughly and extend the application beyond the damaged section.
- Smooth out the putty or sealant with a putty knife or your finger to create a watertight and uniform seal.
- Allow the epoxy-based putty or silicone sealant to dry and cure according to the manufacturer’s instructions. This may take several hours or overnight.
- Once the repair material is fully cured, turn the water supply back on and check for any signs of leakage. Monitor the tank closely for a few days to ensure that the repair is successful.
It’s important to note that a DIY repair for a crack or hole in the toilet tank is a temporary solution. If the crack or hole is extensive or if the repair does not hold up over time, it is recommended to replace the entire toilet tank. Consult a professional plumber to assist with the replacement.
Remember, safety should be your top priority when attempting any toilet repairs. If you are not confident in your abilities or if the damage is significant, it’s best to seek professional help to avoid causing further damage or injury.
Read more: How To Fix An AC Leak
Conclusion
A leaking toilet can be a frustrating and wasteful problem, but fortunately, many common causes of leaks can be easily fixed. By taking the time to assess the leak and determine the source, you can effectively address the issue and restore the functionality of your toilet.
Throughout this guide, we have discussed various methods to fix a leaking toilet, including fixing a leaky wax seal, adjusting the flush valve, fixing a leaky fill valve, replacing the flapper valve, tightening connections, and addressing cracks or holes in the tank. These step-by-step instructions can help you tackle the specific issue causing the leak.
When performing any repairs, it’s crucial to prioritize safety. Always remember to turn off the water supply to the toilet before starting any work and exercise caution when handling plumbing components.
If you encounter any difficulties or if the leak persists after attempting the suggested fixes, it’s advisable to consult a professional plumber. They have the expertise to diagnose and resolve complex toilet leaks, ensuring a long-lasting and reliable repair.
Fixing a leaking toilet not only saves water and reduces utility bills but also prevents potential water damage to your home. It’s essential to address the issue promptly to avoid any further complications and inconvenience.
We hope this guide has provided valuable insights and empowered you with the knowledge to fix a leaking toilet. Remember, proper maintenance and regular inspections can help prevent leaks from occurring in the first place. Take care of your toilet, and it will continue to serve you well for years to come.
Frequently Asked Questions about How To Fix A Leaking Toilet
Was this page helpful?
At Storables.com, we guarantee accurate and reliable information. Our content, validated by Expert Board Contributors, is crafted following stringent Editorial Policies. We're committed to providing you with well-researched, expert-backed insights for all your informational needs.


0 thoughts on “How To Fix A Leaking Toilet”