Articles
How To Fix A Leaking Toilet Valve
Modified: October 31, 2024
Learn how to easily fix a leaking toilet valve with our informative articles. Save money and avoid the hassle of hiring a plumber.
(Many of the links in this article redirect to a specific reviewed product. Your purchase of these products through affiliate links helps to generate commission for Storables.com, at no extra cost. Learn more)
Introduction
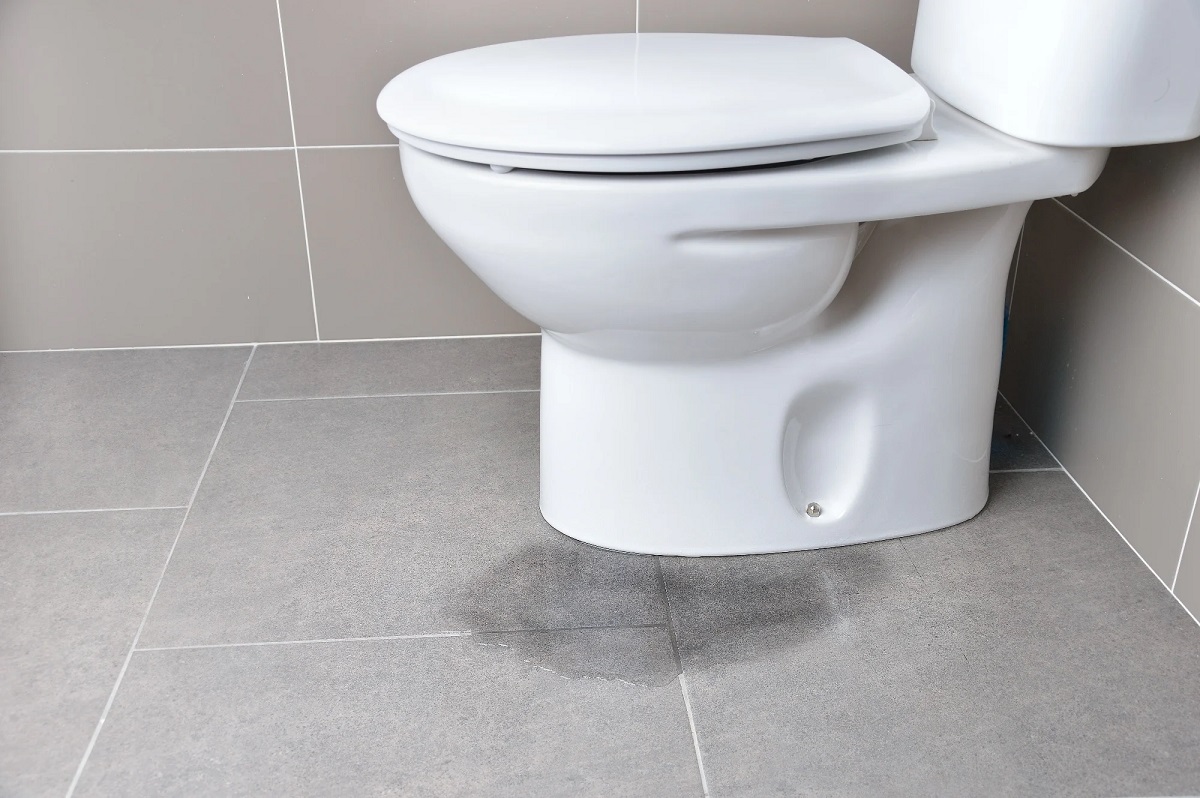
A leaking toilet valve can be a frustrating problem to deal with. Not only does it waste water, but it can also cause damage to your bathroom floor. The good news is that fixing a leaking toilet valve is a relatively simple task that can be done with a few basic tools and some knowledge of plumbing. In this article, we will guide you through the step-by-step process of fixing a leaking toilet valve, helping you save water, money, and prevent further damage.
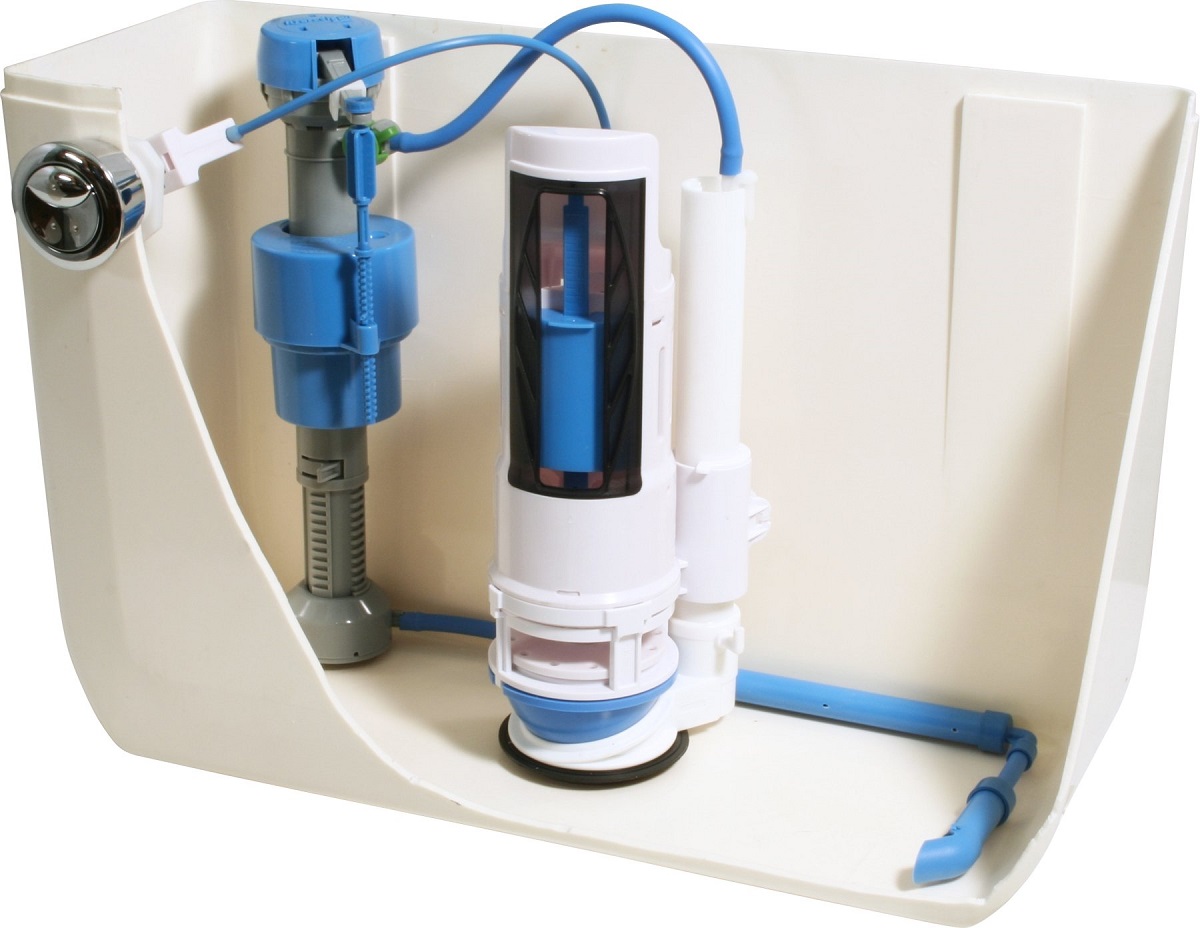
Before we dive into the repair process, it’s important to understand the common causes of a leaking toilet valve. The valve, also known as the flush valve, is responsible for controlling the flow of water from the tank into the bowl. Over time, the valve components, such as the O-ring or the seal, may wear out or become damaged, resulting in leaks. Other common causes include loose connections, mineral buildup, or a faulty float.
To fix a leaking toilet valve, you will need some basic tools and materials. Here is a list of what you will need:
- Adjustable wrench
- Pliers
- Screwdriver
- Replacement O-ring
- Teflon tape
- Clean cloth
- Bucket or container
Now that you are familiar with the common causes and have gathered the necessary tools, let’s dive into the step-by-step guide on how to fix a leaking toilet valve.
Key Takeaways:
- Save water, money, and prevent damage by fixing a leaking toilet valve with basic tools and step-by-step guidance. Identify common causes and follow additional tips for a successful repair.
- Gather necessary tools, shut off water supply, inspect and replace O-ring, and test the repair to fix a leaking toilet valve. Follow precautions and seek professional help if needed for a smooth repair process.
Read more: How To Fix A Leaking Toilet
Common Causes of a Leaking Toilet Valve
A leaking toilet valve can be caused by a variety of factors. Understanding these common causes will help you diagnose the issue and take appropriate steps to fix it. Here are some potential culprits:
- Worn Out or Damaged O-ring: The O-ring is a rubber seal that helps create a watertight connection between the valve cap and the valve body. Over time, this O-ring can wear out, crack, or become dislodged, resulting in leaks.
- Loose Connections: Another common cause of a leaking toilet valve is loose connections. The nuts and bolts that hold the valve in place may become loose over time, causing water to seep out around the valve.
- Mineral Buildup: In areas with hard water, mineral deposits can accumulate inside the valve, causing it to malfunction and leak. These mineral deposits can prevent the valve from sealing properly or cause it to become stuck in an open position.
- Faulty Float: The float is responsible for regulating the water level in the toilet tank. If the float is damaged or malfunctioning, it can cause the valve to remain open, leading to a constant leak.
- Cracked Valve Body: In rare cases, the valve body itself may develop cracks or damage, leading to leaks. This can occur due to excessive pressure, aging, or physical impact on the toilet.
It’s important to identify the specific cause of the leaking toilet valve before proceeding with the repair. This will help you determine which parts need to be replaced or fixed. In the next section, we will guide you through the step-by-step process of fixing a leaking toilet valve.
Tools and Materials Needed
Before you start fixing a leaking toilet valve, make sure you have the necessary tools and materials on hand. Having these items ready will help you complete the repair process smoothly. Here is a list of what you will need:
- Adjustable wrench: This tool will be used to loosen and tighten nuts and bolts.
- Pliers: Pliers will come in handy for gripping and turning small parts, such as the valve cap.
- Screwdriver: You will need a screwdriver to remove screws or access certain components of the toilet valve.
- Replacement O-ring: Depending on the specific cause of the leak, you may need to replace the O-ring. Make sure you have the correct size and type of O-ring for your toilet valve.
- Teflon tape: Teflon tape is a plumber’s go-to for creating a watertight seal. You will need it to wrap around threaded connections.
- Clean cloth: Keep a clean cloth or rag nearby to wipe away any excess water, debris, or dirt during the repair process.
- Bucket or container: It’s always a good idea to have a bucket or container ready to catch any water that may spill during the repair.
Having these tools and materials prepared will save you time and ensure that you have everything you need to fix the leaking toilet valve. Now that you are equipped with the necessary supplies, let’s move on to the step-by-step guide on how to repair a leaking toilet valve.
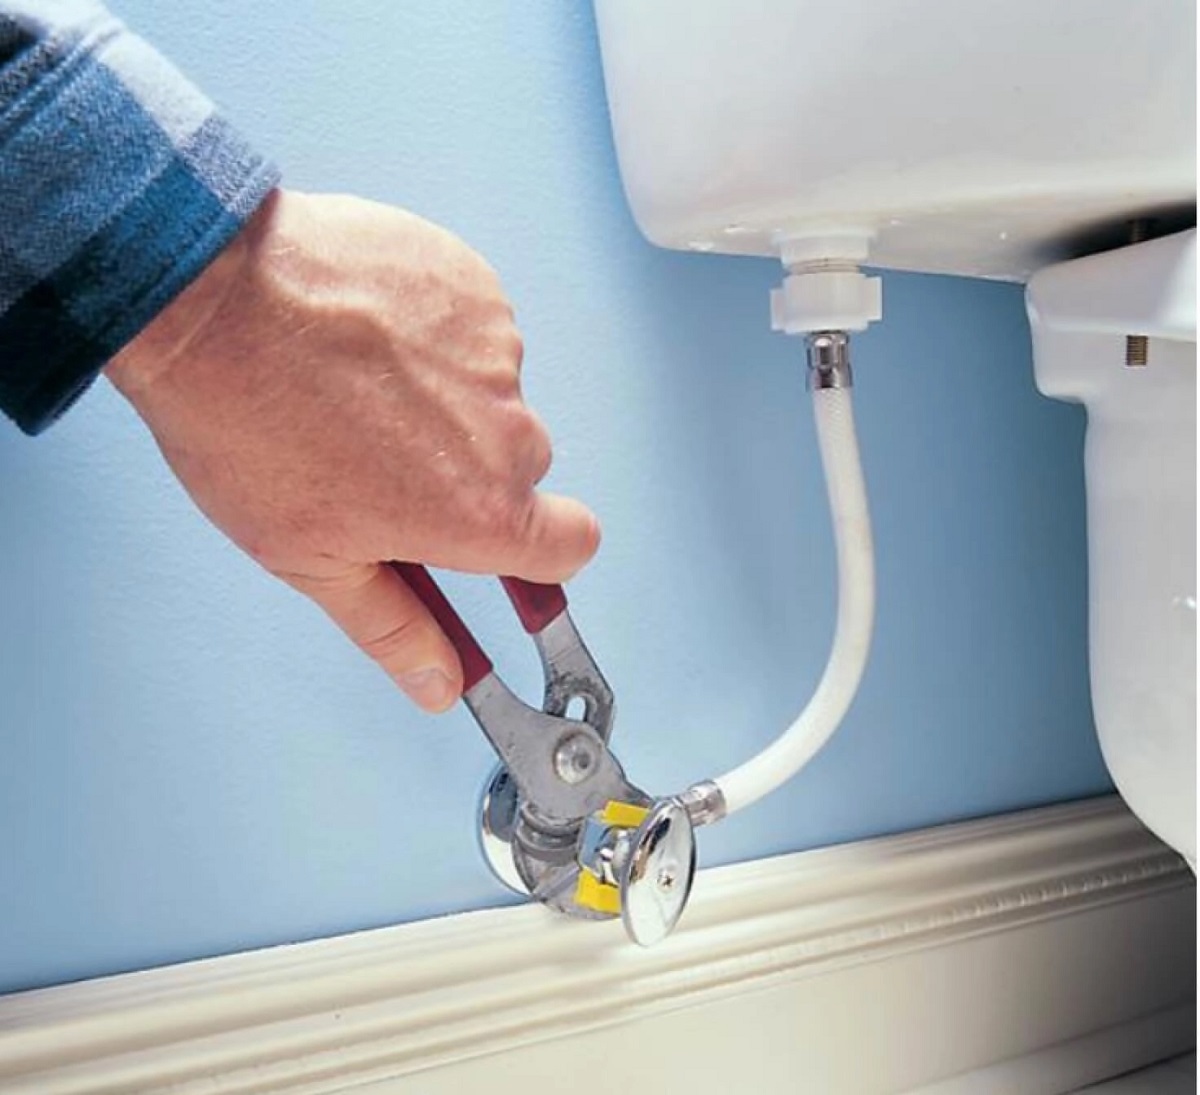
Check the water supply line and the valve for any leaks or damage. Tighten any loose connections and replace any worn out parts to stop the leaking.
Step-by-Step Guide:
Fixing a leaking toilet valve is a straightforward process that can be completed by following these step-by-step instructions:
- Shutting off the Water Supply: Start by locating the water shut-off valve near the base of the toilet. Turn the valve clockwise until it is fully closed. This will prevent any water from flowing into the toilet tank during the repair process.
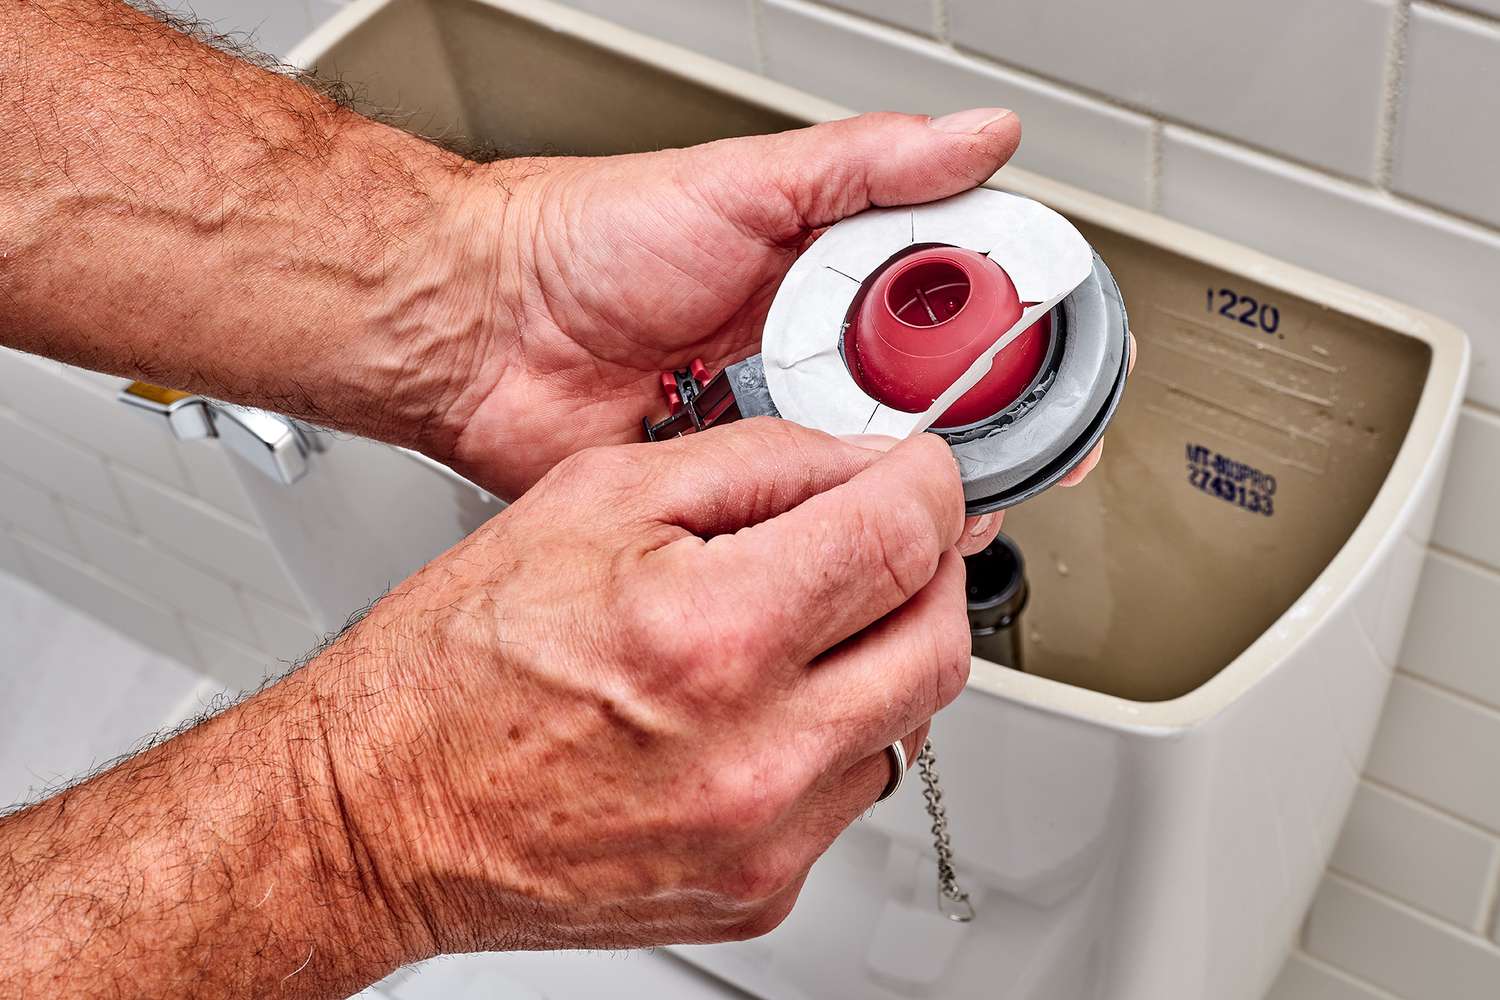
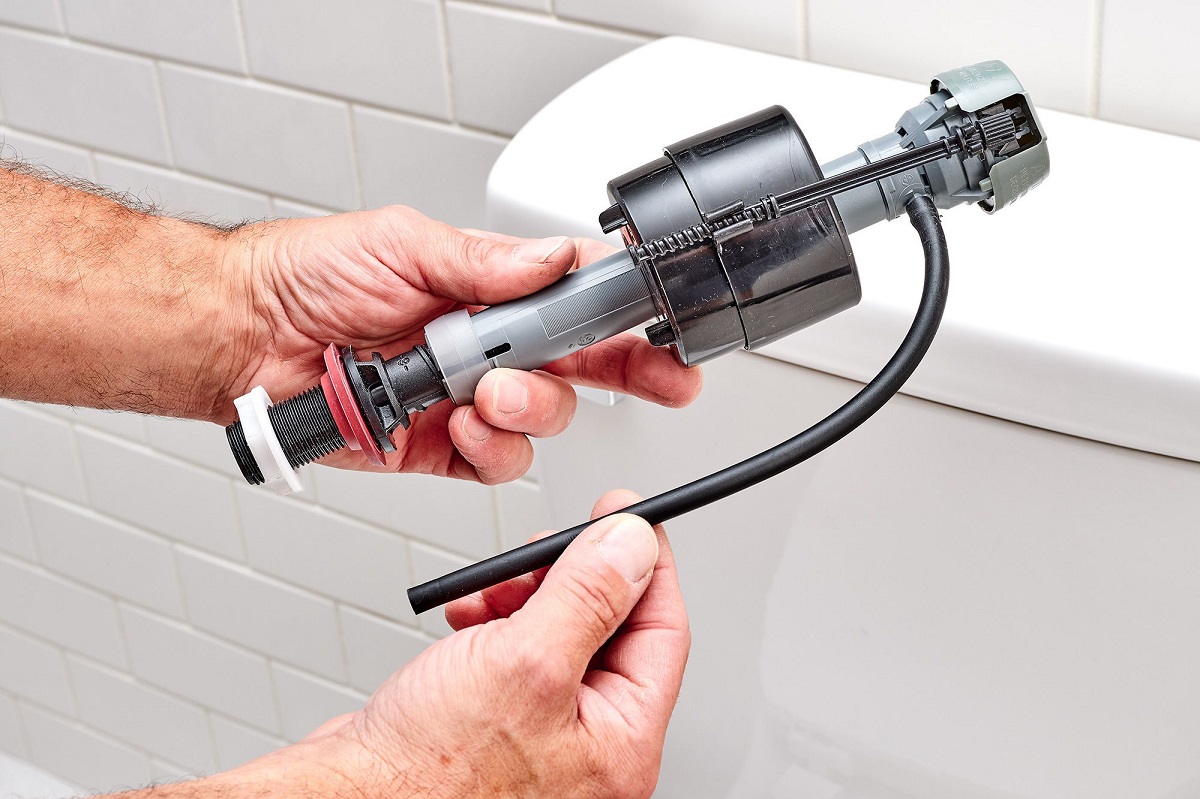
- Removing the Valve Cap: Use an adjustable wrench or pliers to loosen and remove the nut securing the valve cap. Once the nut is removed, lift the valve cap off of the valve body. Set it aside in a safe place where it won’t get lost.
- Inspecting and Replacing the O-Ring: Take a close look at the O-ring that sits between the valve cap and the valve body. Inspect it for any signs of wear, damage, or deterioration. If the O-ring is in poor condition, carefully remove it and replace it with a new one of the same size and type. Make sure the new O-ring is seated properly in the groove of the valve cap.
- Reassembling the Valve: Place the valve cap back onto the valve body, ensuring that the O-ring is properly aligned. Use your hand to tighten the nut onto the valve cap, but be careful not to overtighten it. Use pliers or an adjustable wrench to give it a final snug fit, ensuring a secure connection.
- Testing the Repair: Slowly turn the water shut-off valve counterclockwise to restore the water supply to the toilet. Once the water is flowing, observe the valve for any signs of leakage. Check for drips or moisture around the valve cap and valve body. If there are no leaks, flush the toilet to ensure proper functionality. Monitor the valve for any further signs of leakage over the next few days to confirm that the repair was successful.
Following these steps will help you fix a leaking toilet valve and prevent further water wastage. Remember to take your time and work carefully to ensure a successful repair. If you encounter any difficulties or the leak persists, it is recommended to consult a professional plumber for further assistance.
Additional Tips and Precautions
While fixing a leaking toilet valve is a relatively simple task, it’s important to keep a few additional tips and precautions in mind to ensure a successful repair and avoid any mishaps. Follow these guidelines to make the process smoother:
- Turn off the Water Supply: Before starting any repair work, always shut off the water supply to the toilet. This will prevent any accidental flooding or water damage.
- Empty the Tank: After shutting off the water supply, flush the toilet to empty the tank. This will make it easier to access and work on the valve without excess water interfering with the repair process.
- Check for Proper Fit: When reassembling the valve, ensure that all parts are properly aligned and fitted. A loose or misaligned connection can lead to leaks or improper functioning of the valve.
- Use Teflon Tape: Apply Teflon tape to the threaded connections to create a tight seal. This will help prevent any leaks from occurring at these connection points.
- Inspect Other Components: While you are repairing the valve, take the opportunity to inspect other components of the toilet, such as the float and the fill valve. Check for any signs of damage or wear and consider replacing these parts if necessary.
- Monitor for Leaks: After completing the repair, carefully observe the valve, particularly the area around the valve cap, for any signs of leakage. If you notice any drips or moisture, tighten the nut further or replace the O-ring again if needed.
- Seek Professional Help if Needed: If you are unsure about the repair process or encounter any difficulties, it is always best to seek professional assistance. A licensed plumber can provide expert guidance and ensure the repair is done correctly.
By following these additional tips and precautions, you can ensure a successful repair of your leaking toilet valve and minimize the risk of further issues. Remember to work carefully and methodically, and don’t hesitate to seek professional help if the need arises.
Read more: How To Fix A Leaking Washer
Conclusion
Fixing a leaking toilet valve is a task that can be easily accomplished with a few basic tools and some know-how. By following the step-by-step guide outlined in this article, you can save water, money, and prevent potential damage to your bathroom. Remember to start by identifying the common causes of a leaking toilet valve, such as a worn-out O-ring or loose connections, before proceeding with the repair process.
Gather all the necessary tools and materials before you begin, including an adjustable wrench, pliers, screwdriver, replacement O-ring, Teflon tape, clean cloth, and a bucket or container to catch any water that may spill.
By shutting off the water supply, removing the valve cap, inspecting and replacing the O-ring as needed, reassembling the valve, and testing the repair, you can fix the leaking toilet valve and restore proper functionality to your toilet.
Remember to follow additional tips and precautions, such as turning off the water supply, emptying the tank, checking for proper fit, using Teflon tape, inspecting other components, and monitoring for leaks after the repair is complete. And if you are unsure of the process or encounter difficulties, don’t hesitate to seek professional assistance.
By taking the time to fix a leaking toilet valve, you can not only save water and money but also contribute to a more sustainable environment. Remember, every drop counts.
So, roll up your sleeves, gather your tools, and get ready to fix that leaking toilet valve. Your bathroom will thank you!
Frequently Asked Questions about How To Fix A Leaking Toilet Valve
Was this page helpful?
At Storables.com, we guarantee accurate and reliable information. Our content, validated by Expert Board Contributors, is crafted following stringent Editorial Policies. We're committed to providing you with well-researched, expert-backed insights for all your informational needs.


0 thoughts on “How To Fix A Leaking Toilet Valve”