Articles
How To Fix Warped Siding
Modified: August 31, 2024
Learn effective methods to fix warped siding with our informative articles. Get expert advice and step-by-step instructions to restore your siding to its original condition.
(Many of the links in this article redirect to a specific reviewed product. Your purchase of these products through affiliate links helps to generate commission for Storables.com, at no extra cost. Learn more)
Introduction
Warped siding can be a frustrating issue for homeowners. Not only does it affect the aesthetic appeal of a home, but it can also lead to further damage if left unaddressed. Whether it’s due to extreme weather conditions, improper installation, or a lack of maintenance, warped siding should be fixed promptly to prevent any long-term consequences.
In this article, we will explore the causes of warped siding, how to assess the damage, the necessary tools and materials for repair, and three effective methods to fix it. Additionally, we will provide some valuable tips to ensure an efficient and successful repair process.
Before embarking on any repair project, it’s important to understand the underlying causes of warped siding. This will not only help address the immediate issue but also prevent future occurrences.
Next, we’ll dive into the various factors that can contribute to warped siding, enabling homeowners to make informed decisions and take appropriate action to prevent further damage.
Key Takeaways:
- Address the root cause of warped siding to prevent future occurrences. Choose the right repair method based on the extent of damage, and regularly inspect and maintain your siding for long-term protection.
- Whether using the heat gun technique, moisture technique, or siding replacement, prioritize safety, test techniques on a small area, and seek professional help if needed for an effective and efficient repair process.
Read more: What Causes Vinyl Siding To Warp
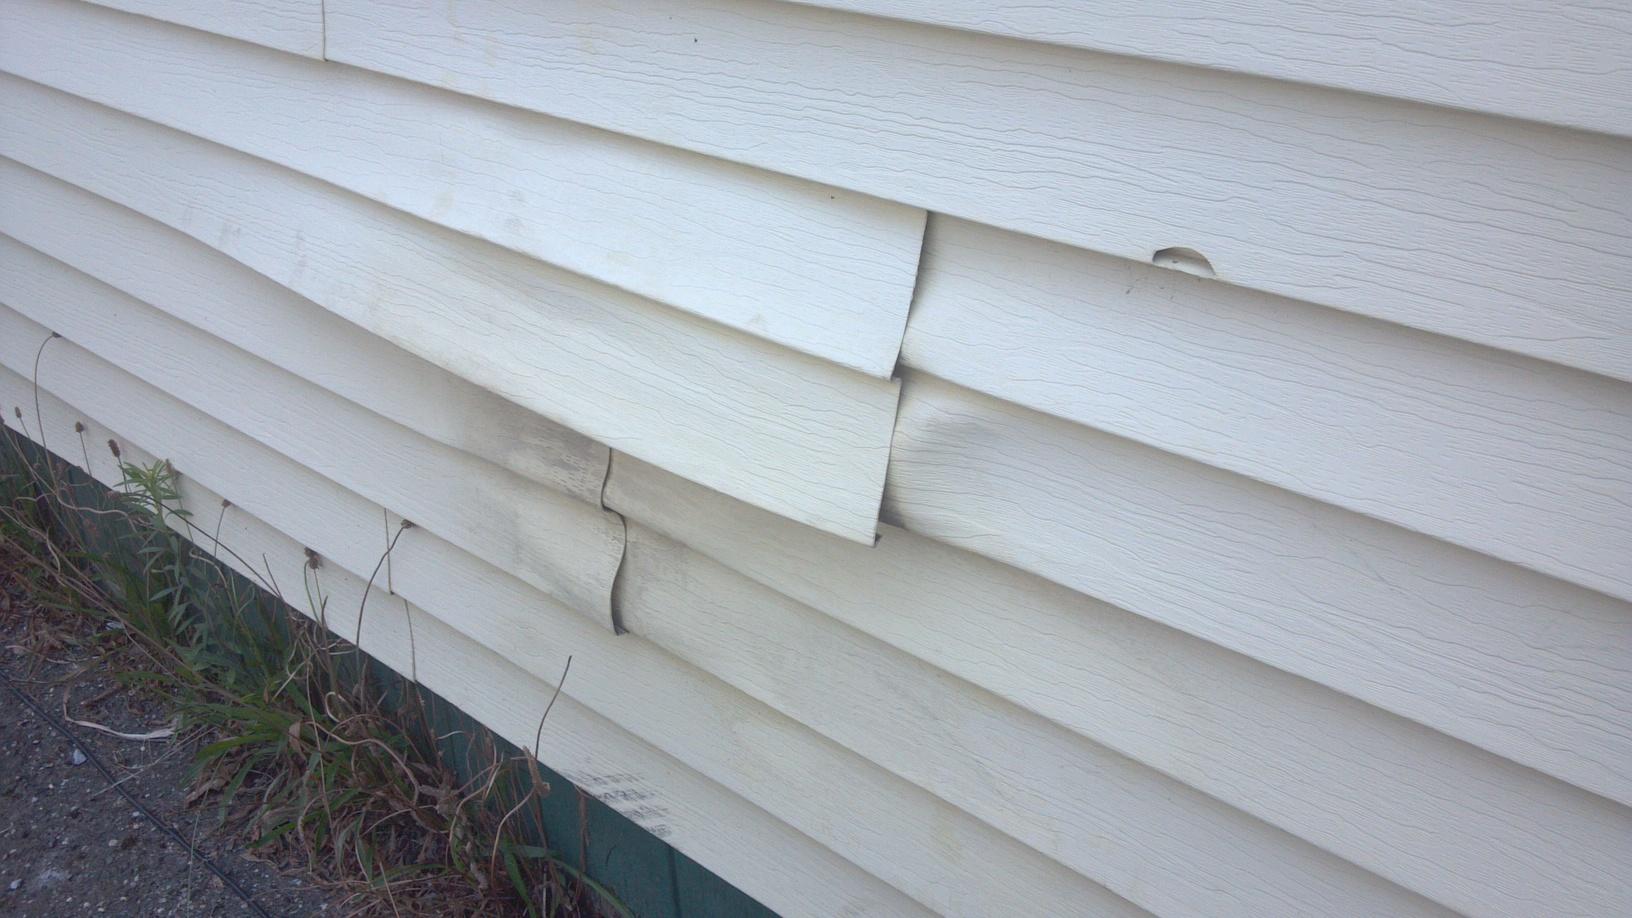
Causes of Warped Siding
Warped siding can be caused by a variety of factors, ranging from environmental conditions to poor installation techniques. Understanding the root causes will help homeowners address the issue effectively and prevent it from recurring in the future. Here are some common causes of warped siding:
- Extreme Temperature Fluctuations: Constant exposure to extreme heat or cold can cause siding materials to expand and contract, leading to warping. This is especially common in regions with fluctuating weather patterns.
- Moisture Infiltration: If water seeps behind the siding and remains trapped, it can cause the siding to deform. This is particularly common in areas with heavy rainfall or high humidity levels. Poorly sealed joints, cracks, or damaged caulking can allow moisture to enter and contribute to warping.
- Improper Installation: Inadequate installation techniques can cause the siding to be misaligned, resulting in uneven stress distribution. Over time, this can lead to warping. It is essential to hire experienced professionals or follow manufacturer’s instructions diligently to ensure proper installation.
- Substandard Materials: Low-quality siding materials may lack the necessary durability and resistance to withstand environmental stressors. Inferior materials can warp more easily, particularly under harsh weather conditions.
- Inadequate Maintenance: Lack of regular maintenance can also contribute to warped siding. Neglecting to clean the siding, remove debris, or repair minor damages can accelerate the deterioration process, making the siding more susceptible to warping.
Identifying the reasons behind warped siding is crucial in determining the appropriate course of action for repair. Once the causes have been evaluated, homeowners can proceed to assess the level of damage and gather the necessary tools and materials for the repair process.
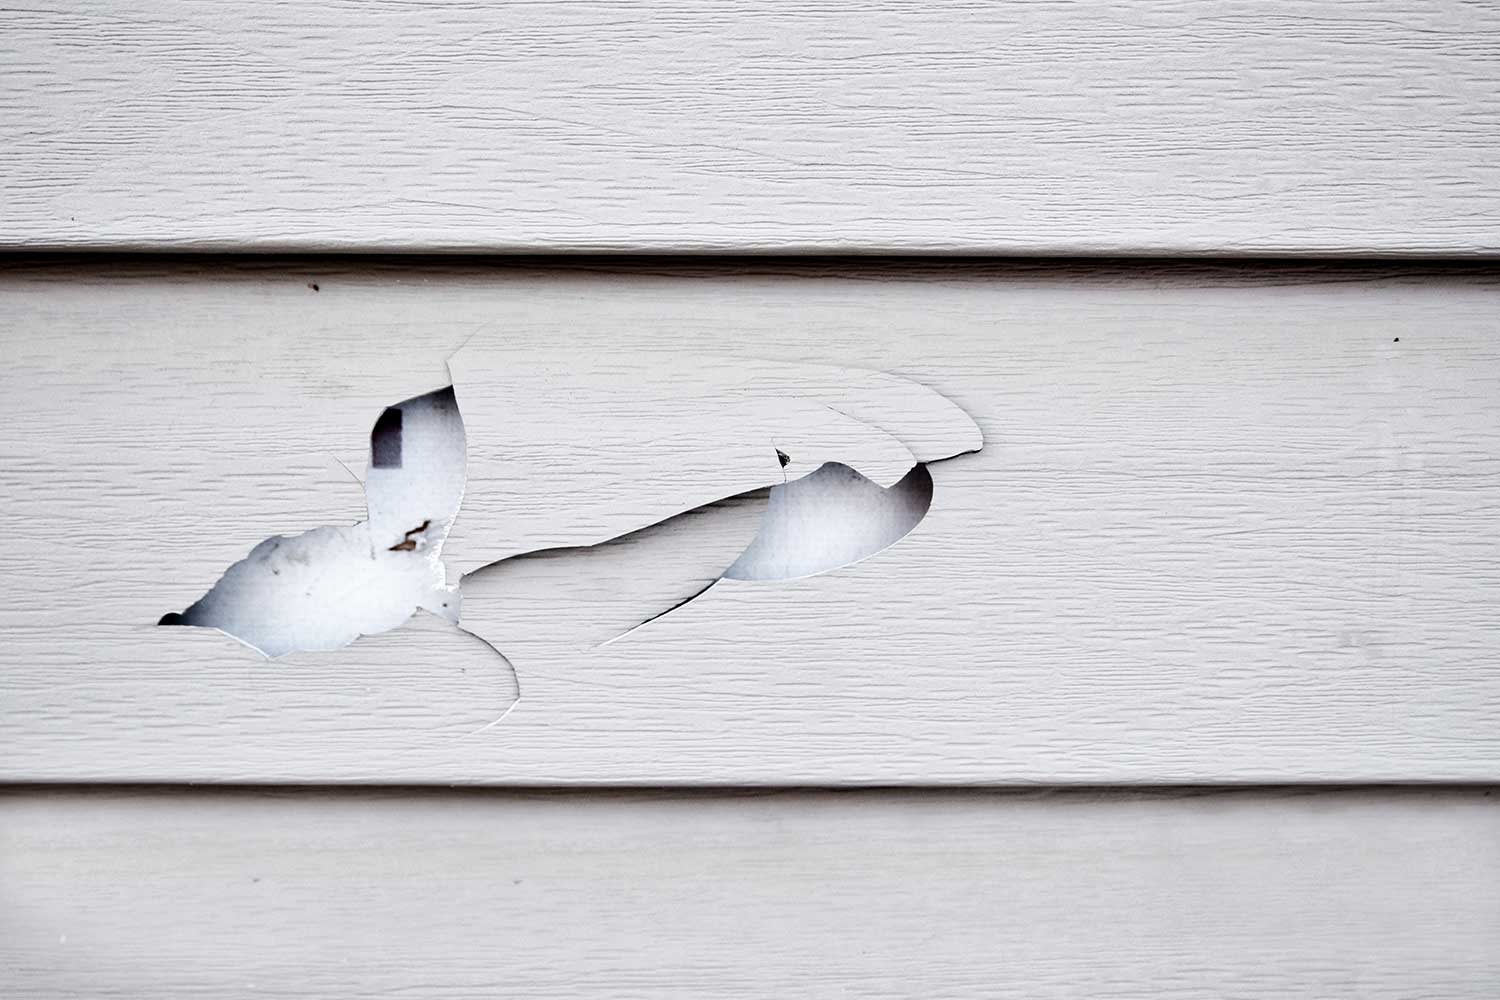
Assessing the Damage
Before undertaking any repair work, it is important to assess the extent of the damage to the siding. This will help determine the appropriate repair method and the level of effort required. Here are some steps to follow when assessing the damage:
- Visual Inspection: Begin by conducting a thorough visual inspection of the siding. Look for any signs of warping, such as bulges, dips, or buckling. Pay attention to areas that are exposed to direct sunlight or excessive moisture, as they are more prone to damage.
- Touch Test: In addition to visually examining the siding, gently press on the warped areas to determine their level of flexibility. If the siding feels soft or spongy, it may be a sign of water damage or rot, requiring more extensive repairs.
- Noise Test: Tap on the siding with your knuckles and listen for any hollow sounds. If you hear a hollow noise, it may indicate that the siding is detached or damaged underneath.
- Warp Extent: While observing the warping, assess how widespread it is. Determine if the warping affects individual pieces or if it extends across larger sections of the siding. This will help in deciding the repair approach.
- Penetration: Inspect the siding for any signs of punctures or holes that may have allowed moisture or pests to infiltrate. If the damage is severe, it might require a complete replacement of the affected area.
By performing a thorough assessment, homeowners can gain a better understanding of the condition of their siding and make informed decisions about the appropriate repair method. Once the damage has been evaluated, it’s time to gather the necessary tools and materials for the repair process.
Tools and Materials Needed
Repairing warped siding requires specific tools and materials to ensure a successful and efficient process. Here is a list of the essential items you will need:
Tools:
- Utility knife or siding removal tool
- Hammer
- Pry bar
- Nail punch
- Power drill
- Caulking gun
- Heat gun
- Level
- Measuring tape
- Chalk line
Read more: How To Fix Warped Cabinet Door
Materials:
- Replacement siding panels or shingles
- Galvanized nails or screws
- Siding adhesive or caulk
- Outdoor caulk
- Primer
- Paint
- Siding cleaner
- Sanding block
It is important to have all the necessary tools and materials ready before starting the repair process. This will help ensure a smooth and uninterrupted workflow. Additionally, be sure to select materials that match the existing siding in terms of style, color, and texture to maintain a cohesive appearance.
Once you have gathered all the required tools and materials, it’s time to prepare for the repair process by following a set of guidelines.
Preparing for Repair
Before delving into the repair process, it’s essential to prepare the area and follow a few guidelines to ensure a smooth and successful repair. Here are some steps to follow when preparing for the repair:
1. Safety First:
Prioritize your safety by wearing protective gear such as gloves, safety goggles, and a dust mask. This will protect you from any potential hazards, especially when using tools or handling any chemicals.
2. Clear the Area:
Remove any furniture, planters, or obstacles from the area to create ample space for the repair work. This will not only make the process easier but also prevent any damage to surrounding objects.
Read more: How To Fix Siding That Is Loose
3. Clean the Siding:
Thoroughly clean the warped siding using a siding cleaner and a soft brush or sponge. This will remove dirt, debris, and any loose paint, ensuring a clean surface for the repair. Rinse the siding with water and allow it to dry completely before proceeding.
4. Inspect the Substrate:
While inspecting the siding, also examine the underlying substrate for any damage. Repair or replace any damaged portions to provide a stable base for the new siding.
5. Remove Old Siding:
If you are replacing warped siding panels or shingles, carefully remove the damaged pieces using a utility knife or siding removal tool. Take caution not to damage the surrounding siding during the removal process.
6. Check for Structural Issues:
Inspect the framing and insulation behind the siding for any signs of moisture damage or rot. Address any underlying structural issues before proceeding with the repair to ensure a long-lasting solution.
By following these preparation steps, you will create a clean and sturdy foundation for the repair process. Now that you’re prepared, we can move on to the repair methods for fixing warped siding.
Read more: How To Fix Holes In Siding
Method 1: Heat Gun Technique
The heat gun technique is an effective method for fixing warped siding caused by heat or temperature fluctuations. This technique involves using a heat gun to gently apply heat to the warped section in order to restore its original shape. Here are the steps to follow:
1. Prepare the Heat Gun:
Set the heat gun to a low to medium heat setting. Avoid using high heat, as it can damage the siding or melt the material. Maintain a safe distance of at least 6 to 8 inches between the heat gun and the siding.
2. Warm up the Warped Section:
Direct the heat gun towards the warped area and move it back and forth in a sweeping motion. Apply heat evenly across the entire warped section to gradually warm it up. Be patient and avoid overheating the siding, as it can lead to further damage.
3. Apply Pressure:
Once the siding becomes pliable under the heat, use a gloved hand or a flat object (like a block of wood) to gently press against the warped area. Apply even pressure to encourage the siding to regain its original shape. Hold the pressure for a few seconds before releasing.
Read more: How To Fix Cracked Siding
4. Check and Repeat if Necessary:
Inspect the repaired section to assess if it has returned to its original form. If there is still some warping, repeat the process of heating and shaping until the desired result is achieved. Avoid excessive force, as it can damage the siding.
5. Allow the Siding to Cool:
Once the warped section has been successfully reshaped, allow it to cool down naturally. Avoid exposing the area to any sudden temperature changes or excessive physical stress during the cooling process, as it can lead to new warping.
The heat gun technique can be a simple and effective way to fix minor warping in siding caused by temperature fluctuations. However, if the warping is more severe or the siding is extensively damaged, it may require an alternative repair method such as the moisture technique or siding replacement, which we will explore next.
Method 2: Moisture Technique
The moisture technique is a helpful method for addressing warped siding caused by moisture infiltration. This technique aims to rehydrate the siding to restore its original shape. Here’s how to use the moisture technique to fix warped siding:
1. Assess the Damage:
Before starting the repair process, ensure that the warped siding is not severely damaged or rotten. If the damage is extensive or the siding is compromised, it may need to be replaced entirely.
Read more: How To Fix Siding On House
2. Soak the Towel:
Dampen a clean towel or cloth with water and wring out any excess moisture. The towel should be damp but not dripping to prevent further water damage to the siding.
3. Place the Towel:
Position the damp towel over the warped section of the siding, ensuring it covers the entire affected area. Press the towel firmly against the siding to establish contact and promote moisture absorption.
4. Allow Time for Rehydration:
Leave the towel in place for several hours to allow the moisture to penetrate the warped siding. The time required for rehydration will vary depending on the severity of the warping and the type of siding material.
5. Remove the Towel and Assess the Results:
After the designated time, remove the towel and inspect the repaired section. In many cases, the rehydration process will have caused the siding to regain its original shape. If the warping persists, repeat the process or consider alternative repair methods.
Read more: How To Fix Siding That Fell Off
6. Monitor for Further Damage:
Keep an eye on the repaired section and the surrounding area for any signs of ongoing moisture damage or warping. Address and resolve any underlying issues that may have caused the initial warping to prevent future recurrence.
The moisture technique can be an effective solution for minor to moderate warping due to moisture infiltration. However, if the warping persists or the damage is extensive, you may need to consider the option of siding replacement, which we will discuss in the next method.
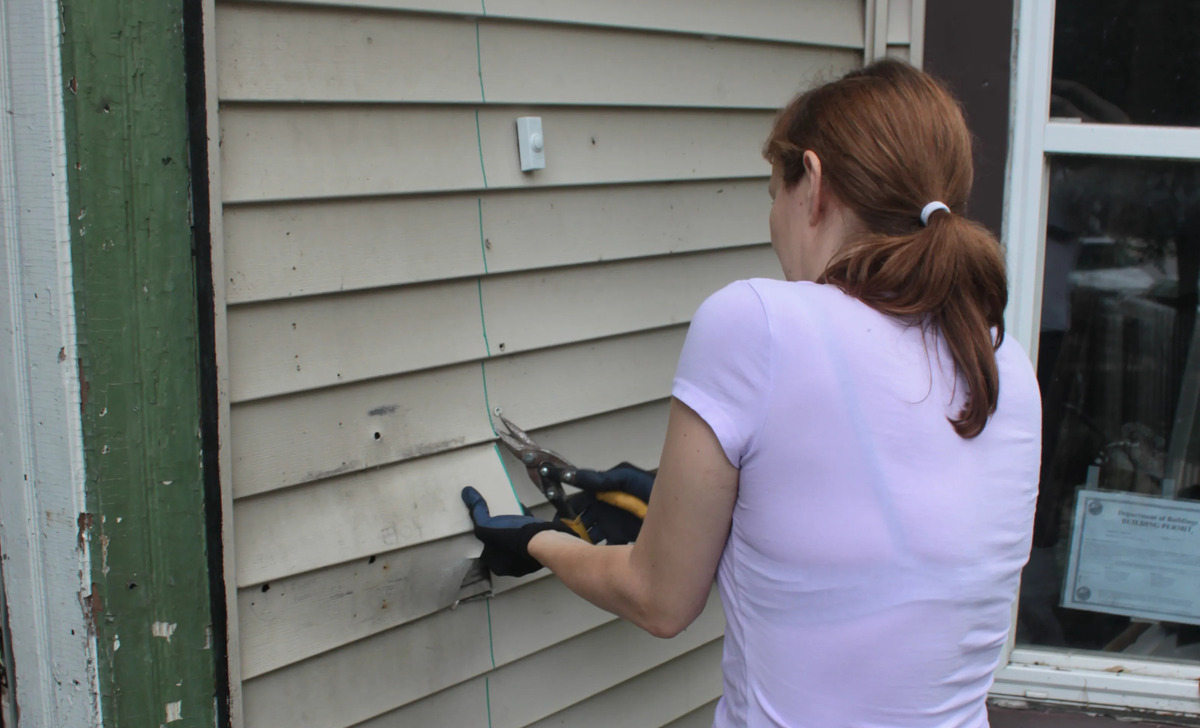
Method 3: Siding Replacement
If the warping in your siding is severe or the damage is extensive, it may be necessary to replace the affected sections. Siding replacement ensures a long-lasting and visually appealing solution. Here’s how to go about it:
1. Measure and Purchase Replacement Siding:
Start by accurately measuring the dimensions of the damaged siding sections. This will help you purchase the appropriate amount of replacement siding. Ensure that the new siding matches the style, color, and texture of the existing siding to maintain a cohesive appearance.
2. Remove the Damaged Siding:
Using a utility knife or a siding removal tool, carefully cut or remove the damaged siding. Take caution not to damage the surrounding siding in the process. Remove any nails or screws that secured the damaged section in place.
Read more: How To Fix A Hole In Aluminum Siding
3. Prepare the Replacement Siding:
Cut the replacement siding pieces to match the measurements of the removed sections. Double-check the dimensions and make any necessary adjustments to ensure a precise fit. If needed, prime and paint the replacement siding panels before installation.
4. Install the Replacement Siding:
Position the replacement siding in place and secure it using galvanized nails or screws. Make sure the new siding aligns properly with the surrounding pieces. Use a level to ensure the replacement siding is straight and level. Repeat this step for each section of siding that needs to be replaced.
5. Caulk and Seal:
Apply siding adhesive or outdoor caulk along the edges and joints of the new siding to create a watertight seal. This will help prevent moisture infiltration that can cause future warping. Smooth out the caulk with a caulk smoother or your finger for a neat and clean finish.
6. Paint and Finish:
If necessary, paint the new siding to match the rest of the exterior. Apply a primer first, if required, then use a high-quality exterior paint suitable for the siding material. Follow the manufacturer’s instructions for optimal adhesion and durability. Allow the paint to dry completely before considering the repair process complete.
Siding replacement is a more involved repair method, but it offers a long-term solution for severe warping or extensive damage. Remember to take the necessary safety precautions and follow proper installation techniques to ensure a successful outcome.
Read more: How To Fix Gap On Side Of Garage Door
Tips for Effective Repair
When it comes to repairing warped siding, following these tips can improve the effectiveness and efficiency of your repair process. Keep these pointers in mind as you work on fixing your siding:
1. Address the Root Cause:
To prevent future warping, identify and address the underlying cause. Whether it’s poor installation, moisture issues, or extreme temperature fluctuations, addressing the root cause will help maintain the integrity of your repaired siding.
2. Take Safety Precautions:
Ensure your safety by wearing protective gear, such as gloves and safety goggles, when handling tools and chemicals. Follow proper safety protocols when working at heights or using power tools to minimize the risk of accidents.
3. Choose the Right Repair Method:
Select the most appropriate repair method based on the extent of the damage. Use the heat gun technique for minor warping caused by temperature fluctuations, the moisture technique for moisture-related warping, and consider siding replacement for severe damage.
Read more: How To Fix A Recliner That Leans To One Side
4. Test Techniques on a Small Area:
If you’re unsure about the effectiveness of a repair method or concerned about potential damage, test it on a small, inconspicuous area of the siding first. This will allow you to assess the effectiveness and ensure that it won’t cause any further damage.
5. Maintain Consistent Pressure:
Whether using the heat gun technique or applying pressure during the repair process, maintain a consistent and even amount of pressure. Applying excessive force or uneven pressure can cause additional damage to the siding.
6. Regularly Inspect and Maintain:
After repairing the warped siding, make it a habit to regularly inspect and maintain your siding. Clean it periodically, check for any signs of new warping or damage, and promptly address any issues to prevent further deterioration.
7. Seek Professional Help if Needed:
If you are unsure about the repair process or have extensive damage, it is advisable to seek professional help. Experienced contractors can provide expertise, ensure the proper repair techniques are used, and guarantee a high-quality outcome.
By following these tips, you can ensure an effective and efficient repair process for your warped siding. Remember, timely repairs and proper maintenance will not only enhance the appearance of your home but also protect it from potential long-term damage.
Conclusion
Warped siding can be a frustrating and unsightly issue for homeowners, but with the right knowledge and techniques, it is possible to restore your siding to its original condition. In this article, we have explored the causes of warped siding, methods for assessing the damage, and three effective repair techniques: the heat gun technique, the moisture technique, and siding replacement.
It is important to determine the underlying cause of the warping before proceeding with the repair. Whether it’s extreme temperature fluctuations, moisture infiltration, improper installation, or other factors, addressing the root cause will help prevent future occurrences.
Assessing the damage is crucial in deciding the appropriate repair method. Visual inspection, touch tests, and checking for structural issues will help determine the best course of action. Once the extent of the damage is evaluated, gather the necessary tools and materials for the repair process.
For minor warping caused by temperature fluctuations, the heat gun technique can be a suitable solution. Applying heat to the warped section and gently shaping it back to its original form can restore the siding’s appearance. However, more severe warping or damage caused by moisture infiltration may require the moisture technique, which involves rehydrating the siding using a damp towel.
If the warping is extensive or the siding is significantly damaged, it may be necessary to pursue a siding replacement. This method ensures a long-lasting and visually appealing solution by removing the damaged sections and installing new siding that matches the existing exterior.
To ensure an effective repair process, remember to take safety precautions, choose the appropriate repair method, and regularly inspect and maintain your siding. If you’re unsure about the repair process or have extensive damage, it’s recommended to seek professional help.
By following the tips and techniques outlined in this article, you can successfully fix warped siding and restore the beauty and functionality of your home’s exterior. Remember, timely repairs and proper maintenance will not only enhance the appearance of your home but also protect it from potential long-term damage.
Now that you’re equipped with the knowledge and techniques for fixing warped siding, roll up your sleeves and start the repair process to transform your home’s exterior back to its original glory.
Frequently Asked Questions about How To Fix Warped Siding
Was this page helpful?
At Storables.com, we guarantee accurate and reliable information. Our content, validated by Expert Board Contributors, is crafted following stringent Editorial Policies. We're committed to providing you with well-researched, expert-backed insights for all your informational needs.

0 thoughts on “How To Fix Warped Siding”