
Articles
How To Install A Ceiling Medallion
Modified: January 18, 2024
Learn how to easily install a beautiful ceiling medallion with our step-by-step articles, providing helpful tips and guidance. Transform your space today!
(Many of the links in this article redirect to a specific reviewed product. Your purchase of these products through affiliate links helps to generate commission for Storables.com, at no extra cost. Learn more)
Introduction
Installing a ceiling medallion can add elegance and beauty to any room. Whether you’re looking to enhance the style of your living space or add a touch of sophistication to a formal area, a ceiling medallion is a perfect choice. With its intricate designs and ornamental details, a ceiling medallion can instantly transform a plain ceiling into a focal point of your room.
In this article, we will guide you through the step-by-step process of installing a ceiling medallion. From gathering the necessary tools and materials to securing and finishing the installation, we will cover all the essential steps to ensure a successful project.
Before we begin, it’s important to note that while installing a ceiling medallion is a relatively simple task, it does require some basic DIY skills and a few hours of your time. Follow along with our instructions, and soon you’ll have a stunning ceiling medallion that will impress anyone who enters your home.
So, let’s get started on this exciting home improvement project!
Key Takeaways:
- Elevate the Charm: Installing a ceiling medallion is a rewarding DIY project that instantly adds elegance and sophistication to any room, transforming a plain ceiling into a captivating focal point.
- Detailed Transformation: From gathering tools to finishing touches, the step-by-step guide ensures a visually appealing and durable result, enhancing the overall aesthetics of your living space.
Read more: How To Hang Ceiling Medallion
Step 1: Gather the Necessary Tools and Materials
Before you begin the installation process, it’s important to gather all the tools and materials you’ll need to make the task easier and more efficient. Here is a list of items you should have on hand:
- Ceiling medallion
- Measuring tape
- Pencil
- Adhesive or caulk
- Ladder or scaffolding
- Screwdriver or drill
- Screws
- Paint or stain (if desired)
- Paintbrush or sponge
- Safety goggles
- A helping hand (optional)
Make sure to choose a ceiling medallion that matches the style and size of your room. Measure the diameter of your light fixture or chandelier to determine the appropriate size of the medallion. Additionally, consider the design and material of the medallion to ensure it complements the overall aesthetics of the space.
Once you have all the necessary tools and materials, you’re ready to move on to the next step: preparing the area.
Step 2: Prepare the Area
Preparing the area where you will be installing the ceiling medallion is crucial to ensure a smooth and successful installation. Here’s what you need to do:
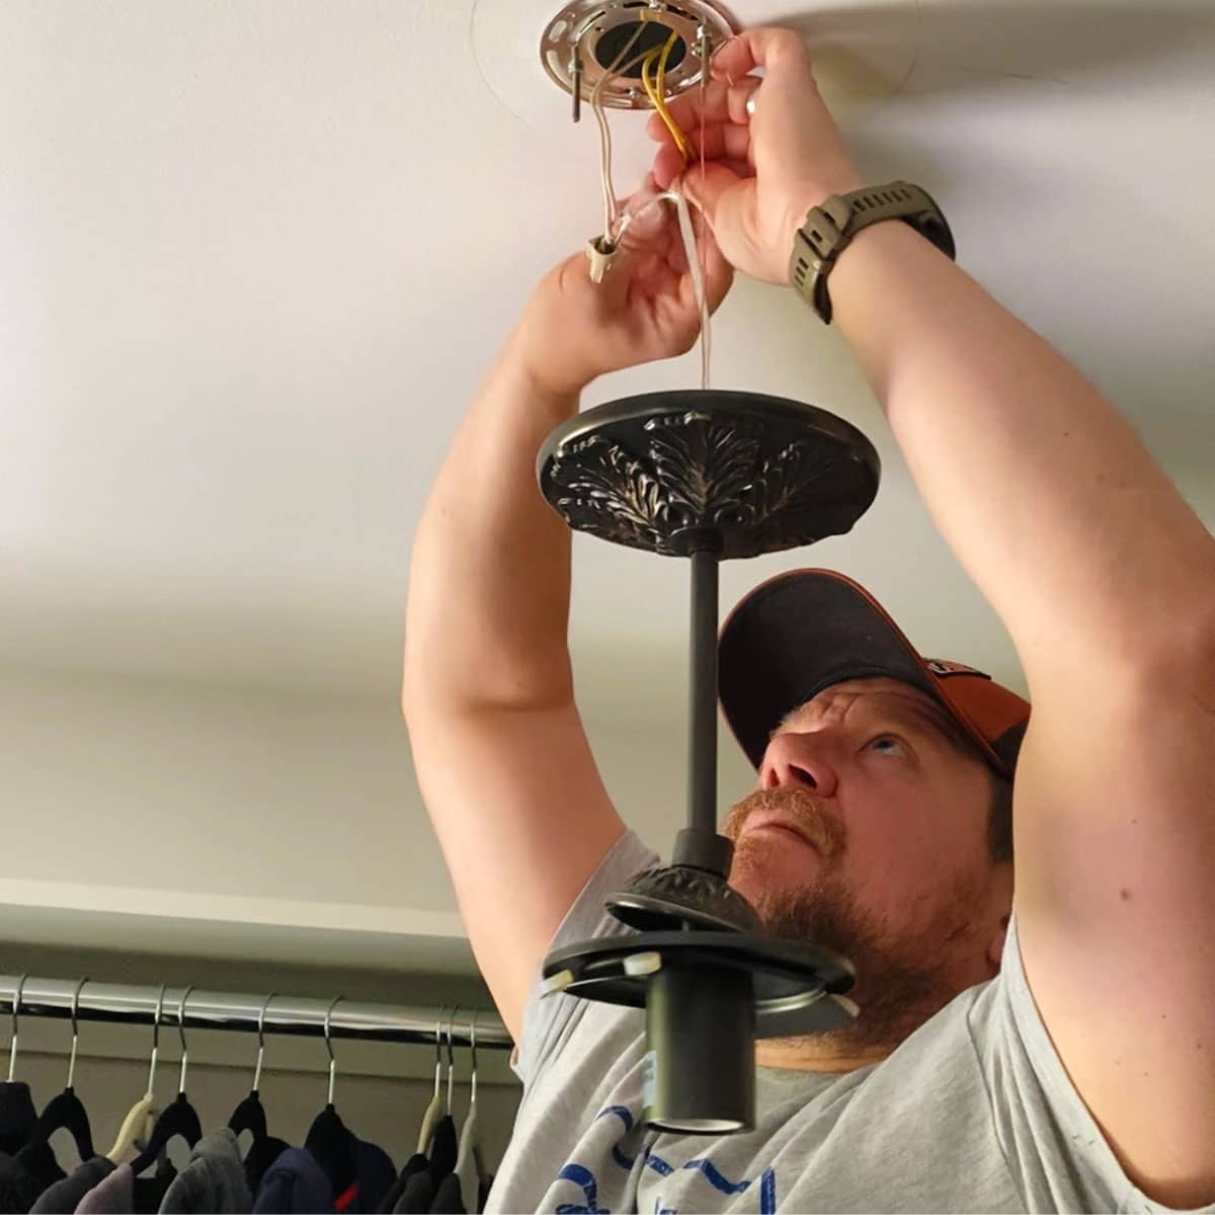
- First, turn off the power to the light fixture or chandelier at the circuit breaker. This will ensure your safety while working with electrical components.
- Next, remove the light fixture or chandelier from the ceiling, carefully disconnecting any wires. If you are unsure about this step, it’s recommended to seek the assistance of a licensed electrician.
- With the fixture removed, inspect the ceiling surface to make sure it is clean and free from any debris or loose paint. Use a damp cloth or sponge to wipe away any dirt or dust.
- If there are any imperfections or rough surfaces on the ceiling, you may need to patch or sand them down to create a smooth and even surface for the medallion to adhere to.
- Finally, if you plan to paint or stain the ceiling medallion, now is the time to do so. Apply the desired finish using a paintbrush or sponge, following the manufacturer’s instructions. Allow the medallion to dry completely before moving on to the next step.
By properly preparing the area, you’ll ensure that the ceiling medallion installation goes smoothly and that the final result is visually appealing. With the area prepared, you’re now ready to move on to the next step: measuring and marking the placement of the medallion.
Step 3: Measure and Mark the Placement
Accurate measurements and precise marking are crucial for a successful installation of your ceiling medallion. Follow these steps to ensure proper placement:
- Start by measuring the diameter of the ceiling medallion. Use a measuring tape to determine the exact size.
- Locate the center point of the ceiling where you want the medallion to be installed. This is usually aligned with the center of the light fixture or chandelier.
- Hold the medallion against the ceiling, making sure it is centered with the light fixture. Use a pencil to lightly mark the edges or outline of the medallion on the ceiling. This will serve as a guide during the installation process.
- Measure the distance between the marked edges of the medallion and the closest wall or adjacent objects, such as crown molding or ceiling beams. This will help you ensure that the medallion is evenly spaced and positioned.
- If you are planning to install a decorative canopy or rosette around the base of the light fixture, measure and mark its placement accordingly.
Double-check your measurements and markings to ensure accuracy. Making any necessary adjustments at this stage will save you time and potential rework later on. With the measurements and markings in place, you’re ready to move on to the next step: applying adhesive or caulk.
When installing a ceiling medallion, be sure to turn off the power to the light fixture before starting. This will ensure your safety while working with electrical components.
Step 4: Apply Adhesive or Caulk
Applying adhesive or caulk is an essential step in securing the ceiling medallion to the ceiling surface. Follow these steps for a proper application:
- Before you begin, read the instructions provided by the manufacturer of the adhesive or caulk you are using. Different products may have specific application requirements.
- Apply a generous amount of adhesive or caulk to the back of the medallion, ensuring that it is evenly distributed. You can use a putty knife or a caulking gun to apply the adhesive.
- Position the medallion on the ceiling, aligning it with the markings you made in the previous step. Press the medallion firmly against the ceiling, ensuring good contact between the adhesive and the surface.
- Use a clean cloth or sponge to wipe away any excess adhesive or caulk that may have seeped out from the edges of the medallion. This will give your installation a clean and finished look.
- Allow the adhesive or caulk to dry according to the manufacturer’s instructions. This may take a few hours or longer, depending on the product used. Avoid touching or disturbing the medallion during the drying process to ensure a strong bond.
Properly applying the adhesive or caulk will ensure that the ceiling medallion stays securely in place. It’s important to follow the manufacturer’s instructions for drying times to ensure a strong and durable installation. With the adhesive or caulk applied, you’re ready to move on to the next step: attaching the ceiling medallion.
Read also: 11 Incredible Ceiling Medallions For 2025
Step 5: Attach the Ceiling Medallion
Attaching the ceiling medallion is where your careful placement and preparation pays off. Follow these steps to securely attach the medallion to the ceiling:
- Make sure the adhesive or caulk has fully dried before proceeding with this step.
- Using a screwdriver or drill, carefully insert screws through the pre-drilled holes in the ceiling medallion. Start with one screw and use the others to secure the medallion in place evenly.
- Tighten the screws until the medallion is flush against the ceiling, but be careful not to overtighten and risk damaging the medallion or the ceiling surface.
- Continue tightening the remaining screws until the medallion is securely attached on all sides.
It’s important to distribute the screws evenly around the medallion to ensure a balanced and secure installation. If the medallion is larger or heavier, you may need additional screws for added stability.
Once the medallion is securely attached, step back and inspect the installation for any gaps or misalignments. If necessary, adjust the position of the medallion or tighten the screws as needed.
With the ceiling medallion attached, you’re one step closer to completing the installation. However, there are a few final steps to ensure a finished and polished appearance, which we will cover in the next step: securing and finishing the installation.
Step 6: Secure and Finish the Installation
Now that the ceiling medallion is attached, it’s time to ensure its stability and add the finishing touches. Follow these steps to secure and finish the installation:
- Check the screws once more to ensure they are tightened securely and that the medallion is firmly in place. If any screws feel loose, tighten them as needed.
- If desired, apply a small amount of adhesive or caulk around the edges of the medallion to fill in any gaps between the medallion and the ceiling. This will create a seamless and polished finish.
- Allow the adhesive or caulk to dry completely according to the manufacturer’s instructions before moving on to the next step.
- If necessary, touch up the paint or stain on the ceiling medallion to ensure a consistent and professional appearance. Use a paintbrush or sponge to apply the desired finish, taking care not to drip or splatter onto the surrounding area.
- Once the touch-up paint or stain is dry, clean any remaining dust or debris from the medallion and the surrounding area. A soft cloth or duster can be used for this purpose.
- Finally, reattach the light fixture or chandelier to the medallion using the appropriate hardware and reconnect any wiring following the manufacturer’s instructions. It’s recommended to have a licensed electrician assist with this step if you are unsure.
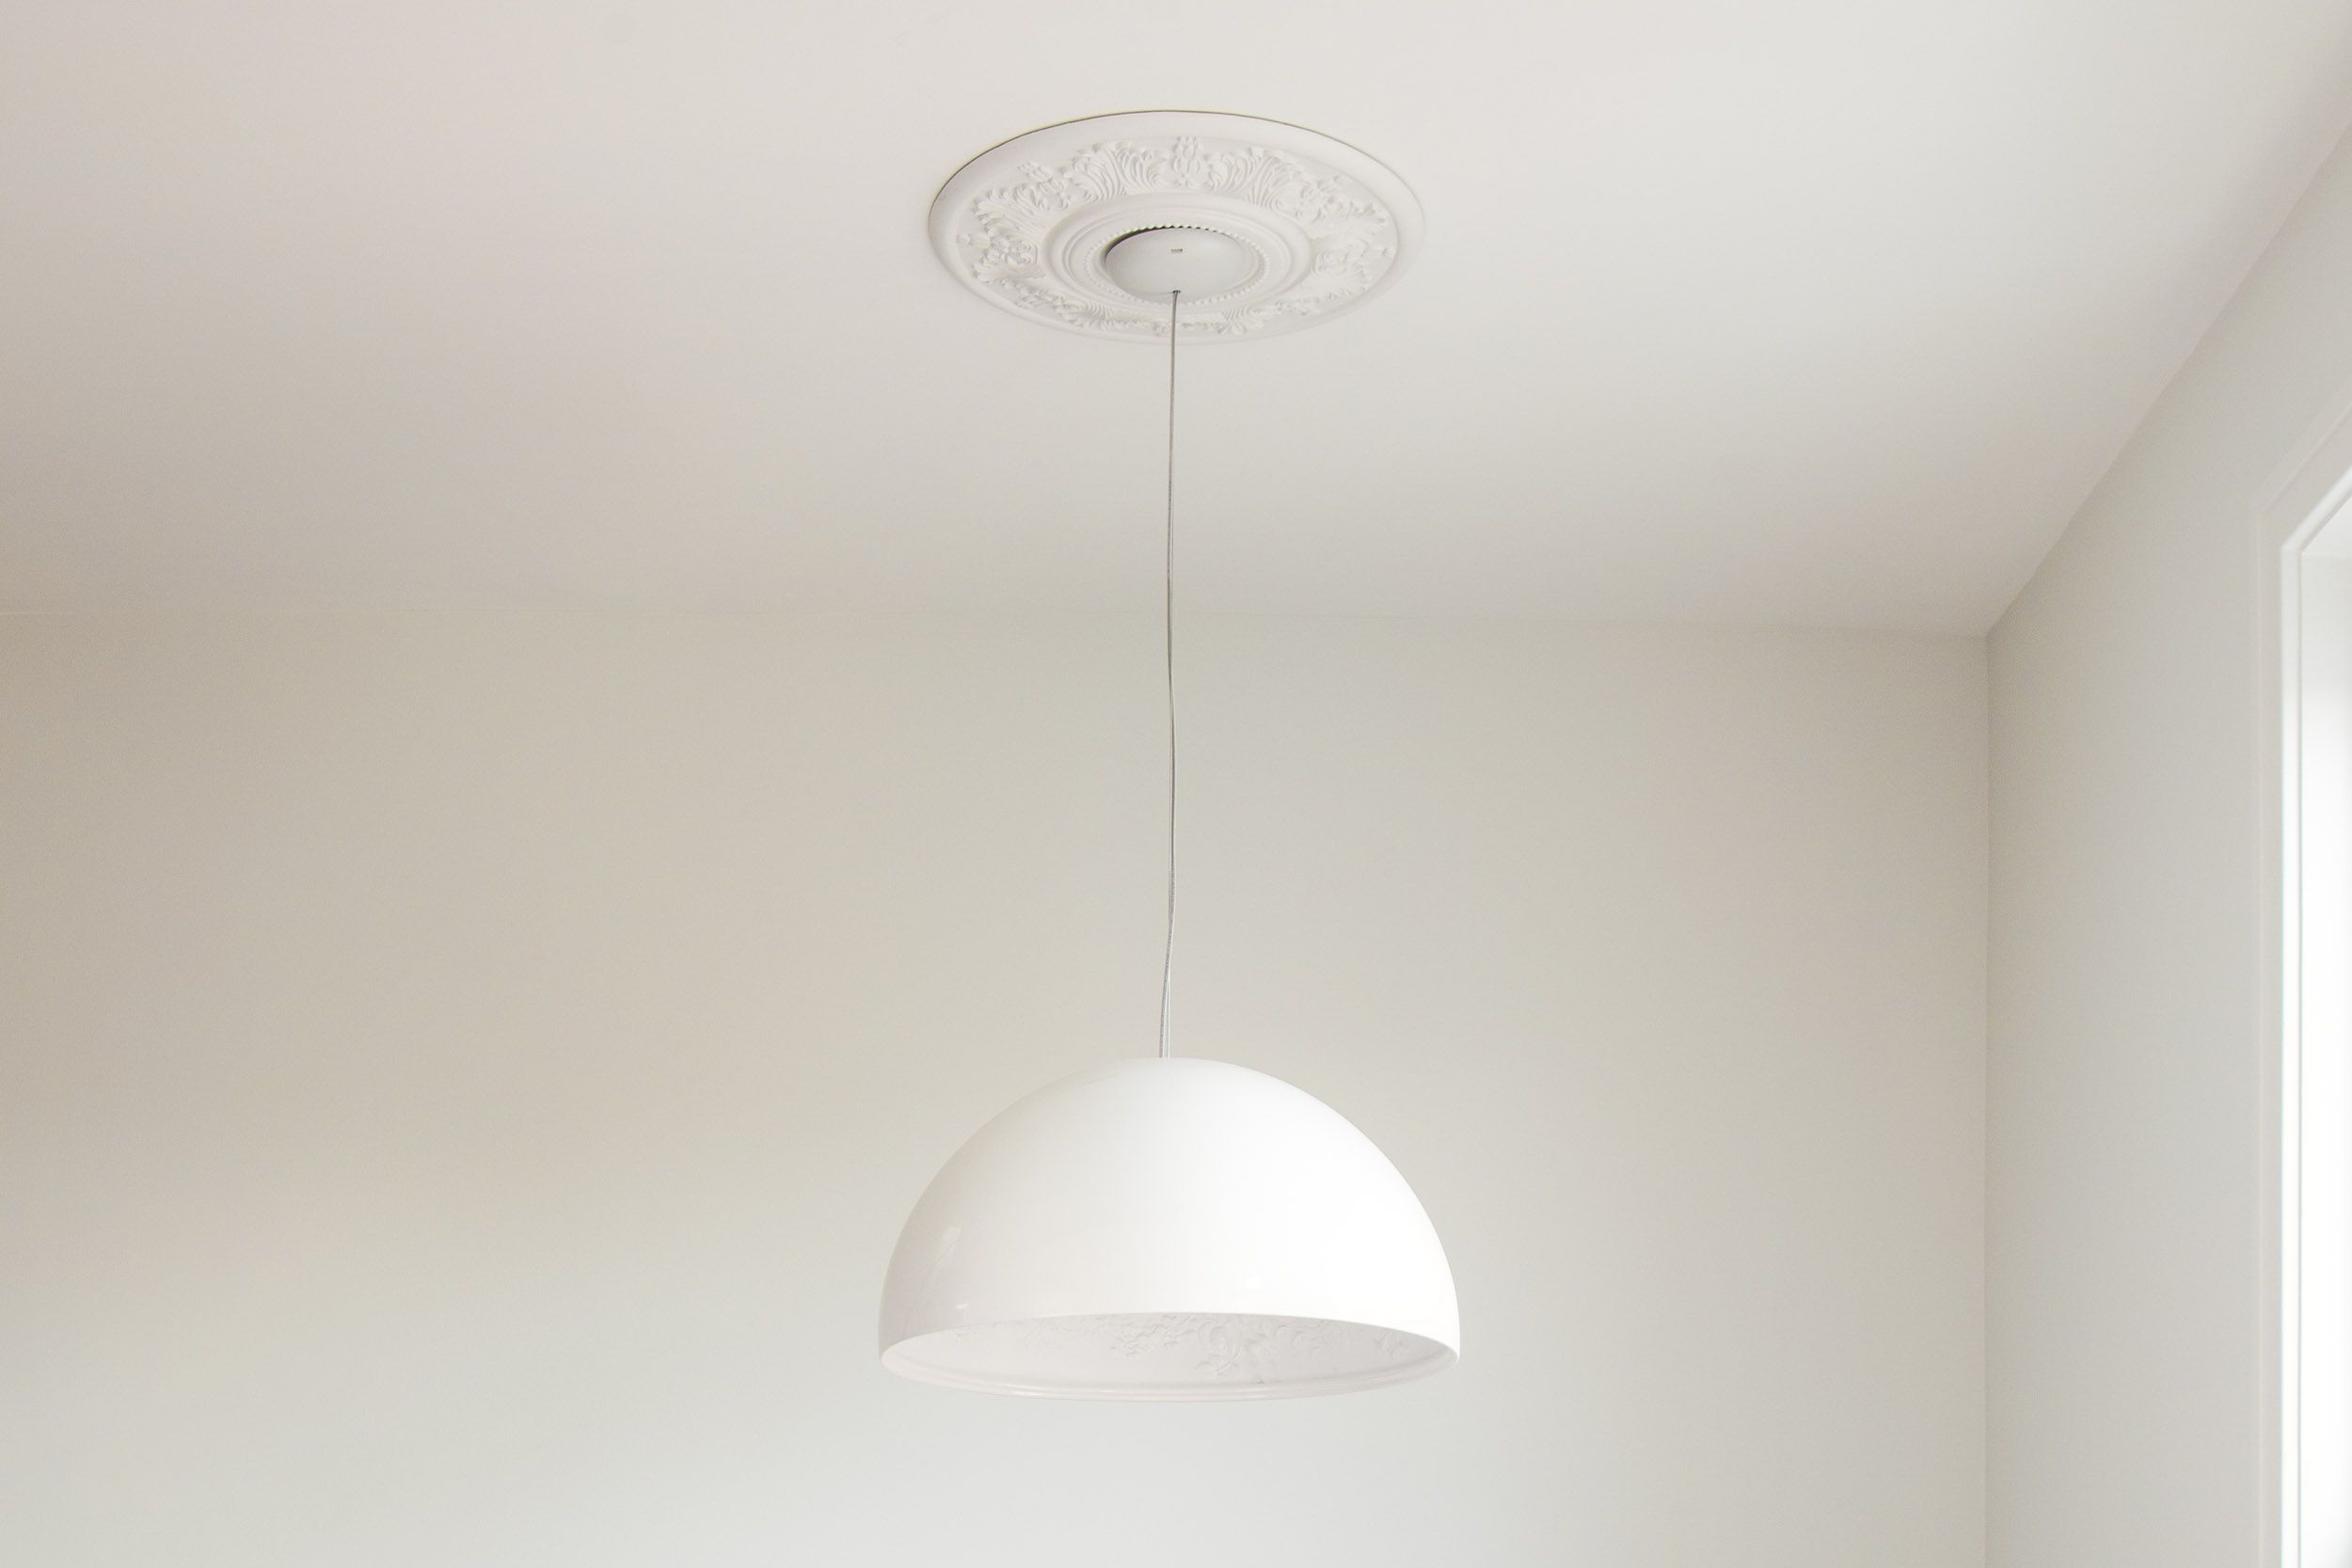
With these final steps, the installation of your ceiling medallion is complete. Take a moment to step back and admire the transformation it has brought to your space. The beautifully installed medallion adds charm and elegance to your room, enhancing its overall aesthetics.
Remember to follow safety precautions throughout the installation process and consult with professionals if needed. Now, enjoy the newfound beauty and sophistication that your ceiling medallion brings to your home!
Conclusion
Installing a ceiling medallion is a rewarding home improvement project that can instantly elevate the style and charm of any room. By following the step-by-step guide provided in this article, you now have the knowledge and understanding to successfully install a ceiling medallion in your own home.
From gathering the necessary tools and materials to preparing the area, measuring and marking the placement, applying adhesive or caulk, attaching the medallion, and securing and finishing the installation, each step plays a crucial role in ensuring a visually appealing and durable result.
Remember, while the process may require some basic DIY skills and a few hours of your time, the end result will be well worth the effort. The intricate designs and ornamental details of the ceiling medallion will add an elegant touch to your living space, making it a focal point that is sure to impress your guests.
As with any DIY project, always prioritize safety and consult professionals if needed. Additionally, take your time and pay attention to detail to ensure a seamless installation.
So, why wait? Start gathering the tools and materials needed and turn your plain ceiling into a captivating masterpiece with a beautiful ceiling medallion. Embark on this exciting journey of transformation and enjoy the enhanced ambiance and aesthetic appeal it brings to your home.
Happy installing!
Frequently Asked Questions about How To Install A Ceiling Medallion
Was this page helpful?
At Storables.com, we guarantee accurate and reliable information. Our content, validated by Expert Board Contributors, is crafted following stringent Editorial Policies. We're committed to providing you with well-researched, expert-backed insights for all your informational needs.


0 thoughts on “How To Install A Ceiling Medallion”