Articles
How To Make A Lakota Star Quilt
Modified: August 22, 2024
Learn how to create stunning Lakota star quilts with our informative articles. Discover the rich history and cultural significance behind this Native American art form.
(Many of the links in this article redirect to a specific reviewed product. Your purchase of these products through affiliate links helps to generate commission for Storables.com, at no extra cost. Learn more)
Introduction
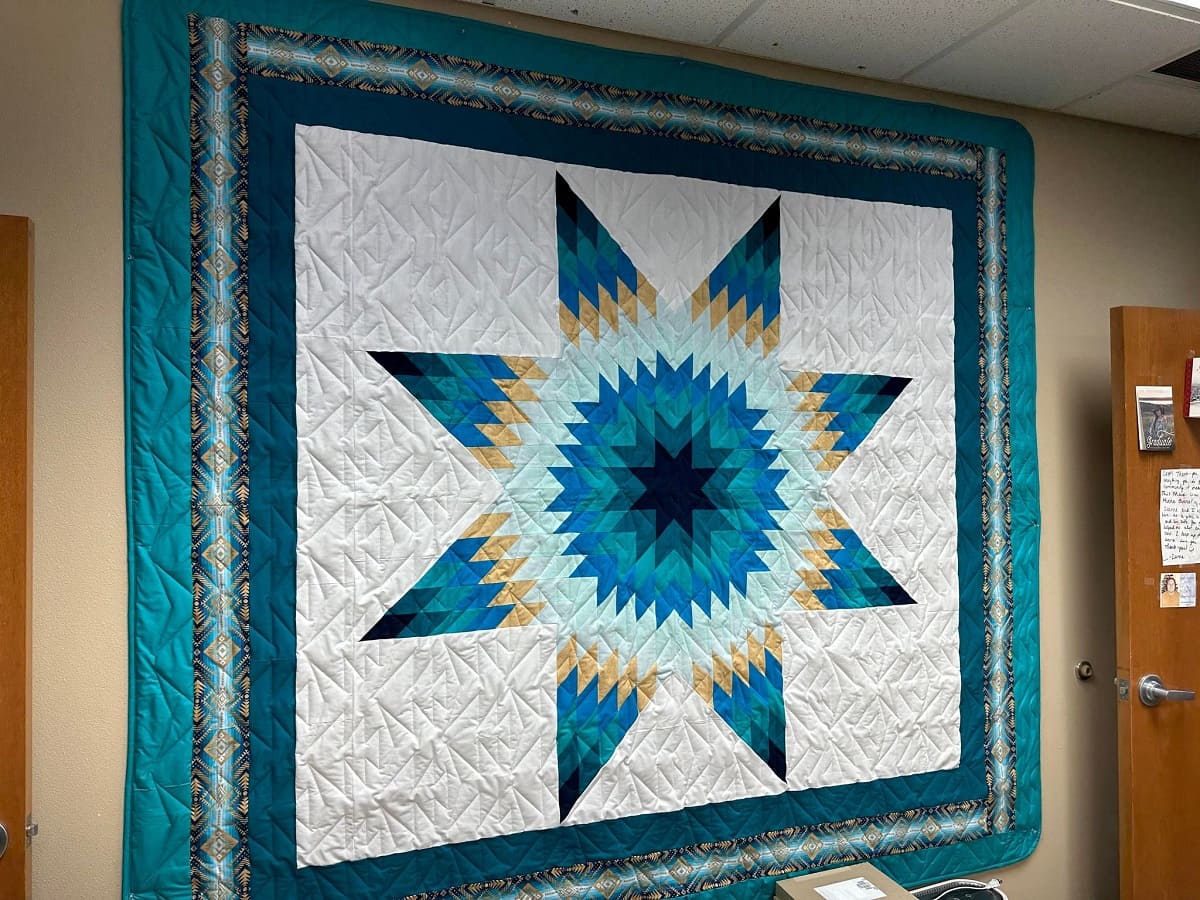
Quilting is a beloved art form that has been passed down through generations, capturing the essence of tradition, creativity, and craftsmanship. One style of quilting that holds deep cultural significance is the Lakota Star quilt. Originating from the Lakota Sioux tribe, these stunning quilts are representative of Native American culture and hold a special place in the hearts of those who create and cherish them.
The Lakota Star quilt, also known as the Star Quilt, features a distinctive star pattern that is both visually captivating and meaningful. Traditionally, these quilts were made as gifts and presented at special occasions such as weddings, births, and milestones. Each quilt tells a unique story and is infused with the love, dedication, and artistry of its creator.
In this article, we will guide you through the process of making your own Lakota Star quilt. From selecting fabric to adding finishing touches, we will provide you with step-by-step instructions and expert tips to help you create a beautiful and meaningful quilt that honors the tradition and spirit of the Lakota Sioux tribe.
Whether you are an experienced quilter or a beginner looking to embark on a new creative journey, this article will equip you with the knowledge and inspiration to create a cherished heirloom that can be passed down through generations. So, let’s gather our materials and dive into the intricate world of creating a Lakota Star quilt.
Key Takeaways:
- Dive into the intricate world of Lakota Star quilt-making, honoring tradition and spirit while creating a cherished heirloom with step-by-step guidance and expert tips.
- Connect with the artistry and craftsmanship of quilting, infusing your personal style and creativity into a stunning Lakota Star quilt that tells a unique and meaningful story.
Read more: How To Make A Star Quilt
Materials Needed
To create a Lakota Star quilt, you will need the following materials:
- Fabric: Choose a variety of fabrics in different colors and patterns to create the star motifs. Consider using traditional Native American prints, solid colors, or a combination of both. You will need enough fabric to create the quilt top, backing, and borders. The exact amount will depend on the size of your quilt.
- Thread: Select a high-quality thread that matches or complements the colors of your fabric. This will be used for piecing and quilting the layers together.
- Quilt Batting: This is the middle layer of the quilt that provides warmth and dimension. Opt for a batting that suits your desired level of thickness and insulation.
- Fabric Scissors: A sharp pair of scissors is essential for cutting fabric accurately and cleanly.
- Ruler: A long ruler with clear markings will help you measure and cut your fabric pieces with precision.
- Pins: Use straight pins or quilting pins to hold the layers together when assembling the quilt sandwich.
- Quilting Needles: Choose needles with sharp points and strong shafts specifically designed for quilting. These will ensure smooth stitching through multiple layers of fabric.
- Quilting Hoop or Frame: If you prefer to hand quilt your quilt, a quilting hoop or frame will help keep the fabric taut and make the stitching process more manageable.
- Sewing Machine (optional): While you can hand stitch the entire quilt, having a sewing machine can save time and make the piecing process more efficient.
- Iron and Ironing Board: An iron is necessary to press your fabric as you sew and assemble the quilt top.
- Binding Fabric: The binding fabric is used to finish the edges of the quilt and give it a polished look. Choose a coordinating fabric that complements your quilt design.
- Quilt Marking Tools (optional): These can include fabric markers or chalk pencils for marking your quilting designs onto the quilt top.
Having these materials on hand will ensure that you have everything you need to embark on your Lakota Star quilt-making journey. Remember to gather all the necessary supplies before you begin, so you can focus on the creative process without any interruptions. Now that you have your materials ready, let’s move on to the next step: choosing fabric.
Step 1: Choosing Fabric
Choosing the right fabric is a critical step in creating a beautiful Lakota Star quilt. The fabric you select will contribute to the overall aesthetic and impact the final result. Here are some tips to help you choose the perfect fabric for your quilt:
- Consider the Meaning: Lakota Star quilts often carry symbolic meaning. Think about the purpose of your quilt and the message you want to convey. Traditional Lakota Star quilts often feature colors associated with the Lakota Sioux tribe, such as red, white, yellow, and blue.
- Choose a Color Palette: Decide on a color palette or theme that speaks to you. You can go for a monochromatic look with varying shades of the same color, create a bold and vibrant palette, or opt for a more subdued and earthy color scheme.
- Mix Prints and Solids: To create dynamic visual interest, combine patterned fabrics with solid colors. This will give your Lakota Star quilt depth and dimension. Consider using Native American-inspired prints, floral patterns, geometric designs, or anything that resonates with the story you want your quilt to tell.
- Consider Scale and Contrast: Balancing the scale and contrast of the fabric is crucial to ensure that the star motifs stand out. Choose fabrics with varying scales of pattern and contrasting colors to create a visually pleasing composition.
- Durability and Washability: Think about the practicality of the fabric you choose. Quilts are meant to be used and loved, so select fabrics that are durable and can withstand washing. Check the fabric label to ensure it is suitable for quilting and can withstand regular wear and tear.
- Personal Style: Your Lakota Star quilt is a reflection of your personal style and creativity. Don’t be afraid to select fabrics that speak to you and evoke emotions. Trust your instincts and choose fabrics that resonate with your artistic vision.
When choosing fabric, it can be helpful to create a color and fabric swatch board to visualize how the fabrics will work together. Lay out the fabrics side by side and experiment with different combinations to see what appeals to you most.
By taking the time to thoughtfully select your fabrics, you will set the foundation for a stunning Lakota Star quilt that tells a meaningful story. Once you have chosen your fabrics, it’s time to move on to the next step: cutting the fabric.
Step 2: Cutting the Fabric
Now that you have chosen the perfect fabric for your Lakota Star quilt, it’s time to cut it into the required pieces. Precise cutting is essential for achieving accurate piecing and a professional-looking quilt. Follow these steps to cut your fabric:
- Prepare Your Workspace: Clear a large, flat surface where you can lay out your fabric. Make sure the surface is clean and free of any debris that could interfere with cutting.
- Measure and Mark: Use a ruler or measuring tape to determine the dimensions of the quilt blocks, borders, and any other fabric pieces required for your specific quilt pattern. Measure twice to ensure accuracy.
- Fabric Preparation: Before cutting, iron your fabric to remove any wrinkles or creases. This will help you achieve accurate measurements and clean, straight edges.
- Align Fabric: Lay your chosen fabric out on the cutting surface, ensuring it is smooth and even. If you are cutting multiple layers of fabric, stack them neatly on top of each other, aligning the edges as best as possible.
- Cut with Precision: Using fabric scissors or a rotary cutter, carefully cut along the marked lines. Ensure your cuts are straight and accurate, as this will affect the final outcome of your quilt.
- Organize Pieces: As you cut each fabric piece, keep them organized and labeled. This will make the assembly process easier later on.
- Repeat for Each Fabric: If your Lakota Star quilt includes multiple fabrics, repeat the cutting process for each fabric, ensuring that all pieces are cut to the correct size and shape.
Remember to take your time and be precise when cutting the fabric. Accurate cutting will result in more precise piecing, which is crucial for achieving a visually appealing and well-constructed Lakota Star quilt.
Once you have finished cutting all the required pieces, you are ready to move on to the next step: piecing the quilt top.
Step 3: Piecing the Quilt Top
Now that you have your fabric pieces cut and ready, it’s time to piece them together to create the beautiful quilt top of your Lakota Star quilt. The piecing process involves sewing the fabric pieces together in a specific pattern or design. Follow these steps to piece your quilt top:
- Arrange Fabric Pieces: Lay out your fabric pieces according to your chosen pattern or design. This will give you a visual guide before you start sewing. Take the time to experiment with different arrangements until you are happy with the layout.
- Start Stitching: Begin sewing your fabric pieces together one by one, following your layout. Use a ¼-inch seam allowance unless otherwise specified in your pattern. Sew slowly and carefully to ensure accurate stitching and alignment.
- Press Seams: After sewing each seam, press the fabric open or to one side, depending on the design. This will help create crisp and flat seams, ensuring a professional finish.
- Continue Piecing: Repeat the stitching and pressing process until all the fabric pieces are joined together to form the complete quilt top. Take your time and double-check your layout as you go, ensuring everything is aligned correctly.
- Trim Excess Fabric: Once your quilt top is fully pieced, trim any excess fabric or uneven edges to make sure the quilt top is square and symmetrical. This will help with later stages of the quilting process.
Remember to stay organized and keep track of the different fabric pieces as you sew them together. Labeling each piece can be helpful in maintaining a clear understanding of the design and layout.
Piecing the quilt top is an exciting and creative step in the quilt-making process. It is also an opportunity to infuse your personal style and artistic vision into your Lakota Star quilt. Enjoy the journey of piecing together your fabric pieces, and once your quilt top is complete, you are ready to move on to the next step: constructing the quilt sandwich.
Read more: How To Make A Friendship Star Quilt Block
Step 4: Constructing the Quilt Sandwich
With your quilt top complete, it’s time to move on to the next stage of quilt-making: constructing the quilt sandwich. The quilt sandwich consists of the quilt top, batting, and backing fabric, which are layered together and secured before quilting. Follow these steps to construct the quilt sandwich:
- Lay Out Backing Fabric: Start by spreading out your backing fabric on a large, flat surface, wrong side up. Smooth out any wrinkles or creases and ensure the fabric is larger than your quilt top on all sides. Secure the fabric to the surface using quilt basting spray or masking tape.
- Add Quilt Batting: Place your quilt batting on top of the backing fabric. Smooth out any wrinkles or lumps to ensure an even distribution. Trim the batting if necessary so that it is approximately the same size as the quilt top.
- Layer the Quilt Top: Carefully place your quilt top on top of the batting, right side up. Make sure it is centered and aligned with the backing fabric and batting below. Smooth out any wrinkles or folds in the fabric.
- Pin or Baste the Layers: To hold the layers together securely, you can either pin or baste them. Pinning involves using safety pins to hold the layers in place, while basting involves using large hand stitches or a long basting stitch on a sewing machine. Choose the method that works best for you.
- Check for Smoothness: Once the layers are pinned or basted together, check for any wrinkles or puckering. Smooth out any imperfections by gently tugging on the layers and re-adjusting as needed.
Constructing the quilt sandwich is a vital step in the quilting process, as it ensures that the layers remain in place while you quilt. Take your time to carefully layer and secure the quilt top, batting, and backing fabric to ensure a smooth and professional-looking result.
Now that you have your quilt sandwich prepared, it’s time to move on to the next step: quilting the layers together.
When making a Lakota Star Quilt, be sure to carefully select and coordinate your fabric colors to create a visually striking and balanced design.
Step 5: Quilting the Layers
Quilting is the process of sewing the layers of the quilt together, creating a decorative design and providing stability to the finished quilt. Quilting can be done by hand or by using a sewing machine, depending on your preference and skill level. Follow these steps to quilt the layers of your Lakota Star quilt:
- Choose a Quilting Design: Consider the design and pattern you want to stitch on your quilt. Traditional options for a Lakota Star quilt include straight lines, geometric motifs, or even custom quilting designs that hold personal significance. Take the time to plan and sketch out your design beforehand.
- Prepare Your Machine (if using): If you are using a sewing machine, change the presser foot to a quilting foot or a walking foot to help guide the layers evenly. Thread the machine with a color that complements your quilt top or choose invisible nylon thread for a seamless look.
- Start Quilting: Begin quilting from the center of the quilt and work your way outwards. Secure the layers together in place by stitching along the lines of your chosen design. Take your time and stitch carefully, ensuring even stitch length and maintaining the desired quilting pattern.
- Hand Quilting Option: If you prefer to hand quilt, use quilting needles and quilting thread. Start by anchoring the thread on the back of the quilt and stitch through all layers, following your quilting design. Use a thimble to protect your fingers and ensure smooth stitching.
- Continue Quilting: As you quilt, periodically check the back of your quilt to ensure the stitches are even and the layers are staying together. Adjust the tension of your machine or the tightness of your hand stitches as needed.
- Quilt the Entire Quilt Top: Continue quilting until you have covered the entire quilt top. Take breaks when needed and enjoy the meditative process of quilting. Remember, quilting is as much a labor of love as it is an artistic expression.
Quilting the layers of your Lakota Star quilt brings the design to life and adds depth and texture to the finished piece. Whether you choose to quilt by hand or by machine, the quilting process is an opportunity to showcase your creativity and enhance the overall beauty of your quilt.
Once you have finished quilting, it’s time to move on to the next step: adding borders to your Lakota Star quilt.
Step 6: Adding Borders
Adding borders to your Lakota Star quilt not only enhances its visual appeal but also provides a finishing touch to your masterpiece. Borders can frame the quilt and tie all the elements together. Follow these steps to add borders to your quilt:
- Measure and Calculate Border Length: Measure the length of each side of your quilt top. Add the desired border width to each measurement. This will give you the length of fabric needed for each border.
- Cut Border Fabric: Cut fabric strips according to the measurements you calculated in the previous step. Ensure that the width of the strips matches your desired border width.
- Attach Borders: Place one border strip right sides together with one side of the quilt top. Sew along the length of the border using a ¼-inch seam allowance. Repeat this process for the remaining sides of the quilt top.
- Press Seams: After attaching each border strip, press the seams open or towards the border fabric to create a smooth and flat surface.
- Measure and Trim: Once all the borders are attached, measure the quilt top across the center both horizontally and vertically. Trim the borders if necessary to ensure the quilt top is square.
- Add Additional Borders (Optional): If desired, you can add additional border strips in different fabrics to create a layered effect. Repeat the same process of measuring, cutting, attaching, and pressing for each additional border.
- Press One Final Time: After all the borders are attached, give your quilt top one final press to create crisp edges and ensure all seams are flat and smooth.
Adding borders allows you to customize the size of your quilt and provides an opportunity to incorporate additional colors or prints. Take your time in choosing the border fabric and consider coordinating it with the colors and style of your Lakota Star quilt.
Once the borders are added, your quilt is nearing completion. The next step is to add the binding, which will encase the raw edges and give your Lakota Star quilt a beautiful and polished look.
Step 7: Binding the Quilt
Binding is the final step in completing your Lakota Star quilt. It not only provides a finishing touch but also serves to secure the raw edges of the quilt layers, giving it durability and a professional appearance. Follow these steps to bind your quilt:
- Prepare Binding Strips: Cut fabric strips for binding, ensuring that they are wide enough to cover the raw edges of the quilt sandwich. The length of the strips should be equal to the perimeter of the quilt top plus a few extra inches for corner mitering and joining the ends.
- Join Binding Strips: If needed, join shorter binding strips together to create one continuous strip. To do this, place two strips at a 90-degree angle, right sides together, and sew diagonally from one corner to the opposite corner. Trim the excess fabric and press the seam open.
- Attach Binding: Starting in the middle of one side of the quilt, leave a few inches of the binding strip loose and align the raw edges of the binding strip with the raw edges of the quilt top. Sew the binding to the quilt sandwich using a ¼-inch seam allowance, stopping ¼ inch before each corner.
- Miter Corners: To create mitered corners, fold the binding strip up, away from the quilt top, creating a 45-degree angle. Then, fold the strip down, aligning it with the next side of the quilt at a 45-degree angle. Continue sewing along the next side. Repeat this process for all corners.
- Join Binding Ends: When you reach the starting point, leave a few inches of the loose binding strip. Trim the excess binding to align with the starting end, and then join the ends together by folding and sewing them. Trim any excess fabric, tuck the raw edges inside the binding, and finish sewing the binding to the quilt.
- Secure Binding: Fold the binding over the raw edges of the quilt and secure it in place using hand stitching or a decorative machine stitch. Ensure that the binding is evenly folded along the edges of the quilt.
- Press the Binding: To give your binding a professional finish, gently press it along the edges of the quilt. This will help the binding lay flat and create clean corners.
With the binding attached, your Lakota Star quilt is now complete and ready to be enjoyed and cherished for years to come. Take a step back and admire your creation, knowing that your hard work and dedication have resulted in a beautiful and meaningful piece of art.
Now that you have finished binding your quilt, there is one final step to add some finishing touches and polish to your Lakota Star quilt before it is fully complete.
Read more: How Do You Make A Lone Star Quilt
Step 8: Finishing Touches
With your Lakota Star quilt almost complete, it’s time to add some final touches to enhance its beauty and ensure its longevity. These finishing touches will not only add a personal touch but also protect and preserve your quilt for years to come. Follow these final steps to add those special finishing touches:
- Clip Thread Ends: Carefully inspect your quilt for any loose threads and trim them close to the fabric. This will give your quilt a neat and clean appearance.
- Label Your Quilt (Optional): Adding a label is a wonderful way to personalize your quilt and provide information about its creation. Include your name, the date, any relevant details, and a special message if desired. Hand embroider or use fabric pens to create a lasting label on the back of your quilt.
- Document Your Quilt: Take photos of your finished quilt to document your journey and preserve memories of its creation. These photos can also be great for sharing with family and friends or for showcasing your quilting skills online.
- Document Care Instructions: Create a note or card with care instructions for the quilt recipient, detailing how to properly wash and care for the quilt. Include information such as recommended temperatures, laundry detergents, and drying methods to ensure the quilt remains pristine for years to come.
- Consider Quilt Sleeves or Hanging Tabs: If you plan to hang your quilt, consider attaching a quilt sleeve or hanging tabs to the back. This will make it easier to display your quilt on a wall without damaging the fabric or the quilt itself.
- Display or Wrap Your Quilt: Finally, decide how you will display or store your finished Lakota Star quilt. You can showcase it on a quilt rack, drape it over a couch or bed, or carefully fold and pack it in acid-free tissue paper to preserve its colors and prevent any damage.
By taking these final steps, you not only add a personal touch to your Lakota Star quilt but also ensure that it is protected and cared for properly. Embrace the pride and joy that comes with completing a quilt and prepare to share it with others who will appreciate its beauty and craftsmanship.
Congratulations! You have successfully completed all the steps to create a stunning Lakota Star quilt. Take a moment to admire your handiwork and reflect on the time, effort, and love that went into each stitch. Your Lakota Star quilt is a beautiful testament to your creativity, skill, and appreciation for Native American culture.
Now it’s time to enjoy your masterpiece or share it as a meaningful gift. Whether it becomes a cherished family heirloom or a beloved addition to someone’s home, your Lakota Star quilt will continue to inspire and bring warmth for generations to come.
Conclusion
Congratulations on completing your journey to create a stunning Lakota Star quilt! Through careful fabric selection, precise cutting, meticulous piecing, and thoughtful finishing touches, you have created a masterpiece that honors the rich tradition and cultural significance of the Lakota Sioux tribe’s quilting heritage.
Throughout this process, you connected with the artistry and craftsmanship of quilting, allowing your creativity to shine through each step. Your efforts have produced a quilt that tells a unique story, capturing your personal style, love, and dedication.
As you gaze upon your finished Lakota Star quilt, you can take pride in knowing that you have created an heirloom that will be cherished for generations. The intricate star design, carefully chosen fabrics, and expertly quilted layers all come together to create a work of art that exemplifies both beauty and meaning.
Not only have you created a stunning quilt, but you have also learned valuable skills and techniques along the way. From choosing fabric and cutting precisely to piecing and quilting, each step has contributed to your growth as a quilter. The challenges you conquered and the joy you experienced during the process are a testament to your dedication and passion for this art form.
As you wrap your finished quilt in your arms or gift it to a loved one, remember the cultural significance of the Lakota Star quilt. It is more than just a cozy blanket; it is a symbol of love, dedication, and tradition. Each stitch represents a connection to the past and a bridge to the future.
Now, as you embark on new quilting projects or dive deeper into the world of quilting, carry the knowledge and experience gained from creating your Lakota Star quilt. Use your newfound skills to continue to create beautiful quilts that reflect your unique style and celebrate the art of quilting.
Remember, the journey of crafting a quilt is as important as the finished piece itself. Embrace the creativity, joy, and fulfillment that quilting brings. Whether you are quilting for yourself, your loved ones, or to preserve a cultural heritage, each quilt becomes a special part of your own story.
So, gather your fabrics, thread your needle, and let your imagination soar as you embark on your next quilting adventure. May your stitches be strong, your colors be vibrant, and your creations bring warmth and comfort to all who have the pleasure of wrapping themselves in the beauty of your quilts.
Frequently Asked Questions about How To Make A Lakota Star Quilt
Was this page helpful?
At Storables.com, we guarantee accurate and reliable information. Our content, validated by Expert Board Contributors, is crafted following stringent Editorial Policies. We're committed to providing you with well-researched, expert-backed insights for all your informational needs.


0 thoughts on “How To Make A Lakota Star Quilt”