Articles
How To Finish Quilt Edges
Modified: August 28, 2024
Learn how to finish quilt edges with these helpful articles. Find tips and techniques for creating a polished and professional look to your quilting projects.
(Many of the links in this article redirect to a specific reviewed product. Your purchase of these products through affiliate links helps to generate commission for Storables.com, at no extra cost. Learn more)
Introduction
When it comes to quilting, finishing the edges of your quilt is an essential step that adds a polished and professional look to your project. Not only does it provide a neat and clean finish, but it also helps to protect the edges of your quilt from fraying and wear over time. Whether you are a beginner or an experienced quilter, learning how to finish quilt edges is a skill that will enhance your quilting projects.
In this article, we will guide you through the step-by-step process of finishing quilt edges. From trimming the quilt edges to attaching a binding strip and mitering corners, we will cover all the necessary techniques to achieve a beautifully finished quilt. So, grab your quilting supplies and let’s get started!
Key Takeaways:
- Achieve a professional and polished look for your quilting projects by mastering the art of finishing quilt edges. From trimming to mitering corners, each step adds durability and elegance to your creations.
- Embrace the process of creating beautifully finished quilt edges, knowing that the effort you put into trimming, binding, and mitering will result in a stunning and cherished quilt for years to come.
Read more: How To Finish The Edge Of Backsplash
Step 1: Trimming the Quilt Edges
The first step in finishing the edges of your quilt is to trim any excess batting and backing fabric. This ensures that the edges are straight and even, allowing for a clean and smooth finish. Here’s how you can do it:
- Spread your quilt flat on a clean and level surface. Smooth out any wrinkles or unevenness using your hands or a fabric smoothing tool.
- Using a ruler and fabric scissors, carefully trim away any excess batting that extends beyond the quilt top. Make sure to follow the shape of the quilt top and maintain a consistent edge.
- Next, trim the backing fabric to match the size of the quilt top. Align the edges of the backing fabric with the edges of the quilt top and carefully trim away any excess fabric.
- Inspect the edges of your quilt to ensure they are uniformly trimmed. If you notice any uneven areas, take the time to make additional trims until all edges are straight and even.
Trimming the quilt edges is an important step as it sets the foundation for the rest of the finishing process. By ensuring that the edges are neat and uniform, you’ll achieve a professional-looking end result.
Step 2: Making a Binding Strip
Once you have trimmed the edges of your quilt, the next step is to create a binding strip. The binding is a fabric strip that will wrap around the edges of the quilt, enclosing the raw edges and providing a finished look. Here’s how you can make a binding strip:
- Measure the perimeter of your quilt by taking the sum of all four sides. Add a few extra inches to this measurement to account for corners and seam allowances.
- Cut fabric strips that are 2.5 inches wide using a rotary cutter and a clear quilting ruler. The length of the strips should be equal to the measurement you calculated in the previous step.
- Join the fabric strips together by placing two ends right sides together at a 90-degree angle. Sew diagonally across the fabric from corner to corner, creating a diagonal seam. Trim the excess fabric, leaving a ¼ inch seam allowance.
- Continue joining the strips until you have a long continuous binding strip that is long enough to go around the entire quilt.
- Press the binding strip in half lengthwise, wrong sides together, to create a crease down the center.
Once you have made your binding strip, you are ready to move on to the next step of attaching it to the quilt. The binding will not only provide a decorative accent to your quilt but also serve as a durable and functional finish for the raw edges.
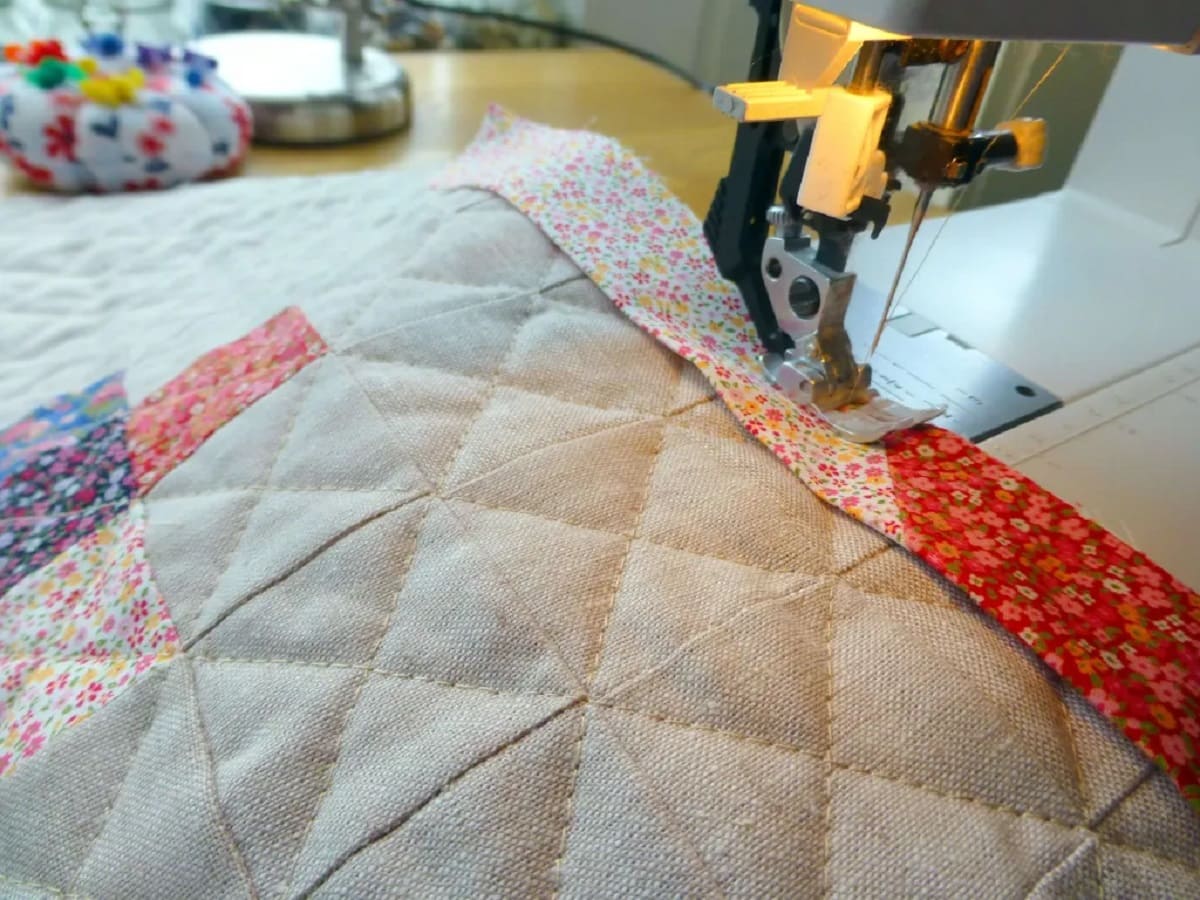
Step 3: Attaching the Binding Strip to the Quilt
Now that you have your binding strip prepared, it’s time to attach it to the quilt. This step requires careful alignment and stitching to ensure a secure and clean finish. Follow these steps to attach the binding strip to your quilt:
- Starting from the center of one side of your quilt, align the raw edge of the binding strip with the raw edge of the quilt top. Leave a tail of about 6-8 inches loose.
- Using a ¼ inch seam allowance, begin stitching the binding strip to the quilt. Backstitching at the start is recommended to secure the thread.
- Continue stitching along the edge of the quilt, easing any fullness or puckers as you go. Stop stitching a ¼ inch away from the corner of the quilt.
- With the needle down, lift the presser foot, and pivot the quilt 45 degrees. Lower the presser foot and continue stitching in a straight line, creating a mitered corner. Repeat this process for all four corners of the quilt.
- When you reach the starting point, overlap the binding strip and trim off any excess. Fold the binding strip to the back of the quilt, enclosing the raw edges.
- Hand-sew the folded edge of the binding strip to the back of the quilt using a blind stitch or ladder stitch, ensuring that your stitches remain invisible from the front of the quilt.
Attaching the binding strip to the quilt can be a bit time-consuming, but it is worth the effort for a clean and professional finish. The careful stitching and mitered corners will ensure that your quilt edges are secure and aesthetically pleasing.
When finishing quilt edges, consider using a binding to provide a clean and professional look. This can be done by sewing a strip of fabric around the edges of the quilt to encase the raw edges and create a finished border.
Step 4: Mitering the Corners
Creating mitered corners adds a crisp and polished look to the quilt binding. Mitering involves folding and aligning the binding strip to create a diagonal seam at the corners. Follow these steps to achieve perfectly mitered corners:
- As you approach the corner of the quilt, stop stitching ¼ inch away from the edge. Backstitch to secure the thread.
- Fold the binding strip up, away from the quilt, creating a 45-degree angle at the corner. The folded edge of the binding strip should align with the next side of the quilt.
- Hold the fold in place and fold the binding strip down, aligning it with the next side of the quilt. This will create a neat diagonal fold at the corner.
- Pinch the corner to hold the folds firmly in place. Ensure that the folded edges are aligned with the 45-degree angle.
- Resume stitching from the corner, starting ¼ inch from the edge. Continue stitching along the next side of the quilt.
- Repeat the mitering process for all four corners of the quilt, ensuring that the folds are neat and the angles are clean.
Mitering the corners of the quilt binding adds a touch of elegance and professionalism to your finished quilt. Taking the time to create precise and crisp corners will greatly enhance the overall appearance of your quilt.
Read more: How To Finish Napkin Edges
Step 5: Finishing the Binding
After attaching the binding strip and mitering the corners, the final step is to finish the binding by securing it to the back of the quilt. This step ensures that the binding is firmly in place and gives your quilt a polished look. Here’s how you can finish the binding:
- Trim any excess binding strip that extends beyond the edges of the quilt, leaving a tail of about 6-8 inches.
- Fold the binding strip over to the back of the quilt, covering the raw edges. The fold should align with the stitching line on the front of the quilt.
- Secure the folded binding strip to the back of the quilt using pins or binding clips.
- Using a needle and thread or a sewing machine, hand-sew or topstitch along the folded edge of the binding strip, making sure to catch the folded edge on the back of the quilt.
- Continue sewing until you reach the next corner. Fold and miter the corner in the same way as before and continue sewing along the next side of the quilt.
- Repeat this process for all sides of the quilt, securing the binding strip to the back with neat and even stitches.
- Once you reach the starting point, overlap the binding strip and trim off any excess. Secure the end with a few extra stitches and knot the thread.
Finishing the binding is the final touch that brings your quilt project together. The secure stitching and neatly folded edges ensure that your quilt will withstand use and maintain its beautiful appearance for years to come.
Conclusion
Finishing the edges of your quilt is an important step that adds a professional and polished look to your project. By following the steps outlined in this article, you can achieve beautifully finished quilt edges that not only enhance the visual appeal but also provide durability and protection.
Trimming the quilt edges ensures that they are straight and even, laying the foundation for the rest of the finishing process. Creating a binding strip allows you to enclose the raw edges of the quilt and adds a decorative touch. Attaching the binding strip requires careful alignment and stitching to secure it to the quilt. Mitering the corners adds a crisp and elegant look to the binding, while finishing the binding ensures that it is securely attached to the back of the quilt.
Remember to take your time and pay attention to detail while working on each step. The effort you put into finishing the edges of your quilt will be well worth it when you see the final result – a beautifully finished quilt that will be cherished for years to come.
Now that you have learned how to finish quilt edges, it’s time to put your newfound knowledge into practice. Grab your quilting supplies, choose your favorite quilt project, and enjoy the process of creating a stunning quilt with perfectly finished edges!
Frequently Asked Questions about How To Finish Quilt Edges
Was this page helpful?
At Storables.com, we guarantee accurate and reliable information. Our content, validated by Expert Board Contributors, is crafted following stringent Editorial Policies. We're committed to providing you with well-researched, expert-backed insights for all your informational needs.


0 thoughts on “How To Finish Quilt Edges”