Articles
How To Make A Puff Quilt
Modified: August 22, 2024
Discover the best articles and tutorials for creating a stunning puff quilt. Learn step-by-step instructions and expert tips to make your own unique masterpiece.
(Many of the links in this article redirect to a specific reviewed product. Your purchase of these products through affiliate links helps to generate commission for Storables.com, at no extra cost. Learn more)
Introduction
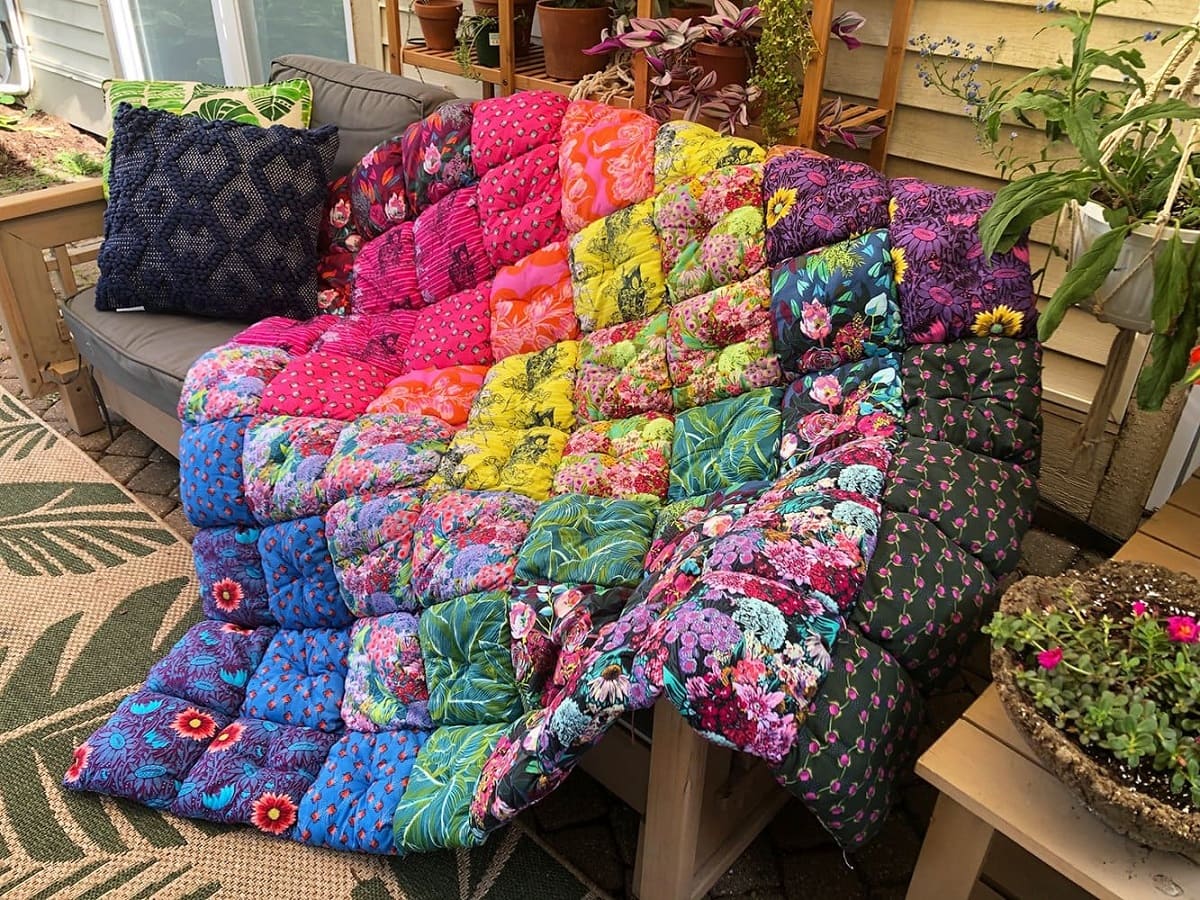
Welcome to the world of puff quilts! If you’re looking for a fun and creative project to explore your sewing skills, then making a puff quilt is the perfect endeavor for you. Puff quilts, also known as biscuit quilts or bubble quilts, are famous for their unique design and cozy texture. They consist of individual fabric “puffs” that are stuffed and sewn together to create a visually appealing and wonderfully soft quilt.
Whether you’re a quilting enthusiast or a beginner eager to try something new, this article will guide you through the process of creating your very own puff quilt. By following these step-by-step instructions and investing a little bit of time and effort, you’ll soon have a beautiful quilt that will become a cherished heirloom for years to come.
In this article, we’ll discuss the materials needed for the project, as well as the detailed steps to complete your puff quilt. From preparing the fabric squares and creating the puff layers to assembling and finishing the quilt, we’ll cover it all. So, gather your sewing supplies and let’s get started on this exciting quilting adventure!
Key Takeaways:
- Dive into the world of puff quilts and create a visually stunning and wonderfully soft masterpiece by following step-by-step instructions and investing a little bit of time and effort.
- Embrace the warmth and comfort of your completed puff quilt, a testament to your creativity and sewing skills, and share the joy of quilting with others.
Read more: How To Make A Quilt
Materials Needed
Before diving into the creation of your puff quilt, it’s essential to gather all the necessary materials. Here’s a list of items you’ll need:
- Fabric: Choose a variety of fabrics in different colors and patterns to create eye-catching puffs. You’ll need enough fabric for both the quilt top and backing. The amount will depend on the desired size of your quilt.
- Batting: Select a lightweight or medium-weight batting to stuff the puffs. This will provide the volume and softness that characterizes puff quilts.
- Thread: Invest in a high-quality thread that matches or complements the colors of your fabrics. This ensures that your stitches blend well into the quilt.
- Sewing Machine: A reliable sewing machine with basic stitching functions will be required to sew the puffs and assemble the quilt.
- Scissors: Sharp fabric scissors are a must-have for cutting fabric accurately and with ease.
- Ruler and Rotary Cutter: These tools are helpful for precisely measuring and cutting your fabric squares.
- Pins or Clips: Use pins or sewing clips to hold the fabric layers together while sewing.
- Iron and Ironing Board: Pressing your fabric squares and seams is crucial for achieving crisp and neat results.
- Quilting Supplies: This includes a quilting ruler, marking tools, and a walking foot if you prefer to use one during the quilting process.
Having these materials readily available will ensure a smooth and enjoyable quilting experience. Once you have everything at hand, you’re ready to take the next steps in creating your beautiful puff quilt!
Step 1: Preparing the Fabric Squares
In order to create the puffs for your quilt, you will need to start by cutting fabric into squares. The size of the squares will determine the final size of your puffs. Here’s how to prepare the fabric squares:
- Measure and cut: Decide on the desired size for your fabric squares. A common size for puff quilts is 5 inches by 5 inches, but you can adjust according to your preference. Use a ruler and rotary cutter to cut fabric into square pieces.
- Choose fabrics: Select a variety of fabrics in different colors and patterns. This will add visual interest to your quilt. Aim for a mix of light, medium, and dark fabrics to create contrast and balance.
- Arrange the squares: Lay out the fabric squares in the desired pattern. You can create a random arrangement or follow a specific design. Take into consideration how the colors and patterns complement each other.
- Pin or clip: Once you’re satisfied with the arrangement, pin or use sewing clips to keep the squares in place. This will prevent them from shifting during the next steps.
By following these steps and taking your time to choose and arrange the fabric squares, you’ll set the foundation for a visually stunning puff quilt. Ensure that you have a good variety of fabric patterns and colors to add depth and visual appeal to your quilt.
In the next step, we’ll explore how to create the puff layers that give the quilt its unique and cozy texture. Get ready to bring your quilt to life!
Step 2: Creating the Puff Layers
Now that you have your fabric squares prepared, it’s time to transform them into fluffy puff layers. These layers will give your quilt its distinctive and inviting texture. Here’s how to create the puff layers:
- Place fabric squares: Take two fabric squares and place them right sides together, aligning the edges.
- Sew a seam: Using a ¼ inch seam allowance, sew a straight line along one edge of the fabric squares. Leave a small opening, around 2-3 inches, for turning the puff right side out.
- Clip corners: Trim the corners of the sewn squares to reduce bulk and create crisp corners when the puff is turned out.
- Turn the puff: Carefully turn the sewn squares right side out, using a chopstick or the blunt end of a pencil to push out the corners for a clean finish.
- Stuff the puff: Fill the puff with batting, using small amounts at a time to achieve a plump and evenly stuffed layer. Avoid overstuffing, as it may cause the puff to lose its shape.
- Close the opening: Hand stitch the opening closed using small, discreet stitches, or use a machine stitch for a faster finish. Make sure the opening is securely closed to keep the batting in place.
- Repeat the process: Continue creating puff layers with the remaining fabric squares until you have enough for your desired quilt size.
By following these steps, you’ll create the lush and cushiony layers that make the puff quilt so appealing. Take your time to stuff the puffs evenly and securely close the openings to ensure the durability of your quilt.
With the puff layers ready, it’s time to move on to the next step: assembling the layers to create your beautiful puff quilt!
When making a puff quilt, be sure to use high-quality fabric and batting to ensure a plush and durable finished product.
Step 3: Assembling the Puff Quilt
Now that you have created your puff layers, it’s time to assemble them into a beautiful quilt. Follow these steps to bring all the elements together:
- Lay out the puffs: Begin by arranging your puff layers in the desired pattern. You can create a random layout, a specific design, or even a gradient effect using different shades of fabric.
- Join the puffs: Take two puff layers and place them right sides together, aligning the edges. Pin or secure them with sewing clips to hold them in place.
- Sew the seam: Using a ½ inch seam allowance, sew along one edge of the puff layers, connecting them together. Continue joining the puffs, one by one, until you have completed a row.
- Repeat the process: Repeat the process of joining the puff layers until you have assembled all the rows needed for your quilt size.
- Joining the rows: With the rows complete, it’s time to join them together. Take two rows and place them right sides together, aligning the edges. Sew a seam, using a ½ inch seam allowance.
- Continue sewing: Continue joining the rows together until all the rows are connected, resulting in a complete quilt top.
During the assembly process, ensure that the puffs are aligned properly and the seams are securely sewn. Take your time with the stitching and use pins or sewing clips to keep everything in place.
Once you’ve assembled your puff quilt, it’s time to move on to the next step: tying or stitching the layers together to create a cohesive and long-lasting quilt.
Read more: How To Make A Quilt Larger
Step 4: Tying or Stitching the Layers Together
With your quilt top assembled, it’s time to secure the layers together to ensure durability and longevity. There are two common methods to accomplish this: tying or stitching. Here’s how to proceed:
- Tying method: If you prefer a more traditional and rustic look, tying the layers together is a popular choice. Select a strong and durable thread or yarn in a contrasting color to your quilt. Thread a large needle with the chosen thread and knot the end.
- Start tying: Starting at one corner of the quilt, insert the needle from the top through all layers, pulling the thread through until the knot rests against the fabric. Create a small loop with the thread and insert the needle back into the same spot, forming a tie. Pull the thread snugly, but not too tight to avoid distorting the puff layers. Repeat this process at regular intervals across the quilt, making sure to keep the ties evenly spaced.
- Stitching method: If you prefer a more finished and quilted look, stitching the layers together is a common choice. Select a coordinating thread that complements the colors of your quilt. Using a walking foot or a free-motion quilting foot, stitch along the seam lines of the quilt top. You can choose to stitch straight lines, diagonal lines, or even experiment with intricate quilting designs to enhance the overall aesthetic of the quilt.
Whichever method you choose, make sure to tie or stitch the layers together firmly and consistently across the quilt. This will prevent shifting and ensure the longevity of your puff quilt.
Now, you’re nearing the finish line! The final step involves adding some finishing touches and completing the last few steps to transform your puff quilt into a masterpiece.
Step 5: Finishing Touches and Final Steps
As you approach the final stage of completing your puff quilt, it’s time to add some finishing touches and take care of the remaining steps. Follow these guidelines to give your quilt that professional and polished look:
- Trim the edges: Once the layers are secured together, trim the excess fabric and batting from the edges of the quilt. Use scissors or a rotary cutter and ruler to achieve clean and even edges.
- Add a border (optional): If you want to frame your puff quilt with a border, measure and cut strips of fabric to the desired width. Sew these strips around the edges of the quilt, mitering the corners for a neat finish.
- Create the backing: Measure and cut a piece of fabric slightly larger than the quilt top. Place the backing fabric right side down and lay the quilt top on top of it. Pin or clip the layers together.
- Quilt the layers: If you choose to go with the stitching method in Step 4, now is the time to quilt the layers together. Use your preferred quilting technique to sew through all the layers, securing them together. Ensure even stitching across the quilt.
- Bind the edges: To finish the quilt, create a binding by cutting fabric strips and sewing them together to form one continuous strip. Attach the binding to the edges of the quilt, folding it over and stitching it down. This will encase the raw edges and give your quilt a polished look.
- Final touches: Give your quilt a final press with an iron to smooth out any wrinkles or creases. Check for any loose threads and trim them. Admire your completed puff quilt!
Congratulations! You have successfully completed all the steps to create a beautiful and cozy puff quilt. Take a moment to appreciate your hard work and the craftsmanship that went into making this unique piece.
Now, you can enjoy the warmth and comfort of your puff quilt, or gift it to someone special. It’s a testament to your creativity and sewing skills, and a beautiful addition to any home.
Remember, practice makes perfect, so feel free to experiment with different fabrics, patterns, and techniques to create even more stunning puff quilts in the future. Happy quilting!
Conclusion
Congratulations on completing your puff quilt! You’ve embarked on a creative journey, bringing together fabric, craftsmanship, and your own unique touch to create a beautiful and cozy masterpiece. The steps you followed, from preparing the fabric squares to assembling the layers and adding finishing touches, have resulted in a quilt that is not only visually appealing but also exudes warmth and comfort.
Through this process, you’ve discovered the art of creating puff layers, joining them together to form a quilt top, and securing the layers either through tying or stitching. You’ve learned the importance of careful selection of fabrics, attention to detail, and the skillful execution of each step.
Your puff quilt is not just a functional item, but a labor of love that reflects your passion for quilting. It’s a unique and personalized creation that can bring joy and coziness to any space. Whether you choose to use your quilt as a focal point on a bed, as a cozy throw on a couch or as a treasured gift to a loved one, it is sure to be appreciated and cherished.
Remember, quilting is a continuous journey of growth and exploration. As you gain more experience, don’t hesitate to experiment with different fabrics, patterns, and techniques. This will allow you to further develop your skills, express your creativity, and create even more stunning puff quilts.
Now that you’ve completed this project, take a moment to admire your work, knowing that you have created something truly special. Embrace the warmth and comfort your puff quilt provides, and share the joy of quilting with others. Your creativity and craftsmanship have added beauty to the world of quilting.
So, keep sewing, keep quilting, and keep exploring the possibilities that lie within each stitch. Your puff quilt is a testament to your talent, dedication, and love for the art of quilting. Happy quilting!
Now that you've mastered making a puff quilt, why not dive into more creative projects? For those who love crafting, our article on elegant DIY Easter crafts offers a fantastic array of ideas to spruce up your holiday decor. From simple adornments to more intricate designs, these crafts provide fun, engaging activities for all skill levels. Whether you're planning a quiet afternoon of crafting or a full-blown crafting party, these ideas are sure to add a special touch to your Easter celebrations. Don't miss out on these charming and easy-to-follow craft ideas!
Frequently Asked Questions about How To Make A Puff Quilt
Was this page helpful?
At Storables.com, we guarantee accurate and reliable information. Our content, validated by Expert Board Contributors, is crafted following stringent Editorial Policies. We're committed to providing you with well-researched, expert-backed insights for all your informational needs.


0 thoughts on “How To Make A Puff Quilt”