Articles
How To Make A 9 Patch Quilt Block
Modified: December 7, 2023
Learn how to make a stunning 9 patch quilt block with our step-by-step articles. Perfect for beginners and experienced quilters alike!
(Many of the links in this article redirect to a specific reviewed product. Your purchase of these products through affiliate links helps to generate commission for Storables.com, at no extra cost. Learn more)
Introduction
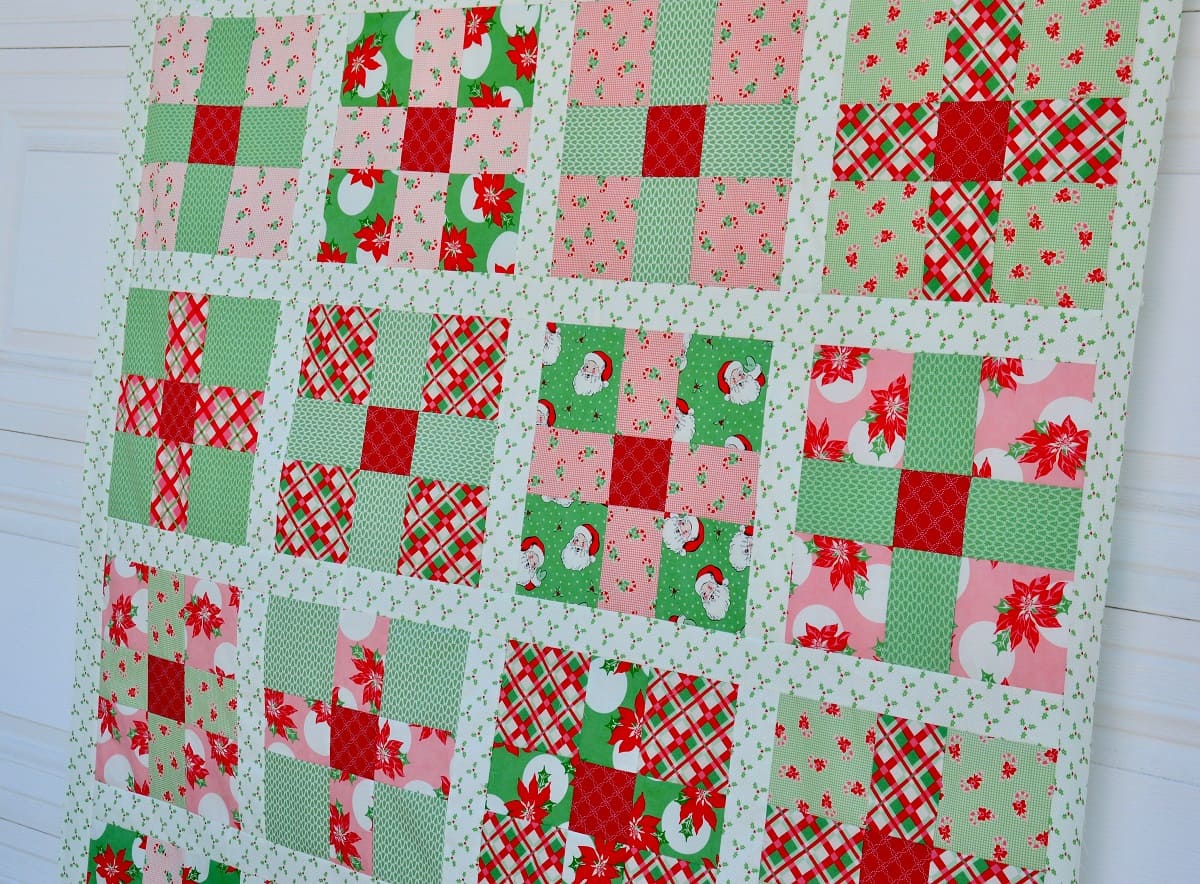
Welcome to the wonderful world of quilting! If you’re a beginner looking for a fun and easy project to start with, making a 9 patch quilt block is a great choice. The 9 patch block is a classic quilting pattern that consists of nine equal-sized squares arranged in a grid. It’s simple to make yet versatile enough to create endless design possibilities.
In this article, we will guide you through the process of creating a 9 patch quilt block step by step. Whether you’re an experienced quilter or a novice, this project can be easily accomplished, allowing you to showcase your creativity and create a beautiful piece of handmade art.
Before we dive into the details, let’s gather all the materials you’ll need for this project.
Key Takeaways:
- Creating a 9 patch quilt block is a fun and versatile project suitable for both beginners and experienced quilters. With the right materials and step-by-step guidance, you can unleash your creativity and produce stunning handmade art.
- Mastering the 9 patch block opens up endless design possibilities, allowing you to experiment with fabric combinations, color schemes, and arrangements. Embrace precision and creativity to craft visually pleasing and personalized quilt blocks.
Read more: How To Make A Four Patch Quilt Block
Materials
Before you begin making your 9 patch quilt block, it’s important to gather all the necessary materials. Here’s a list of what you’ll need:
- Fabric: Choose two or more coordinating fabrics for your 9 patch quilt block. You can select different colors, patterns, or textures to add visual interest.
- Cutting tools: You’ll need a rotary cutter, cutting mat, and quilting ruler to accurately cut your fabric into the desired sizes.
- Sewing machine: A sewing machine will make the process faster and more efficient. However, you can also sew the quilt block by hand if you prefer.
- Thread: Select a thread color that matches or complements your fabric choices.
- Pins: Use pins to hold the fabric layers together for sewing.
- Iron and ironing board: An iron is essential for pressing your fabric and achieving crisp seams.
- Scissors: Keep a pair of scissors handy for trimming threads and making any necessary adjustments.
- Quilting ruler: A quilting ruler will help you measure and trim your fabric accurately.
- Quilting pins or clips: These are useful for holding the quilt layers in place during the quilting process.
- Backing fabric and batting: If you plan to turn your 9 patch block into a quilt, you’ll need backing fabric and batting to create the quilt sandwich.
Once you have all the materials ready, we can move on to the next step: cutting the fabric.
Step 1: Cutting the fabric
Now that you have gathered all the necessary materials, it’s time to cut the fabric for your 9 patch quilt block. Follow these steps:
- Start by determining the size of your finished quilt block. Let’s say you want a 12-inch finished block. To achieve this, you’ll need to cut your fabric squares into 4-inch pieces.
- Choose your fabric colors and patterns. For the 9 patch block, you can divide it into three sections, with each section consisting of three squares. So, you’ll need three different fabrics or patterns.
- Take your first fabric and press it to remove any wrinkles.
- Using a rotary cutter, cutting mat, and quilting ruler, cut three 4-inch squares from your first fabric. These will be the center squares of your 9 patch block.
- Repeat the process with the other two fabrics, cutting three 4-inch squares from each.
- Now you should have a total of nine 4-inch squares, three of each fabric.
Ensure that your fabric squares are cut accurately and are of the same size. This will help you achieve precise and symmetrical blocks.
Once you have all your fabric squares cut, it’s time to move on to the next step: sewing the center square.
Step 2: Sewing the center square
With the fabric squares cut to size, it’s now time to start sewing your 9 patch quilt block. Let’s begin sewing the center square:
- Take one square from each of the three fabrics you have chosen for your 9 patch block.
- Place the squares right sides together, aligning the edges.
- Using a 1/4-inch seam allowance, sew the three squares together along one side.
- Press the seam open with an iron, smoothing out any wrinkles.
- Repeat the process with the remaining two sets of squares.
By sewing the three squares together, you have created the center section of your 9 patch block. This section will be surrounded by borders in the next steps.
Now that the center square is complete, let’s move on to adding the first border.
When making a 9 patch quilt block, be sure to accurately measure and cut your fabric pieces to ensure that your block comes together neatly and accurately. Accuracy in cutting and sewing will result in a more professional-looking finished block.
Step 3: Adding the first border
With the center square sewn together, it’s time to add the first border to your 9 patch quilt block. This border will surround the center square and provide a frame for the block.
- Measure and cut strips of fabric for the first border. The width of the strips will depend on how wide you want your border to be. Let’s say you want a 1-inch border, so cut fabric strips that are 1.5 inches wide.
- Take one fabric strip and align it with one side of the center square. The right sides of the fabric should be facing each other.
- Pin the border strip to the center square, ensuring that the edges are aligned. Leave a little extra length at each end of the border to account for seam allowances.
- Sew the border strip to the center square using a 1/4-inch seam allowance. Backstitch at the beginning and end of the seam to secure it.
- Press the seam towards the border strip with an iron. This will help the seam lie flat.
- Repeat the process for the remaining three sides of the center square, adding a border strip to each side and pressing the seams.
By adding the first border, you have started to see the 9 patch pattern forming. The center square is now surrounded by a frame of fabric, ready for the next steps.
Now that the first border is attached, let’s move on to sewing the outer border.
Read more: How To Make A Block Quilt
Step 4: Sewing the outer border
Now that the center square and the first border are in place, it’s time to sew the outer border of your 9 patch quilt block. This border will further enhance the design of your block and provide a finished look.
- Measure and cut fabric strips for the outer border. The width of these strips will depend on how wide you want your outer border to be. Let’s continue with the example of a 1-inch border, so cut fabric strips that are 1.5 inches wide.
- Take one fabric strip and align it with one side of the block, right sides together. The outer border strip should cover the seams of the first border.
- Pin the outer border strip to the block, ensuring that the edges are aligned. Leave a little extra length at each end of the strip for seam allowances.
- Sew the outer border strip to the block using a 1/4-inch seam allowance. Backstitch at the beginning and end of the seam to secure it.
- Continue adding the outer border strips to the remaining three sides of the block, sewing and pressing the seams as you did before.
Once all the outer border strips are sewn in place, your 9 patch quilt block is almost complete. The outer border adds the final touch, framing the block and accentuating the pattern.
Now that you have sewn the outer border, it’s time to move on to the next step: pressing and trimming the block.
Step 5: Pressing and trimming the block
With the outer border sewn on, it’s time to give your 9 patch quilt block a polished look by pressing and trimming it. These final steps will ensure that your block is neat, flat, and ready for further quilting or assembly.
- Start by pressing the block with an iron. Set the seams by placing the iron on the surface and pressing gently. Then, open up the seams by pressing them to the side or pressing them open, depending on your preference.
- Once the block is pressed, square it up by trimming the edges. Use a quilting ruler and rotary cutter to trim the block to your desired size. For example, if you want a 12-inch finished block, trim the edges so that the block measures 12.5 inches square, including seam allowances.
- Ensure that the corners are square and the sides are straight. Take your time to measure and trim accurately for a perfectly aligned block.
- Once you have trimmed the block, give it a final press with the iron to flatten any wrinkles or creases caused by the trimming process.
With the block pressed and trimmed, your 9 patch quilt block is now complete and ready to be incorporated into your quilting project. Whether you are making a single block or multiple blocks to create a larger quilt, follow these steps for each block to ensure consistency and uniformity.
Congratulations! You have successfully learned how to make a 9 patch quilt block. This versatile block can be repeated and arranged in various ways to create stunning designs and patterns. Have fun exploring different color combinations, fabric choices, and layouts to unleash your creativity.
Now that you have completed your first 9 patch quilt block, you can continue making more blocks to create a quilt, or use the block as a component in other sewing projects such as bags, pillows, or wall hangings. The possibilities are endless!
Happy quilting!
Conclusion
Congratulations on completing your 9 patch quilt block! You have learned the essential steps to create this classic quilting pattern. From cutting the fabric to sewing the borders and pressing the block, each step contributes to the creation of a beautiful and versatile quilt block.
By mastering the 9 patch block, you have not only gained valuable quilting skills but also opened up a world of possibilities for your creativity. Experiment with different fabric combinations, color schemes, and arrangements to design unique and stunning quilts and projects.
Remember to pay attention to accuracy and precision throughout the process. Accurately cut fabric squares, precise seam allowances, and squared-up blocks will result in well-crafted and visually pleasing quilt blocks.
Whether you choose to make a single 9 patch quilt block as a mini-quilt or create multiple blocks for a larger quilt, the 9 patch pattern is a timeless and versatile choice. By varying the fabrics, colors, and layouts, you can achieve different effects and create personalized designs that reflect your style and creativity.
Enjoy the journey of quilting, embrace your passion for fabric and design, and let your imagination soar as you create beautiful quilts and projects. Don’t be afraid to try new techniques, explore different patterns, and make each project uniquely yours.
Thank you for joining us on this quilting adventure. We hope that making a 9 patch quilt block has sparked your passion for quilting and inspired you to embark on many more quilting projects in the future. Happy quilting!
Frequently Asked Questions about How To Make A 9 Patch Quilt Block
Was this page helpful?
At Storables.com, we guarantee accurate and reliable information. Our content, validated by Expert Board Contributors, is crafted following stringent Editorial Policies. We're committed to providing you with well-researched, expert-backed insights for all your informational needs.


0 thoughts on “How To Make A 9 Patch Quilt Block”