Articles
How To Make A Rail Fence Quilt
Modified: August 22, 2024
Learn how to make a beautiful rail fence quilt with our informative articles. Get step-by-step instructions and helpful tips for creating your own stunning quilt.
(Many of the links in this article redirect to a specific reviewed product. Your purchase of these products through affiliate links helps to generate commission for Storables.com, at no extra cost. Learn more)
Introduction
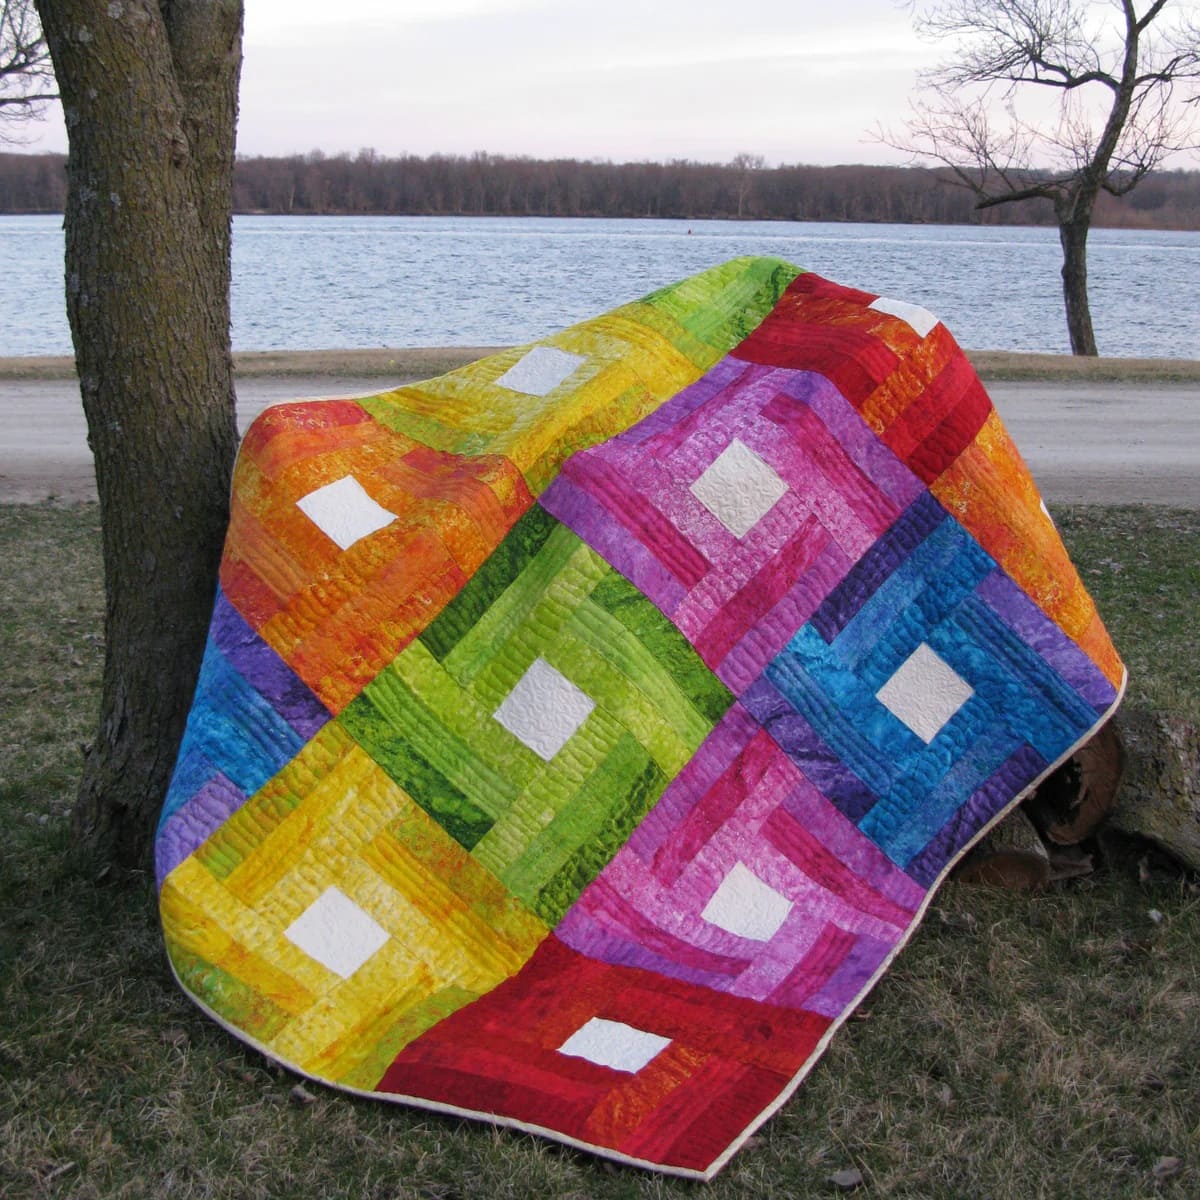
Welcome to the world of quilting! Making a rail fence quilt is a classic and timeless project that is perfect for both beginner and experienced quilters. This quilt pattern creates a beautiful design that resembles a fence made up of colorful rails, giving it its name.
Whether you’re looking to create a cozy quilt for yourself or a thoughtful gift for a loved one, the rail fence quilt is a versatile choice. With its simple yet striking design, it can be made using a wide range of fabrics to suit any style or occasion.
In this article, we will take you through the step-by-step process of making a rail fence quilt. We’ll guide you on choosing fabric, cutting strips, sewing the strips together, and assembling the blocks to create the quilt top. Then, we’ll cover adding borders, layering and quilting, and finally binding the quilt. By the end, you’ll have a beautiful, handmade quilt to cherish.
Whether you’re a beginner or an experienced quilter, this project provides a great opportunity to further develop your skills and creativity. So, let’s gather our materials and get started on making a stunning rail fence quilt!
Key Takeaways:
- Making a rail fence quilt is a versatile and enjoyable project suitable for both beginners and experienced quilters. From choosing fabric to binding the quilt, each step offers an opportunity for creativity and self-expression.
- The process of creating a rail fence quilt is a journey of dedication and passion. From precise cutting and sewing to meticulous pressing and assembly, each step contributes to a one-of-a-kind masterpiece that brings warmth and joy to both the quilter and the recipient.
Read more: How To Build A Post And Rail Fence
Materials Needed
Before we begin, let’s gather all the materials needed to make a rail fence quilt. Having everything ready will ensure a smooth and efficient quilting process. Here’s a list of essential items:
- Fabric: You’ll need a variety of fabrics to create the rail fence pattern. Choose fabrics that complement each other and match the theme or color scheme you have in mind. Fat quarters or fabric scraps are great options for this project.
- Rotary Cutter and Cutting Mat: These tools are essential for precise and efficient cutting of fabric strips.
- Ruler: A clear quilting ruler with measurements will help you accurately cut your fabric strips to the desired size.
- Sewing Machine: A reliable sewing machine is necessary for piecing the fabric strips together.
- Thread: Choose a high-quality thread that matches or complements your fabric colors.
- Pins: Use pins to hold your fabric strips in place while sewing.
- Iron and Ironing Board: Pressing your seams is essential for achieving crisp and professional-looking quilt blocks.
- Quilting Batting: This provides the middle layer of the quilt sandwich and adds warmth and texture.
- Backing Fabric: Choose a fabric that coordinates with your quilt top. Ensure it’s a few inches larger than your quilt top on all sides.
- Binding Fabric: This fabric is used to finish the edges of the quilt and adds a polished look. It should coordinate with your quilt top or backing fabric.
- Quilting Pins or Spray: These are used to secure your quilt layers together before quilting.
- Quilting Needles: Choose needles that are specifically designed for quilting to ensure smooth stitching.
- Thimble: Protect your finger while hand quilting with a thimble.
- Scissors: Use sharp scissors for trimming fabric and thread.
- Quilting Ruler: A long quilting ruler is helpful for measuring and marking quilting lines.
Having these materials ready will make the quilting process more enjoyable and efficient. Once you have everything prepared, it’s time to move on to the next step of choosing fabric for your rail fence quilt.
Step 1: Choosing Fabric
The first step in making a rail fence quilt is selecting the fabrics that will bring your project to life. The beauty of the rail fence pattern is that it allows for endless possibilities in terms of color, texture, and pattern combinations. Here are some tips to help you choose the perfect fabric for your quilt:
- Consider the Theme: Think about the overall theme or mood you want to convey with your quilt. Are you going for a modern and vibrant look or a more traditional and serene feel? This will guide you in selecting fabric colors and patterns.
- Color Palette: Decide on a color palette that works harmoniously together. Look for fabrics in different shades and tones of your chosen colors. Mixing light, medium, and dark tones will add depth and visual interest to your quilt.
- Contrasting Fabrics: Consider using fabrics that provide contrast to make the rail fence pattern pop. Pairing light and dark fabrics or using complementary colors can create striking visual impact.
- Texture and Pattern: Don’t be afraid to mix different textures and patterns in your quilt. Solids, florals, stripes, and geometric prints can all work together beautifully. Just make sure they complement each other and create a cohesive look.
- Fabric Quantity: Determine how much fabric you’ll need based on the desired size of your quilt. Typically, you’ll need enough fabric for the rail blocks, borders, backing, and binding. Consider buying extra fabric for mistakes and future projects.
- Fabric Pre-washing: Some quilters prefer to pre-wash their fabric to remove any sizing and prevent shrinkage. This step is optional and depends on personal preference.
Remember, the fabric you choose will be the foundation of your rail fence quilt, so take your time exploring different options and envisioning how they will come together. Don’t forget to trust your instincts and go with the fabrics that speak to you.
Once you have selected your fabrics, it’s time to move on to the next step: cutting the fabric into strips.
Step 2: Cutting Strips
Now that you have your fabric selected, it’s time to start cutting them into strips for your rail fence quilt. Here’s how to proceed:
- Prepare Your Cutting Area: Clear and level your cutting mat, making sure you have enough space to work comfortably. Keep your rotary cutter, ruler, and fabric neatly organized and within reach.
- Measure and Mark: Decide on the width of your fabric strips. The standard size for rail fence quilts is usually 2.5 inches, but you can adjust it according to your preference. Using your quilting ruler, measure and mark the desired width along the length of your fabric.
- Cut the Strips: Hold the ruler firmly in place and use your rotary cutter to cut along the marked line. Take your time and aim for clean and straight cuts. Continue cutting strips from all of your chosen fabrics until you have the desired number of strips.
- Organize the Strips: Once the strips are cut, organize them in the order you want them to appear in your quilt. This will help you maintain consistency and achieve the desired aesthetic. You can lay them out on your work surface or use clothespins or clips to keep them in order.
- Label the Strips: To keep track of the fabric placement, consider labeling the strips with colored sticky notes or small pieces of paper. This will help prevent any mix-ups during the sewing process.
- Optional Variation: If you want to add more visual interest to your rail fence quilt, you can create strip sets by sewing strips of different fabric combinations together. This will create a multi-colored effect within the rail blocks.
Remember to take breaks and rest your cutting hand to prevent fatigue or injury. Additionally, it’s a good idea to clean your cutting mat and rotary cutter regularly to maintain their effectiveness.
Now that your fabric strips are ready, it’s time to move on to the next step: sewing the strips together to create the rail blocks.
Step 3: Sewing the Strips
With the fabric strips cut and organized, it’s time to start sewing them together to create the rail blocks. Here’s how to proceed:
- Prepare Your Sewing Machine: Make sure your sewing machine is in good working condition and threaded with a coordinating thread color. Set your machine to a straight stitch and adjust the stitch length according to your preference.
- Choose the Order: Decide on the order of your fabric strips. Take into consideration the color placement and the visual effect you want to achieve. You can follow a pattern or simply go with your intuition.
- Sewing the Strips: Take the first two fabric strips and place them right sides together, aligning the raw edges. Sew a straight seam along one side of the strips using a ¼ inch seam allowance. Press the seam open or towards one side, whichever you prefer.
- Continue Sewing: Take the next fabric strip in line and place it right sides together with the previous strip, aligning the raw edges. Sew a straight seam and press the seam in the desired direction. Repeat this process until all the fabric strips are sewn together.
- Trim Excess Fabric: Once all the fabric strips are sewn, trim the excess fabric from the edges to ensure a neat and square rail block. Use your quilting ruler and rotary cutter to trim any uneven edges.
- Press the Final Seam: Press the final seam open or towards one side. Use a hot iron and steam to create crisp and flat seams. This will ensure that your rail blocks lie flat and look professional.
- Repeat for More Blocks: If you plan to make multiple rail blocks for your quilt, repeat the above steps to sew the fabric strips together for each block.
Throughout the sewing process, remember to sew slowly and accurately, aiming for consistent seam allowances. Take breaks and adjust your stitching if needed.
Once your rail blocks are sewn together, you’re ready to move on to the next step: pressing the seams for a polished finish.
Read more: How Much Is Split Rail Fence
Step 4: Pressing the Seams
After sewing the fabric strips together to create the rail blocks, the next step is to press the seams. Pressing the seams will not only give your quilt blocks a professional finish but also make it easier to join them together later. Here’s how to proceed:
- Set up Your Ironing Station: Place an ironing board or a heat-resistant surface near your sewing area. Ensure that your iron is clean and set to the appropriate heat setting for your fabric.
- First Press: Start by pressing the just-sewn seam as it is, without opening or moving it. Lay your rail block on the ironing board and press the seam from the top using a hot iron. Pressing from the top will set the stitches and flatten the seam.
- Pressing Direction: Decide on the direction in which you want to press the seams of your rail blocks. This can be either open or to one side. Both methods have their advantages, so choose whichever method you prefer or follow pattern instructions if applicable.
- Open Seams: To press the seams open, gently open up the seam with your fingers. Place the seam on the ironing board, and using a hot iron, press the seam open from both sides. Take care not to distort the fabric or stretch the seam too much.
- One-Sided Seams: If you prefer pressing the seams to one side, place the seam on the ironing board with the seam allowance facing the direction you want to press it. Use a hot iron to press the seam to the desired side, ensuring it lays flat and smooth.
- Press the Entire Block: Once you have pressed the individual seams, flip your rail block over and press the entire block from the top. This will further ensure that your block is flat and well-pressed.
- Repeat for Remaining Blocks: Repeat the pressing process for each of your rail blocks. Take your time and be meticulous in pressing to achieve consistent and well-pressed blocks.
Remember, pressing the seams is an essential step in quilting. It helps to set the stitches, reduce bulk, and create sharp, precise blocks. Take care when handling the iron to avoid accidental burns and never leave the iron unattended.
Now that your rail blocks are pressed, it’s time to move on to the next step: assembling the blocks to create your quilt top.
When making a rail fence quilt, be sure to accurately measure and cut your fabric strips to ensure that your blocks line up neatly and your finished quilt is symmetrical.
Step 5: Assembling the Blocks
Now that your rail blocks are neatly pressed, it’s time to arrange and assemble them to create your quilt top. This step will bring your design together and showcase the beautiful pattern you’ve created. Here’s how to proceed:
- Design Layout: Plan out the arrangement of your rail blocks to achieve the desired pattern. You can create a repetitive pattern, random placement, or follow a specific design. Lay out your blocks on a design wall, bed, or any large flat surface to get a visual sense of how they will look together.
- Block Placement: Once you’re happy with your layout, start placing your rail blocks in the desired order. Pay attention to color placement and the overall balance of the design. Rearrange blocks as needed until you’re satisfied with the arrangement.
- Joining the Blocks: To join the blocks, take the first two blocks in the first row. Place them right sides together, aligning the edges. Sew a straight seam with a ¼ inch seam allowance to join the blocks. Press the seam according to your chosen pressing direction.
- Continue Joining: Next, take the third block and place it right sides together with the second block. Sew a seam and press the seam. Repeat this process to join all the blocks in the first row.
- Assembly Rows: Once the first row is complete, repeat the joining process to assemble the remaining rows of blocks. Take care to match up seam intersections and press the seams consistently.
- Joining Rows: Once all the rows are assembled, it’s time to join them together. Place the first and second rows right sides together, aligning the edges. Sew a seam and press. Repeat this process to join all the rows together.
- Finishing Touches: After joining all the rows, press the entire quilt top from the top. Check for any loose stitches or misalignments and correct them as needed. Trim any excess threads for a clean finish.
Take your time during the assembly process and double-check your block placement before sewing. Accuracy in joining the blocks will result in a quilt top that lies flat and showcases your design beautifully.
Now that your rail blocks are assembled, it’s time to move on to the next step: adding borders to your quilt top to give it a finished look.
Step 6: Adding Borders
Adding borders to your quilt top not only enhances its visual appeal but also provides a framing element that brings the design together. Borders can be chosen to complement the colors and patterns in your rail fence blocks or create contrast for a striking effect. Here’s how to add borders to your quilt top:
- Measurements: Start by measuring the width and length of your quilt top. This will help you determine the size and dimensions of your borders.
- Fabric Selection: Choose a fabric for your borders that coordinates with your quilt top. Consider using a solid or a fabric that complements the colors and patterns already present in your quilt.
- Border Width: Decide on the desired width for your borders. The width can vary based on personal preference and the overall design of your quilt. A common width is 2.5 to 4 inches, but you can go larger or smaller depending on your vision.
- Cutting the Borders: Using your measurements, cut the fabric for your borders. Cut two strips for the side borders, using the width of your quilt top plus the border width. Cut two strips for the top and bottom borders, using the length of your quilt top plus the border width.
- Attaching the Borders: Start with the side borders. Place one strip right sides together with the side edge of your quilt top. Pin in place and sew a straight seam with a ¼ inch seam allowance. Press the seam towards the border. Repeat for the other side border.
- Top and Bottom Borders: Attach the top and bottom borders in the same manner. Place one strip right sides together with the top edge of your quilt top. Pin, sew, and press the seam towards the border. Repeat for the bottom border.
- Border Trimming: Once all the borders are attached, trim any excess fabric from the edges of your quilt top to ensure a clean finish.
- Pressing: After adding the borders, press the entire quilt top from the top to set the seams and give your quilt a neat and professional look.
Adding borders is a wonderful way to frame your quilt top and bring cohesion to the overall design. Take care to measure accurately and sew the borders on straight to achieve a polished finish.
With the borders in place, it’s time to move on to the next step: layering and quilting your rail fence quilt.
Step 7: Layering and Quilting
Layering and quilting your rail fence quilt is an exciting step that brings your project one step closer to completion. Layering involves sandwiching the quilt top, batting, and backing together, while quilting refers to the stitching that holds these layers in place. Here’s how to proceed:
- Prepare Your Quilt Layers: Start by laying your backing fabric on a large, clean, and flat surface, wrong side up. Smooth out any wrinkles or folds. Secure the backing fabric in place using tape or clamps if necessary.
- Add Batting: Place your quilting batting on top of the backing fabric, ensuring it is centered and covers the entire quilt top. Smooth out any bumps or lumps in the batting.
- Add Quilt Top: Carefully place your rail fence quilt top on top of the batting, right side facing up. Adjust the quilt top to align with the backing and batting, making sure it is centered and evenly positioned.
- Baste the Layers: To hold the layers together temporarily, you can either pin baste or use a quilt basting spray. Pin basting involves securing the layers with safety pins placed about 4-6 inches apart. Quilt basting spray is an adhesive spray that holds the layers together temporarily. Choose the method that works best for you.
- Quilt Design: Decide on the quilting design you want to use for your rail fence quilt. This can be a simple diagonal or straight line quilting, free-motion quilting, or any other design that complements your quilt top. Make sure to mark any specific design lines if needed.
- Quilting the Layers: Using your sewing machine, start quilting by following the design lines you marked or your chosen quilting design. Take your time, and adjust your quilting speed accordingly. Go slowly and steadily to ensure accuracy and even stitching.
- Secure Loose Threads: Trim and secure any loose threads as you quilt to maintain a neat appearance.
- Quilting Borders: Don’t forget to quilt the borders of your rail fence quilt. You can choose to quilt them with the same design as the rest of the quilt or use a different pattern for added visual interest.
Remember to enjoy the quilting process and let your creativity shine through. Quilting is a personal and artistic expression, so don’t be afraid to experiment and make the design your own.
Once the quilting is complete, it’s time to move on to the final step: binding your rail fence quilt.
Read more: How To Build Split Rail Fence
Step 8: Binding the Quilt
The final step in completing your rail fence quilt is binding. Binding not only adds a decorative finish but also provides durability and structure to the edges of your quilt. Here’s how to bind your quilt:
- Calculate Binding Length: Measure the entire perimeter of your quilt. Add about 20 inches to this measurement to account for corners, overlap, and any mistakes or adjustments. This will be the total length of binding fabric you’ll need.
- Cut Binding Strips: Determine the width of your binding strips. A common width is 2.5 inches, but you can adjust it according to personal preference. Cut enough binding strips from your fabric, aligning them parallel to the selvage edge. Sew the strips together diagonally to create one long continuous binding strip.
- Prepare Binding: Fold the binding strip in half lengthwise, with wrong sides together, and press. This will create a crease along the length of the binding. Open up the strip and fold the raw edges towards the center crease, meeting at the center. Press again to create double-fold binding.
- Attach Binding: Starting in the middle of one side of your quilt, align the raw edges of the binding with the raw edges of the quilt top. Pin or clip in place. Begin sewing the binding to the quilt, starting a few inches down from the corner and leaving a tail of binding hanging.
- Binding Corners: As you approach a corner, stop sewing a ¼ inch away from the edge. Fold the binding up, creating a 45-degree angle. Then, fold it back down, aligning with the next side of the quilt. Continue sewing along the next side, repeating the corner-folding process for each corner.
- Joining Binding Ends: Once you reach the starting point, trim the excess binding, leaving a tail large enough to overlap with the initial binding tail. Open up both ends of the binding and place them right sides together. Sew along the diagonal line previously marked and trim the excess fabric.
- Finishing the Binding: Fold the binding over the raw edges of the quilt and secure it in place using clips or pins. Stitch in the ditch or do a decorative binding stitch to secure the binding to the back of the quilt, making sure to catch the folded edge. Remove any remaining clips or pins.
- Final Pressing: Give your quilt a final press with a hot iron to ensure the binding lies flat and crisp.
Binding is the finishing touch to your rail fence quilt, giving it a polished and professional look. Take your time and sew carefully to achieve clean and even stitching.
Congratulations! You’ve completed all the steps to make a beautiful rail fence quilt. Step back and admire your creation. Your quilt is now ready to be cherished or gifted to someone special.
Remember, quilting is a journey of creativity and self-expression. Enjoy the process, experiment with colors and patterns, and let your imagination soar. Happy quilting!
Conclusion
Congratulations on completing your rail fence quilt! You’ve shown creativity, skill, and attention to detail throughout the entire quilting process. The rail fence pattern has come to life through your choice of fabric, precise cutting and sewing, and meticulous pressing and assembly.
As you step back and admire your finished quilt, take a moment to appreciate the journey you’ve embarked on. Quilting is not just about creating a beautiful and functional piece of art; it’s also about the joy and satisfaction that comes from working with your hands and the sense of accomplishment that accompanies completing a project.
Your rail fence quilt showcases your individual style and creativity. The colors and patterns you chose, the precision of your piecing and pressing, and the unique quilting design all contribute to a one-of-a-kind masterpiece. It’s a testament to your dedication and passion for quilting.
As you snuggle under your rail fence quilt or gift it to a loved one, remember the love and warmth that is infused into every stitch. Quilts have a special way of wrapping us in comfort and bringing joy to our lives. Your rail fence quilt will not only provide warmth and comfort but also serve as a reminder of your quilting journey and the satisfaction of creating something from scratch.
Now that you’ve mastered the art of making a rail fence quilt, you can use your newfound skills and creativity to explore other quilt patterns and techniques. Quilting offers endless possibilities for experimentation and personal expression, and each project becomes a unique reflection of the quilter’s personality and style.
So, embrace your quilting journey, challenge yourself with new patterns and designs, and continue to enjoy the process of transforming fabric into cherished quilts. Whether you’re making quilts for yourself, family, or friends, your passion for quilting will continue to bring joy and warmth to those who receive your beautiful creations.
Once again, congratulations on completing your rail fence quilt, and happy quilting!
Frequently Asked Questions about How To Make A Rail Fence Quilt
Was this page helpful?
At Storables.com, we guarantee accurate and reliable information. Our content, validated by Expert Board Contributors, is crafted following stringent Editorial Policies. We're committed to providing you with well-researched, expert-backed insights for all your informational needs.


0 thoughts on “How To Make A Rail Fence Quilt”