Articles
How To Build Split Rail Fence
Modified: October 18, 2024
Learn the step-by-step process of building a split rail fence with our informative articles. From materials to installation, we've got you covered!
(Many of the links in this article redirect to a specific reviewed product. Your purchase of these products through affiliate links helps to generate commission for Storables.com, at no extra cost. Learn more)
Introduction
Welcome to the world of split rail fences! If you’re looking to add a touch of rustic charm to your property, a split rail fence is a great option. With its simple yet elegant design, this type of fence can enhance the aesthetic appeal of any outdoor space while still serving its purpose of creating boundaries and providing security.
In this comprehensive guide, we will walk you through the step-by-step process of building a split rail fence. Whether you’re a seasoned DIY enthusiast or a beginner in the world of home improvement projects, you’ll find all the information you need to successfully complete this project and enjoy the satisfaction of creating a beautiful and functional fence on your own.
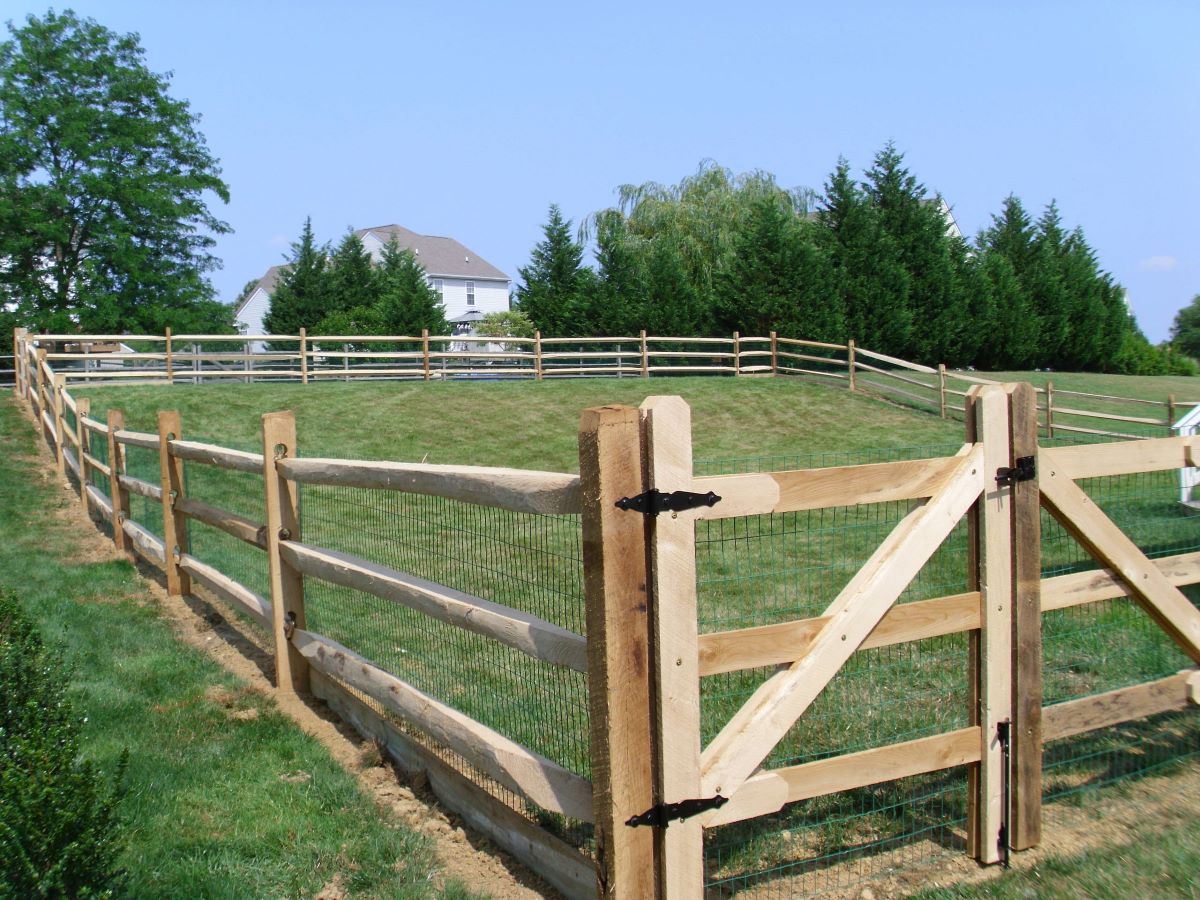
But before we dive into the nitty-gritty of building a split rail fence, let’s take a moment to understand what exactly it is. As the name suggests, a split rail fence is made up of horizontal rails that are split from logs or timber. These rails are then connected to vertical posts, creating a sturdy yet visually appealing structure. The open design of the fence allows for better air circulation and unobstructed views, making it a popular choice for rural settings and large properties.
Now that you have a basic understanding of what a split rail fence is, let’s move on to the first step of building your very own: gathering the necessary materials.
Key Takeaways:
- Building a split rail fence involves gathering materials, determining the layout, setting corner and line posts, attaching split rails, adding gates, and finishing touches. Regular maintenance ensures longevity and beauty.
- A split rail fence adds rustic charm and functionality to outdoor spaces. It’s a versatile choice for marking boundaries, enclosing gardens, and enhancing landscapes. Enjoy the satisfaction of creating something beautiful!
Read more: How Much Is Split Rail Fence
Step 1: Gather Materials
Before you start building your split rail fence, it’s important to gather all the necessary materials. Here’s a list of what you’ll need:
- Split rail fence posts: These can be made of wood, vinyl, or metal. Make sure you have enough posts to cover the desired length of your fence.
- Split rails: These are the horizontal bars that connect the posts. Again, you can choose between wood, vinyl, or metal depending on your preference.
- Gravel: This is used for the fence post holes to provide stability and drainage.
- Concrete mix: This is optional but can be used to secure the fence posts in the ground.
- Tools: You’ll need a shovel, post hole digger, level, measuring tape, hammer, and saw to complete the project.
- Additional materials: Depending on your specific design, you may also need screws, nails, gate hardware, and any other decorative elements you wish to add.
Once you have gathered all the necessary materials, you can move on to the next step: determining the layout of your split rail fence.
Step 2: Determine Fence Layout
Now that you have all the materials ready, it’s time to determine the layout of your split rail fence. This step involves deciding where the fence will be placed, measuring the desired length, and marking the locations for the posts.
Start by identifying the boundaries of your property and any specific areas where you want the fence to be installed. Use a measuring tape to determine the length of each section where the fence will go. Keep in mind any obstacles such as trees, rocks, or uneven terrain that may affect the placement of the fence.
Next, mark the locations where the fence posts will be positioned. This will depend on the length of the split rails you have and the desired spacing between the posts. In general, posts are placed 8 to 10 feet apart, but you can adjust this based on your preferences.
Use a stake or marker to indicate the position of each post along the fence line. Make sure they are evenly spaced and level with each other. To ensure accuracy, use a string or chalk line to create a straight line between the marked positions.
Before moving on to the next step, take a step back and evaluate the layout. Ensure that the fence will serve its intended purpose, whether it’s marking property boundaries, enclosing a garden, or providing a decorative border. Make any necessary adjustments to the layout before proceeding.
Now that you have determined the layout of your split rail fence, it’s time to move on to the next step: setting the corner posts.
Step 3: Set Corner Posts
Setting the corner posts is a crucial step in building a sturdy split rail fence. These posts serve as the foundation of the fence and provide stability and support at the corners.
Start by digging the first corner post hole. Use a post hole digger or shovel to dig a hole that is approximately one-third of the length of the post and about one foot wide. The depth of the hole should be below the frost line to prevent shifting or damage during freezing temperatures.
Once the hole is dug, place the corner post vertically in the hole, ensuring it is level and plumb. You can use a level and a measuring tape to ensure accuracy. If necessary, add or remove soil from the hole to achieve the desired height and alignment.
Next, pour gravel into the hole around the base of the post. This will provide stability, drainage, and help prevent the post from rotting. Tamp the gravel down firmly to create a solid foundation.
If desired or if local building codes require it, you can also set the corner post in concrete. This will provide additional strength and durability. Simply mix the concrete according to the instructions on the package and pour it into the hole around the post. Use a level to ensure the post remains plumb while the concrete sets.
Repeat these steps to set the second corner post at the other end of the fence line. Remember to measure the distance between the corner posts to ensure they are evenly spaced.
With the corner posts securely in place, you’re ready to move on to the next step: installing the line posts.
Step 4: Install Line Posts
Now that you have the corner posts set, it’s time to install the line posts. Line posts provide additional support and stability to the split rail fence, ensuring that it remains strong and upright.
Start by measuring the distance between the corner posts, keeping in mind the desired spacing for your split rails. Typically, line posts are placed 8 to 10 feet apart, but you can adjust this based on your specific design.
Dig a hole for the first line post using a post hole digger or shovel. The hole should be approximately one-third of the length of the post and about one foot wide. Ensure the hole is deep enough to reach below the frost line for stability.
Place the line post vertically in the hole, making sure it is level and plumb. Use a level and measuring tape to ensure accurate alignment. As with the corner posts, you can fill the hole with gravel for stability or set the post in concrete for added strength.
Continue this process for each line post, making sure they are evenly spaced along the fence line. Use a string or chalk line to guide you and maintain a straight alignment.
Once all the line posts are installed, double-check their alignment and ensure they are all at the desired height. Adjust as necessary by adding or removing soil from the holes.
With the line posts securely in place, you’re ready to move on to the next step: attaching the split rails.
Note: If you plan on adding gates to your split rail fence, you may need to install additional posts and hinges at the gate locations. Consider the width and design of the gates when determining the spacing between the line posts.
Let’s proceed to the next step – attaching the rails!
When building a split rail fence, make sure to set the corner and end posts first, then evenly space the remaining posts. Use a level to ensure the posts are straight and plumb before securing them in place.
Read more: How To Build A Post And Rail Fence
Step 5: Attach Rails
Attaching the split rails is where your split rail fence starts to take shape. The rails are the horizontal bars that run between the fence posts, providing structure and defining the overall look of the fence.
Start by placing the first split rail between two adjacent posts. Position it at the desired height, typically about 2 to 3 feet from the ground for a traditional split rail fence. Make sure the rail is level and aligns with the tops of the posts.
Secure the rail to the posts using appropriate fasteners such as screws, nails, or brackets. Make sure the connection is sturdy and capable of withstanding outdoor elements and the test of time.
Repeat this process for each split rail, working your way along the fence line. Ensure that each rail is evenly spaced and aligned with the previous one. Use a level to maintain a straight and level line throughout the fence.
If you’re using wooden split rails, it’s important to treat them with a protective finish or stain to prevent rotting and weathering. This will also enhance the natural beauty of the wood. Follow the manufacturer’s instructions for the appropriate time to apply the finish.
Continue attaching the split rails until you reach the end of the fence line. Double-check the alignment and height of each rail to ensure consistency and uniformity.
With the split rails securely attached, you’re one step closer to completing your split rail fence. The penultimate step involves adding gates, which is optional but can provide convenient access to your property.
Move on to the next step to learn how to add gates to your split rail fence.
Step 6: Add Gates (Optional)
If you wish to have convenient access to your property, you can consider adding gates to your split rail fence. Gates provide a functional and visually appealing element to the fence, allowing for easy entry and exit.
Start by selecting the type and size of gate you want to install. You can choose between single or double gates, depending on your needs and the width of the entrance you want to create. Measure the desired width of the gate opening and purchase a gate that fits those dimensions.
Once you have the gate, determine the location where it will be installed. This can be at the entry point of your property or any other desired location along the fence line.
Measure the distance between the posts where the gate will be installed, and mark the locations for the hinges. The hinges should be attached to both the gate and the post, allowing the gate to swing open and closed smoothly.
Attach the hinges securely to both the gate and the post, following the manufacturer’s instructions. Make sure they are properly aligned and that the gate opens and closes without any obstructions.
Add a latch or lock mechanism to secure the gate when closed. There are various options available, such as a simple latch or a more advanced locking system. Choose one that suits your needs in terms of security and convenience.
Double-check the alignment of the gate and its functionality before proceeding. Make any necessary adjustments to ensure a smooth operation.
If desired, you can also add decorative elements to the gate, such as finials or ornamental accents, to enhance its visual appeal.
With the gate successfully installed, you’ve reached the final step in building your split rail fence.
In the next step, we’ll cover some optional finishing touches to complete your fence and make it truly stand out.
Step 7: Finishing Touches
With the majority of the split rail fence construction complete, it’s time to add some finishing touches to enhance its overall appearance and functionality.
One optional finishing touch is to add a cap or post toppers on the fence posts. These serve both as decorative elements and provide additional protection against moisture and decay. You can choose from a variety of styles and materials, such as wood, metal, or vinyl, to match the overall aesthetic of your fence.
Another option is to install mesh or wire fencing in between the split rails if you want to keep small animals out of your property or have added security. This can be particularly useful if you have a garden or want to keep pets contained.
If you’re looking for added privacy, you can attach privacy slats or plant climbing vines such as ivy or climbing roses along the fence. This will create a natural barrier and add a touch of greenery to your split rail fence.
Lastly, consider landscaping around the fence to further enhance its visual appeal. Plant flowers, shrubs, or small trees along the perimeter of the fence to create a seamless transition between your property and the fence. This will not only improve the aesthetics but also help with erosion control.
Make sure to periodically inspect and maintain your split rail fence to ensure its longevity. Check for any loose rails or posts and make repairs as necessary. Regularly clean the fence to remove dirt, debris, and any plant growth that could damage the wood or other materials.
Congratulations! You have successfully completed the construction of your split rail fence, adding charm and functionality to your outdoor space.
Remember, each step of the process is important, from gathering materials to the finishing touches. By following these steps, you’ve created a beautiful split rail fence that will stand the test of time.
So sit back, relax, and enjoy the beauty and security of your newly built split rail fence!
Is there anything else I can help you with?
Conclusion
Building a split rail fence is a rewarding and fulfilling project that adds charm and functionality to your property. Throughout this comprehensive guide, we’ve covered the step-by-step process of constructing a split rail fence, from gathering materials to adding the finishing touches.
By following these steps, you can create a visually appealing and durable split rail fence that enhances the overall aesthetics of your outdoor space. Whether you’re looking to mark property boundaries, enclose a garden, or add a rustic touch to your landscape, a split rail fence is a versatile and timeless choice.
Remember to take the time to gather all the necessary materials, determine the layout of your fence, set the corner and line posts securely, attach the split rails with precision, and optionally add gates for convenient access. Adding finishing touches such as post caps or toppers, wire fencing, privacy slats, or landscaping around the fence can further enhance its beauty and functionality.
Regular maintenance and inspection of your split rail fence will ensure its longevity. Check for any needed repairs, clean the fence periodically, and ensure it remains in good condition year after year.
Now that you have all the knowledge and guidance to build your own split rail fence, it’s time to get started and transform your outdoor space. Enjoy the satisfaction of creating something with your own hands and the beauty that a split rail fence can bring to your property.
If you have any further questions or need assistance along the way, don’t hesitate to reach out. Happy fence building!
Now that you've mastered building a split rail fence, why not tackle some new challenges? Our guide on outdoor projects offers a range of exciting ideas that are perfect for any DIY enthusiast eager to enhance their backyard or garden. From simple setups to more intricate designs, there's something for everyone. And if you're keen on crafting with wood, our list of woodworking projects for the upcoming year is a must-read. These projects cater to various skill levels, ensuring you find something that suits your abilities and helps you create stunning wooden pieces for your home.
Frequently Asked Questions about How To Build Split Rail Fence
Was this page helpful?
At Storables.com, we guarantee accurate and reliable information. Our content, validated by Expert Board Contributors, is crafted following stringent Editorial Policies. We're committed to providing you with well-researched, expert-backed insights for all your informational needs.


0 thoughts on “How To Build Split Rail Fence”