Articles
How To Make A Quilt Into A Rug
Modified: January 5, 2024
Learn how to transform your quilt into a beautiful rug with our informative articles. Find step-by-step instructions and helpful tips to create a unique and cozy addition to your home.
(Many of the links in this article redirect to a specific reviewed product. Your purchase of these products through affiliate links helps to generate commission for Storables.com, at no extra cost. Learn more)
Introduction
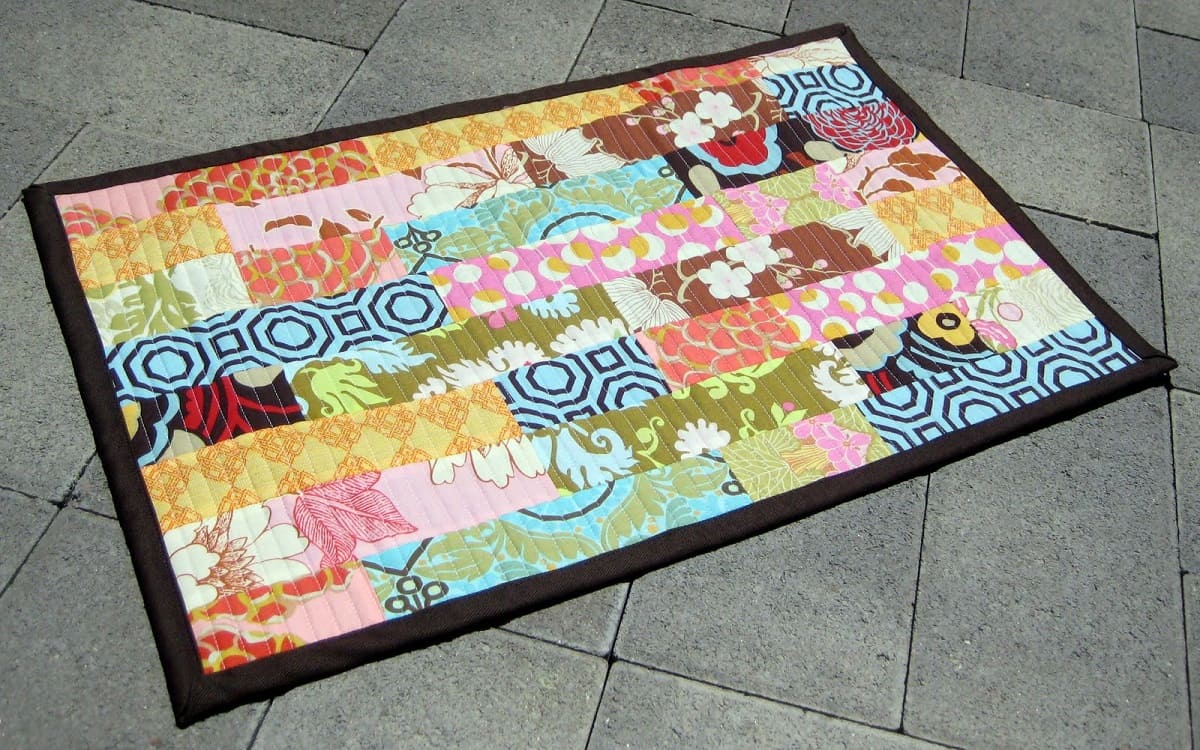
Quilts are not only beautiful pieces of artful craftsmanship, but they also hold sentimental value for many individuals. Whether it’s a cherished family heirloom or a quilt you’ve made with your own hands, sometimes you may want to repurpose it in a way that allows you to enjoy it in a different form. One popular option is to transform a quilt into a rug.
Turning a quilt into a rug not only gives it a new lease on life but also allows you to display it in a practical and functional manner. In this article, we will guide you through the step-by-step process of making a quilt into a rug. With a little bit of skill and creativity, you can create a unique and personalized rug that brings warmth and character to any room.
Before we dive into the steps, it’s important to note that this process is best suited for quilts that are in good condition and do not have significant wear and tear. If your quilt is damaged or fragile, it may be better to consider preserving it in its original form rather than repurposing it into a rug.
Now, let’s get started on this exciting quilting project!
Key Takeaways:
- Transforming a quilt into a rug is a creative and fulfilling project that repurposes cherished quilts into unique, personalized rugs, adding charm and warmth to any home.
- Balancing functionality with aesthetics, each step in the process, from choosing the right quilt to adding finishing touches, plays a crucial role in creating a durable and visually appealing rug.
Read more: How To Make A Quilt
Step 1: Choosing the right quilt
The first step in turning a quilt into a rug is selecting the right quilt for the project. Here are a few factors to consider:
- Quilt Size: Determine the size of rug you want to create. Ideally, choose a quilt that is larger than the desired rug size, as you will be trimming it later in the process.
- Quilt Condition: Inspect the quilt for any damages, stains, or weak areas. While some minor imperfections can be worked around, it is important to choose a quilt that is in relatively good condition. Avoid quilts with extensive wear and tear or delicate fabrics that may not withstand the rug-making process.
- Quilt Design and Colors: Consider the design and colors of the quilt. If you want the rug to match your existing decor, choose a quilt with colors and patterns that complement your space. Alternatively, you can embrace the eclectic look and opt for a quilt with bold and vibrant designs.
- Quilt Material: Take note of the quilt’s material. Quilts made from sturdier fabrics, such as cotton or denim, will be easier to work with and provide more durability for the finished rug. However, if you have a sentimental attachment to a quilt made from more delicate material, you can still use it for the project, but handle it with extra care.
Once you have chosen the right quilt, you are ready to move on to the next step: preparing the quilt for the rug-making process.
Step 2: Preparing the quilt
Before you can transform your quilt into a rug, it’s essential to properly prepare it. This step ensures that the rug-making process goes smoothly and results in a rug that is both visually appealing and functional.
Here are the key steps to prepare your quilt:
- Clean the quilt: It’s important to start with a clean quilt. If your quilt is machine washable, follow the manufacturer’s instructions to wash and dry it. If it is not machine washable, you can gently spot clean any stains using a mild detergent and a soft cloth.
- Iron the quilt: After cleaning, iron the quilt to remove any wrinkles or creases. This will make it easier to work with when attaching the backing fabric and quilting the rug.
- Inspect for loose threads or weak spots: Carefully examine the quilt for any loose threads or weak areas that could potentially unravel during the rug-making process. If you find any, use a needle and thread to secure them and reinforce the quilt’s integrity.
- Trim excessive batting: If your quilt has excessive batting – the layer between the quilt top and backing – consider trimming it down to a more manageable thickness. This step will make it easier to attach the backing fabric and create a flat and even rug.
By properly preparing your quilt, you are setting the foundation for a successful rug-making project. Once the quilt is cleaned, ironed, inspected, and trimmed if necessary, it’s time to move on to the next step: attaching a backing fabric.
Step 3: Attaching a backing fabric
Attaching a backing fabric to your quilt is an essential step in transforming it into a rug. The backing fabric provides support and stability to the quilt, ensuring that the rug retains its shape and longevity. Here’s how you can attach the backing fabric:
- Select the right backing fabric: Choose a fabric that is durable and complements the design and colors of your quilt. A heavy-duty cotton or canvas fabric is a popular choice as it provides strength and longevity to the rug.
- Measure and cut the backing fabric: Lay your quilt on top of the chosen backing fabric and cut it slightly larger than the quilt top. Leave enough excess fabric on all sides to account for any adjustments and trimming in later steps.
- Secure the backing fabric to the quilt: Start by folding over one edge of the backing fabric by 1/2 inch and pressing it with an iron. Place the backing fabric on a flat surface, with the right side facing down. Lay the quilt on top, aligning the edges. Fold the excess backing fabric over the edges of the quilt and pin it in place.
- Attach the backing fabric: Use a sewing machine or hand-sew with a strong thread to stitch around the perimeter of the quilt, securing the backing fabric in place. You can use straight stitches, running stitches, or any other stitching pattern that you prefer. Make sure to remove the pins as you sew.
- Trim the excess backing fabric: Once the backing fabric is securely attached, trim off any excess fabric, leaving a 1/4-inch seam allowance. This step ensures that the rug’s edges are neat and uniform.
By attaching a backing fabric, you are adding stability and structure to your quilt, turning it into a sturdy and functional rug. Now that the backing fabric is in place, let’s move on to step 4: securing the layers.
When making a quilt into a rug, consider adding a non-slip backing to prevent slipping and ensure safety. This can be achieved by sewing or gluing a non-slip rug pad to the back of the quilt.
Step 4: Securing the layers
In order to create a durable and long-lasting rug, it’s important to secure the layers of the quilt together. This step ensures that the quilt top, batting, and backing fabric stay in place and prevent shifting or bunching. Here’s how you can secure the layers:
- Baste the layers: Use safety pins, large hand stitches, or a basting spray to hold the quilt layers together. Start in the center and work your way outwards, smoothing out any wrinkles or bubbles as you go. Make sure the layers are taut and evenly distributed.
- Choose a quilting pattern: Decide on a quilting pattern that complements the design of your quilt and enhances the overall appearance of the rug. Options include straight lines, free-motion quilting, or a combination of various patterns. Consider using a walking foot or free-motion quilting foot on your sewing machine for easier quilting.
- Quilt the layers together: Using your chosen quilting pattern, stitch the layers together. Follow the lines or design you have selected, working from the center towards the edges. Take your time and stitch slowly to ensure even stitches and secure the layers properly. This step not only adds stability but also enhances the visual appeal of the rug.
- Continue quilting: Once the central area is quilted, gradually move towards the outer edges of the rug. Pay attention to maintaining an even tension and smoothness in the layers. Depending on the size of your quilt, you may need to readjust the basting pins or stitches as you progress.
- Knot or backstitch: When you reach the end of your quilting, securely hand knot or backstitch the thread to prevent unraveling. Trim any excess thread.
By securing the layers through quilting, you are ensuring that the rug remains intact and retains its shape over time. With the layers properly secured, it’s time to move on to the final steps of transforming your quilt into a rug.
Read more: How To Make A Quilt Larger
Step 5: Quilting the rug
Now that the layers of your quilt are securely held together, it’s time to add the final touches that will turn it into a true rug. Quilting the rug involves the process of stitching through all the layers to create a cohesive and functional surface. Follow these steps to quilt your rug:
- Choose a quilting design: Select a quilting design that complements the style and pattern of your quilt. You can opt for simple straight lines, intricate geometric patterns, or even free-motion quilting. The design you choose will add texture and visual interest to your rug.
- Mark the quilting lines: Use a chalk pencil or washable fabric marking pen to mark the quilting lines on your rug. This will serve as a guide as you stitch through the layers. You can either freehand the lines or use stencils or templates for more precise designs.
- Quilt the rug: Set your sewing machine to the desired stitch length and position the quilt under the needle. Begin quilting along the marked lines, taking care to stay consistent with your stitches. Sew slowly and evenly, keeping the fabric taut and guiding it through the machine with smooth movements. Repeat this process until you have quilted the entire rug surface.
- Experiment with different quilting techniques: Don’t be afraid to experiment with different quilting techniques to add depth and dimension to your rug. You can try echo quilting, stippling, or even custom designs that complement the theme or motifs of your quilt. Remember, this is your opportunity to infuse your personal style into the rug.
- Check for any missed spots: Once you have finished quilting the rug, inspect it carefully for any areas that you may have missed or areas that need additional quilting. Make any necessary adjustments or add extra stitching as needed.
Quilting the rug not only adds stability but also enhances the overall appearance and texture of the finished product. With the quilting complete, it’s time to move on to the final step of trimming and adding the finishing touches to your quilted rug.
Step 6: Trimming and finishing touches
As you near the completion of your quilt-to-rug transformation, it’s important to add the final touches that will give your rug a polished and professional look. This step involves trimming any excess fabric and adding the finishing touches to make your rug ready to grace your home. Follow these steps to finish your quilted rug:
- Trimming the edges: Using a rotary cutter or fabric scissors, carefully trim the excess backing fabric and batting around the edges of your rug. Trim it to be even with the edges of the quilt top, ensuring a clean and uniform finish.
- Binding the edges (optional): If you prefer a more defined and finished look, you can add binding to the edges of your rug. Cut strips of fabric, approximately 2.5 inches wide, and long enough to go around the entire perimeter of the rug. Fold the strips in half lengthwise, press them, and sew them to the rug’s edges, mitering the corners for a neat finish.
- Final inspection: Once the edges are trimmed or bound, carefully inspect the rug for any loose threads, missed stitches, or imperfections. Address any issues with hand sewing or using a sewing machine, ensuring that your rug is free from any flaws.
- Finishing touches: To add a decorative element to your rug, consider adding a label to the back that includes your name, the date, and any meaningful information about the quilt’s origin or history. This personal touch adds a special touch to your rug and makes it an even more valuable keepsake.
With the trimming and finishing touches complete, stand back and admire your beautiful quilted rug. The time and effort you’ve put into transforming the quilt into a rug have resulted in a unique and functional piece that adds warmth and style to any room in your home.
Remember to regularly vacuum and clean your quilted rug to keep it in good condition, and enjoy the comfort and beauty it brings to your living space for years to come.
Congratulations on successfully turning your quilt into a rug!
Conclusion
Transforming a quilt into a rug is a creative and fulfilling project that allows you to repurpose a cherished quilt in a functional and decorative way. By following the steps outlined in this article, you can create a unique and personalized rug that adds charm and warmth to your home.
From choosing the right quilt and preparing it for the rug-making process to attaching a backing fabric, securing the layers, quilting the rug, and adding the finishing touches, each step plays a crucial role in creating a durable and visually appealing rug.
Throughout this process, it’s important to balance functionality with aesthetics. Consider the design, colors, and patterns of your quilt, as well as the overall decor of your space, when making decisions regarding fabric choices, quilting patterns, and finishing touches.
Remember to take your time and enjoy the journey of turning your quilt into a rug. This project allows you to showcase your creativity and craftsmanship while also preserving the sentimental value of your quilt.
Once your quilt is transformed into a rug, it becomes a unique piece of art that tells a story and brings warmth to your living space. Whether you choose to display it in a cozy corner, lay it by the bedside, or showcase it in a high-traffic area, your quilted rug will be a beautiful addition to your home.
So, gather your materials, let your creativity soar, and embark on the exciting journey of transforming your beloved quilt into a stunning rug that will be cherished for years to come.
Frequently Asked Questions about How To Make A Quilt Into A Rug
Was this page helpful?
At Storables.com, we guarantee accurate and reliable information. Our content, validated by Expert Board Contributors, is crafted following stringent Editorial Policies. We're committed to providing you with well-researched, expert-backed insights for all your informational needs.


0 thoughts on “How To Make A Quilt Into A Rug”