Articles
How To Make Candles With Shells In Them
Modified: February 4, 2024
Learn how to make beautiful candles with shells in them. Our articles provide step-by-step instructions and creative ideas for crafting unique decorative candles.
(Many of the links in this article redirect to a specific reviewed product. Your purchase of these products through affiliate links helps to generate commission for Storables.com, at no extra cost. Learn more)
Introduction
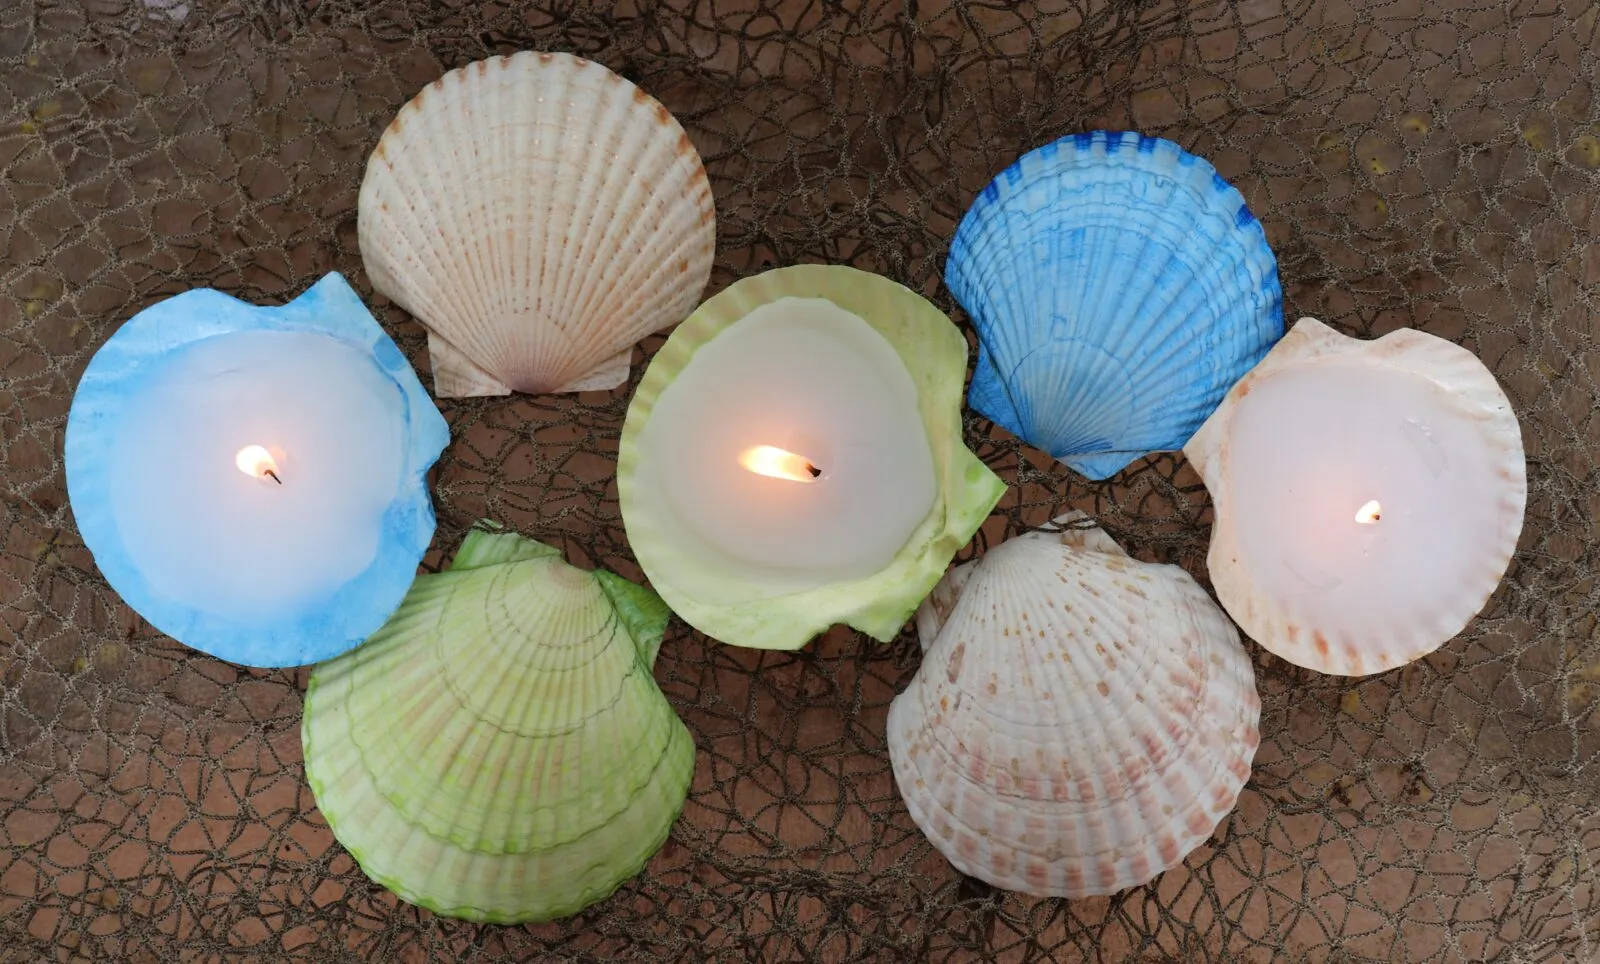
Welcome to the world of creative candle making! If you’re looking to add a touch of seaside charm to your home or create personalized gifts, making candles with shells in them is a fantastic way to do it. Not only do these candles provide a unique and decorative element, but they also infuse your space with a soothing oceanic ambiance.
In this article, we will guide you through the step-by-step process of making candles with shells, from collecting the shells to displaying the final product. You don’t need any specialized equipment or experience to get started, making it a fun and accessible DIY project for all skill levels.
By following this guide, you’ll be able to create stunning candles that make great additions to your own home decor or thoughtful gifts for loved ones. So let’s dive in and learn how to make candles with shells in them!
Key Takeaways:
- Create stunning shell candles by collecting, cleaning, and filling shells with wax. Enjoy the tranquil ambiance and personalized touch they bring to your home or gift them for a unique present.
- Infuse your space with seaside charm by making candles with shells. Embrace the creative process and enjoy the soothing glow of your handmade shell candles.
Read more: How To Make A Heater With Candles
Materials Needed
Before you begin, it’s important to gather all the necessary materials. Luckily, you won’t need anything too fancy or hard to find. Here’s a list of the items you will need:
- Shells: Look for different sizes and shapes to add variety to your candles. You can collect them yourself from the beach or purchase them from a craft store.
- Candle wax: You can use either soy wax, beeswax, or paraffin wax depending on your preference.
- Candle wicks: Choose wicks that are long enough to reach the base of your shell candles.
- Candle dye: If you want to add color to your candles, opt for candle dye in the desired shades.
- Candle fragrance oil: Optional, but if you want scented candles, select fragrance oils that complement the ambiance you’re looking to create.
- Candle thermometer: To ensure your wax reaches the right temperature for pouring.
- Double boiler or a heat-resistant container: Used for melting the wax. If using a heat-resistant container, you will need a pot of boiling water to create a makeshift double boiler.
- Stirring utensil: A wooden or silicone spatula works well for mixing the wax and dye.
- Scissors: To trim the wicks after the candles have cooled.
Once you’ve gathered all the materials, you’re ready to start creating your shell candles. So let’s move on to the next step: collecting shells!
Step 1: Collecting Shells
The first step in making candles with shells is to gather a variety of shells. This part can be especially enjoyable as you embark on a beachcombing adventure or explore your local craft store.
If you’re collecting shells yourself, head to a beach or shoreline known for its abundance of seashells. Take a stroll along the shoreline, keeping an eye out for shells that catch your attention. Look for shells of different shapes, sizes, and colors to create a visually appealing candle collection.
When collecting shells, be mindful of the environment and follow any regulations or guidelines in place. It’s important to only collect empty shells and leave living creatures undisturbed.
If you prefer to skip the beachcombing process, you can purchase shells from a craft store or online. Craft stores often offer a wide variety of shells, allowing you to select the ones that best suit your aesthetic preferences.
Once you have gathered your shells, be sure to give them a gentle rinse with water to remove any sand or dirt. This will help ensure that your finished candles look clean and polished.
With your shells in hand, you’re ready to move on to the next step: cleaning and drying the shells.
Step 2: Cleaning and Drying the Shells
Now that you have collected your shells, it’s time to clean and dry them before incorporating them into your candles. This step is essential to remove any dirt, debris, or lingering odors from the shells.
Start by rinsing the shells under running water to remove any loose particles or sand. Use a soft-bristled brush or toothbrush to gently scrub the shells, paying extra attention to crevices or hard-to-reach areas. This will help remove any stubborn dirt or residue.
Next, prepare a solution of warm water and mild dish soap. Place the shells in the soapy water and let them soak for a few minutes. This will help loosen any remaining dirt or grime.
After soaking, gently scrub the shells again using the brush or toothbrush. Rinse them thoroughly under running water to remove all traces of soap. Take care not to scrub too hard, as delicate shells can break or chip.
Once the shells are clean, pat them dry using a soft cloth or paper towel. Ensure that each shell is completely dry before proceeding to the next step, as any remaining moisture can affect the quality and appearance of your candles.
If you’re working with shells that have a strong odor, you can minimize or eliminate the scent by soaking them in a solution of equal parts vinegar and water. After soaking, rinse and dry the shells as usual.
With your shells cleaned and dried, they are now ready to be transformed into beautiful, shell-adorned candles. Let’s move on to the next step: preparing the wax.
Step 3: Preparing the Wax
Now that your shells are clean and dry, it’s time to prepare the wax for your shell candles. The type of wax you choose will depend on your preference, but popular options include soy wax, beeswax, or paraffin wax.
Begin by setting up a double boiler on your stove. Fill the bottom pot with water and place it on low to medium heat. Place the top pot or heat-resistant container on top of the bottom pot, ensuring that it fits snugly.
Add the desired amount of wax to the top pot or heat-resistant container. The amount will depend on how many candles you plan to make and the size of your shells. It’s always better to have a little extra wax on hand to avoid running out.
Allow the wax to melt gently, stirring occasionally with a wooden or silicone spatula. It’s important to monitor the temperature of the wax using a candle thermometer. Different waxes require different pouring temperatures, so consult the instructions on your wax packaging for the recommended temperature range.
If you want to add color to your candles, now is the time to incorporate candle dye. Gradually add small amounts of dye to the melted wax, stirring well after each addition. Continue adding dye until you achieve the desired color intensity.
If you prefer scented candles, you can also add a few drops of candle fragrance oil to the melted wax. Choose fragrances that complement the ambiance or theme you’re looking to create.
Once the wax is thoroughly melted and any color and fragrance have been added, remove it from the heat and let it cool for a few minutes. It’s important not to pour hot wax into the shells, as it can cause them to crack or break.
You’ve successfully prepared the wax, and now it’s time to move on to the next step: adding the wick to the shells.
Read more: How To Make Candles With Herbs
Step 4: Adding the Wick
With your melted and colored wax ready, it’s time to move on to adding the wick to your shells. The wick is what will allow your candles to burn and provide a warm, flickering glow.
Start by selecting a suitable wick for your shell candles. Ensure that the wick is long enough to reach the base of each shell and still have a small portion sticking out at the top for lighting. Trim the wick to the appropriate length using scissors.
To secure the wick in place, you have a couple of options. One method is to use a hot glue gun to attach the metal base of the wick to the bottom of the shell. Dab a small amount of hot glue onto the base of the wick and press it firmly onto the center of the shell’s bottom.
An alternative method is to use a small amount of melted wax from your double boiler. Dip the metal base of the wick into the melted wax and press it onto the center of the shell’s bottom. Hold it in place for a few seconds to allow the wax to harden and secure the wick in place.
Whichever method you choose, make sure the wick is centered and straight in the shell. This will ensure an even burn and a stable candle.
Allow the glue or wax to completely set and harden before moving on to the next step. This will prevent any movement or displacement of the wick during the pouring process.
You’ve successfully added the wick to your shells, and now it’s time to move on to the next step: positioning the shells for pouring.
When making candles with shells, ensure the shells are clean and dry before placing them in the mold. This will prevent any moisture from affecting the candle’s quality.
Step 5: Positioning the Shells
Now that the wicks are securely in place, it’s time to position the shells in preparation for pouring the melted wax. The way you position the shells will determine the final look and functionality of your shell candles.
Ensure that the shells are stable and level. You can achieve this by placing them on a flat surface or using various props to hold them in position. For example, if you want your candles to sit upright, you can use small rocks or pieces of folded aluminum foil to prop them up.
If you intend to create hanging shell candles, gently thread a piece of wire or a small loop of twine through the hole or opening in the shell. Make sure the wire or twine is securely fastened so that it can support the weight of the candle once it’s hung.
Consider the aesthetic and functionality you want to achieve with your shell candles. You can position them individually or group them together in a creative arrangement. Experiment with different angles, orientations, and heights to create a visually appealing display.
Before moving on to the next step, double-check that all your shells are positioned securely and level. This will ensure a smooth and even pour when adding the melted wax.
You’re now ready to move on to the next step: pouring the wax into the shells and bringing them to life.
Step 6: Pouring the Wax
With the shells positioned and ready, it’s time to pour the melted wax into them. This step requires a careful and steady hand to ensure a clean and even fill.
Start by slowly and gently pouring the melted wax into each shell, taking care not to overflow or spill. Pouring the wax at a steady pace will help prevent air bubbles from forming and ensure a smooth finish.
Fill each shell until the melted wax reaches just below the rim. Leave a small space at the top to allow for any additional decorations or embellishments, if desired.
If you accidentally overflow a shell or notice any air bubbles, you can gently use a toothpick or a skewer to pop the bubbles and level out the surface of the wax.
Once all the shells are filled, allow the wax to cool and solidify. This process may take a couple of hours, depending on the size and thickness of the wax layers.
While the wax is cooling, make sure to leave the wicks sticking out from the shells, as this will make trimming them later much easier.
Patience is key during this step, as rushing the cooling process can result in uneven surfaces or wax shrinkage. Find a cool, undisturbed area to let your candles cool completely.
Congratulations! You’ve successfully poured the wax into the shells, and now it’s time to move on to the next step: allowing the wax to cool.
Step 7: Allowing the Wax to Cool
After pouring the melted wax into the shells, it’s important to allow the wax to cool and solidify completely. This step requires patience and can take several hours, but it is crucial for achieving the desired finished product.
Find a cool, undisturbed area where you can leave the shell candles to cool. Avoid placing them in direct sunlight or near any sources of heat as this can cause the wax to melt unevenly.
As the wax cools, it will go through a transition from a liquid state to a solid state. During this process, it’s normal to see some contraction or slight shrinking of the wax. This is completely normal and does not affect the quality or functionality of the candles.
Resist the temptation to touch or move the candles while they are cooling, as this can disrupt the cooling process and lead to uneven surfaces. Allow the shells to sit undisturbed until the wax is completely solid and firm to the touch.
The cooling time will depend on the size and thickness of the wax layers, as well as the ambient temperature of the room. On average, it may take several hours for the candles to cool, so it’s best to leave them overnight to ensure they are fully hardened.
Once the wax has completely cooled and solidified, you can move on to the next step: trimming the wicks.
Remember, patience is key during this step. While waiting for the wax to cool, you can use the time to clean up any residual wax and prepare for the final steps of the candle-making process.
Read more: How To Make Dipped Candles
Step 8: Trimming the Wick
Now that the wax has cooled and solidified, it’s time to trim the wicks of your shell candles. Trimming the wicks helps create a clean and even burn, ensuring a longer-lasting and more enjoyable candle experience.
Using a pair of scissors, carefully trim the wicks of each candle to a length of about ¼ inch (6 mm). This length is ideal for optimal burning and minimizing any smoking or soot formation.
Trimming the wick to the appropriate length is important because a longer wick can lead to a larger flame and potentially uneven burning, while a shorter wick may struggle to stay lit.
Ensure that the wicks are centered and straight in the candles after trimming. Gently adjust any misaligned wicks to achieve a balanced and visually pleasing appearance.
Take care not to cut the wicks too short or leave them too long, as this can affect the overall performance and safety of the candles.
By trimming the wicks, you are setting up your shell candles for a smooth and controlled burn. This final touch will enhance their longevity and ensure a delightful candle experience.
With the wicks neatly trimmed, you’re almost ready to display and enjoy your shell candles. But before that, let’s move on to the last step: displaying and enjoying your creations.
Step 9: Displaying and Enjoying Your Shell Candles
Congratulations! You have successfully completed the process of making candles with shells in them. Now it’s time to showcase your beautiful creations and bask in the warm glow of your handmade shell candles.
Choose a designated spot in your home to display your shell candles. They can instantly add a touch of coastal charm and elegance to any room. Consider placing them on a mantel, coffee table, shelf, or even in a centerpiece arrangement for a captivating focal point.
You can also get creative with the display by incorporating elements such as sand, sea glass, or coral around the candles to enhance the beachy vibe. Play around with different combinations and settings to find the perfect arrangement that suits your style and aesthetic preferences.
When it’s time to light your shell candles, make sure you have a safe and stable surface to place them on. Avoid placing them near flammable objects or in drafts that may affect the candle’s flame.
Now sit back, relax, and enjoy the serene ambience created by your shell candles. Admire the soft glow as it illuminates the shells, casting mesmerizing shadows and bringing a sense of tranquility to your space.
You can choose to light your shell candles on special occasions, to create a cozy atmosphere during relaxing evenings, or simply as a decorative element to enjoy every day.
Always remember to practice proper candle safety by never leaving a lit candle unattended and keeping them out of reach of children and pets.
As your shell candles burn down, you may notice that the shells become more exposed. It’s normal for the shells to become partially or fully visible as the wax melts away. Embrace this aesthetic change and appreciate the unique transformation of your candles.
Now that you have completed the process of making candles with shells in them, you can continue to explore your creativity by experimenting with different shell combinations, colors, and fragrances to create an array of stunning shell candles.
Enjoy the tranquil ambiance and personalized touch that your handmade shell candles bring to your home or gift to others as a thoughtful and unique present.
Thank you for joining us on this creative candle-making journey, and we hope you have a wonderful time crafting and enjoying your shell candles!
Conclusion
Congratulations on completing your journey of making candles with shells in them! Through the process of collecting shells, cleaning and drying them, preparing the wax, adding the wick, positioning the shells, pouring the wax, allowing it to cool, trimming the wick, and finally, displaying and enjoying your creations, you have created unique and captivating shell candles.
Not only do these shell candles add a touch of seaside charm to your home, but they also bring a sense of tranquility and relaxation with their soothing glow. Each candle represents your creativity and personal touch, making them perfect for your own home decor or as thoughtful gifts for loved ones.
Remember to exercise caution and practice proper candle safety when using your shell candles. Always keep them away from flammable objects, never leave them unattended, and ensure they are out of reach of children and pets.
Feel free to continue exploring your creativity by experimenting with different shell combinations, colors, and scents. You can create an entire collection of shell candles that reflect your unique style and aesthetic.
We hope this journey has inspired you to embark on more creative projects and embrace the joy of crafting. Making candles with shells is just one of the many ways you can infuse your personal touch into your living space and create a warm and inviting ambiance.
So, let your creativity soar, and enjoy the peaceful glow of your shell candles as they bring a little piece of the ocean into your home. Happy candle making!
Frequently Asked Questions about How To Make Candles With Shells In Them
Was this page helpful?
At Storables.com, we guarantee accurate and reliable information. Our content, validated by Expert Board Contributors, is crafted following stringent Editorial Policies. We're committed to providing you with well-researched, expert-backed insights for all your informational needs.


0 thoughts on “How To Make Candles With Shells In Them”