Articles
How To Make Candles From Pool Noodles
Modified: October 28, 2024
Learn how to make unique and budget-friendly candles using pool noodles. Our comprehensive articles provide step-by-step instructions and creative ideas for all your candle-making needs.
(Many of the links in this article redirect to a specific reviewed product. Your purchase of these products through affiliate links helps to generate commission for Storables.com, at no extra cost. Learn more)
Introduction
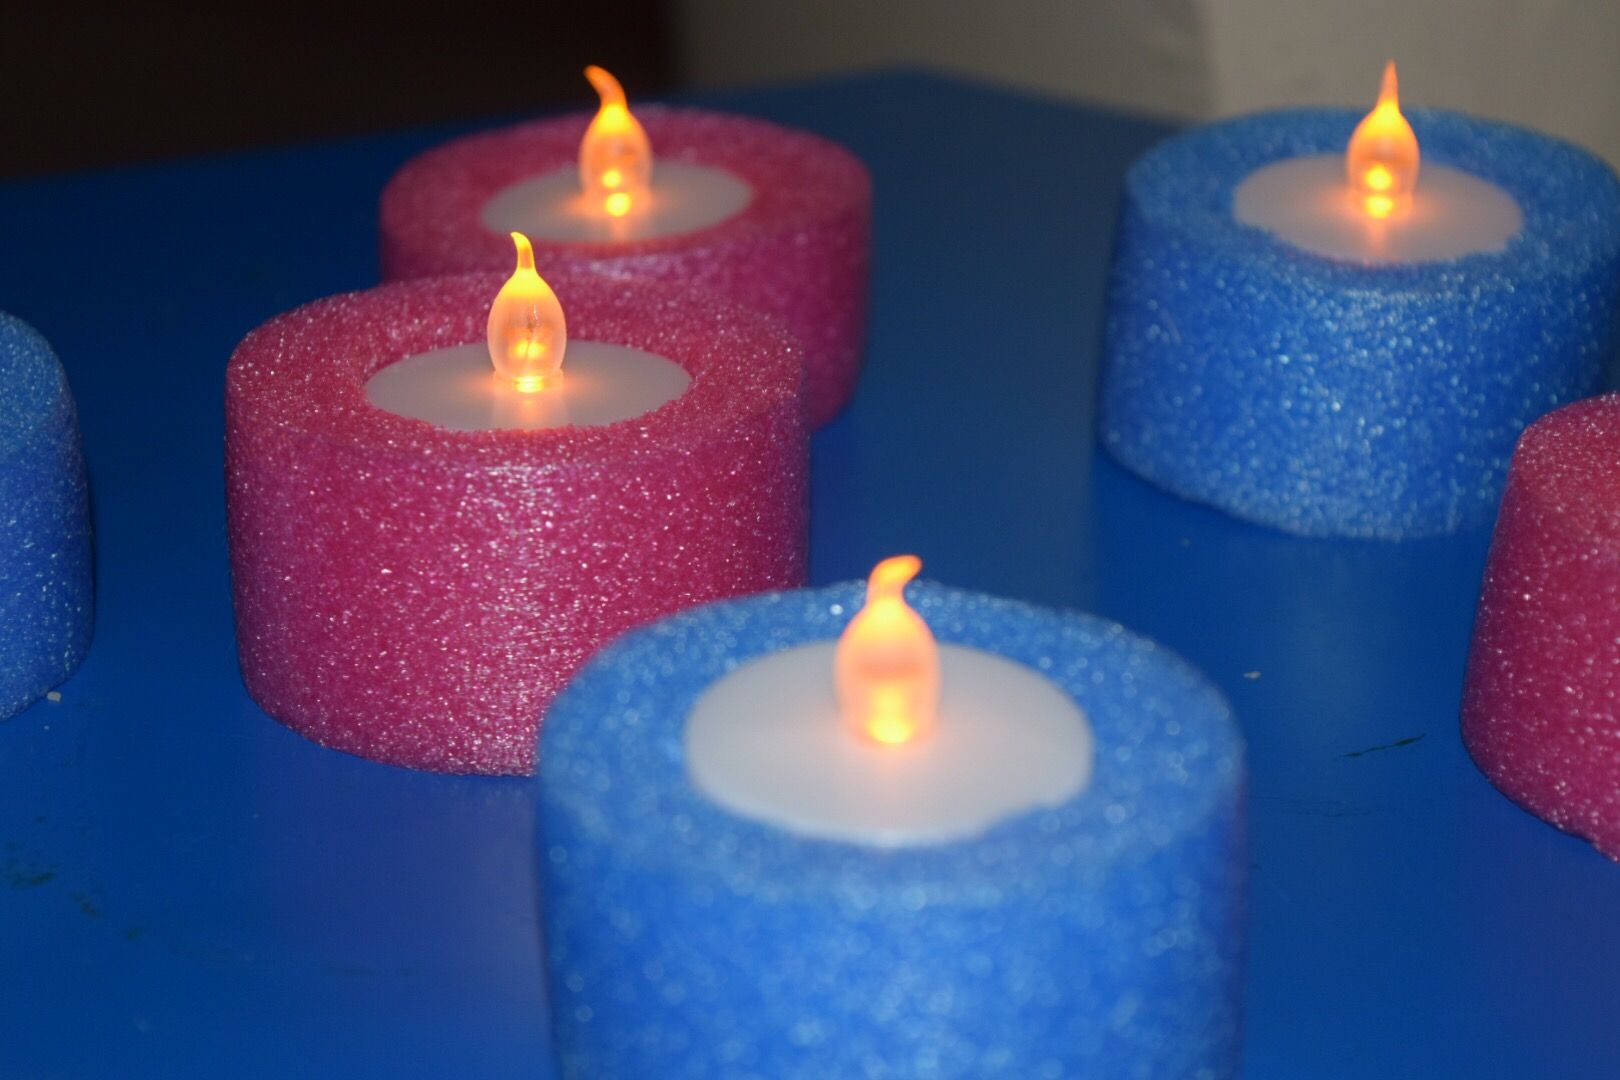
Welcome to the world of DIY crafts, where creativity knows no bounds. In this article, we will explore a unique and fun project: making candles from pool noodles. Yes, you read that right – pool noodles! These versatile foam tubes, commonly used for pool activities or water play, can be transformed into beautiful, customized candles that add a touch of charm to any space.
Creating your own pool noodle candles is not only a fun and creative endeavor but also an eco-friendly alternative to store-bought candles. By repurposing pool noodles that would otherwise go to waste, you can create unique and personalized candles that reflect your style and taste.
In this step-by-step guide, we will walk you through the process of making candles from pool noodles. From cutting the noodles to melting the wax, and finally, lighting and enjoying your creation, you will learn everything you need to know to successfully complete this DIY project.
Before we begin, let’s gather all the necessary materials and equipment for this undertaking.
Key Takeaways:
- Transform pool noodles into personalized candles with this fun and eco-friendly DIY project. Enjoy creating unique candles that reflect your style and taste while repurposing unused materials.
- Unleash your creativity and craft charming candles from pool noodles. Follow the step-by-step guide to create beautiful, one-of-a-kind candles that radiate warmth and add a personal touch to any space.
Read more: How To Store Pool Noodles
Materials Needed
Before diving into this creative project, let’s gather all the materials and tools you’ll need to make candles from pool noodles. Don’t worry – the list is simple and budget-friendly!
- Pool Noodles: Choose pool noodles in your desired colors and lengths. These can be purchased at most dollar stores, discount stores, or online.
- Wax: Opt for paraffin wax or soy wax, both of which are readily available at craft stores or online. The amount of wax you’ll need will depend on the size and number of candles you plan to make.
- Wick: Select a wick that is appropriately sized for your pool noodles. You can find wicks at craft stores or online. Make sure to choose wicks that are specifically designed for candles.
- Candle Fragrance (Optional): If you want to add a pleasant scent to your candles, consider purchasing candle fragrance oils. There are numerous scent options available, so choose one that appeals to your senses.
- Double Boiler or Wax Melting Pot: You’ll need a vessel to melt the wax. A double boiler or a dedicated wax melting pot is ideal for this purpose. Alternatively, you can use a heat-resistant container placed in a pot of boiling water.
- Heat Source: To melt the wax, you’ll need a heat source such as a stove or a hot plate.
- Thermometer: A thermometer is essential for monitoring the temperature of the melted wax, ensuring it reaches the appropriate pouring temperature.
- Scissors: Use a pair of scissors to cut the pool noodles to your desired length.
- Container or Tray: Prepare a container or tray to hold the pool noodle candles while the wax sets and hardens.
- Optional Decorations: If you’d like to add a personal touch to your candles, consider decorative elements such as ribbons, beads, or stickers.
Now that you have all the necessary materials and tools, it’s time to dive into the step-by-step process of creating your pool noodle candles! So, let’s get started with step one: cutting the pool noodles.
Step 1: Cutting the Pool Noodles
The first step in making candles from pool noodles is to cut the noodles to your desired length. You can choose the length based on the size of the candles you want to create.
Here’s a simple guide to help you cut the pool noodles:
- Measure and mark the desired length on the pool noodle using a ruler or measuring tape.
- Hold the pool noodle firmly in place, ensuring it doesn’t roll away or move while cutting.
- Using a sharp pair of scissors, carefully cut through the pool noodle along the marked line. Take your time to ensure a clean cut.
- Repeat the process for each pool noodle, cutting as many pieces as you’d like for your candles.
Remember, the length of your pool noodle will determine the height of your candle. You can cut them all to the same height for uniform candles or vary the heights for a more dynamic display.
Once you’ve cut the pool noodles to your desired length, it’s time to move on to the next step: preparing the wick.
Step 2: Preparing the Wick
Now that you have your pool noodles cut to the desired length, it’s time to prepare the wick. The wick is what will allow your candle to burn and provide a beautiful, flickering flame.
Here’s how you can prepare the wick for your pool noodle candles:
- Measure and cut the wick to a length slightly longer than the height of your pool noodle candle.
- Thread the wick through the center of the pool noodle, leaving a couple of inches of wick hanging out from the top of the noodle.
- Secure the wick in place by tying a knot at the bottom of the pool noodle. Make sure the knot is tight and secure.
- To prevent the wick from shifting or moving during the pouring and setting process, you can use a small piece of tape or a wick sticker to secure it to the bottom of the pool noodle.
By preparing the wick properly, you ensure that it is centered and straight within the pool noodle. This will result in an even burn and a well-formed candle.
With the wick prepared, you’re ready to move on to the next step: melting the wax. This is where the transformation from pool noodle to candle truly takes place!
Step 3: Melting the Wax
The next step in creating your pool noodle candles is to melt the wax. This process will transform the solid wax into a liquid form, allowing you to pour it into the pool noodles.
Follow these steps to melt the wax for your candles:
- Begin by setting up your double boiler or wax melting pot. If you’re using a double boiler, fill the bottom pot with water and place the wax in the top pot. If you’re using a wax melting pot, simply add the wax to the pot.
- Place the double boiler or wax melting pot on a heat source, such as a stove or hot plate.
- Heat the water or wax slowly, at a low to medium heat, until the wax melts completely. Stir the wax occasionally to ensure even melting.
- Use a thermometer to monitor the temperature of the melted wax. The optimal pouring temperature will depend on the type of wax you’re using, so refer to the manufacturer’s instructions for guidance.
- Once the wax has reached the desired pouring temperature, carefully remove it from the heat source.
It’s important to exercise caution while working with hot wax to avoid burns or accidents. Keep in mind that the melted wax can be highly flammable, so keep it away from open flames or any source of ignition.
With the wax melted and ready, you’re ready to move on to the next step, where you can add fragrance to your candles, if desired. Skip to step 5 if you prefer unscented candles.
Step 4: Adding Fragrance (Optional)
If you want to add a delightful aroma to your pool noodle candles, this step is for you. Adding fragrance to your candles can create a soothing and inviting atmosphere in your space.
Here’s how you can add fragrance to your pool noodle candles:
- Choose a candle fragrance oil that appeals to your senses. There are countless options available, ranging from floral scents to fruity or woody aromas. Select one that complements your preferences.
- Add a few drops of the fragrance oil to the melted wax. Start with a small amount and gradually increase if desired. Remember, a little goes a long way, so don’t overdo it.
- Stir the melted wax gently to ensure the fragrance is evenly distributed throughout.
If you prefer unscented candles, you can skip this step and proceed to the next one. However, adding a fragrant touch can enhance the ambiance and create a more enjoyable candle experience.
Now that you’ve added fragrance to your melted wax (if desired), it’s time to move on to the exciting part: pouring the wax into the pool noodles!
When cutting the pool noodle to make a candle mold, use a sharp knife and make sure to cut straight and even to ensure the candle sets properly.
Step 5: Pouring the Wax into the Pool Noodle
With your melted wax ready and, if desired, fragrant, it’s time to pour it into the pool noodles to create your candles. This step is where you will witness the transformation of the pool noodles into unique and personalized candle holders.
Follow these steps to pour the wax into the pool noodles:
- Place your pool noodles upright on a flat surface. You can use a container or tray to hold the pool noodles steady during the pouring process.
- Take the container of melted wax, ensuring it is still at the appropriate pouring temperature.
- Slowly pour the melted wax into each pool noodle, filling them to the desired height. Take care not to overfill or spill the wax.
- Allow the wax to cool and solidify within the pool noodles. This process may take several hours, so be patient and avoid moving or disturbing the candles while they set.
While the wax is setting, you may notice a slight indentation forming in the center of the candle. Don’t worry; this is normal and can easily be remedied in the next step.
Now that you’ve poured the wax into the pool noodles, it’s time to let the magic happen as the candles solidify and take their final form. Move on to step six to allow the wax to harden completely.
Step 6: Allowing the Wax to Harden
Once you’ve poured the melted wax into the pool noodles, it’s important to allow it sufficient time to cool and harden. This step is crucial to ensure that your candles set properly and maintain their shape.
Follow these steps to allow the wax to harden:
- Leave the pool noodle candles undisturbed on a flat surface or in a container for several hours. The exact time needed for the wax to harden will depend on various factors, such as the size of the candles and the room temperature.
- Avoid moving or touching the candles during this time to prevent any misshaping or indentations.
- As the wax cools and solidifies, you may notice a slight sinkhole forming in the center of the candle. Don’t worry; this is normal and can be easily fixed in the next step.
- Allow the candles to cool completely before moving on to the next step. This may take anywhere from 4 to 8 hours, depending on the size and thickness of the candles.
While the wax is hardening, take the opportunity to clean up your work area and prepare for the finishing touches. Once the wax is completely solid, you’re ready to move on to step seven: trimming the wick.
Step 7: Trimming the Wick
Now that your pool noodle candles have hardened and cooled, it’s time to trim the wick to the appropriate length. Trimming the wick ensures a clean and controlled burn, allowing your candles to burn evenly and safely.
Follow these steps to trim the wick:
- Gently remove any tape or wick stickers holding the wick in place at the bottom of the pool noodle.
- Using a pair of scissors, trim the wick to a length of about ¼ inch (6 mm).
- Discard the trimmed wick, making sure it doesn’t fall into the wax.
By trimming the wick, you’re creating the ideal length for a controlled and efficient flame. This will help prevent excessive smoke, soot, or uneven burning.
With the wicks neatly trimmed, your pool noodle candles are almost ready to be lit and enjoyed. But before that, let’s move on to the final step: lighting and savoring your DIY pool noodle candles!
Read more: How To Make Candles From Tallow
Step 8: Lighting and Enjoying Your DIY Pool Noodle Candle
Congratulations! You’ve reached the final step of creating your pool noodle candles. Now it’s time to light them up and bask in the warm glow and ambiance they provide.
Follow these steps to light and enjoy your DIY pool noodle candles:
- Place your pool noodle candle on a heat-resistant surface, away from any flammable objects or materials.
- Hold a lighter or a match to the trimmed wick and carefully ignite it.
- Observe the gentle flickering flame as it dances atop the pool noodle.
- Sit back, relax, and enjoy the soothing glow and aroma (if you added fragrance) that your pool noodle candle emits.
- Remember to always keep an eye on burning candles and never leave them unattended.
As you enjoy your pool noodle candles, take pride in the fact that you’ve created these beautiful and unique pieces using simple materials and your own creativity. They can serve as charming décor for your home, a thoughtful gift for a loved one, or a centerpiece for special occasions.
Feel free to experiment with different colors and scents to suit your personal style and preferences. You can also explore various decorating options such as tying ribbons around the pool noodles or adding decorative stickers.
Now that you’ve completed all the steps, it’s time to sit back, relax, and revel in the cozy atmosphere created by your homemade pool noodle candles. Enjoy the warm glow and the satisfaction of knowing you have crafted something truly special with your own hands.
And with that, we conclude our journey of making candles from pool noodles. We hope you had a wonderful time exploring this DIY project, and we wish you many delightful moments with your newly created candles.
Note: As with any craft project involving heat and open flames, it’s crucial to prioritize safety. Ensure that you place and burn your candles in a safe and controlled environment, away from flammable objects and out of reach of children and pets. Always follow proper fire safety guidelines and exercise caution when working with lit candles.
Happy candle-making and happy enjoying!
Conclusion
Creating candles from pool noodles is a fantastic way to unleash your creativity and add a personal touch to your home decor. This unique DIY project not only repurposes pool noodles that would otherwise go to waste but also allows you to customize your candles to match your style.
Throughout this step-by-step guide, we’ve taken you through the process of cutting the pool noodles, preparing the wick, melting the wax, adding fragrance (optional), pouring the wax into the pool noodles, allowing the wax to harden, trimming the wick, and finally, lighting and enjoying your DIY pool noodle candles.
By following these steps, you have crafted beautiful and one-of-a-kind candles that radiate warmth and create a cozy atmosphere. Whether you choose to display them around your home, give them as gifts to loved ones, or use them for special occasions, your pool noodle candles are sure to delight and impress.
Remember to prioritize safety when working with lit candles, always keeping an eye on them and ensuring they are placed away from flammable objects. Be sure to follow fire safety guidelines and take precautions to prevent accidents.
So, the next time you find yourself with unused pool noodles, don’t throw them away. Instead, turn them into stunning candles that showcase your creativity and bring a touch of charm to any space. Gather your materials, follow the steps outlined in this guide, and let your imagination run wild in creating your own unique pool noodle candles.
Embrace the art of candle-making and enjoy the warm and inviting glow of your very own DIY pool noodle candles. Get ready to bask in the beauty and ambiance that these homemade creations provide while impressing your friends and family with your crafting skills.
Now, go ahead, gather your supplies, and get started on your journey of making pool noodle candles. Happy crafting!
Frequently Asked Questions about How To Make Candles From Pool Noodles
Was this page helpful?
At Storables.com, we guarantee accurate and reliable information. Our content, validated by Expert Board Contributors, is crafted following stringent Editorial Policies. We're committed to providing you with well-researched, expert-backed insights for all your informational needs.


0 thoughts on “How To Make Candles From Pool Noodles”