Articles
How To Make Ice Candles
Modified: January 6, 2024
Learn how to make beautiful ice candles with this step-by-step guide. Our articles provide all the information you need to create stunning homemade candles.
(Many of the links in this article redirect to a specific reviewed product. Your purchase of these products through affiliate links helps to generate commission for Storables.com, at no extra cost. Learn more)
Introduction
Welcome to the wonderful world of ice candles! If you’re looking for a unique and captivating way to add ambiance to your home or special event, then you’re in the right place. Ice candles are a visually stunning and easy-to-make decorative item that will impress your guests and create a magical atmosphere.
Creating ice candles is a fun and creative project that can be enjoyed by people of all ages. Whether you’re a seasoned DIY enthusiast or just starting out, this step-by-step guide will help you master the art of making ice candles.
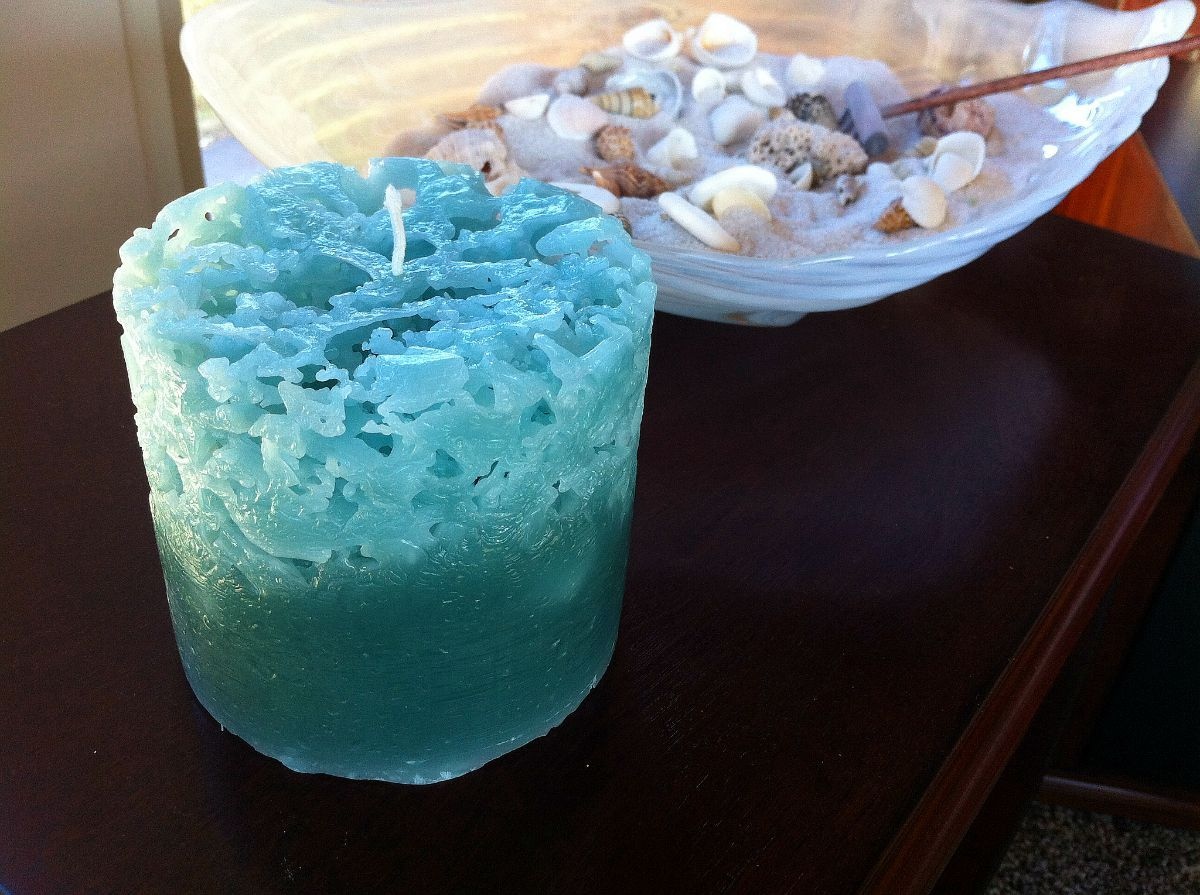
Ice candles are made by freezing water in a mold with a wick in the center. The result is a beautiful and delicate candle that has a mesmerizing glow as the flame illuminates the ice. The best part is that every ice candle is unique, with its own shape, texture, and patterns.
In this article, we will walk you through the process of making ice candles from start to finish. We’ll cover everything you need to know, from gathering the materials to lighting the finished candle. So grab your gloves and get ready to dive into the world of ice candle making!
Key Takeaways:
- Create a mesmerizing ambiance with unique ice candles that captivate guests and add a touch of magic to any event. Enjoy the creative process and prioritize safety for a rewarding DIY experience.
- Transform simple ingredients into stunning ice candles, showcasing intricate patterns and a captivating glow. Embrace your creativity, prioritize safety, and bask in the enchanting beauty of your homemade creation.
Read more: How To Make A Heater With Candles
Materials Needed
Before you get started on your ice candle making adventure, make sure you have the following materials ready:
- Plastic or silicone mold: You can use any mold with a shape and size of your choice. It can be a cake mold, a cup, or even a balloon. Just make sure it’s freezer-safe.
- Wick: You can find candle wicks at craft stores or online. Choose a wick that is long enough to extend from the bottom of the mold to the top, with a little extra length for trimming.
- Wick holder: This can be a small washer or a piece of metal wire to hold the wick in place at the top of the mold.
- Decorations (optional): You can add various decorative items to your ice candles, such as flower petals, glitter, or small plastic figurines.
- Boiling water: You’ll need boiling water to help create a clear and transparent ice candle.
- Freezer or deep freezer: This is where you’ll freeze your ice candle to solidify it.
- Candle lighter or matches: You’ll need a way to light your ice candle once it’s ready.
- Protective gloves: It’s important to protect your hands when handling the mold and working with ice.
Now that you have all the necessary materials, you’re ready to start crafting your ice candle masterpiece! Follow the next steps to turn these simple ingredients into a stunning decorative piece.
Step 1: Prepare the Mold
The first step in making an ice candle is to prepare the mold. This is where you’ll create the shape and size of your candle. Follow these steps to prepare the mold:
- Clean the mold: Make sure your mold is clean and free of any dirt or residue. This will help create a smooth surface for your ice candle.
- Apply a release agent (optional): If you’re using a plastic or silicone mold, you can apply a thin layer of cooking oil or non-stick spray to make it easier to remove the candle once it’s frozen.
- Place the mold on a flat surface: Find a stable and level surface to place your mold on. This will ensure that your candle freezes evenly and maintains its shape.
Now that your mold is prepared, let’s move on to the next step of securing the wick.
Step 2: Secure the Wick
Securing the wick is an important step in making an ice candle, as it will ensure that the flame is centered and the candle burns evenly. Follow these steps to securely attach the wick:
- Cut the wick: Cut a piece of wick that is long enough to extend from the bottom of the mold to the top, with a little extra length for trimming.
- Create a wick holder: Take a small washer or a piece of metal wire and bend it into a U-shape. This will serve as the wick holder.
- Thread the wick: Insert one end of the wick through the center of the washer or loop it around the metal wire. Make sure the wick is pulled through the center so that it stands upright.
- Position the wick in the mold: Place the wick with the washer or wire at the bottom of the mold. Make sure the wick is centered in the mold and standing upright.
- Secure the wick: To keep the wick in place, you can use a few drops of hot wax or a small piece of melted candle wax at the bottom of the mold. This will help anchor the wick and keep it steady as you pour the water.
Once the wick is securely attached, you’re ready to move on to the next step of filling the mold with water.
Step 3: Fill the Mold with Water
Now that you have secured the wick, it’s time to fill the mold with water. Follow these steps to ensure a successful and beautiful ice candle:
- Boil water: Bring a pot of water to a boil. It’s important to use boiling water as it helps create a clear and transparent ice candle.
- Let the water cool slightly: Allow the boiling water to cool for a few minutes before pouring it into the mold. This will prevent any damage to the mold or the wick.
- Carefully pour the water: Slowly pour the hot water into the mold, being mindful not to splash or disturb the wick. Fill the mold all the way to the top, leaving a small amount of space to account for expansion as the water freezes.
- Avoid bubbles: To minimize the formation of bubbles in your ice candle, pour the water slowly and try to pour it along the side of the mold, rather than directly onto the wick. This will help reduce the likelihood of air bubbles forming in the center of the candle.
- Adjust the wick position: As you pour the water, the weight of the liquid may cause the wick to deviate from its centered position. Use a pair of tweezers or a toothpick to gently reposition the wick if needed.
Once the mold is filled with water, it’s time to add some optional decorations to make your ice candle even more special. Let’s move on to the next step!
Read more: How To Make Candles With Herbs
Step 4: Add Decorations (Optional)
Adding decorations to your ice candle can elevate its visual appeal and make it truly unique. While decorations are optional, they can add an extra touch of creativity and personalization to your candle. Follow these steps to add decorations to your ice candle:
- Select your decorations: Choose the decorations you’d like to include in your ice candle. This could be flower petals, glitter, small plastic figurines, or any other small decorative items that are safe to freeze.
- Place decorations in the mold: Carefully drop or arrange the decorations inside the mold, making sure they are evenly distributed and not obstructing the wick. Be mindful not to overcrowd the mold, as this can affect the freezing process.
- Adjust the position of decorations: Once the decorations are in place, use a toothpick or a small tool to gently nudge them into the desired position. This will help ensure that the decorations are visible and evenly distributed throughout the ice candle.
Adding decorations to your ice candle allows you to get creative and personalize the final product. However, remember to keep the decorations small and non-flammable to ensure a safe and enjoyable experience.
Now that your mold is filled with water and decorated, it’s time to move on to the next step and freeze the mold to create your ice candle.
To make ice candles, use a sturdy mold and fill it with water. Place a smaller container inside to create a hollow space. Once frozen, remove the inner container and pour hot wax into the hollow space. Allow the wax to cool and then remove the ice mold.
Step 5: Freeze the Mold
With the mold filled with water and decorated, it’s time to freeze it to transform it into a beautiful ice candle. Follow these steps to freeze the mold:
- Find a flat surface in your freezer or deep freezer: Ensure that there is enough space for the mold to sit upright and that it won’t be disturbed during the freezing process.
- Place the mold in the freezer: Carefully position the mold in the freezer, making sure it is stable and upright. Avoid tilting or shaking the mold as this can cause the water to spill or the decorations to shift.
- Allow time for freezing: The amount of time it takes for the water to freeze will depend on the size of the mold and the temperature of your freezer. It usually takes several hours or overnight for the ice candle to fully freeze.
- Do not open the freezer unnecessarily: Opening and closing the freezer door frequently can disrupt the freezing process and impact the quality of your ice candle. Try to limit the number of times you open the freezer during the freezing period.
It’s important to note that freezing times may vary, so it’s best to check the mold periodically. Once the water is fully frozen, you’re ready to move on to the next step and remove the ice candle from the mold.
Step 6: Remove the Candle from the Mold
Now that your ice candle is frozen and solid, it’s time to carefully remove it from the mold. Follow these steps to ensure a successful release:
- Prepare a bowl of warm water: Fill a bowl with warm water. The water should be warm but not hot.
- Place the mold in the warm water: Submerge the bottom of the mold in the warm water. This will help loosen the ice candle from the mold.
- Wait for a few minutes: Allow the warm water to work its magic and gradually loosen the ice candle from the mold. The time needed will depend on the size and thickness of the ice candle.
- Gently remove the mold: After a few minutes, carefully lift the mold out of the warm water. If the ice candle doesn’t slide out easily, you can gently tap the sides of the mold or flex the mold slightly to release the ice candle.
- Run the mold under warm water (if needed): If the ice candle still doesn’t come out, you can try running warm water on the outside of the mold. This will melt the ice slightly and make it easier to remove.
Be patient and gentle when removing the ice candle from the mold. Rushing or using excessive force can cause the candle to crack or break. Take your time and enjoy the process.
With the ice candle successfully removed from the mold, it’s time to move on to the final step of lighting and enjoying your creation.
Step 7: Light and Enjoy
The moment has finally arrived to light up your ice candle and bask in its mesmerizing glow. Follow these steps to safely ignite and enjoy your creation:
- Trim the wick (if necessary): If the wick is too long, use a pair of scissors to trim it to a length of about 1/4 inch. This will help facilitate a clean and steady burn.
- Find a suitable holder: Place your ice candle on a heat-resistant surface or in a candle holder to prevent any melting ice from damaging surrounding surfaces.
- Light the wick: Use a candle lighter or a match to carefully ignite the wick. Ensure that the flame is steady and centered on the wick.
- Observe safety precautions: Keep the ice candle away from flammable materials, drafts, and anything that could easily catch fire. Never leave a burning candle unattended.
- Enjoy the beautiful glow: Sit back, relax, and embrace the enchanting ambiance created by your ice candle. Watch as the flame dances and illuminates the intricate patterns of the frozen water.
It’s important to remember that ice candles have a shorter burn time compared to traditional wax candles. The melting ice will eventually extinguish the flame, so enjoy the magical glow while it lasts.
Now that you’ve completed all the steps, you can sit back, admire your creation, and revel in the captivating beauty of your own homemade ice candle.
Read more: How To Make Dipped Candles
Safety Tips
Making ice candles can be a fun and rewarding experience, but it’s important to prioritize safety throughout the process. Follow these safety tips to ensure a safe and enjoyable ice candle-making experience:
- Wear protective gloves: When handling the mold and working with ice, wearing protective gloves can help prevent frostbite and maintain a good grip.
- Work in a well-ventilated area: It’s best to work in a well-ventilated area to prevent the buildup of fumes from melting ice or any other materials you may be using.
- Use a heat-resistant surface: Place your ice candle on a heat-resistant surface or in a candle holder to prevent any melting ice from damaging surrounding surfaces.
- Keep away from flammable materials: Always keep your ice candle away from flammable materials, such as curtains, paper, or decorations that can easily catch fire.
- Never leave a burning candle unattended: Always monitor your ice candle while it’s burning and never leave it unattended. Extinguish the candle before leaving the room or going to bed.
- Keep out of reach of children and pets: Ice candles may be visually appealing to children and pets, but they can pose a potential hazard. Keep them out of reach to prevent accidents or injuries.
- Dispose of melted ice safely: When your ice candle melts, dispose of the water in a suitable drainage area. Avoid pouring it directly onto surfaces that may be sensitive to water damage.
- Follow local regulations: Depending on where you live, there may be specific rules or regulations regarding the use and disposal of candles. Familiarize yourself with these guidelines and comply with them accordingly.
By adhering to these safety tips, you can enjoy the process of making ice candles while ensuring the well-being of yourself, your loved ones, and your environment.
Conclusion
Congratulations! You have successfully learned how to make beautiful ice candles from start to finish. These enchanting and unique creations are sure to add a touch of magic to your home or special event. Making ice candles is not only a creative and enjoyable DIY project but also a wonderful way to create a calming and mesmerizing ambiance.
From preparing the mold and securing the wick to filling it with water, adding decorations, and freezing the mold, each step contributes to the creation of a stunning ice candle. With patience and careful execution, you can produce a candle that showcases intricate patterns and a captivating glow.
Remember to prioritize safety throughout the process, wearing protective gloves, working in a well-ventilated area, and keeping the candle away from flammable items. Safely lighting your ice candle and enjoying its beauty should always be done with caution and consideration.
So go ahead, grab your materials, put on your creativity hat, and embark on your ice candle-making journey. Let the flickering flame and delicate beauty of your ice candle transport you to a world of enchantment and tranquility.
Enjoy the process, embrace your own artistic flair, and revel in the captivating beauty of your homemade ice candle. Happy candle making!
Frequently Asked Questions about How To Make Ice Candles
Was this page helpful?
At Storables.com, we guarantee accurate and reliable information. Our content, validated by Expert Board Contributors, is crafted following stringent Editorial Policies. We're committed to providing you with well-researched, expert-backed insights for all your informational needs.


0 thoughts on “How To Make Ice Candles”