
Articles
How To Make Marble Candles
Modified: December 7, 2023
Discover the perfect tutorial on how to make marble candles with our informative articles. Learn the step-by-step process and create stunning candles at home.
(Many of the links in this article redirect to a specific reviewed product. Your purchase of these products through affiliate links helps to generate commission for Storables.com, at no extra cost. Learn more)
Introduction
Welcome to the world of candle making! Making your own candles is a rewarding and creative hobby that allows you to express your personal style and create beautiful, one-of-a-kind pieces for your home or as gifts.
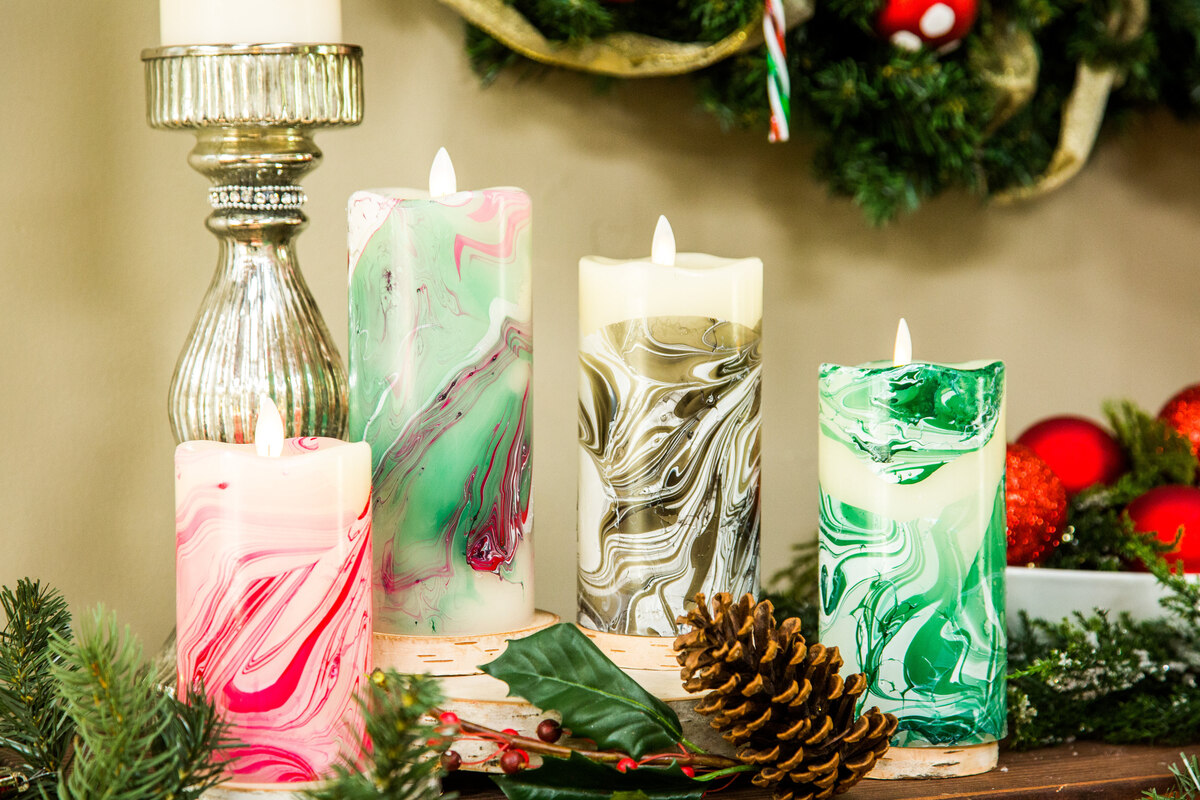
In this article, we will explore the fascinating technique of making marble candles. These unique candles feature a beautiful marble pattern on the surface, adding a touch of elegance and sophistication to any space. With a few simple materials and some creativity, you can easily create your own stunning marble candles that will impress everyone who sees them.
Marble candles not only look stunning, but they also provide a warm and cozy ambiance when lit. Whether you want to create a relaxing atmosphere in your living room or set the mood for a romantic dinner, marble candles are the perfect choice.
Before we dive into the step-by-step process of making marble candles, let’s gather all the materials we will need:
Key Takeaways:
- Create stunning marble candles by following a step-by-step process that involves preparing the mold, adding colors, pouring the wax, and creating the marble effect. Enjoy the warm glow and inviting ambiance they bring to your space.
- Prioritize safety and creativity when making marble candles. Experiment with contrasting colors and swirling techniques to produce unique and eye-catching candles that will captivate anyone who sees them.
Read more: How To Make Glass Marbles
Materials Needed
To make marble candles, you will need the following materials:
1. Candle wax: Choose a high-quality wax suitable for candle making, such as soy wax or beeswax. The amount of wax you need will depend on the size and number of candles you want to make.
2. Candle wicks: Select wicks that are appropriate for the size of your candles. Pre-tabbed wicks are recommended as they come with a metal base that makes it easier to attach them to the candle mold.
3. Candle mold: Use a mold that is heat-resistant and suitable for pouring hot wax. There are various options available, such as silicone molds, aluminum molds, or glass containers.
4. Coloring agents: Choose candle dyes or liquid candle colors in the shades you desire for your marble pattern. It’s best to select contrasting colors to create a vibrant marble effect.
5. Fragrance oil (optional): If you want scented candles, you can add fragrance oil of your choice. Make sure it is specially formulated for candle making.
6. Heat-resistant containers: You will need containers to melt your wax. It can be a double boiler or a heat-resistant glass or metal container that fits well in a pot of boiling water.
7. Stirring utensils: Have a dedicated heat-resistant spoon or spatula for stirring the wax and colors. Avoid using wooden or plastic utensils, as they may melt.
8. Thermometer: A candle-making thermometer is essential to monitor the temperature of the wax accurately. This helps ensure proper pouring and prevents any damage to the mold or wax.
9. Heat source: You will need a stove or hot plate to melt the wax. Ensure you have a safe and well-ventilated area for the candle-making process.
10. Protective gear: Protect yourself by wearing heat-resistant gloves, an apron, and safety goggles. Safety should always be the top priority when working with hot wax and melting equipment.
Now that we have everything we need, let’s move on to the step-by-step instructions for making marble candles.
Step 1: Preparing the Mold
The first step in making marble candles is to prepare the mold. If you’re using a new mold, make sure to clean it thoroughly to remove any dust or residue. Follow these simple instructions to prepare your candle mold:
- Ensure the mold is clean and dry. Use warm soapy water to wash it gently, and then dry it thoroughly with a clean cloth.
- If you’re using a silicone mold, you may want to apply a thin layer of mold release spray or a small amount of oil inside the mold to make it easier to remove the candle later. This step is optional but can help prevent sticking.
- Position the wick in the mold. Attach the metal base of the wick to the bottom of the mold using a small amount of melted wax or a dab of hot glue. Make sure the wick stands upright in the center of the mold.
Once the mold is prepared and the wick is securely in place, you’re ready to move on to the next step: melting the wax.
Step 2: Melting the Wax
Now that your mold is prepared, it’s time to melt the wax. Follow these steps to ensure a smooth and successful wax melting process:
- Measure the amount of wax you will need for your candles. It’s best to use a kitchen scale to get accurate measurements. Remember to account for any extra wax needed to account for shrinkage during cooling.
- Place the measured wax into a heat-resistant container. If you’re using a double boiler, fill the bottom pot with water and place the wax container on top. If you don’t have a double boiler, you can create one by placing a heat-resistant container in a pot of boiling water.
- Heat the water or pot on low to medium heat and allow the wax to melt slowly. Stir the wax occasionally with a heat-resistant utensil to ensure even melting.
- Monitor the temperature of the wax using a candle-making thermometer. It’s essential to heat the wax to the recommended temperature specified by the wax manufacturer. Different types of wax have different melting points, so refer to the product instructions for guidance.
- Once the wax reaches the desired temperature, remove it from the heat source and let it cool slightly.
Now that the wax is melted, we can move on to the exciting part – adding colors to create the beautiful marble effect!
Step 3: Adding Colors
Now that your wax is melted and cooled slightly, it’s time to add colors to create the unique marble effect on your candles. Follow these steps to achieve stunning marble patterns:
- Divide the melted wax into separate containers for each color you want to use. The number of containers will depend on how many different colors you want in your marble pattern.
- Add a few drops of your chosen candle dye or liquid candle color to each container. Start with a small amount of color and gradually increase until you achieve the desired shade. Remember, you can always add more color, but it’s harder to lighten the wax once it’s been colored.
- Using separate stirring utensils for each color, mix the dye or liquid candle color thoroughly into the wax. Make sure there are no streaks or clumps of color remaining.
- Now comes the exciting part – creating the marble effect! Pour the different colored waxes into the main container simultaneously. You can pour in a random pattern, alternate colors, or create swirls – it’s up to you to get creative!
- To enhance the marble effect, you can use a toothpick or skewer to gently swirl the colors together. Be careful not to overmix, as you want distinct marble patterns to emerge.
Once the colors are added and swirled together, it’s time to move on to the next step of pouring the wax into the prepared mold.
Read more: How To Make A Glass Marble
Step 4: Pouring the Wax
With the beautiful marble effect achieved in the colored wax, it’s time to pour the wax into the prepared mold. Follow these steps to ensure a clean and successful pouring process:
- Carefully pour the colored wax into the mold, being mindful not to disturb the marble patterns too much. Start by pouring the wax slowly and steadily, covering the entire bottom of the mold.
- Continue pouring the wax until the mold is nearly full. Leave a small space at the top to account for any shrinkage during cooling.
- If you have any leftover colored wax, set it aside for later use or additional candles. Make sure to keep it warm so it remains in a liquid state.
- Gently tap the mold on a flat surface to remove any air bubbles trapped in the wax. This helps ensure a smooth and even surface on your finished candle.
- Allow the wax to cool and solidify completely. This process may take a few hours, depending on the size of your candle and the ambient temperature. Avoid moving or disturbing the mold during this time to prevent any uneven settling of the wax.
Once the wax has completely cooled and solidified, we can move on to the next step of creating the marble effect on the candle’s surface.
When making marble candles, use a variety of colored wax and swirl them together to create a marble effect. Be sure to work quickly before the wax sets.
Step 5: Creating the Marble Effect
Now that the wax has cooled and solidified in the mold, it’s time to create the marble effect on the surface of the candle. Follow these steps to achieve the desired marbled look:
- Prepare a heat source, such as a heat gun or a hairdryer, to melt the top layer of wax and create the marble effect. Make sure to have a safe and well-ventilated area to perform this step.
- Hold the heat source about 6-8 inches away from the surface of the candle. Start applying heat to different areas of the candle, moving in circular motions or in a random pattern.
- As you apply heat, you will notice the wax beginning to melt and create swirls, giving it the marble-like appearance. Be careful not to hold the heat source too close or apply excessive heat, as it can cause the wax to melt unevenly or become too liquid.
- Continue applying heat until you achieve the desired marble effect. You can create subtle swirls or more pronounced patterns – it’s all about experimenting and finding the look you love!
- Once you’re satisfied with the marble effect, set the candle aside to cool and solidify again. This may take some time, so be patient and allow the wax to fully harden.
With the marble effect created, our marble candle is taking shape. Now, let’s move on to the next step of removing the candle from the mold.
Step 6: Letting the Candle Set
After creating the marble effect on the surface of the candle, it’s important to let it set and fully harden before moving on to the next step. Follow these steps to ensure the candle sets properly:
- Place the mold in a cool and undisturbed area, away from direct sunlight and drafts. This will help the wax cool and solidify evenly.
- Allow the candle to set for at least 24 hours, though a longer curing time may be necessary for larger or thicker candles. Patience is key during this step to ensure the candle is fully hardened.
- Avoid touching or moving the candle during the curing process, as it can cause the wax to shift or create blemishes on the surface.
- Check the consistency and hardness of the candle by gently pressing on the surface. If it feels firm and doesn’t leave any indentations, it’s ready for the next step.
While waiting for the candle to set, you can take this time to clean up your workspace and prepare for the next steps of removing the candle from the mold and trimming the wick.
Once your candle has fully set, it’s time to move on to step 7 – removing the candle from the mold.
Step 7: Removing the Candle from the Mold
With the candle fully set and hardened, it’s time to carefully remove it from the mold. Follow these steps to safely and successfully release your marble candle:
- Gently tap the sides of the mold to loosen the wax from the edges. This helps to release any potential suction between the mold and the candle.
- Flip the mold upside down and gently tap the bottom to coax the candle out. If it doesn’t come out easily, you can try placing the mold in warm water for a few seconds to loosen the wax.
- Slowly and steadily lift the mold sides to release the candle. Be patient and avoid pulling or yanking on the wick, as it can damage the surface or break the wick.
- Once the candle is out of the mold, inspect it for any imperfections or rough edges. You can use a clean, sharp knife or a candle smoother to trim or smooth out any uneven areas if necessary.
With the candle successfully removed from the mold, we’re ready to move on to the next step of trimming the wick.
Trimming the wick is an essential step to ensure a clean and efficient burn. Let’s proceed to step 8 to learn how to trim the wick of your marble candle.
Read more: How To Make A Marble Dining Table
Step 8: Trimming the Wick
Trimming the wick of your marble candle is crucial for a safe and efficient burn. Follow these steps to properly trim the wick:
- Inspect the length of the wick and ensure it’s trimmed to approximately ¼ inch (0.6 cm) before lighting the candle. A long wick can cause uneven burning, excessive smoke, and potential safety hazards.
- Using a pair of sharp scissors or wick trimmers, carefully trim the wick, leaving a short and even length. Make sure to remove any charred or excess wick to prevent it from falling into the melted wax while burning.
- Dispose of the trimmed wick in a safe manner, ensuring it’s completely extinguished.
Remember to trim the wick each time before lighting your marble candle to maintain a clean and controlled burn.
With the wick properly trimmed, we’re almost done. Let’s move on to the final touches to add that extra charm to your marble candle.
Step 9: Final Touches
Now that your marble candle is complete, it’s time to add some final touches to enhance its beauty and make it ready for display or gifting. Follow these steps to add those finishing touches:
- Inspect the surface of the candle for any rough edges or imperfections. Use a candle smoother or a clean cloth to gently buff and shine the wax, giving it a polished look.
- If desired, you can add a decorative ribbon, twine, or charm around the base of the candle. This extra embellishment adds a personal touch and enhances the overall aesthetic.
- Consider packaging your marble candle in a gift box or wrapping it in tissue paper to create an elegant presentation. This is especially ideal if you’re gifting the candle to someone special.
- Add a label or tag with the candle’s fragrance name, your initials, or any additional information you’d like to include. This helps identify the candle and adds a professional touch.
With these final touches, your marble candle is now ready to be enjoyed or gifted. Place it on a decorative candle holder or display it proudly on a mantel, coffee table, or shelf to showcase its exquisite design.
Remember to always burn your candle in a safe and supervised manner, keeping it away from flammable materials, drafts, and out of reach from children and pets.
Congratulations on successfully creating your very own marble candle! The process may require practice and experimentation, but the results are truly rewarding. Enjoy the warm glow, soothing fragrance, and the ambiance that your handmade marble candle brings to your space.
Happy candle making!
Conclusion
Creating marble candles is a fun and rewarding craft that allows you to express your creativity while adding an elegant touch to your space. With just a few simple materials and some creativity, you can transform ordinary candles into stunning works of art.
In this article, we’ve covered the step-by-step process of making marble candles, from preparing the mold to adding colors, pouring the wax, creating the marble effect, letting the candle set, removing it from the mold, trimming the wick, and adding the final touches.
Throughout the process, it’s important to prioritize safety by using heat-resistant equipment, working in a well-ventilated area, and wearing appropriate protective gear. Always follow the instructions provided by the wax and dye manufacturers for best results.
By incorporating contrasting colors, swirling the wax, and using heat to create the marbled effect, you can produce unique and eye-catching marble candles that will be a focal point in any room. Experiment with different color combinations and techniques to create your own signature style.
Whether you choose to make marble candles for personal use or as thoughtful gifts, these handmade creations will captivate anyone who sets their eyes upon them. The warm glow and enticing fragrance of your marble candles will delight your senses and create a cozy and inviting atmosphere.
So unleash your creativity, gather your materials, and start making your own marble candles today. With each step, you’ll be amazed at how the wax transforms into a stunning piece of art. Get ready to impress your friends and family with these unique and beautiful creations.
Enjoy the journey of candle making and may your marble candles bring joy and warmth to your life!
Frequently Asked Questions about How To Make Marble Candles
Was this page helpful?
At Storables.com, we guarantee accurate and reliable information. Our content, validated by Expert Board Contributors, is crafted following stringent Editorial Policies. We're committed to providing you with well-researched, expert-backed insights for all your informational needs.






0 thoughts on “How To Make Marble Candles”