Articles
How To Make A Driveway
Modified: August 22, 2024
Learn how to make a beautiful and durable driveway with our informative articles. Discover tips, techniques, and step-by-step guides to create the perfect driveway for your home.
(Many of the links in this article redirect to a specific reviewed product. Your purchase of these products through affiliate links helps to generate commission for Storables.com, at no extra cost. Learn more)
Introduction:
Welcome to the ultimate guide on how to make a driveway! Whether you’re looking to build a new driveway or update your existing one, this comprehensive article will guide you through the process step-by-step. A well-designed and properly constructed driveway can greatly enhance the curb appeal of your home while providing easy and convenient access for vehicles.
Before we dive into the details, let’s understand the importance of planning and preparation. Building a driveway requires careful consideration of various factors such as the size and layout of the driveway, the type of materials to use, and any local regulations that need to be followed. Taking the time to plan ahead will ensure a smooth and successful driveway construction project.
In this guide, we will cover everything from planning and marking the boundaries to excavating the ground, preparing the base, installing the pavers, and finishing touches. By following these steps, you’ll be on your way to having a beautiful and functional driveway that will last for years to come.
So, grab your tools, put on your work gloves, and let’s get started on creating the driveway of your dreams!
Key Takeaways:
- Proper planning, thorough excavation, and precise installation of pavers are crucial for creating a durable and visually appealing driveway that enhances the overall curb appeal of your home.
- Attention to detail, including compacting, leveling, and applying jointing sand, is essential for ensuring the stability and longevity of your driveway. Regular maintenance will preserve its beauty and functionality for years to come.
Read more: How To Make A Gravel Driveway
Step 1: Planning your driveway
The first step in making a driveway is careful planning. Before jumping into any construction work, take the time to consider a few key aspects that will greatly impact the overall outcome of your project.
The first consideration is the purpose of your driveway. Are you primarily looking for a functional space to park your vehicles, or do you want to create a visually appealing entrance to your home? Understanding your needs and preferences will help you determine the size, layout, and design of the driveway.
Next, take a look at your property and consider its topography. Are there any slopes, curves, or obstacles that need to be taken into account? It’s important to work with the natural landscape to ensure proper drainage and easy access.
Another crucial factor to consider is the local regulations and permits. Check with your local municipality or homeowners’ association to determine if there are any specific guidelines or restrictions you need to follow. This might include setback requirements, maximum driveway width, or regulations for materials used.
Once you have a clear understanding of your needs, the site conditions, and any legal considerations, it’s time to think about the materials for your driveway. There are several options available, including concrete, asphalt, gravel, interlocking pavers, and more. Each material has its own advantages and aesthetic appeal, so choose one that suits your preferences and budget.
In addition to the material, also consider the design elements of your driveway. You can opt for a simple straight design, a curved shape, or even add decorative elements like borders or patterns. The design should complement the overall style of your home and enhance its curb appeal.
Lastly, take into account your future maintenance plans. Consider factors such as regular cleaning, sealing, and repairs to ensure the longevity and durability of your driveway. Planning for ongoing maintenance will help you keep your driveway in great condition for years to come.
By taking the time to carefully plan your driveway, you’ll set the foundation for a successful project. Your well-thought-out plan will help you make informed decisions throughout the construction process, resulting in a driveway that meets your needs and exceeds your expectations.
Step 2: Clearing the area
Once you have completed the planning phase, it’s time to move on to the next step: clearing the area where your driveway will be located. Clearing the area is an important step to ensure a smooth and level surface for the construction of your driveway.
The first task is to remove any existing vegetation, rocks, debris, or obstacles that may be in the way. Start by marking the boundaries of your driveway using stakes and string. This will serve as a guide for clearing the area.
Use a shovel, rake, or a skid steer loader to remove the vegetation. Make sure to dig deep enough to remove the roots, as they can cause issues with the stability of the driveway in the future. It’s important to create a clean and level surface by removing not only the top layer but also any underlying grass, plants, or weeds.
If there are any large rocks or boulders in the area, you may need to use heavy equipment or hire a professional to remove them. Clearing the area of obstacles will ensure a smooth and safe construction process.
Additionally, if your driveway will intersect with a sidewalk or any other existing structures, you may need to consider making adjustments to accommodate the transition. This may involve removing a portion of the sidewalk or adjusting its height to match the level of the driveway.
During this process, it’s essential to pay attention to any drainage issues. Ensure that the area is properly sloped away from your property to prevent water from pooling on the driveway. Proper drainage is crucial to avoid water damage and to maintain the integrity of your driveway.
Once the area is cleared of vegetation and obstacles, take a moment to inspect the soil. Depending on the composition of the soil, you may need to make additional preparations such as adding fill dirt or addressing any drainage issues that could affect the stability of the driveway.
Clearing the area is an important step to create a clean and level surface for the construction of your driveway. By taking the time to properly clear the area, you’ll ensure a solid foundation for the next steps in the process.
Step 3: Marking the boundaries
Once you have cleared the area for your driveway, the next step is to mark the boundaries. Properly marking the boundaries will serve as a guide during the construction process and help ensure that your driveway is properly aligned and has the desired dimensions.
The first thing you’ll need is a measuring tape to determine the width and length of your driveway. Measure the width from one side to the other and make sure it meets any local regulations or restrictions. Consider the number of vehicles you plan to park on the driveway and leave enough space for comfortable maneuvering.
Next, use stakes and string to mark the outer edges of your driveway. Start by placing stakes at each corner and then stretch string between them. Make sure the string is tight and level. This will define the boundaries of your driveway and allow you to visualize its layout.
It’s important to take into account any curves or turns in the driveway while marking the boundaries. Use additional stakes and string to mark these sections accurately. Curving the driveway can add visual interest and create an inviting entrance to your home.
In addition to marking the outer boundaries, consider marking any additional features you want to include in your driveway design. This could include borders, walkways, or decorative elements. Use string and stakes to outline these features, ensuring they are properly aligned and proportionate to the overall design.
While marking the boundaries, it’s crucial to double-check your measurements and ensure that everything is aligned correctly. Taking the time to accurately mark the boundaries will save you from potential issues during the construction process.
Keep in mind that it can be helpful to consult a professional or use software tools to assist with accurately marking the boundaries of your driveway. This can ensure that your driveway is properly aligned and meets all necessary regulations and guidelines.
By clearly marking the boundaries of your driveway, you’ll have a visual guide to follow during the construction process. This step will help you ensure that your driveway is properly aligned, has the desired dimensions, and includes any additional features you envisioned.
Step 4: Excavating the ground
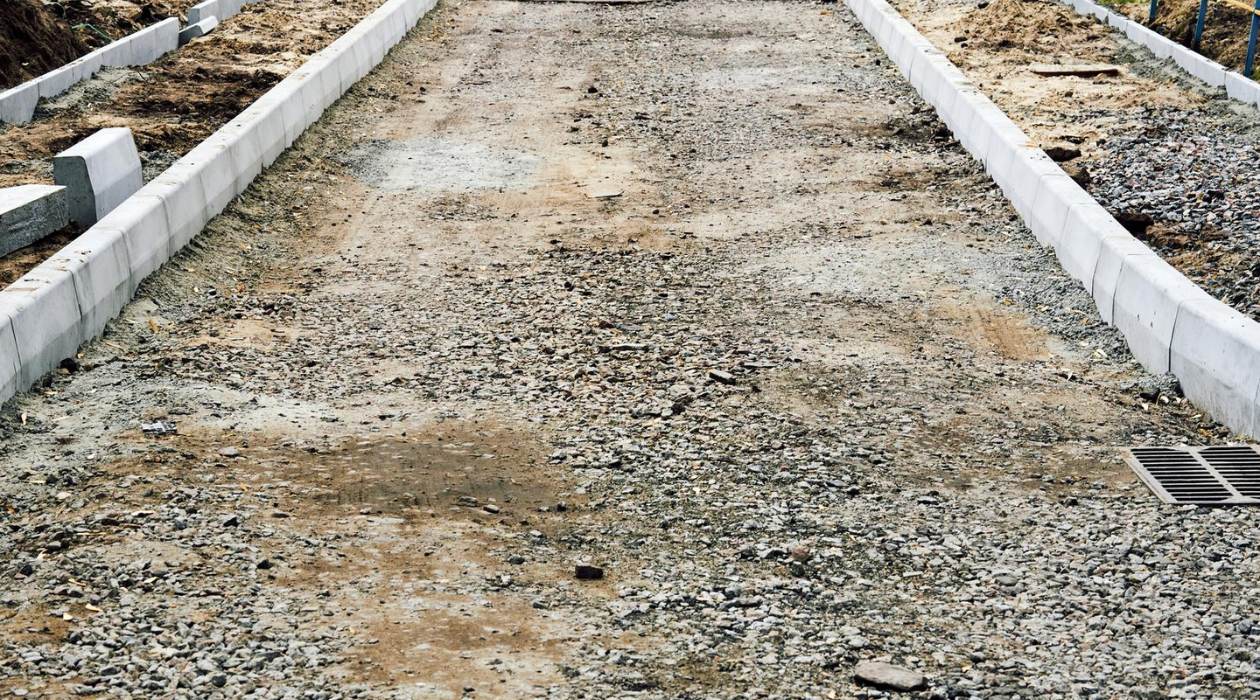
Once the boundaries of your driveway are marked, it’s time to move onto the next step: excavating the ground. Excavation is a crucial step in the driveway construction process as it involves removing the existing soil to create space for the base and pavers.
Before starting the excavation, make sure you have the necessary safety equipment, including gloves, protective eyewear, and a hard hat if needed. If the excavation is deep or extensive, you may need to rent heavy machinery such as a mini excavator or a skid steer loader.
Begin by removing the top layer of soil within the marked boundaries. This layer may contain grass, plants, rocks, or any other debris. Use a shovel, rake, or other appropriate tools to loosen and remove the soil. It’s important to excavate to the appropriate depth, as this will allow for the proper installation of the base material and pavers.
As you excavate, check the depth at various points to ensure consistency. Use a measuring tape or a laser level to measure the depth and make any necessary adjustments to maintain an even and level surface. The depth will depend on the type of base and pavers you’re using, as well as any local regulations or recommendations.
During excavation, pay attention to any underground utilities or pipes that may be present. If you’re unsure about the location of these utilities, contact your local utility companies to have them marked prior to excavation. This will help prevent any accidents or damages during the digging process.
Once the initial excavation is completed, take a moment to evaluate the grade and slope of the excavated area. Proper drainage is essential for your driveway to prevent water accumulation and potential damage. The driveway should be slightly sloped away from your property, directing water towards appropriate drainage areas.
After the initial excavation, it may be necessary to make further adjustments and remove any remaining roots, rocks, or uneven areas. The goal is to create a smooth and level surface that is ready for the installation of the base material.
Proper excavation is a crucial step in creating a stable and durable driveway. It provides a clean slate for the subsequent construction phases. Take your time with this step, ensuring that the excavation is done accurately and thoroughly.
Read more: How To Make Driveway Gates
Step 5: Preparing the base
With the ground excavated, it’s time to move on to the next step: preparing the base for your driveway. The base is a critical component of the driveway construction process as it provides stability and durability for the pavers or surface material.
The first step in preparing the base is to assess the quality of the soil that was excavated. If the soil is clay-based or has poor drainage, it’s recommended to remove the soil and replace it with a suitable base material. This will ensure proper water drainage and prevent future issues such as sinking or cracking.
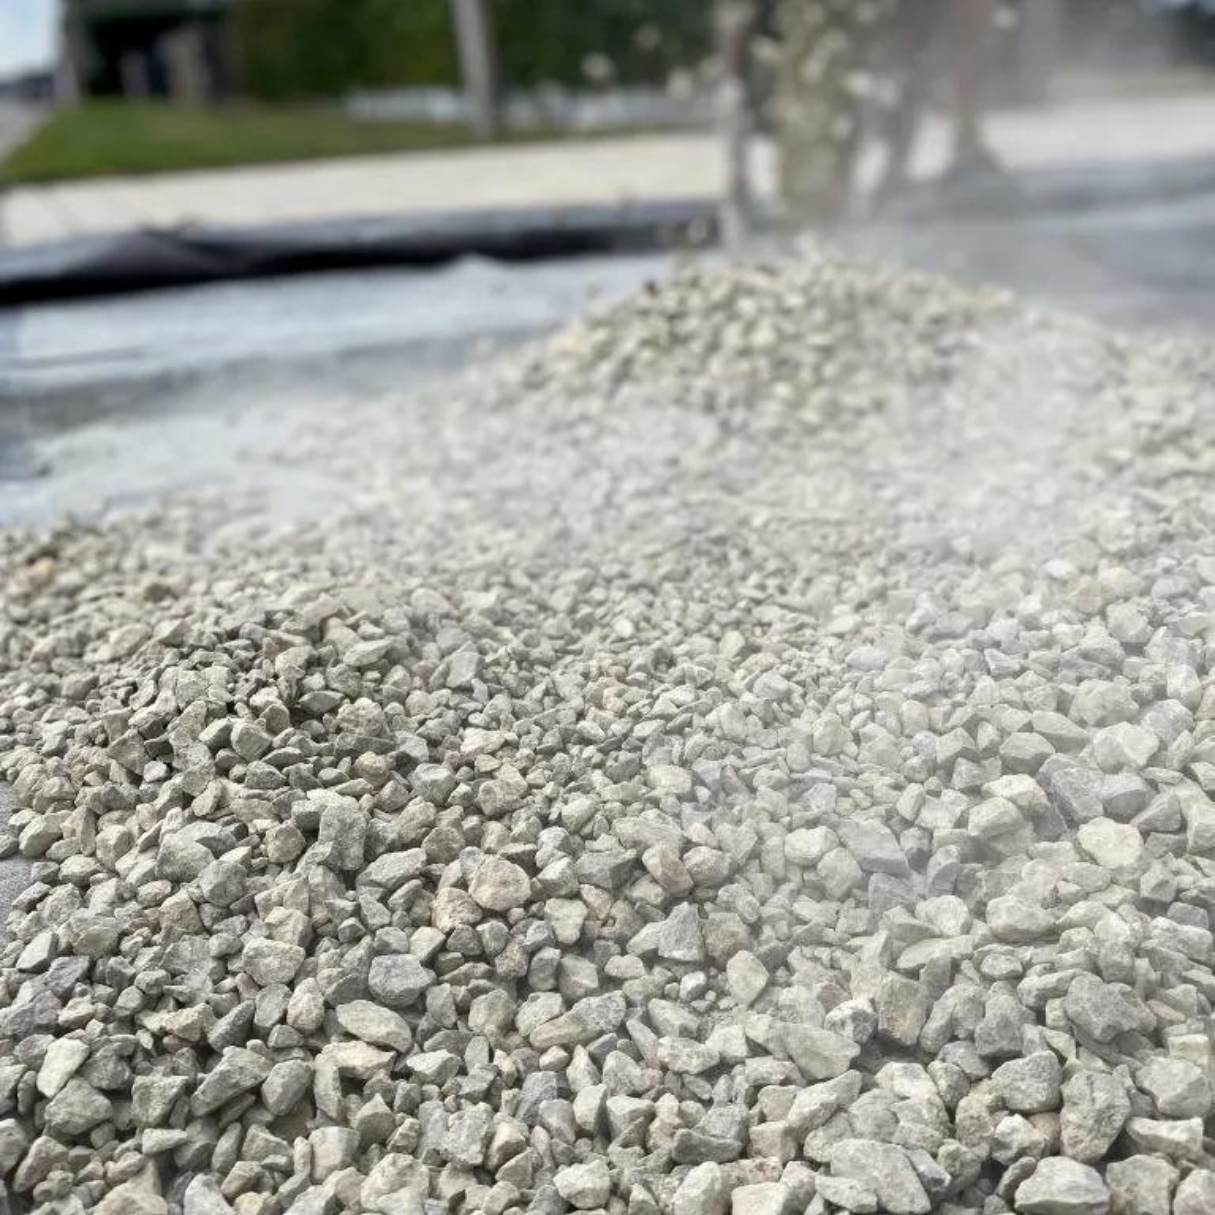
The next step is to add a layer of aggregate material to create a solid and stable base. The type of aggregate material you use will depend on factors such as the climate, soil conditions, and the type of pavers or surface material you plan to install.
It’s recommended to use a combination of different sizes of crushed stone or gravel for the base layer. Begin by adding a layer of larger stones as a base, typically around 4 to 6 inches in depth. Compact the stones using a plate compactor or a tamper to ensure a solid and level surface.
After the initial layer of larger stones, add a layer of smaller aggregate material, such as crushed stone or gravel, with a depth of about 2 to 3 inches. Again, compact the material thoroughly to create a stable base.
To further enhance the stability and prevent shifting of the base material, consider adding a geotextile fabric layer on top of the compacted aggregate. This fabric helps to distribute the weight of the pavers or surface material evenly, preventing them from sinking into the aggregate over time.
Throughout the process of adding and compacting the base material, regularly check the level to ensure a consistent slope away from your property. This will facilitate proper water drainage and help prevent water from pooling on the driveway.
Lastly, it’s important to keep in mind any local regulations or recommendations regarding the thickness and composition of the base. Local guidelines can vary, so it’s important to check with your municipality or consult a professional for specific requirements.
Preparing a solid base is crucial for the longevity and stability of your driveway. Taking the time to properly construct a stable base will ensure that your driveway remains in great condition for years to come.
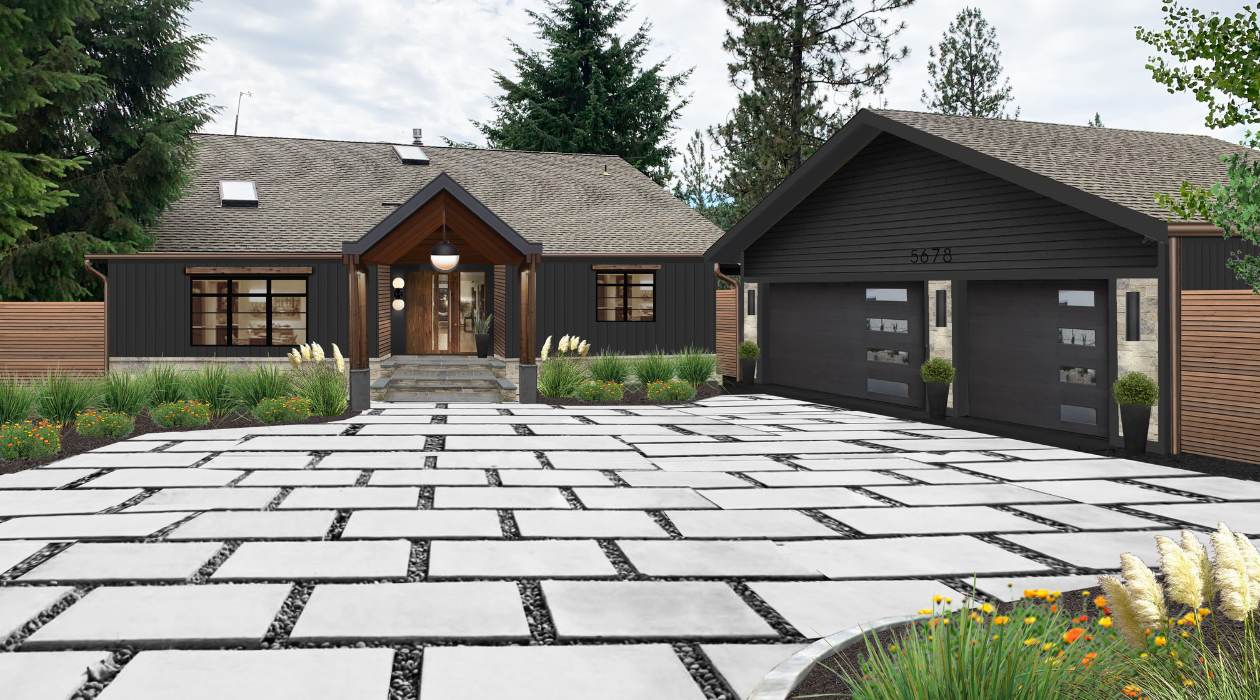
When making a driveway, ensure proper drainage by sloping it away from the house. Use a sturdy base of gravel or crushed rock, and consider using interlocking pavers for a durable and visually appealing surface.
Step 6: Installing the pavers
Once the base is properly prepared, it’s time to move on to the exciting step of installing the pavers for your driveway. Whether you’re using concrete pavers, clay bricks, or another type of paving material, this step will bring your driveway to life and add a touch of elegance.
Before starting the installation process, it’s important to plan the layout and pattern of the pavers. Consider factors such as the size of the pavers, the desired pattern (such as herringbone or running bond), and any borders or accents you want to incorporate. Take your time to experiment with different patterns and designs to find the one that best suits your aesthetic preferences.
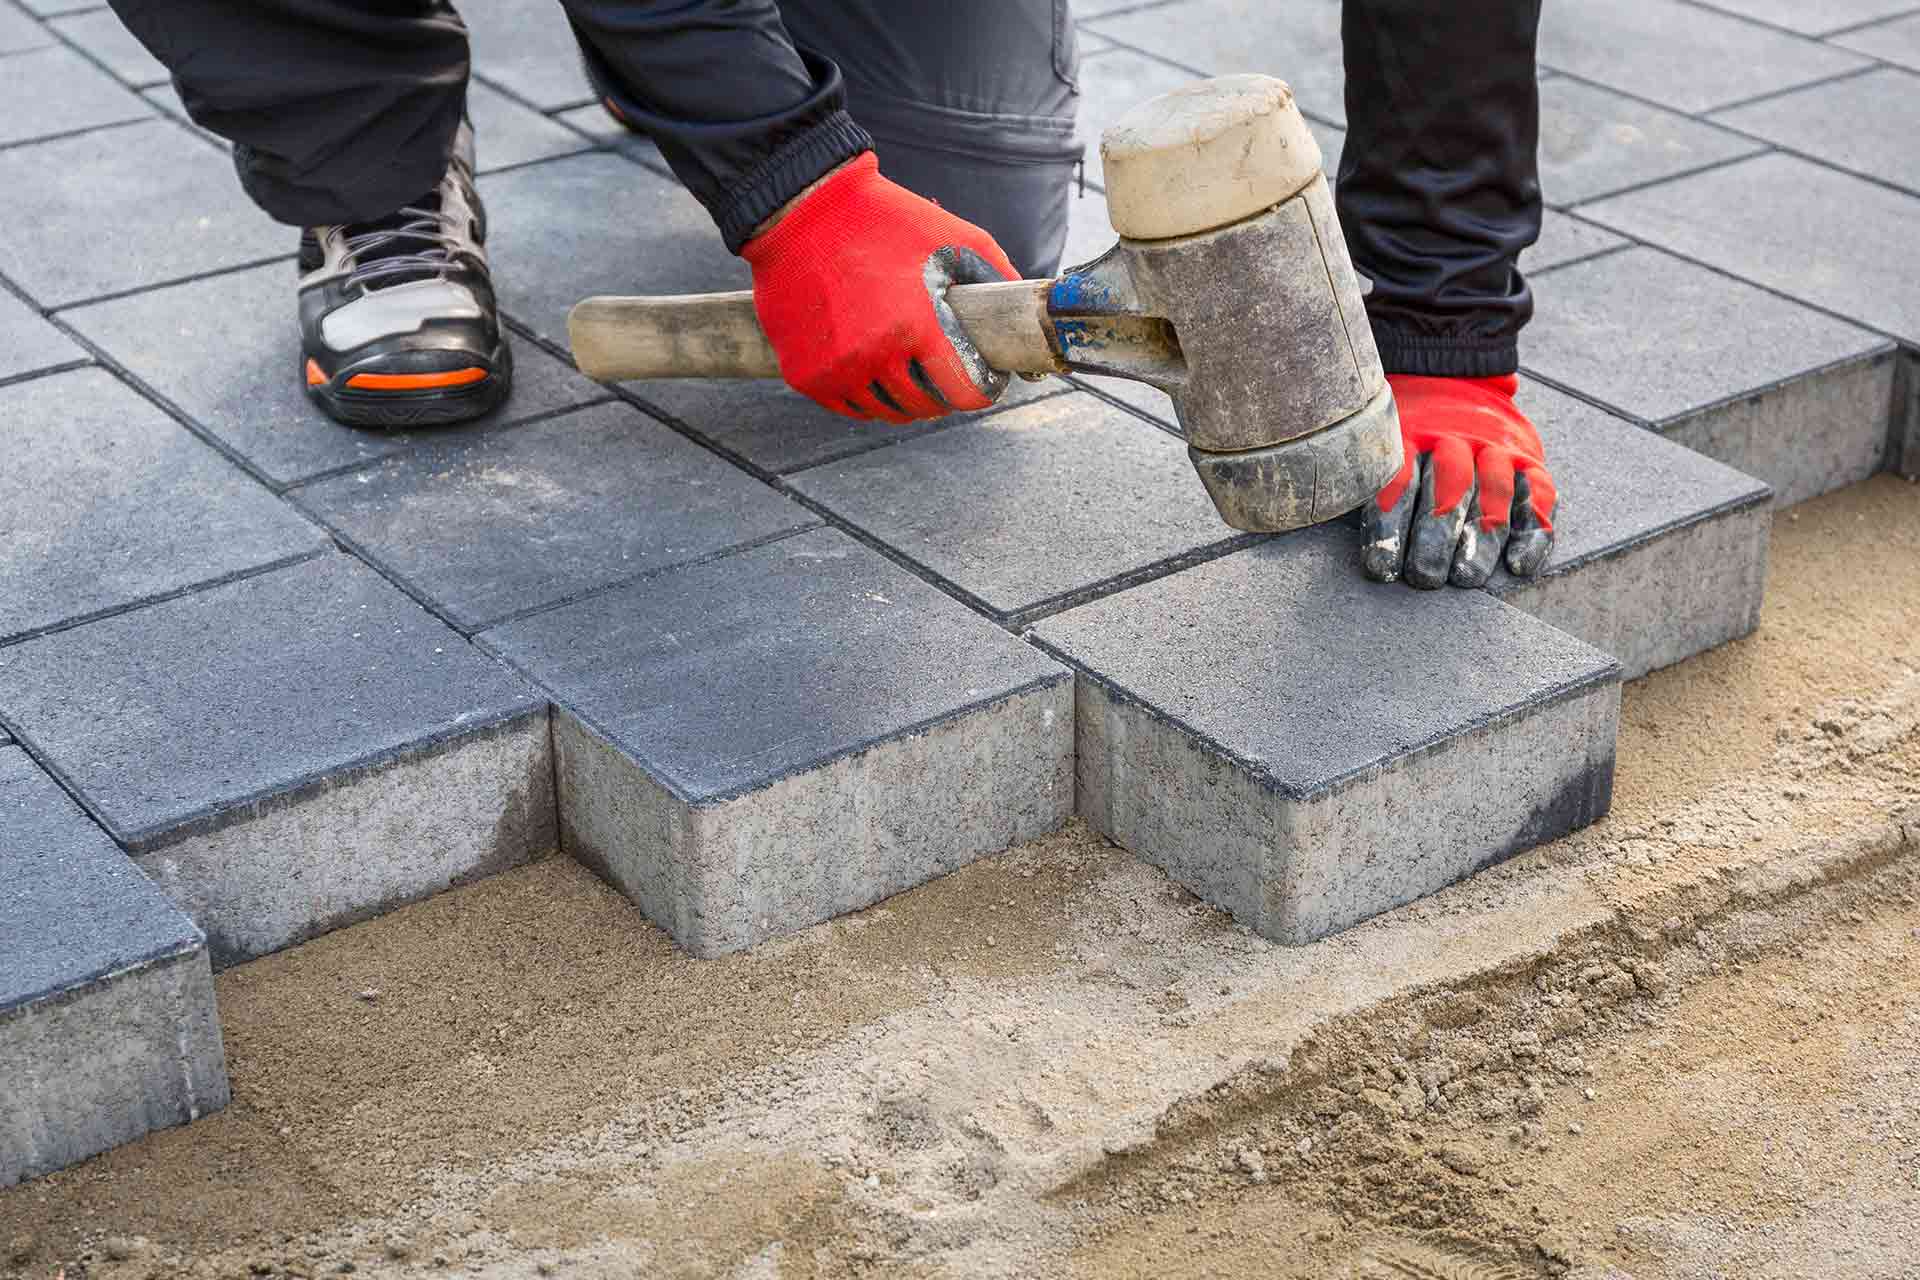
Start the installation process by placing the first row of pavers along one edge of the driveway. Ensure that the pavers are snugly fit against each other, with no gaps or misalignments. Use a rubber mallet or a hand tamper to gently tap the pavers into place and ensure they are level and stable.
As you move along, continue to place each subsequent row of pavers, keeping them tightly together. It’s crucial to maintain an even spacing between the pavers to ensure a neat and uniform appearance. Use string lines or guides to help guide the placement and keep the rows straight.
For added stability, consider using edge restraints or a concrete border along the edges of the driveway. These will help keep the pavers in place and prevent shifting or spreading over time. Install the edge restraints or border according to the manufacturer’s instructions, making sure they are firmly secured into the base.
Don’t forget to periodically check the level and slope of the pavers as you go. Adjust as needed to maintain a consistent slope away from your property for proper water drainage.
It’s worth noting that during the installation process, you may need to cut some pavers to fit into specific areas or around obstacles. Use a wet saw or a paver splitter to make accurate cuts, ensuring a clean and precise fit.
Once all the pavers are installed, sweep sand or fine aggregate material over the surface to fill in the joints. This will help lock the pavers in place and provide stability. Use a broom to sweep the sand into the joints and then lightly mist the surface with water to settle the sand.
Allow the sand to settle for a day or two, and then go over the driveway again with a broom, sweeping in more sand if needed to fill any remaining gaps. This will ensure that the pavers are securely in place and create a smooth and seamless surface.
Installing the pavers is an exciting step in the driveway construction process. Take your time and pay attention to detail to create a visually stunning and durable driveway that will enhance the appeal of your home.
Step 7: Applying jointing sand
After the pavers have been installed, the next important step is to apply jointing sand. Jointing sand is a crucial component of the driveway construction process as it helps to stabilize and lock the pavers in place, preventing shifting and weed growth between the joints.
Before applying the jointing sand, make sure that the surface of the pavers is clean and free from debris or excess sand. Sweep the paver surface thoroughly to remove any loose materials.
Next, spread the jointing sand evenly over the entire surface of the driveway, ensuring that it fills all the joints between the pavers. Use a broom or a specialized sand spreader to achieve an even distribution.
Once the sand is applied, use a vibrating plate compactor or a hand tamper to gently compact the sand into the joints. This will help create a firm and stable surface. Make sure to apply even pressure and work across the entire driveway to ensure that all the joints are properly filled.
After compaction, sweep off any excess sand from the surface of the pavers. This will help create a clean and finished appearance. It’s important to take your time during this step to ensure that all joints are adequately filled, as this will contribute to the long-term stability and durability of your driveway.
Keep in mind that jointing sand may settle over time due to rain or regular use of the driveway. It’s recommended to check the sand levels periodically and add more sand if necessary to maintain the desired joint stability.
It’s worth noting that there are alternative jointing materials available, such as polymeric sand, which hardens when activated with water. This type of sand can provide added strength and resistance to weed growth. Follow the manufacturer’s instructions for proper application if you choose to use polymeric sand.
Applying jointing sand is an important step in the driveway construction process. It not only enhances the stability and strength of the paver surface but also helps to create a polished and finished look. Take the time to properly apply and compact the jointing sand to ensure the longevity and beauty of your driveway.
Step 8: Compact and level the driveway
Once the jointing sand has been applied and settled, it’s time to focus on compacting and leveling the driveway. This step is crucial for ensuring a firm and even surface that can withstand regular use and provide long-lasting durability.
The first task is to compact the entire driveway using a vibrating plate compactor or a roller. The compactor will help to firmly settle the pavers into the base material and ensure that the joints are tightly compressed. Start at one end of the driveway and systematically work your way across, overlapping each pass to ensure even compaction. Pay extra attention to the edges and corners to ensure they are well compacted.
While compacting, make sure to move the compactor slowly and evenly over the surface, not applying excessive pressure. Be cautious not to damage the pavers by going too fast or applying too much force. The goal is to achieve a solid and stable surface without causing any damage to the pavers.
After compacting, it’s time to level the driveway. Use a screed or a straight board to drag across the surface of the pavers, removing any excess sand and ensuring an even level. Pay attention to any uneven areas or low spots and add or remove sand as needed to achieve a uniform surface.
During the leveling process, it’s helpful to periodically check the level using a long straight edge or a level tool. Make any necessary adjustments to ensure that the driveway has a consistent slope away from your property for proper drainage.
If there are any areas where the pavers are noticeably uneven or protruding, use a rubber mallet or a block of wood to gently tap them into place. This will help to achieve a smooth and seamless surface.
Once the driveway is compacted and leveled, take the time to walk across the surface and inspect for any areas that may need additional sand or attention. Sweep off any excess sand or debris from the surface of the pavers to reveal the finished look of your driveway.
By properly compacting and leveling the driveway, you ensure that the pavers are securely in place and provide a stable surface for vehicles and foot traffic. This step is crucial for achieving a well-constructed driveway that will not only stand the test of time but also enhance the overall aesthetic of your property.
Read more: How To Make A Driveway Ramp For Lowered Cars
Step 9: Finishing touches
With the bulk of the driveway construction completed, it’s time to focus on the final step: adding the finishing touches. These small but important details will give your driveway a polished and professional look, enhancing its overall appeal and functionality.
The first finishing touch is to clean up any remaining debris, such as loose paver fragments or excess sand. Use a broom or a leaf blower to sweep the surface of the driveway and remove any unwanted materials. This will ensure a clean and pristine appearance.
Next, consider adding edging or borders to enhance the visual appeal of your driveway. Edging can be made of various materials, such as stone, concrete, or metal, and it can provide a neat and defined edge to your driveway, preventing the pavers from shifting or spreading over time. Install the edging according to the manufacturer’s instructions, making sure it is securely in place.
If desired, you can also add decorative elements to the driveway, such as accent pavers or patterns. These can be arranged in a unique design to create a visually striking effect. Get creative and make your driveway truly stand out.
To maintain the longevity and beauty of your driveway, consider applying a sealant or paver sealer. This protective coating will help prevent stains, deterioration, and color fading caused by exposure to the elements. Follow the manufacturer’s instructions for application and reapplication as needed.
Lastly, add the necessary signage or house numbers to your driveway. This will ensure that your address is clearly visible and easily identifiable for visitors or emergency services. Choose signage or house numbers that complement the overall look of your driveway.
Once these finishing touches are complete, step back and admire your newly constructed driveway. It’s a testament to your hard work and attention to detail.
Remember that maintaining your driveway is an ongoing process. Regularly clean and sweep the surface to remove debris, and address any repairs or maintenance as needed. By taking care of your driveway, you can ensure its longevity and enjoyment for years to come.
Congratulations on completing the driveway construction process! You now have a beautiful and functional driveway that will enhance the curb appeal of your property and provide a smooth and convenient surface for vehicles.
Conclusion
Congratulations on completing the journey of constructing your driveway! Throughout this comprehensive guide, we have covered each step in detail, from the initial planning stages to the final finishing touches. By following these steps, you have created a well-designed and durable driveway that will enhance the overall appeal of your property.
Remember that constructing a driveway requires careful planning, preparation, and attention to detail. By taking the time to assess your needs, consider the site conditions, and select the right materials, you have laid the foundation for a successful project. Clearing the area, marking the boundaries, excavating the ground, preparing the base, installing the pavers, applying jointing sand, compacting and leveling the driveway, and adding the finishing touches have all played a vital role in achieving a high-quality and functional driveway.
Now that your driveway is complete, it’s important to maintain it properly. Regular cleaning, sealing, and occasional repairs will help preserve its beauty and functionality over time. Pay attention to any signs of damage or deterioration, and address them promptly to prevent further issues.
Not only does a well-constructed driveway enhance the aesthetics and curb appeal of your property, but it also provides a smooth and convenient pathway for vehicles and pedestrians. It adds value to your home and creates a welcoming entrance.
Remember to comply with any local regulations and consider your own personal style when designing your driveway. Whether you choose concrete, asphalt, pavers, or another material, the key is to create a driveway that suits your needs, preferences, and budget.
With the completion of your driveway construction, your property has been transformed into a more functional and inviting space. It’s time to enjoy the fruits of your labor and relish in the sense of accomplishment that comes with completing a well-designed and professionally executed project. Sit back, relax, and take pride in your beautiful new driveway, knowing that you have created a lasting improvement to your home.
Thank you for joining us on this journey of creating a driveway. We hope this guide has provided you with the knowledge and confidence to undertake this project successfully. Here’s to many years of driving enjoyment on your newly constructed driveway!
Frequently Asked Questions about How To Make A Driveway
Was this page helpful?
At Storables.com, we guarantee accurate and reliable information. Our content, validated by Expert Board Contributors, is crafted following stringent Editorial Policies. We're committed to providing you with well-researched, expert-backed insights for all your informational needs.


0 thoughts on “How To Make A Driveway”