Articles
How To Shovel A Driveway
Modified: December 7, 2023
Learn the best techniques and tips for shoveling your driveway in this comprehensive articles. Keep your driveway clear and safe during the winter season.
(Many of the links in this article redirect to a specific reviewed product. Your purchase of these products through affiliate links helps to generate commission for Storables.com, at no extra cost. Learn more)
Introduction
Shoveling a driveway is an essential winter task that can be physically demanding. Proper technique and using the right equipment can make the job much easier and more efficient. In this article, we will guide you through the steps of shoveling a driveway effectively, ensuring it is clear and safe for you and your loved ones.
Shoveling a driveway not only helps you gain access to your vehicle but also prevents the accumulation of snow and ice, which can pose a safety hazard. Taking the time to properly shovel your driveway will not only save you from potential accidents but also reduce the risk of slips and falls for yourself and others.
Before we dig into the details of how to shovel a driveway, let’s make sure you have all the necessary tools and equipment to get the job done efficiently.
Key Takeaways:
- Shoveling a driveway requires the right equipment and technique to ensure safety and efficiency. Clearing obstacles, starting from the middle, and pushing snow to the sides are key steps to maintain a clear and safe driveway.
- Properly storing shoveling equipment is essential for longevity and easy accessibility. By following these steps, you can be well-prepared for the next snowfall and ensure a safe and clear driveway throughout the winter season.
Read more: How To Store Shovels And Rakes
Step 1: Gather Necessary Equipment
Before you start shoveling your driveway, it’s important to gather all the necessary equipment to make the task easier and more comfortable. Here’s a list of essential tools you’ll need:
- A sturdy snow shovel: Look for a shovel with a wide blade and a long handle for better leverage.
- Snow boots or waterproof shoes: Make sure you wear footwear that provides good traction and keeps your feet dry.
- Gloves: Choose gloves that are waterproof and offer insulation to protect your hands from the cold.
- Layers of clothing: Dress in warm, breathable layers to stay comfortable while shoveling.
- Snow brush or ice scraper: These tools will come in handy if there is a layer of ice on your driveway.
- Salt or de-icing agent: Having a supply of salt or a de-icing agent can help melt snow and ice and prevent them from re-freezing.
- Ice melt mats or traction aids: Consider using ice melt mats or traction aids to provide extra grip on slippery surfaces.
Once you have gathered all the necessary equipment, you’re ready to tackle the task of shoveling your driveway. But before you dive in, it’s essential to assess the situation and clear any obstacles that may hinder your progress.
Step 2: Clear Any Obstacles
Before you start shoveling snow from your driveway, take a moment to clear any obstacles that may be in your way. Clearing obstacles will not only make the process easier but also safer. Here’s what you should do:
- Move any vehicles: If there are cars parked in your driveway, try to relocate them to a safe area before you start shoveling. This will give you more space to work and prevent any accidental damage to vehicles.
- Remove small objects: Look out for toys, branches, or any other small objects that may be on your driveway. Remove them to avoid tripping or damaging your shovel.
- Mark any hidden hazards: If there are any hidden hazards on your driveway, such as uneven pavement or slippery patches, mark them with cones or flags to avoid accidents.
By taking the time to clear any obstacles, you’ll create a safer working environment for yourself and ensure a smooth snow removal process. Once you’ve cleared the way, it’s time to start shoveling.
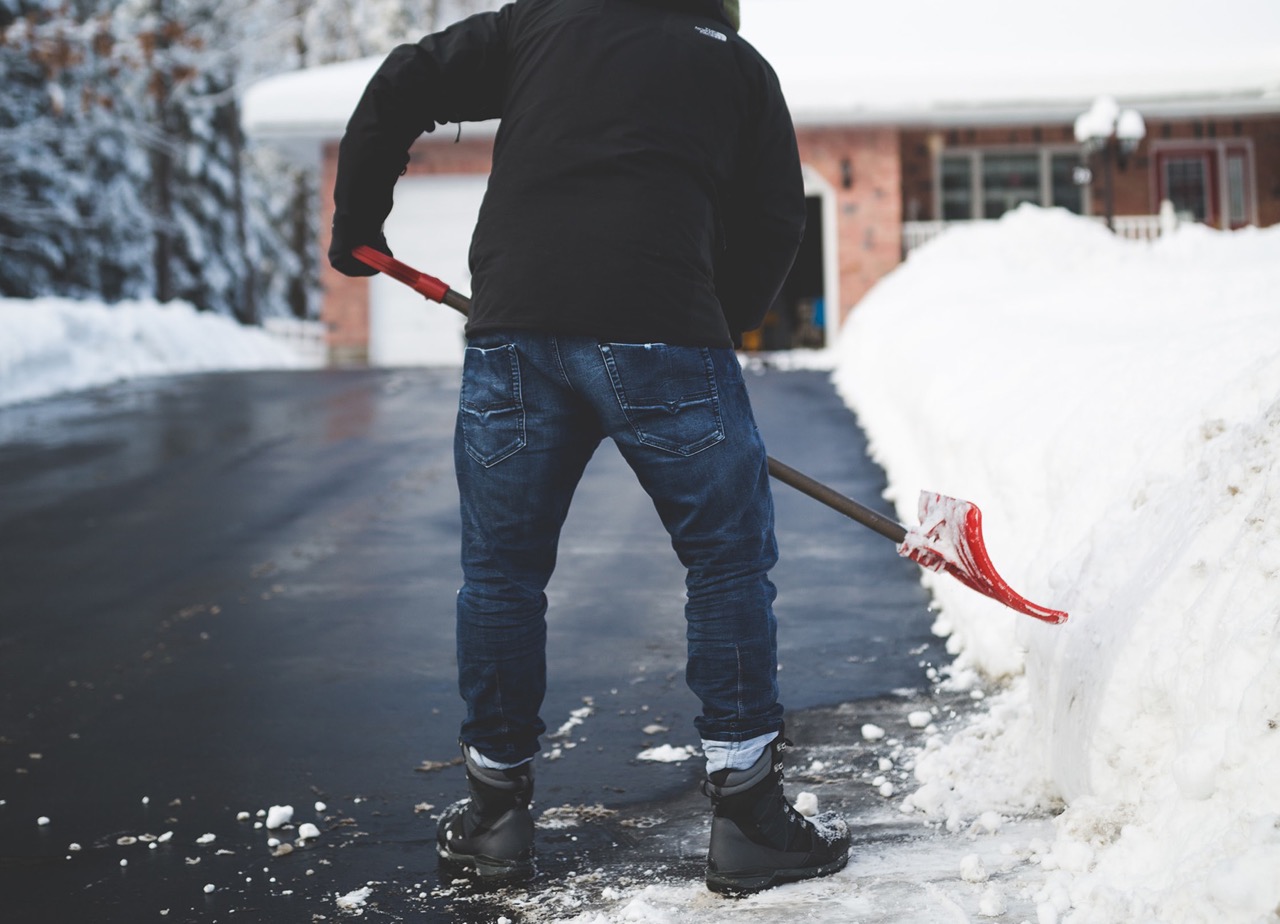
Step 3: Start Shoveling from the Middle
When it comes to shoveling your driveway, starting from the middle is a strategic approach. This technique allows for better snow distribution and helps prevent the formation of heavy piles of snow at the end of your driveway. Follow these steps to begin shoveling:
- Position yourself in the middle of your driveway, facing the entrance.
- Place the shovel blade on the ground and push it into the snow to create a small trench.
- Lean forward and use your legs to lift the snow, rather than straining your back. Bend at the knees and keep your back straight.
- Lift the shovel and throw the snow to the side, aiming for a neat pile away from the middle of the driveway.
- Continue shoveling, working your way outwards from the middle, creating a clear path as you go.
Remember to take regular breaks and pace yourself to avoid overexertion. Shoveling heavy snow can be physically demanding, so it’s important to listen to your body and avoid pushing beyond your limits.
Once you have cleared a sufficient path in your driveway, it’s time to push the remaining snow to the sides.
Step 4: Push Snow to the Sides
After starting from the middle and creating a clear path, it’s time to push the remaining snow to the sides of your driveway. This step helps to create more space and prevent the accumulation of snow in the middle. Follow these steps to effectively push the snow to the sides:
- Position yourself at one end of the cleared path, facing towards the middle of the driveway.
- Place the shovel blade on the ground, slightly angled towards the snow pile.
- Using your legs and hips, push the shovel forward, driving the snow towards the side of the driveway.
- Repeat this motion, working your way from one end of the cleared path to the other.
- Ensure that the snow is evenly distributed along the sides and not piled up in one spot. This will prevent it from impeding the clear path you have created.
Pushing the snow to the sides will not only create more space but also make the final step of snow removal easier. Speaking of the final step, let’s move on to clearing the snow pile at the end of your driveway.
When shoveling a driveway, start from the center and work your way out to the edges. This will help prevent the snow from piling up at the end of the driveway.
Read more: How To Make A Driveway
Step 5: Remove Snow Pile at the End
Once you have cleared your driveway and pushed the snow to the sides, you may notice a snow pile that has accumulated at the end of your driveway. It’s important to remove this pile to ensure a completely clear and safe driveway. Here’s how you can remove the snow pile at the end:
- Stand facing the snow pile at the end of your driveway.
- Use the shovel to break the pile into manageable sections.
- Lift each section of snow and throw it onto the cleared area of your lawn or to a designated snow pile away from your driveway.
- Continue breaking up and removing the snow pile until the area is clear.
It’s important to be cautious while removing the snow pile, as it can be heavier and more compacted than the freshly fallen snow. Take your time and use proper lifting techniques to avoid strain or injury.
Now that you have cleared the major part of the snow, let’s move on to the next step of clearing any remaining snow from your driveway.
Step 6: Clear Remaining Snow
After removing the snow pile at the end of your driveway, it’s time to focus on clearing any remaining snow to ensure a thorough job. While the previous steps have created a clear path and pushed the majority of the snow to the sides, there may still be some patches or thin layers of snow left. Here’s how you can clear the remaining snow:
- Starting from one end of your driveway, work your way towards the other end, using the shovel to scrape away any remaining snow.
- Hold the shovel at a slight angle and use short, controlled strokes to lift and remove the remaining snow from the surface.
- Pay attention to any areas where the snow may have been packed down or frozen. Use the edge of the shovel to break up these patches and then remove the loosened snow.
- Continue moving along your driveway, clearing away the remaining snow until the entire surface is clean and free of snow.
Take care not to damage the surface of your driveway while clearing the remaining snow. If your driveway is made of delicate materials like pavers or gravel, use a snow brush or a gentle sweeping motion with the shovel to avoid scraping or causing damage.
Now that you have cleared the remaining snow, it’s time to address the issue of ice formation by applying salt or a de-icing agent.
Step 7: Apply Salt or De-icing Agent
One of the final steps in properly shoveling your driveway is to address the issue of ice formation. Applying salt or a de-icing agent can help melt ice and prevent it from re-forming, ensuring a safer surface for walking and driving. Here’s how you can apply salt or a de-icing agent:
- First, ensure that the surface of your driveway is clear of any remaining snow.
- Wearing protective gloves, carefully spread a generous amount of salt or de-icing agent evenly across the entire driveway. Pay special attention to areas that tend to accumulate ice, such as slopes or shaded areas.
- Use a shovel or broom to gently spread and distribute the salt or de-icing agent for maximum coverage.
- Allow the salt or de-icing agent to work its magic for a short period of time, typically 15-20 minutes.
- After the designated waiting time, use the shovel or a broom to sweep away any excess salt or de-icing agent, ensuring it does not enter storm drains or sensitive areas.
Remember that excessive use of salt or de-icing agents can be harmful to plants, pets, and the environment. Use them sparingly and follow the recommended guidelines provided by the manufacturer.
By applying salt or a de-icing agent, you’re taking proactive measures to prevent ice formation and maintain a safe and accessible driveway. Now, let’s move on to the final step of properly storing your shoveling equipment.
Step 8: Properly Store Shoveling Equipment
Once you have completed the task of shoveling your driveway, it’s important to properly store your shoveling equipment to ensure its longevity and easy accessibility for future use. Here’s how you can store your shoveling equipment:
- Clean off any remaining snow or ice from your shovel using a broom or brush.
- Inspect the shovel for any signs of damage or wear. Replace or repair any broken or worn parts before storing.
- Find a suitable storage location for your shovel, such as a garage, shed, or designated storage area.
- Hang your shovel vertically on a wall or use hooks to secure it in an organized manner.
- Consider using a shovel cover or sleeve to protect the blade and prevent damage.
- If you have other shoveling equipment, such as a snow brush or ice scraper, ensure they are clean and dry before storing them in a convenient location.
- Keep your shoveling equipment easily accessible for future use, especially during the winter season.
Properly storing your shoveling equipment not only ensures its durability but also allows you to quickly and easily access it when the need arises. By taking these simple steps, you’ll be well-prepared for the next snowfall or icy conditions.
With Step 8 completed, you have successfully learned how to shovel your driveway effectively and efficiently. By following these steps, you can maintain a clear and safe driveway throughout the winter season. Stay safe and enjoy the winter wonderland!
Read more: How Wide Is A Driveway
Conclusion
Shoveling a driveway may seem like a laborious task, but with the right approach and equipment, it can be a manageable and even satisfying endeavor. By following the step-by-step guide outlined in this article, you can ensure a clear and safe driveway throughout the winter season.
Remember to gather all the necessary equipment before you begin, and clear any obstacles that may hinder your progress. Starting from the middle and pushing the snow to the sides will help distribute the snow evenly and prevent heavy piles at the end of your driveway. Clearing the remaining snow and applying salt or de-icing agent will ensure a complete removal of snow and prevent ice formation.
When you have finished shoveling, it’s important to properly store your equipment to maintain its longevity and easy accessibility for future use. Taking the time to clean and inspect your shovel before storing it will ensure it’s ready to go when the next snowfall arrives.
Shoveling your driveway not only helps you gain access to your vehicle but also promotes safety by reducing the risk of slips and falls. By following proper technique and using the right equipment, you can make the task of shoveling more efficient and less physically demanding.
Remember to listen to your body, take frequent breaks, and pace yourself to avoid overexertion. Stay hydrated and dress in layers to stay warm. If you have any health conditions or concerns, it’s always best to consult with a healthcare professional before engaging in strenuous physical activity.
With these tips in mind, you are now equipped to tackle the snow-covered challenge of shoveling your driveway. Stay safe, stay warm, and enjoy the winter season!
Frequently Asked Questions about How To Shovel A Driveway
Was this page helpful?
At Storables.com, we guarantee accurate and reliable information. Our content, validated by Expert Board Contributors, is crafted following stringent Editorial Policies. We're committed to providing you with well-researched, expert-backed insights for all your informational needs.


0 thoughts on “How To Shovel A Driveway”