Articles
How To Measure A Floor
Modified: February 26, 2024
Learn how to measure a floor accurately with our informative articles. Get step-by-step instructions and tips for a successful flooring project.
(Many of the links in this article redirect to a specific reviewed product. Your purchase of these products through affiliate links helps to generate commission for Storables.com, at no extra cost. Learn more)
Introduction
When it comes to home improvement projects such as installing new flooring, one of the first steps is to accurately measure the floor area. Proper measurements are crucial to ensure you purchase the right amount of materials and avoid any unnecessary expenses or delays.
Measuring a floor may seem like a daunting task, but with the right tools and techniques, it can be a straightforward process. In this guide, we will take you through the step-by-step process of measuring a floor accurately, whether you are working with a small room or a large open space.
Before we dive into the details, it’s important to mention that different flooring materials may have specific measurement requirements or considerations. For instance, laminate flooring typically requires a gap along the edges to allow for expansion, while carpeting may need additional measurements for padding. Always refer to the manufacturer’s guidelines for specific instructions regarding your chosen flooring material.
Now, let’s gather our tools and materials and get started with measuring your floor!
Key Takeaways:
- Accurate floor measurements are essential for purchasing the right amount of materials and ensuring a smooth installation process. Preparation, precise measurements, and careful calculations are key to a successful flooring project.
- Measuring irregularly shaped floors requires meticulous attention to detail and breaking down the floor into manageable sections. Careful measurement and calculation of each section’s square footage are crucial for accurate material estimation.
Read more: How To Darken A Room With Blinds
Tools and Materials Needed
To accurately measure a floor, you will need the following tools and materials:
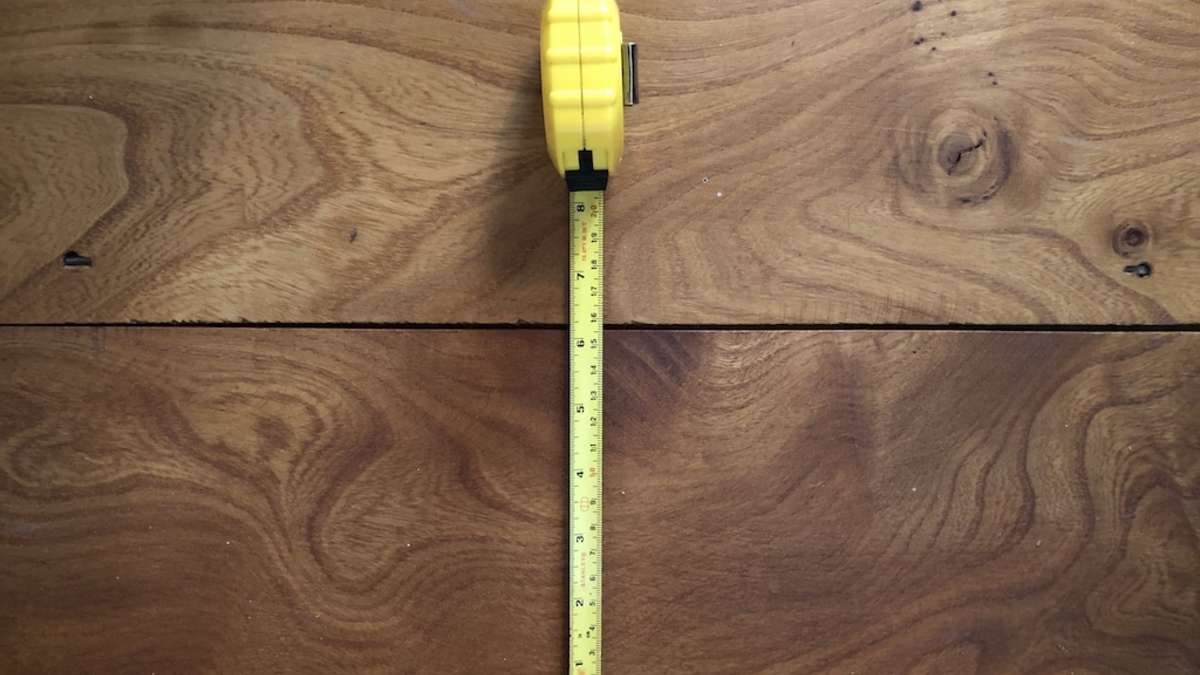
- Tape Measure: A good quality tape measure is essential for precise measurements. Look for one that is at least 25 feet long and has clear markings.
- Pencil or Pen: You’ll need something to mark your measurements on the floor or on a piece of paper.
- Graph Paper: Using graph paper can help you create a scaled drawing of the floor plan, making it easier to calculate square footage.
- Calculator: A calculator will come in handy for performing calculations such as multiplying lengths and widths to determine square footage.
- Safety Equipment: Depending on the type of flooring you will be working with, you may need safety equipment such as gloves, goggles, or knee pads.
These are the basic tools and materials you will need to get started with measuring a floor. However, depending on the specific requirements of your project, you may also need additional tools such as a laser measurer for larger areas or a level to ensure accurate measurements.
Before you begin measuring, it’s important to ensure that the room is clear of any furniture or obstructions. This will make it easier to get accurate measurements and avoid any potential obstacles.
Now that you have your tools ready, let’s move on to the next step: preparation.
Preparation
Before you start measuring your floor, it’s important to prepare the area to ensure accurate measurements. Here are a few steps to follow:
- Clean and Clear the Floor: Remove any furniture, rugs, or debris from the floor to have a clear, unobstructed area for measuring. This will prevent any inaccuracies caused by objects on the floor.
- Inspect for Damage: Take a moment to inspect the floor for any damage or irregularities that may affect your measurements. If you notice any uneven spots or damaged areas, make a note of them to factor into your calculations later.
- Check for Obstructions: Look for any permanent fixtures, such as built-in cabinets or columns, that may be present on the floor. You will need to measure around them or adjust your calculations accordingly.
- Measure the Walls: Before measuring the floor, it’s a good idea to measure the length and width of the walls to ensure they are square. If they are not perfectly square, it may affect the accuracy of your floor measurements.
Once you have completed these preparation steps, you are ready to start measuring the floor area. Remember to take your time and double-check your measurements to ensure accuracy.
Now that you have prepared the area, let’s move on to the next step: measuring the floor area.
Measuring Floor Area
Measuring the floor area is the first step in accurately determining the amount of flooring material you will need. Here’s how you can measure the floor area:
- Divide the floor area into manageable sections: If you are dealing with a large room or an open floor plan, it may be easier to break it down into smaller sections. This will help ensure accuracy and make it easier to calculate the square footage.
- Start with one section at a time: Begin by measuring the length and width of the first section using a tape measure. Extend the tape measure from one wall to the other, ensuring it is straight and flush against the wall.
- Record the measurements: Once you have measured the length and width of each section, record the measurements on a piece of graph paper or in a notebook. This will make it easier to keep track of the measurements and calculate the total area later.
- Repeat the process for each section: Move on to the next section and repeat the measuring process. Be sure to label each section on your diagram or notes to avoid confusion.
- Account for any irregularities: If there are any alcoves, bay windows, or other irregularly shaped areas, measure them separately and add their square footage to the total area. You can do this by measuring the length and width of the irregular shape and calculating its area using basic geometry formulas.
Once you have measured all the sections and accounted for any irregularities, add up the individual areas to calculate the total floor area. This will give you an accurate measurement of the amount of flooring material you will need.
Remember to double-check your measurements and calculations to ensure accuracy. It’s always a good idea to add a little extra to your measurements to account for any cutting, waste, or future repairs.
Now that you have measured the floor area, let’s move on to measuring the floor length.
Measuring Floor Length
Measuring the floor length is an essential step in accurately determining the dimensions of your floor. Here’s how you can measure the length of your floor:
- Start at a reference point: Begin by choosing a wall as your starting point and mark it with a small dot. This will serve as your reference point for measuring the length.
- Extend the tape measure: Using a tape measure, extend it from the reference point along the wall to the opposite end of the floor. Make sure the tape measure is straight and taut.
- Record the measurement: Take note of the measurement on the tape measure. It’s important to be accurate, so double-check your measurement if needed. Consider rounding up to the nearest inch for ease of calculation later on.
- Repeat the process for multiple walls: If your floor has multiple walls, repeat the measuring process for each wall. Make sure to include any corners or irregularities in your measurements.
- Add up the measurements: Once you have measured the length of each wall, add up the individual measurements to get the total floor length. This will give you an accurate understanding of the linear distance of the floor.
Keep in mind that if your floor is not a perfect rectangle or square, you may need to measure additional lengths if there are alcoves, bay windows, or other irregular features. These additional measurements should be added to the total floor length.
Remember to label your measurements and keep them in a safe place for future reference. Accurate floor length measurements are essential when purchasing flooring materials and planning for installation.
Now that you have measured the floor length, let’s move on to measuring the floor width.
When measuring a floor, always measure the length and width at the longest and widest points to ensure accurate dimensions for materials and installation.
Read more: How To Fix Pleated Blinds
Measuring Floor Width
Measuring the floor width is an important step in accurately determining the dimensions of your floor. Here’s how you can measure the width of your floor:
- Select a reference point: Choose one of the walls as your reference point for measuring the width of the floor. Mark it with a small dot to indicate where you will start your measurement.
- Extend the tape measure: Take a tape measure and extend it from the marked reference point to the opposite wall. Ensure that the tape measure is straight and flush against the floor.
- Record the measurement: Read and record the width measurement shown on the tape measure. To ensure accuracy, it’s a good idea to double-check the measurement if needed.
- Repeat the process for multiple locations: If the floor has irregularities or variations in width, repeat the measuring process at different locations. This will ensure you capture the maximum width of the floor.
- Note any irregularities: If there are any alcoves, bay windows, or other irregular features that affect the width, make sure to measure them separately and note their measurements for accuracy.
Once you have measured the width at various locations and accounted for any irregularities, you can determine the average width of the floor. Add up the individual width measurements and divide it by the number of measurements taken to calculate the average width.
Remember to label your measurements and keep them in a safe place for future reference. Accurate floor width measurements are crucial when purchasing flooring materials and planning for installation.
Now that you have measured the floor width, let’s move on to calculating the square footage.
Calculating Square Footage
Calculating the square footage of your floor is a critical step in determining the amount of flooring material you will need. Here’s how you can calculate the square footage:
- Multiply the floor length by the floor width: Take the measurement of the floor length that you obtained in step 5 and multiply it by the floor width that you obtained in step 6. This will give you the square footage of each section of the floor.
- For multiple sections: If you divided the floor into multiple sections in step 4, calculate the square footage for each section individually using the length and width measurements for that section. Add up the square footage of all the sections to get the total square footage of the entire floor.
- Account for irregularities: If there are any irregularly shaped areas or alcoves, calculate their square footage separately using the appropriate formulas. Add the square footage of these areas to the total square footage of the floor.
It’s important to note that square footage is typically measured in square feet, but it can also be expressed in other units such as square meters or square yards depending on your region or preference. Ensure consistency with the unit of measurement throughout your calculations and when purchasing flooring materials.
Once you have calculated the total square footage of the floor, it’s a good idea to add a little extra to account for waste, cutting, and future repairs. It’s better to have slightly more material than necessary rather than falling short during the installation process.
Now that you have calculated the square footage of your floor, you are well-prepared to purchase the right amount of flooring materials for your project.
Lastly, for irregularly shaped floors, we’ll discuss the measuring process in the next section.
Measuring Irregularly Shaped Floors
Measuring irregularly shaped floors requires a slightly different approach compared to measuring rectangular or square floors. Here’s how you can measure irregularly shaped floors:
- Break down the floor into smaller sections: Divide the irregularly shaped floor into smaller, more manageable sections. This will make it easier to measure and calculate the square footage.
- Measure each section separately: Use a tape measure to measure the length and width of each section. Straighten the tape measure along the edges of the section as much as possible.
- Record the measurements: Note down the length and width measurements for each section. Label each section to keep track of the measurements.
- Calculate the square footage of each section: Multiply the length and width of each section to calculate its square footage. Repeat this process for every section of the irregularly shaped floor.
- Add up the square footage: Once you have calculated the square footage for each individual section, add them together to get the total square footage of the irregularly shaped floor.
For irregularly shaped floors, it’s crucial to be meticulous in your measurements and calculations. Take extra care to measure the edges and any curved or angled areas accurately. If needed, consider creating a scaled diagram on graph paper to help visualize the floor and calculate the square footage more precisely.
Remember to account for any alcoves, bay windows, or other irregular features separately. Measure their length and width, calculate their individual square footage, and add it to the total square footage of the floor.
By breaking down the irregularly shaped floor into manageable sections and carefully measuring each one, you’ll be able to accurately determine the square footage and ensure you have enough flooring material for your project.
Now that you have measured irregularly shaped floors successfully, let’s wrap up this guide.
Conclusion
Measuring a floor accurately is a crucial step in any flooring project. It ensures that you purchase the right amount of materials, avoid unnecessary expenses, and ensure a smooth installation process. By following the steps outlined in this guide, you can confidently measure your floor with precision.
Start by gathering the necessary tools and materials, including a tape measure, pencil or pen, graph paper, calculator, and any safety equipment required. Prepare the area by clearing it of furniture and other obstructions, and inspecting for any irregularities or damage.
Next, measure the floor area by dividing it into manageable sections. Measure the length and width of each section and record the measurements. Account for any irregularly shaped areas separately.
After measuring the floor area, measure the floor length and width by extending the tape measure from a reference point and recording the measurements accurately. Calculate the square footage by multiplying the length and width of each section and adding them up. Add extra allowance for waste and cutting.
For irregularly shaped floors, break them down into smaller sections, measure each section separately, and calculate their square footage individually. Add up the square footage of all sections to get the total square footage.
By following these steps, you can ensure that you have the accurate measurements needed to make informed decisions when purchasing flooring materials and planning for installation. Remember to double-check your measurements and calculations for accuracy.
With your floor accurately measured, you can proceed with confidence, knowing that you have the necessary information to complete your flooring project successfully. Good luck with your measurements, and enjoy the process of transforming your space with beautiful new flooring!
Frequently Asked Questions about How To Measure A Floor
Was this page helpful?
At Storables.com, we guarantee accurate and reliable information. Our content, validated by Expert Board Contributors, is crafted following stringent Editorial Policies. We're committed to providing you with well-researched, expert-backed insights for all your informational needs.


0 thoughts on “How To Measure A Floor”