Articles
How To Measure Garage Door Torsion Spring
Modified: September 2, 2024
Learn how to measure a garage door torsion spring in this informative article. Find step-by-step instructions and expert tips to ensure accurate measurements.
(Many of the links in this article redirect to a specific reviewed product. Your purchase of these products through affiliate links helps to generate commission for Storables.com, at no extra cost. Learn more)
Introduction
Garage door torsion springs play a crucial role in the proper functioning of a garage door. These springs are responsible for counterbalancing the weight of the door, making it easier to open and close smoothly.
Measuring garage door torsion springs is necessary when you need to replace a broken spring or when you’re installing a new garage door. Accurate measurements ensure that you select the correct spring size and type for your door, ensuring optimal performance and safety.
While the task may seem daunting, with the right tools and a step-by-step approach, measuring garage door torsion springs can be a relatively straightforward process. In this article, we will guide you through the complete measurement process, providing you with all the necessary information and tips for accurate measurements.
So, whether you’re a seasoned homeowner or a professional garage door technician, read on to learn how to measure garage door torsion springs like a pro!
Key Takeaways:
- Accurate measurement of garage door torsion springs is crucial for optimal performance and safety. Understanding the types of springs, gathering the right tools, and following a step-by-step process ensures a smooth replacement or installation.
- Considering additional factors such as spring direction, coating, and door weight is essential for informed decision-making. Seeking professional assistance when needed guarantees expert guidance for efficient and safe garage door operations.
Read more: How To Rewind A Garage Door Spring
Understanding Garage Door Torsion Springs
Before diving into the measurement process, it’s important to have a solid understanding of what garage door torsion springs are and how they function.
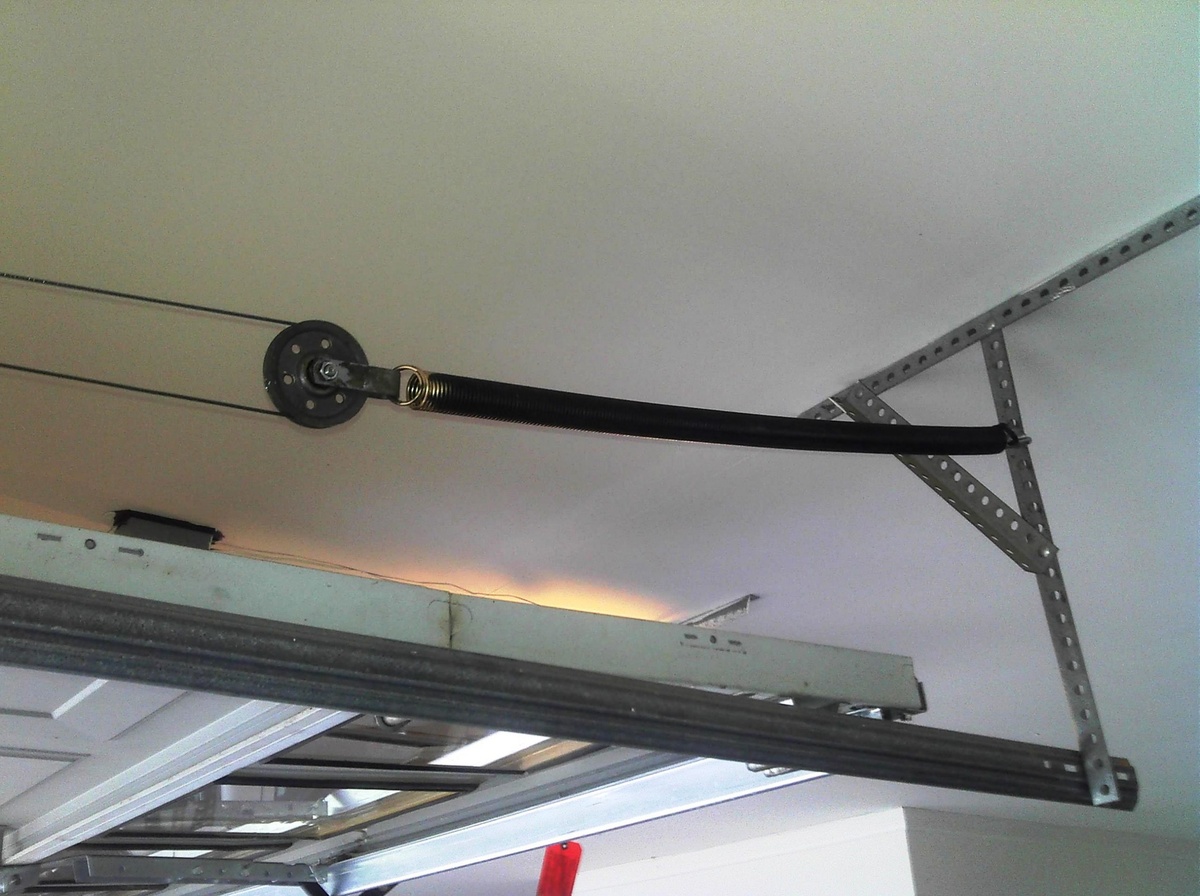
Garage door torsion springs are tightly wound metal springs that are mounted above the garage door. They are typically made from high-quality steel and play a vital role in counterbalancing the weight of the door. This greatly reduces the amount of force required to open and close the door manually or with the assistance of a garage door opener.
These springs work by storing mechanical energy when they are wound tight. As the garage door lowers or raises, the springs unwind or wind, respectively, releasing or storing the energy. This stored energy helps offset the weight of the door, making it easier to operate.
Garage door torsion springs are available in different sizes, wire thicknesses, and lengths. The size and type of spring required will depend on factors such as the weight, height, and type of the garage door. Therefore, it is crucial to accurately measure the dimensions of the existing spring or the door itself to ensure the proper replacement or installation of a new spring.
Incorrectly sized or weak garage door torsion springs can lead to poor door performance, excessive strain on the opener or door components, and, in extreme cases, unpredictable and hazardous door movements. Therefore, proper measurement is essential for the safety and functionality of your garage door.
Now that you have a basic understanding of garage door torsion springs and their importance, let’s move on to the different types of garage door torsion springs you may come across.
Types of Garage Door Torsion Springs
When it comes to garage door torsion springs, there are primarily two types: standard torsion springs and high-cycle torsion springs. Understanding the differences between these two types is important for accurately measuring your garage door springs.
1. Standard Torsion Springs:
Standard torsion springs are the most commonly used type of garage door springs. They are designed to provide the necessary counterbalance for typical residential garage doors. These springs have a specific lifespan measured in cycles, with a cycle typically referring to one full opening and closing of the garage door.
Standard torsion springs are available in different wire sizes and lengths to accommodate various door weights and sizes. The wire size refers to the thickness of the spring wire, while the length indicates the overall length of the spring when it’s not wound.
2. High-Cycle Torsion Springs:
High-cycle torsion springs are designed for garage doors that require more frequent usage or have a heavier weight. They are engineered to withstand a significantly higher number of cycles compared to standard torsion springs. High-cycle springs can last up to five times longer than standard springs, making them ideal for commercial or heavily used residential garage doors.
These springs are typically made from high-grade materials and are available in various wire sizes and lengths to match the specific requirements of the door. The increased durability and longer lifespan of high-cycle torsion springs make them a reliable choice for heavy-duty applications.
It’s important to note that identifying the type of torsion spring you have or need is crucial for accurate measurements. The specific type of spring will determine the wire size, spring rate, and other dimensions that need to be considered during the measurement process.
Now that you have a good understanding of the types of garage door torsion springs available let’s move on to the tools and equipment you’ll need to measure them accurately.
Tools and Equipment Needed
Measuring garage door torsion springs requires a few essential tools and equipment to ensure accurate measurements. Gathering the necessary tools beforehand will help streamline the measurement process and prevent any delays or mistakes.
Here are the tools and equipment you’ll need:
1. Tape Measure: A reliable tape measure is essential for measuring the length and other dimensions of the torsion spring. Make sure the tape measure is long enough to measure the entire length of the spring.
2. Calipers: Calipers are useful for measuring the wire thickness and other small dimensions of the torsion spring. Digital calipers are highly recommended for precise and accurate measurements.
3. Safety Glasses: Safety should be a top priority when working with garage door torsion springs. Wear safety glasses to protect your eyes from any potential spring breakage or flying debris.
4. Work Gloves: Thick work gloves provide an added layer of protection when handling the torsion springs. They help shield your hands from any sharp edges or potential injuries.
5. Step Stool or Ladder: Depending on the height of your garage door, you may need a step stool or ladder to access the torsion spring safely. Make sure the stool or ladder is sturdy and secure before climbing on it.
6. Pen and Paper: Keeping a pen and paper handy allows you to jot down the measurements as you take them. This helps you stay organized and ensures you don’t forget any important details.
Having these tools and equipment readily available will make the measurement process smoother and more efficient. Now that you’re well-equipped, let’s dive into the step-by-step process of measuring garage door torsion springs.
Step-by-step Measurement Process
Follow these step-by-step instructions to measure your garage door torsion springs accurately:
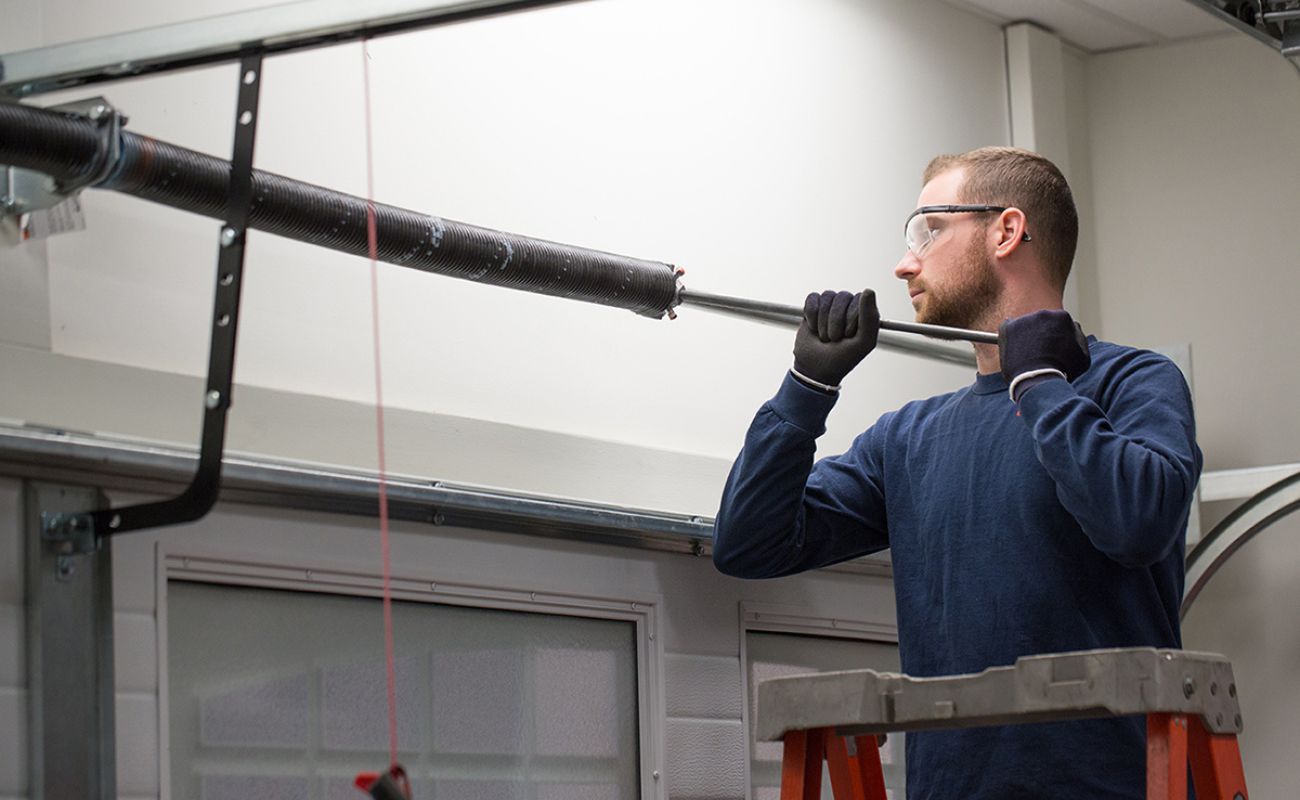
Step 1: Ensure Safety Precautions
Before starting the measurement process, make sure to disconnect the power to the garage door opener and secure the door in the closed position. This prevents any accidental movements or releases of tension during the measurement.
Step 2: Measure the Length
Using your tape measure, measure the length of the torsion spring from end to end. Start from one end of the coiled portion of the spring and measure to the opposite side. Take note of the measurement in inches or centimeters.
Step 3: Measure the Wire Size
Use your calipers to measure the thickness of the spring wire. Place the calipers over the wire and record the measurement. The wire size is typically expressed in gauge, with a lower gauge number indicating a thicker wire.
Step 4: Calculate the Spring Rate
The spring rate is a measure of the amount of force required to compress or extend the spring by one inch. To calculate the spring rate, divide the weight of the door by the amount of travel in inches.
Step 5: Determine the Inside and Outside Diameters
To determine the inside and outside diameters of the spring, measure the distance from the innermost coil to the outermost coil. Record these measurements separately, as they may differ slightly.
Step 6: Note Any Additional Considerations
During the measurement process, be sure to note any additional considerations, such as the number of coils or the direction of the spring’s wind. These details may be necessary when ordering a replacement spring.
By following these step-by-step instructions, you can accurately measure your garage door torsion springs. Remember to take your time and be cautious when handling the springs to ensure your safety.
Now that you have completed the measurement process, you can confidently proceed with selecting the appropriate replacement or installation of your garage door torsion springs.
When measuring a garage door torsion spring, always measure the wire size, inside diameter, and length of the spring. Use a caliper or ruler for accurate measurements.
Read more: How To Wind Garage Door Spring
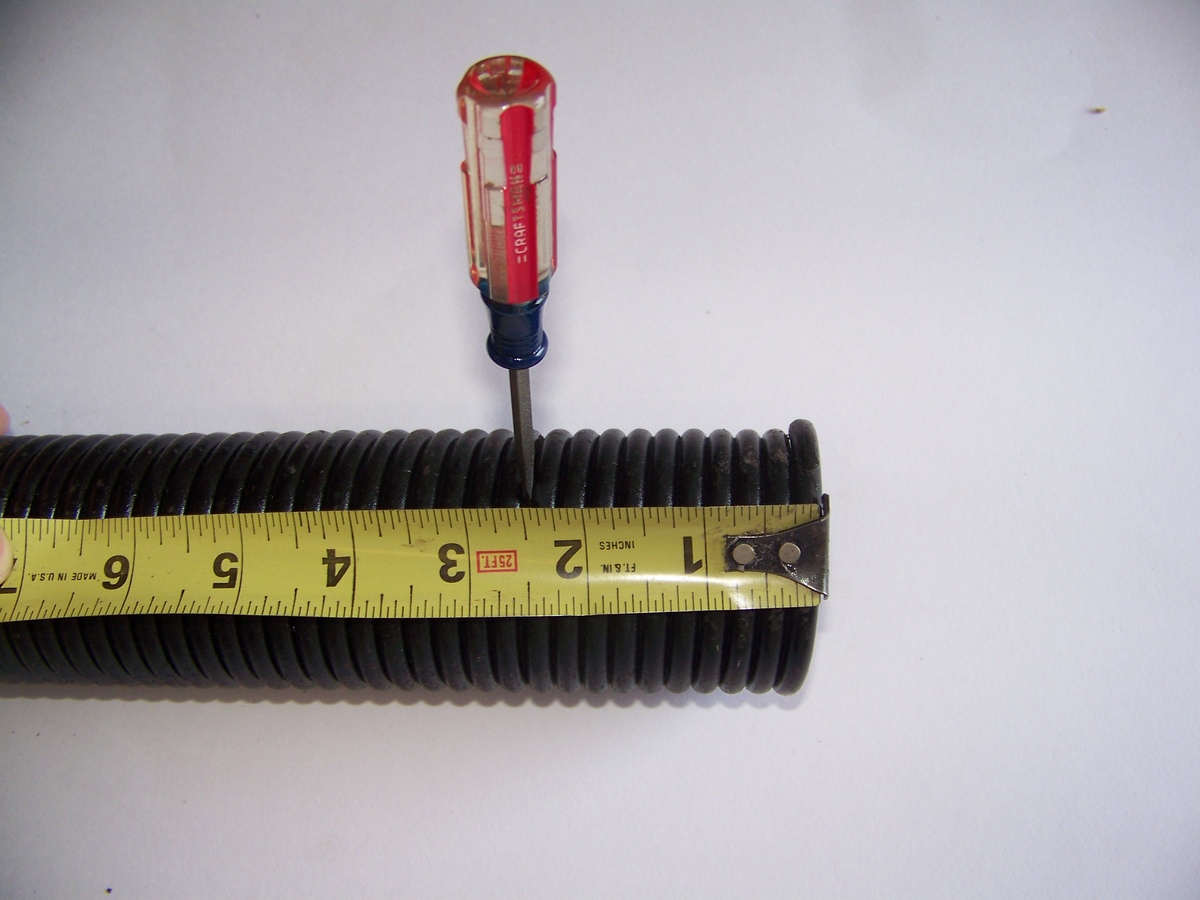
Measuring the Length of the Torsion Spring
Measuring the length of the torsion spring is an essential step in accurately determining the size and type of spring you need. Follow these steps to measure the length of the torsion spring:
Step 1: Safety First
Prioritize safety by disconnecting the power to the garage door opener and ensure that the door is secured in the closed position to prevent any accidents or unfortunate incidents during the measurement.
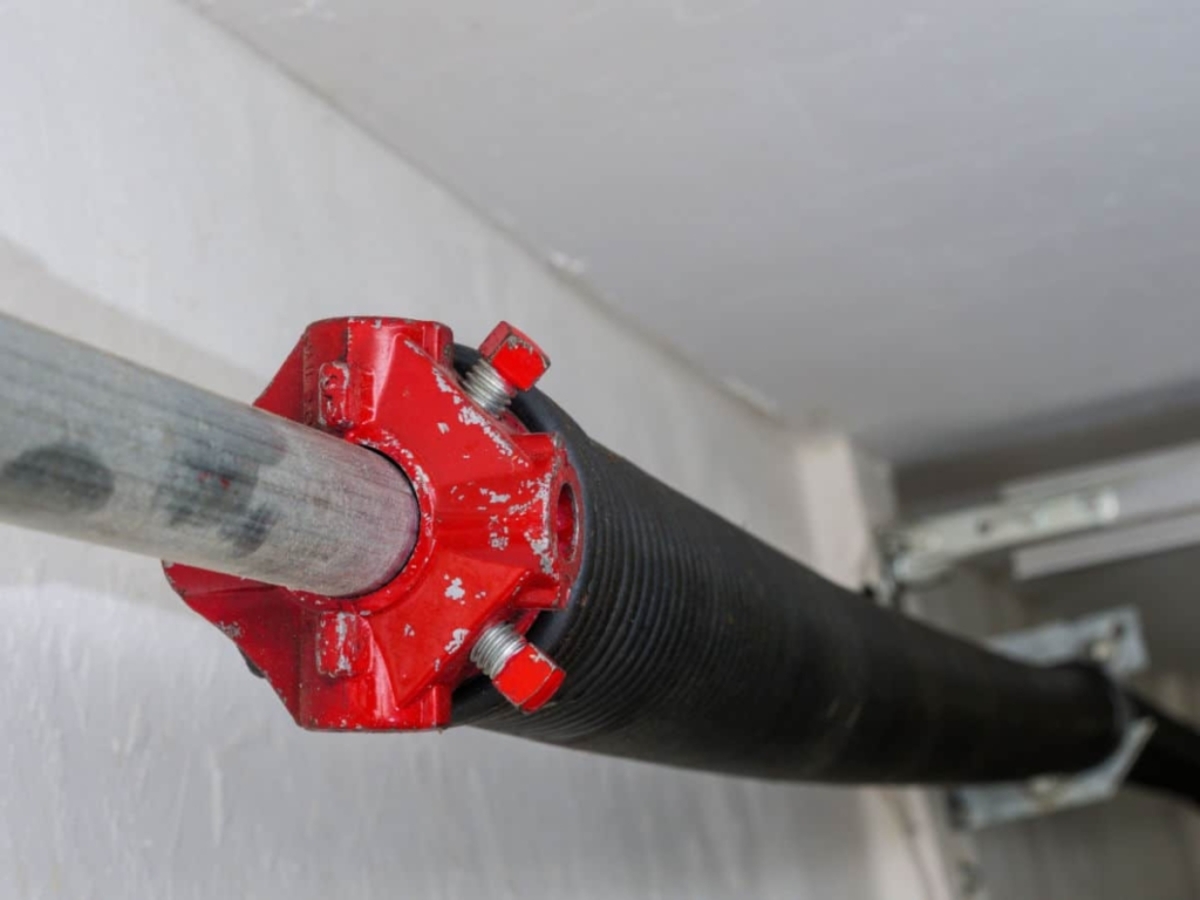
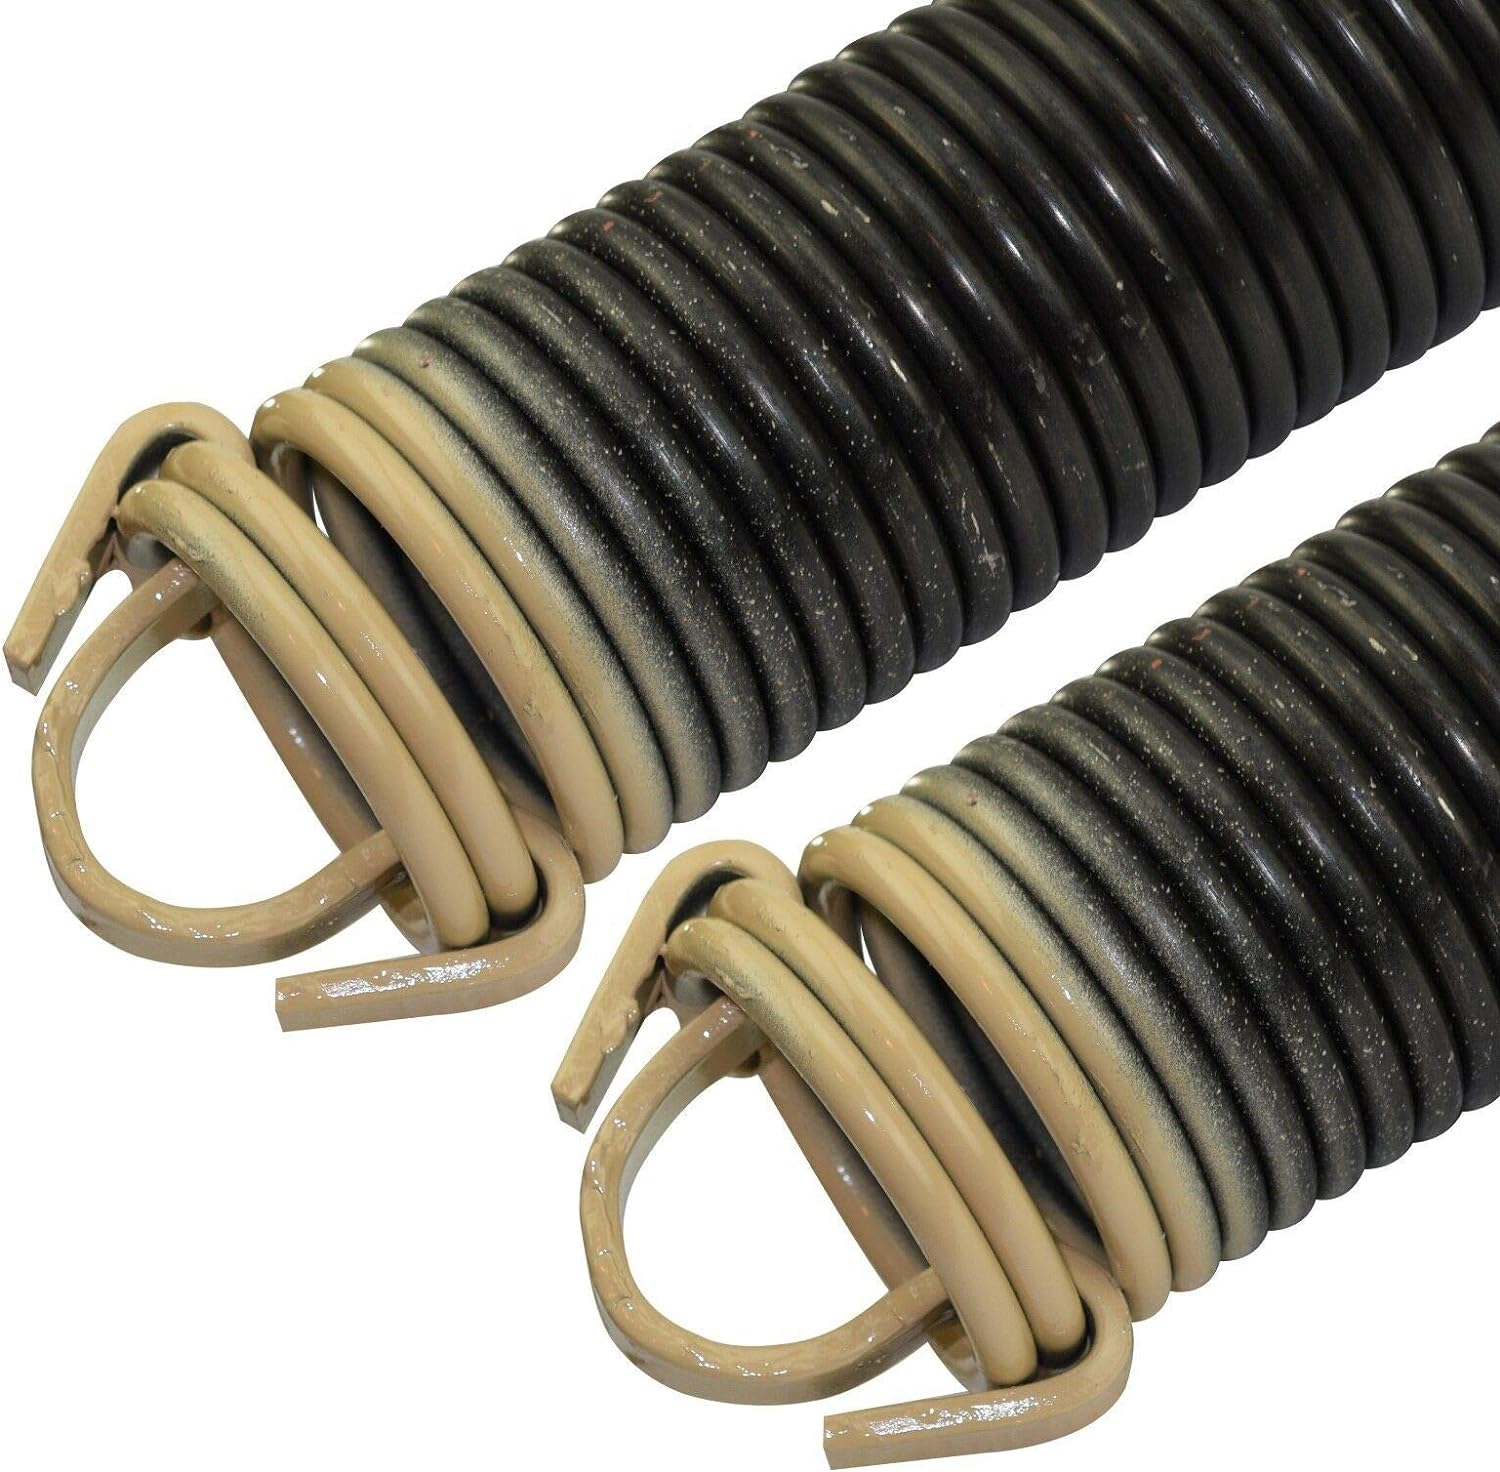
Step 2: Identify the Coiled Portion
Locate the coiled portion of the torsion spring. This is the tightly wound section that stores the energy and provides the counterbalance for the garage door.
Step 3: Measure From End to End
Using a tape measure, carefully measure the length of the torsion spring from one end of the coiled portion to the opposite side. Ensure that you measure the actual length of the spring and not the mounting brackets or any other component attached to it.
Step 4: Record the Measurement
Once you have obtained the length of the torsion spring, record the measurement in inches or centimeters. It is important to be as precise as possible to ensure an accurate replacement or installation.
Step 5: Repeat for Multiple Springs
If your garage door has multiple torsion springs, repeat the measurement process for each spring individually. Each spring may have slightly different dimensions, so it is crucial to measure them separately.
Step 6: Additional Considerations
Take note of any additional considerations, such as the number of coils or the direction of the spring’s wind. These details may be necessary to ensure the correct replacement or installation of the torsion springs.
By following these steps, you can accurately measure the length of the torsion spring. Remember to prioritize safety throughout the process and take accurate measurements to ensure the proper functioning and balance of your garage door.
Now that you have measured the length of the torsion spring, you can proceed to calculate the wire size and spring rate, which are crucial for identifying the appropriate replacement or installation.
Calculating the Wire Size and Spring Rate
Calculating the wire size and spring rate of the torsion spring is an important step in ensuring the proper replacement or installation. The wire size determines the thickness of the spring wire, while the spring rate measures the force required to compress or extend the spring. Follow these steps to calculate the wire size and spring rate:
Step 1: Obtain the Spring Length and Diameter
Refer to the measurements you took earlier to determine the length of the torsion spring. Additionally, measure the inside and outside diameters of the spring using a tape measure or calipers.
Step 2: Determine the Number of Coils
Count the number of coils in the torsion spring. Be sure to include only the active coils, excluding any dead or stationary coils at the ends.
Step 3: Calculate the Mean Diameter
To calculate the mean diameter, add the inside and outside diameters of the spring together and divide by two. This will give you an average diameter that represents the effective position of the spring wire.
Step 4: Calculate the Wire Size
Using a wire size chart or an online calculator, match the spring length, number of coils, and mean diameter to determine the appropriate wire size. Wire sizes are often denoted in gauge, with smaller gauge numbers representing thicker wire.
Step 5: Calculate the Spring Rate
The spring rate measures the amount of force required to compress or extend the spring by one inch. To calculate the spring rate, divide the weight of the garage door by the travel distance. The weight of the door can be found in the manufacturer’s specifications, while the travel distance is typically the height of the door.
Step 6: Consider Professional Guidance
If you are unsure about calculating the wire size and spring rate, or if your calculations show unusual or unexpected results, it is advisable to consult a professional garage door technician. They have the expertise and experience to accurately determine the appropriate wire size and spring rate for your specific door.
By following these steps, you can calculate the wire size and spring rate of the torsion spring. These calculations are crucial in order to select the right replacement or installation for optimal performance and safety.
Now that you have calculated the wire size and spring rate, you can proceed to determine the inside and outside diameters of the torsion spring, which will further aid in selecting the appropriate replacement or installation.
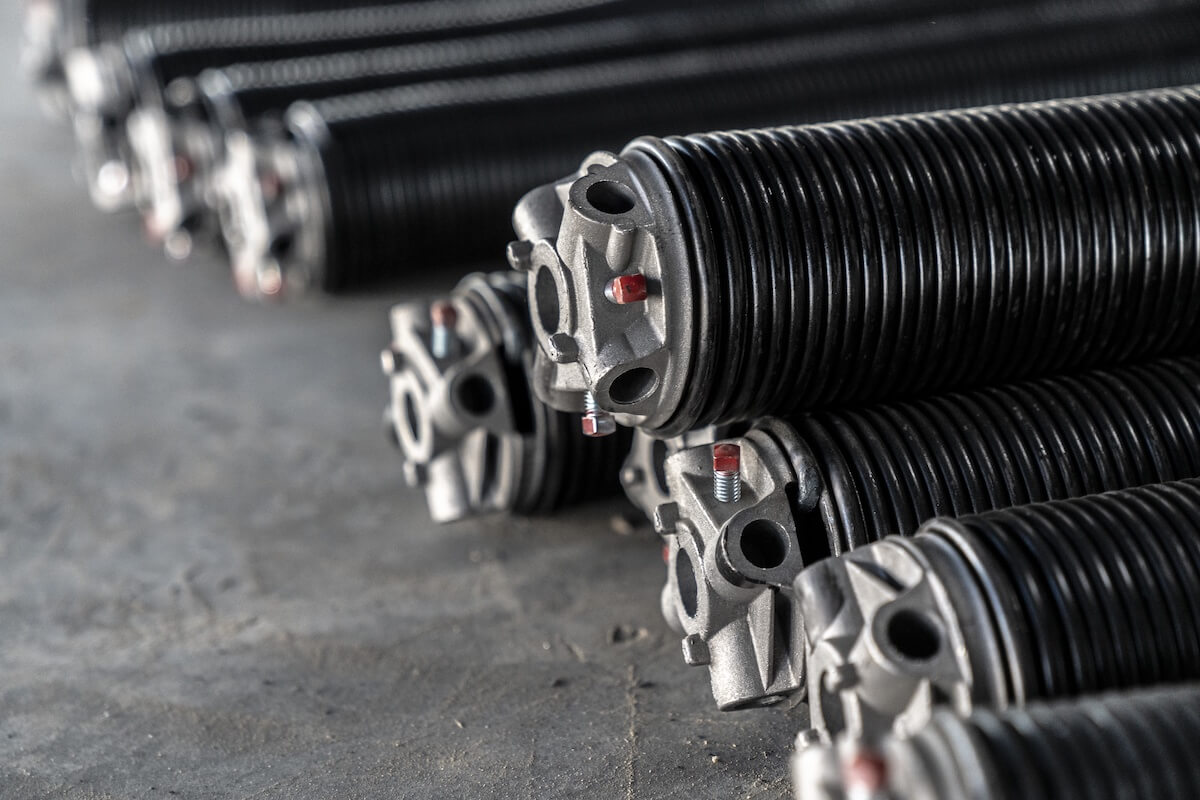
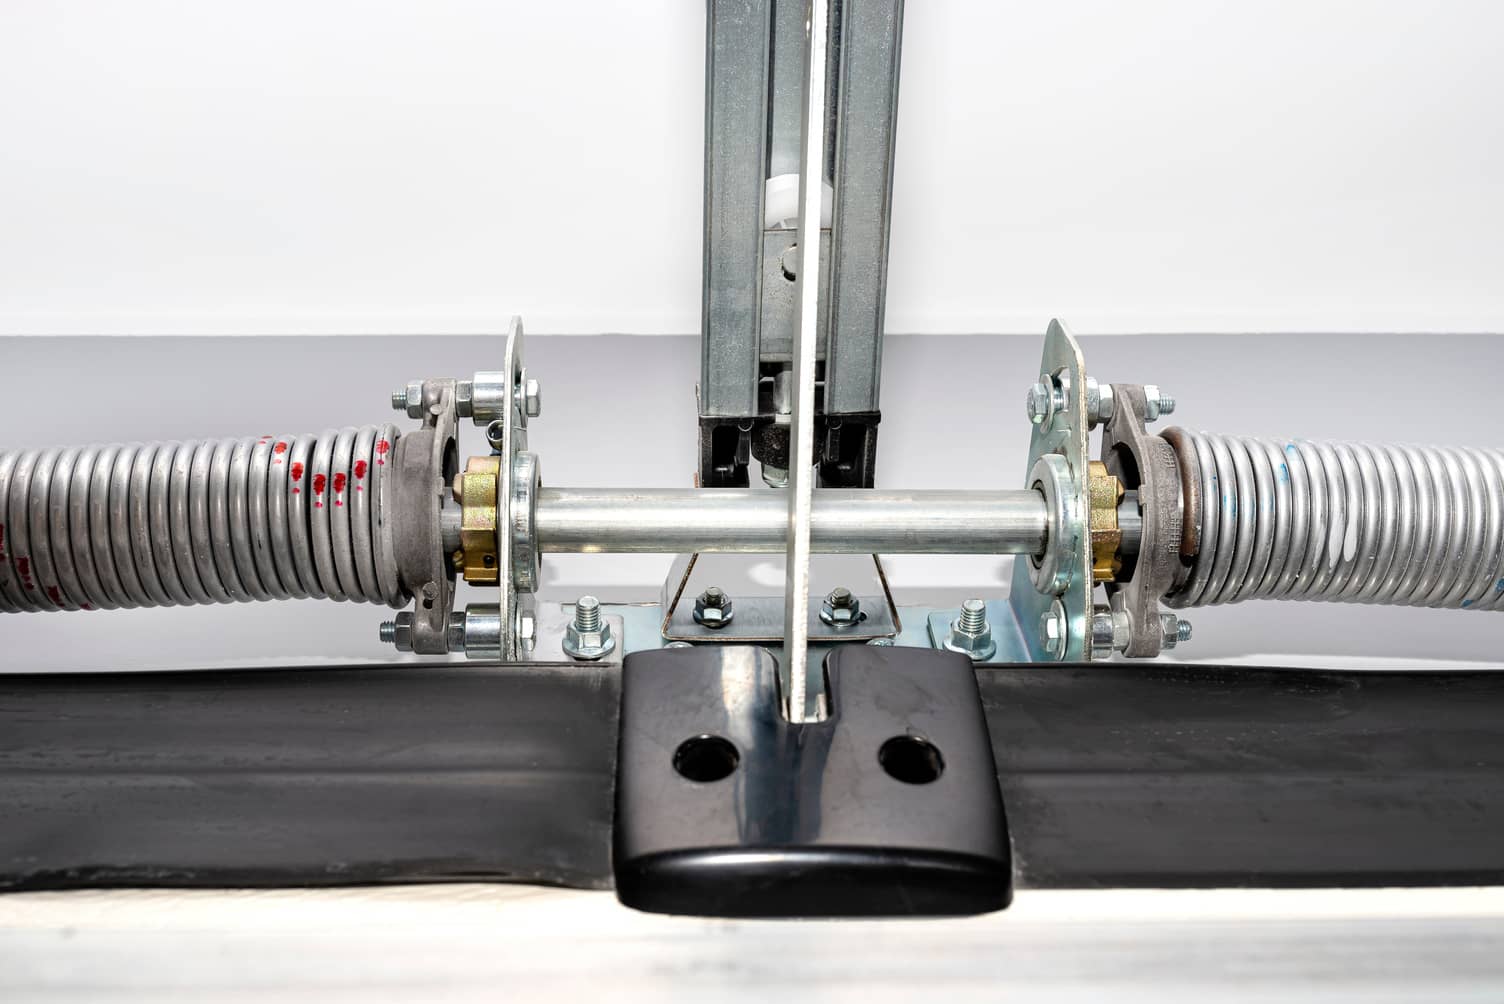
Determining the Inside and Outside Diameters
Knowing the inside and outside diameters of the torsion spring is essential for accurately selecting the right replacement or installation. Determining these dimensions will allow you to match the spring to the specifications of your garage door. Follow these steps to determine the inside and outside diameters:
Step 1: Locate the Coiled Portion
Identify the tightly wound coiled portion of the torsion spring. This is the part of the spring that provides the counterbalance for the garage door.
Step 2: Measure the Inside Diameter
Using a tape measure or calipers, carefully measure the distance from the innermost coil to the center of the spring. This will give you the inside diameter, which represents the opening of the spring.
Step 3: Measure the Outside Diameter
Next, measure the outside diameter by measuring the distance from the outermost coil to the center of the spring. This represents the total diameter of the spring.
Step 4: Record the Measurements
Once you have obtained the measurements, record the inside and outside diameters of the torsion spring separately. It is crucial to be as precise as possible to ensure a proper replacement or installation.
Step 5: Consider Additional Factors
Take note of any additional factors that may affect the dimensions of the torsion spring. For example, the presence of winding cones or mounting brackets may slightly alter the inside or outside diameters.
Step 6: Confirm the Measurements
Double-check the measurements to ensure accuracy. It’s always a good idea to measure multiple times to eliminate any potential errors.
By following these steps, you can determine the inside and outside diameters of the torsion spring. These dimensions are crucial in selecting the appropriate replacement or installation to ensure optimal performance and safety for your garage door.
Now that you have determined the inside and outside diameters, along with the wire size and spring rate, you are well-equipped to make an informed decision when selecting the correct torsion spring for your garage door.
Additional Considerations
When measuring garage door torsion springs, there are a few additional factors and considerations to keep in mind. These details can play a significant role in selecting the right replacement or installation for your specific garage door. Here are some key points to consider:
1. Number of Springs:
Take note of the number of torsion springs your garage door has. Some doors are equipped with a single spring, while others may have two or more. It is essential to measure each spring individually to ensure precise calculations.
2. Wind Direction:
The torsion spring can have a left-hand or right-hand winding. Determine the wind direction of the spring by observing which side the end of the spring faces when viewed from inside the garage. This information is crucial for ordering the correct replacement or installation.
3. Coating and Material:
Consider the coating and material of the existing torsion spring. Common materials include steel and galvanized steel, with some springs coated for added protection against rust and corrosion. If you are replacing the spring, choosing a similar material and coating can help prolong its lifespan.
4. Door Weight and Height:
Be aware of the weight and height of your garage door, as these factors influence the size and type of torsion spring required. The manufacturer’s specifications should provide information on the door’s weight, or you can consult a professional technician for assistance.
5. Professional Assistance:
If you are unsure about any aspect of measuring or selecting torsion springs for your garage door, it is always best to seek professional assistance. Garage door technicians have the expertise and knowledge to help you make the correct choices, ensuring optimal performance and safety.
Taking these additional considerations into account will help you make an informed decision when selecting and installing torsion springs for your garage door. Precise measurements and the right choice of springs are vital for efficient and safe garage door operations.
Now that you have considered all the important factors, you are ready to select and install the proper torsion springs for your garage door.
Read more: How To Adjust Spring Tension On Garage Door
Conclusion
Measuring garage door torsion springs accurately is crucial for proper replacement or installation. By following the step-by-step measurement process and considering important factors, you can ensure optimal performance and safety for your garage door.
Understanding the different types of torsion springs, such as standard and high-cycle, provides valuable insight into the options available. Gathering the necessary tools and equipment, such as a tape measure, calipers, safety glasses, and work gloves, ensures a smooth measurement process.
Measuring the length of the torsion spring, as well as calculating the wire size and spring rate, helps determine the appropriate replacement or installation for your garage door. Determining the inside and outside diameters provides further precision in selecting the right torsion spring.
Additional considerations, such as the number of springs, wind direction, coating and material, and the weight and height of the door, contribute to making an informed choice. Seeking professional assistance when needed ensures expert guidance throughout the process.
By taking into account all these factors and following the proper measurement procedures, you can confidently select and install the correct torsion springs for your garage door. This will result in smooth and efficient garage door operations, enhancing the overall functionality and safety of your garage.
Remember, accurately measuring garage door torsion springs is an important task that should not be overlooked. Taking the time to measure correctly and make informed decisions will save you time, money, and potential safety hazards in the long run.
So, whether you are a homeowner or a garage door technician, equip yourself with the necessary knowledge and tools, and follow the steps outlined in this article to measure garage door torsion springs like a pro. Your garage door will thank you for it!
Frequently Asked Questions about How To Measure Garage Door Torsion Spring
Was this page helpful?
At Storables.com, we guarantee accurate and reliable information. Our content, validated by Expert Board Contributors, is crafted following stringent Editorial Policies. We're committed to providing you with well-researched, expert-backed insights for all your informational needs.


0 thoughts on “How To Measure Garage Door Torsion Spring”