Articles
How To Paint A Ceiling Without Streaks
Modified: August 26, 2024
Learn how to paint a ceiling without streaks with these helpful articles. Find tips and techniques for achieving a smooth and flawless finish.
(Many of the links in this article redirect to a specific reviewed product. Your purchase of these products through affiliate links helps to generate commission for Storables.com, at no extra cost. Learn more)
Introduction
Painting a ceiling can be a daunting task, especially when it comes to avoiding those pesky streaks. However, with the right techniques and supplies, you can achieve a smooth and impeccable finish that will transform the look and feel of any room. In this article, we will guide you through the process of painting a ceiling without streaks, ensuring a professional-quality result.
Before you begin, gather all the necessary supplies and prepare the ceiling for painting. It’s important to have a clean and well-prepped surface to ensure the paint adheres properly and creates a flawless finish. Remember to choose high-quality paint and invest in the right tools for the job.
Whether you’re a DIY enthusiast or a professional painter, these tips and techniques will help you achieve a streak-free ceiling. Let’s get started!
Key Takeaways:
- Transform your ceiling with a streak-free finish by following proper preparation, choosing high-quality paint, and employing the right painting techniques. Achieve a smooth and flawless result with patience and attention to detail.
- Gather the necessary supplies, prepare the ceiling, and utilize proper painting techniques to achieve a streak-free finish. Take your time, follow the steps, and enjoy the rewarding experience of transforming your space.
Read more: How To Paint Ceiling Edges Without Tape
Supplies Needed
Before you embark on your ceiling painting project, gather the following supplies:
- Drop cloths or plastic sheets to protect the floor and furniture
- Painter’s tape to cover trim, walls, and light fixtures
- Sandpaper or a sanding block for smoothing any rough patches
- Primer to ensure proper paint adhesion
- Premium-quality ceiling paint in the desired color
- Paint roller cover suitable for ceilings
- Extension pole to reach high ceilings
- Paint tray for roller application
- Paintbrush for cutting in along the edges
- Ladder or stepladder, if needed
- Paint additive to slow drying time, if desired
- Gloves and safety goggles to protect yourself
- Rags or paper towels for clean-up
Having all the necessary supplies at hand will ensure a smooth and efficient painting process. Additionally, it’s important to use high-quality products for optimal results. Now that you have everything ready, let’s move on to preparing the ceiling for painting.
Preparing the Ceiling
Properly preparing the ceiling is crucial for achieving a streak-free paint job. Follow these steps to ensure a clean and smooth surface:
- Clean the surface: Start by removing any cobwebs, dust, or grease from the ceiling. Use a broom or vacuum cleaner with a soft brush attachment to gently sweep or vacuum the entire area. Any residue left behind can affect paint adhesion and result in streaks.
- Repair imperfections: Inspect the ceiling for any cracks, holes, or other imperfections. Fill them with spackling compound and sand them down once dry. This step will create a seamless surface and prevent the paint from highlighting any flaws.
- Smooth rough patches: If you come across any rough patches or uneven surfaces on the ceiling, use sandpaper or a sanding block to smooth them out. This step will ensure an even application of primer and paint.
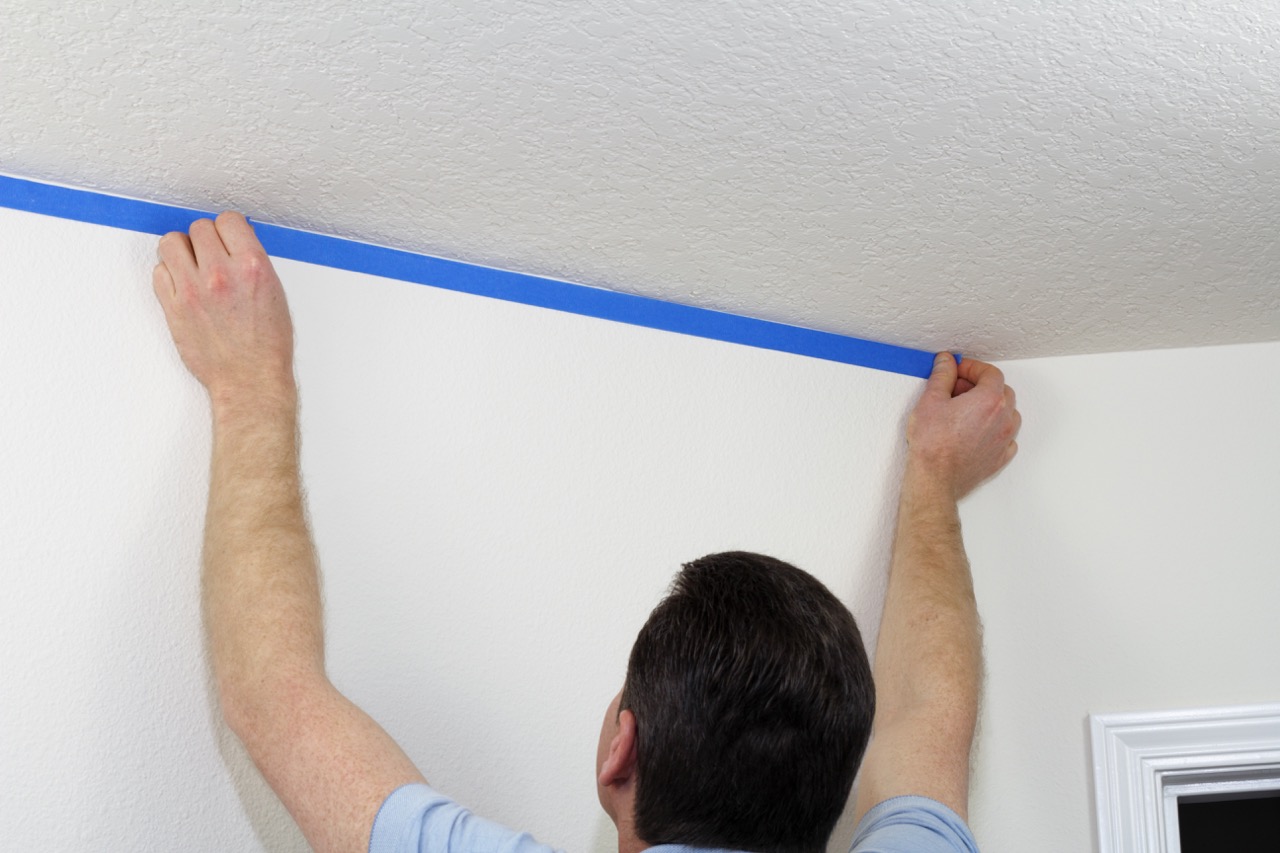
- Protect the surrounding areas: Cover the floor, furniture, and anything else you don’t want to get paint on with drop cloths or plastic sheets. Use painter’s tape to secure the coverings and protect the edges of the walls and trim from accidental paint splatters.
Once you have completed these steps, your ceiling will be clean, repaired, and adequately protected. Preparing the ceiling is a crucial foundation for a streak-free paint job. Now, let’s move on to selecting the right paint for the job.
Choosing the Right Paint
Choosing the right paint for your ceiling is essential to achieve a streak-free finish. Here are some factors to consider when selecting the best paint:
- Sheen: Ceilings are typically painted with a flat or matte finish. These finishes help to hide imperfections and minimize glare. Avoid using glossy paints, as they tend to highlight flaws and can lead to streaks.
- Quality: Invest in high-quality paint from a reputable brand. The quality of the paint can greatly impact its application and final appearance. Premium paints often have better coverage, durability, and color retention.
- Type of paint: Different types of paint are available on the market, including latex, oil-based, and water-based options. Latex paint is commonly used for ceilings due to its easy application, quick drying time, and low odor. Water-based paints are also a popular choice for their environmentally-friendly properties.
- Color: Consider the desired color for your ceiling. Lighter colors can help to make the room appear brighter and more spacious. However, if you prefer a darker shade, ensure that the color complements the overall décor of your space.
It’s recommended to purchase a paint that is specifically formulated for ceilings. These paints are designed to have better coverage and adhesion on vertical surfaces, reducing the likelihood of streaks. Additionally, consult with the experts at your local paint store for recommendations based on your specific needs and preferences.
Remember, choosing the right paint is an essential step towards achieving a streak-free ceiling. Now that you have selected your paint, let’s move on to applying the primer.
Applying the Primer
Applying a primer to your ceiling is an important step in achieving a smooth and streak-free finish. Primer helps to seal the surface, improve paint adhesion, and provide an even base for the topcoat. Here’s how to apply the primer:
- Prepare the primer: If using a water-based primer, stir it thoroughly before starting. If using an oil-based primer, make sure to follow the manufacturer’s instructions for proper mixing.
- Protect the surrounding areas: Just like when preparing the ceiling, cover the floor and furniture with drop cloths or plastic sheets. Use painter’s tape to protect the edges of walls and trim.
- Apply the primer: Start by cutting in along the edges of the ceiling using a paintbrush. This involves carefully painting a narrow band of primer along the edges to create a smooth transition between the ceiling and walls. Then, use a roller on an extension pole to apply the primer to the rest of the ceiling. Apply the primer in smooth, even strokes, working in sections.
- Watch for streaks: As you apply the primer, keep an eye out for any streaks or uneven areas. If you notice any, immediately roll over them again to smooth out the surface. It’s better to address them immediately to prevent them from drying and becoming more difficult to correct.
- Allow the primer to dry: Follow the manufacturer’s instructions for drying time. Once the primer is dry, you can proceed with the paint application.
Applying a primer acts as the foundation for a streak-free paint job. It helps provide a consistent surface for the paint and ensures better adhesion, resulting in a smoother finish. Now, let’s dive into the painting techniques that will help prevent streaks.
Use a high-quality roller with a thick nap to avoid streaks. Work in small sections and use a smooth, even motion to apply the paint. Avoid overloading the roller to prevent drips and streaks.
Read more: How To Paint A Ceiling Without Making A Mess
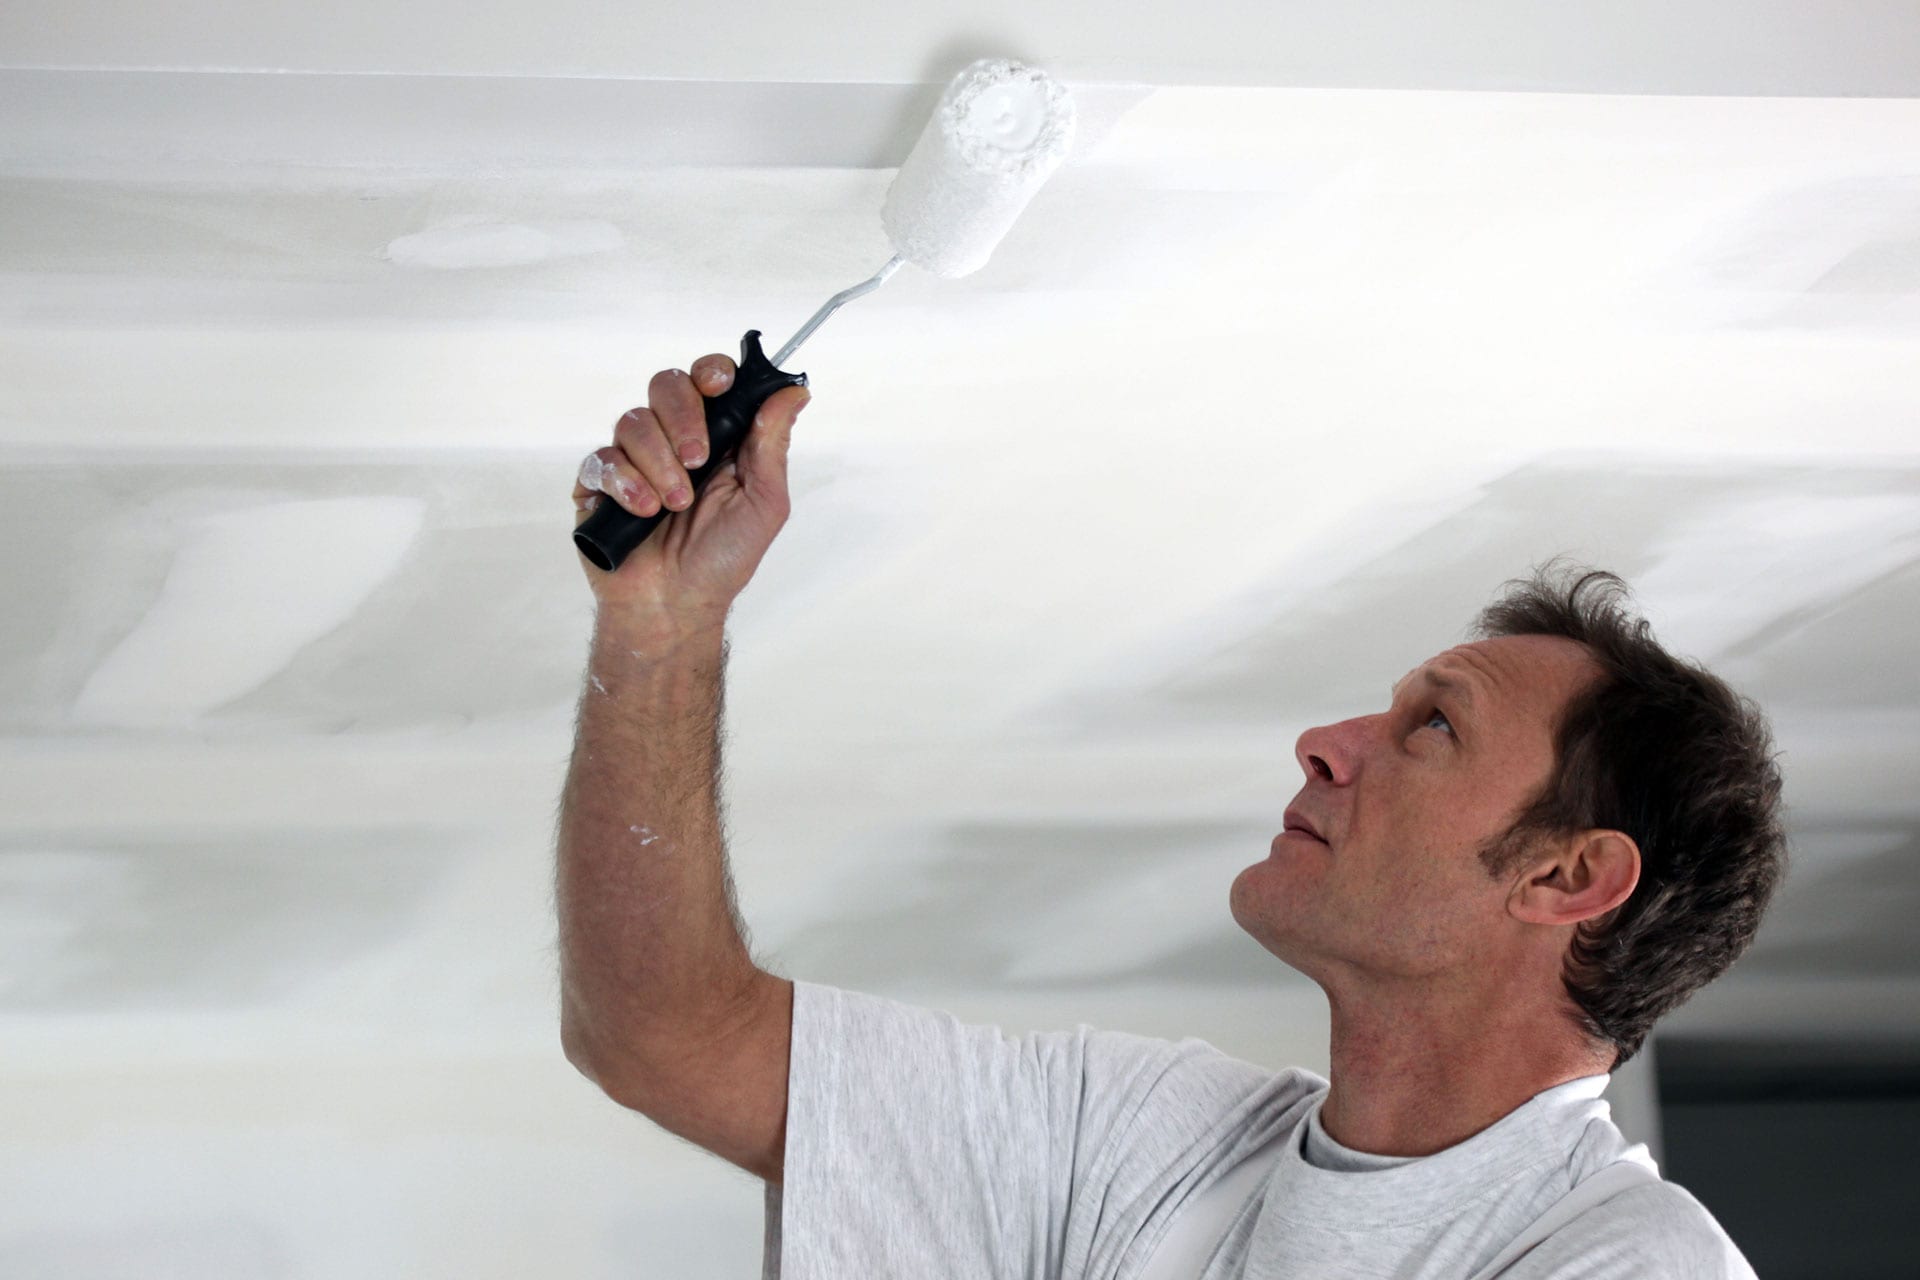
Painting Techniques to Prevent Streaks
Proper painting techniques are crucial for achieving a streak-free finish on your ceiling. By following these techniques, you can minimize the likelihood of streaks and create a smooth, professional-looking result:
- Cut in before rolling: Before you start rolling the paint onto the ceiling, use a paintbrush to cut in along the edges. This means painting a narrow band of paint along the edges of the ceiling, ensuring a smooth transition with the walls. Cutting in helps create clean lines and prevents noticeable color variations between the ceiling and walls.
- Use the right roller cover: Choose a high-quality roller cover specifically designed for ceilings. Look for one with a nap thickness appropriate for your ceiling texture. Thicker naps are suitable for more textured ceilings, while thinner naps are suitable for smoother ceilings.
- Load the roller properly: Dip the roller into the paint tray and roll it up and down to evenly distribute the paint on the roller cover. Avoid overloading the roller with paint, as this can lead to drips and streaks. A properly loaded roller should have a thin, even layer of paint on its surface.
- Apply the paint in even strokes: Begin rolling the paint onto the ceiling in smooth, even strokes. Start from one corner of the room and work your way across, working in small sections. Overlap each stroke slightly to ensure even coverage.
- Maintain a wet edge: It’s crucial to maintain a wet edge while painting. This means working systematically and ensuring that each section you paint overlaps with the previous section while the paint is still wet. This technique helps to blend the paint seamlessly and prevents visible brush or roller marks.
- Avoid excessive pressure: When applying the paint, avoid applying excessive pressure on the roller. This can cause streaks and unevenness. Instead, use a light and steady hand for a more consistent application.
By employing these painting techniques, you can significantly reduce the chances of streaks and achieve a smooth, flawless finish on your ceiling. Now that you are familiar with the techniques, let’s move on to the actual paint application.
Paint Application
Now that you’ve prepared the ceiling and have a good understanding of the techniques to prevent streaks, it’s time to apply the paint. Follow these steps for a successful paint application:
- Start with the cutting in: Begin by cutting in along the edges of the ceiling, using a paintbrush to create clean lines. Take your time and be precise in this step to ensure a smooth transition between the ceiling and walls.
- Use the roller for the main area: Once you’ve cut in, it’s time to use the roller for the main area of the ceiling. Start rolling the paint onto the ceiling using the techniques previously mentioned, working in small sections. Remember to maintain a wet edge and overlap each stroke slightly for even coverage.
- Apply multiple thin coats: It’s better to apply multiple thin coats of paint rather than one thick coat. This helps prevent drips, streaks, and unevenness. Allow each coat to dry before applying the next, following the manufacturer’s recommended drying time.
- Check for streaks: As you’re painting, periodically step back and check for any streaks or areas that may need touch-ups. If you notice any, lightly roll over those areas while the paint is still wet to blend and smooth them out.
- Work in good lighting: Painting a ceiling can be challenging, especially when it comes to detecting streaks or unevenness. Make sure to work in a well-lit room or use additional lighting to clearly see the painted surface and ensure a smooth finish.
Remember to take breaks as needed and allow the paint to dry completely before moving on to the next coat or removing any protective coverings. Patience and attention to detail are key to achieving a streak-free and professional-looking paint job. Once you’re satisfied with the coverage and finish, it’s time to clean up.
Tips for a Smooth Finish
To ensure a smooth finish and minimize the chances of streaks, consider the following tips:
- Work in a well-ventilated space: Adequate ventilation will help the paint dry properly and reduce the chances of streaks caused by prolonged drying times.
- Use a paint additive, if necessary: Depending on the climate or your preferred application method, you may choose to add a paint additive that slows down the drying time. This can help prevent paint streaks caused by the paint drying too quickly.
- Pay attention to the paint consistency: Ensure that the paint is of the right consistency by following the manufacturer’s guidelines. Avoid thinning the paint too much, as this can lead to streaks and a patchy finish.
- Allow adequate drying time: Patience is key when it comes to achieving a streak-free finish. Allow each coat of paint to dry completely before applying the next. Rushing the process can lead to streaks and an uneven appearance.
- Inspect the paint before applying: Before starting the paint application, inspect the paint for any lumps or debris. Strain the paint if necessary to remove any impurities that could cause streaks during application.
- Keep a wet edge: As mentioned before, it’s important to maintain a wet edge while painting. This means working in small, manageable sections and overlapping each stroke while the paint is still wet.
- Check for drips: Keep an eye out for any drips or runs as you paint. If you spot any, gently smooth them out with the roller or brush before they dry and leave streaks.
- Avoid excessive pressure: Apply paint with a light and even pressure to avoid creating streaks. Applying too much pressure with the roller or brush can lead to unevenness and streaks in the paint.
- Take breaks: Painting a ceiling can be physically demanding. Take regular breaks to rest and recharge. Fatigue can lead to rushed and uneven paint application, resulting in streaks.
By following these tips, you’ll increase your chances of achieving a smooth and streak-free finish on your ceiling. Now, let’s move on to the final step of the process – cleaning up.
Cleaning Up
After successfully painting your ceiling without streaks, it’s time to clean up and put away your supplies. Here are some essential steps to follow during the clean-up process:
- Store leftover paint: If you have any leftover paint, make sure to properly seal the can and store it in a cool, dry place for future touch-ups or projects. Label the can with the color and date for easy reference.
- Clean your paintbrush and roller: Depending on the type of paint you used, clean your paintbrush and roller according to the manufacturer’s instructions. For water-based paints, rinse them with water until the water runs clear. For oil-based paints, use an appropriate solvent for cleaning.
- Remove painter’s tape: Carefully remove the painter’s tape from the edges of the ceiling, walls, and trim. Peel it off at a 45-degree angle to ensure a clean line.
- Dispose of drop cloths or plastic sheets: Shake off any excess paint or debris from the drop cloths or plastic sheets. Fold or roll them up neatly and dispose of them properly. If they are still in good condition, you can store and reuse them for future painting projects.
- Clean the surrounding area: Thoroughly clean the area where you worked, removing any paint splatters or spills. Use a mild detergent and warm water to clean any painted surfaces, such as walls or trim, if necessary.
- Properly dispose of paint waste: Check with your local authorities for guidelines on how to dispose of any leftover paint, empty paint cans, and other paint-related waste. Avoid pouring paint down the drain or throwing it in the trash, as it can be harmful to the environment.
Completing these clean-up steps will help preserve your tools, maintain a tidy workspace, and ensure a smooth transition back to your everyday living space. Congratulations on achieving a streak-free ceiling!
Remember, practice and patience are key when it comes to painting. With these techniques, tips, and proper preparation, you’ll be able to paint ceilings without streaks like a professional. Happy painting!
Read more: How To Clean Glass Without Streaks
Conclusion
Painting a ceiling without streaks may seem like a challenging task, but with the right supplies, techniques, and attention to detail, it is achievable. By following the steps outlined in this article, you can transform your ceiling into a smooth and flawless surface that enhances the overall appearance of your space.
From gathering the necessary supplies to preparing the ceiling, choosing the right paint, applying the primer, and utilizing proper painting techniques, each step plays a vital role in achieving a streak-free finish. Taking the time to properly clean up and store your supplies is equally important for future projects and maintaining a well-organized workspace.
Remember to work in a well-ventilated area, use the appropriate roller cover for your ceiling texture, and maintain a wet edge while applying the paint. Pay attention to the consistency of the paint and take breaks when needed to ensure optimal results.
While painting a ceiling can be challenging, it can also be a rewarding experience. Seeing the transformation and the satisfaction of achieving a smooth finish can make all the effort worthwhile. So, gather your supplies and embark on your streak-free ceiling painting journey with confidence!
By implementing the techniques and tips provided in this article, you’ll be well-equipped to tackle your next ceiling painting project. And remember, practice makes perfect. The more you paint, the more comfortable and skilled you’ll become in achieving that flawless finish.
Happy painting, and may your ceilings be streak-free and visually stunning!
Now that you've mastered painting ceilings without streaks, why not expand your skills further? If tackling your ceiling fan seems daunting, worry not. Our next guide offers simple painting tips that ensure even beginners can achieve professional results. With straightforward advice and easy-to-follow steps, you'll learn to refresh that ceiling fan, making it blend perfectly or stand out as a room's focal point.
Frequently Asked Questions about How To Paint A Ceiling Without Streaks
Was this page helpful?
At Storables.com, we guarantee accurate and reliable information. Our content, validated by Expert Board Contributors, is crafted following stringent Editorial Policies. We're committed to providing you with well-researched, expert-backed insights for all your informational needs.


0 thoughts on “How To Paint A Ceiling Without Streaks”