Home>Furniture>Outdoor Furniture>How To Paint Old Metal Patio Furniture
Outdoor Furniture
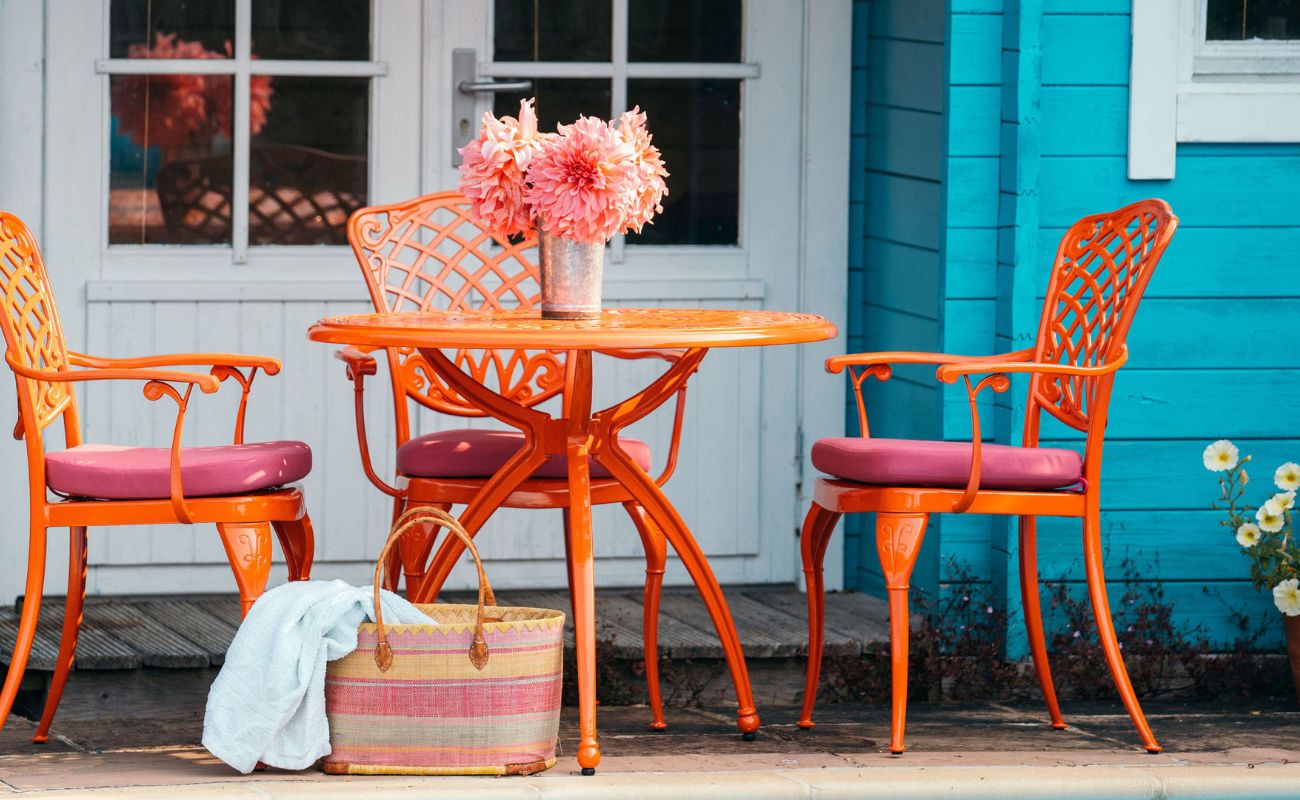
How To Paint Old Metal Patio Furniture
Modified: August 28, 2024
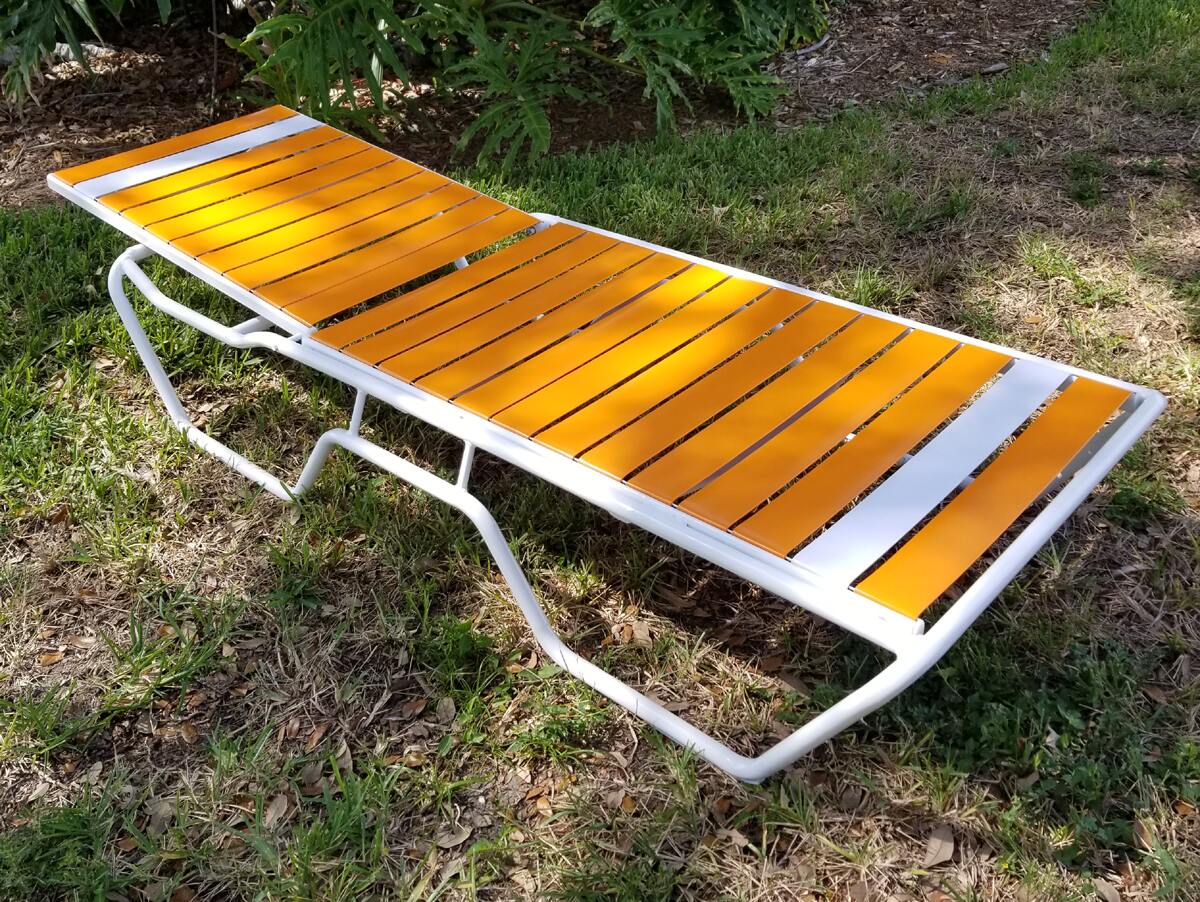
Transform your outdoor space with these easy steps on how to paint old metal patio furniture. Revive your outdoor furniture and give it a fresh new look!
(Many of the links in this article redirect to a specific reviewed product. Your purchase of these products through affiliate links helps to generate commission for Storables.com, at no extra cost. Learn more)
Introduction
Welcome to our comprehensive guide on how to paint old metal patio furniture! If you have faded, rusty, or worn-out outdoor furniture, giving it a fresh coat of paint can rejuvenate its appearance and extend its lifespan. In this article, we will walk you through the step-by-step process of choosing the right paint, preparing the surface, applying the paint, and properly caring for your newly painted metal patio furniture.
Outdoor furniture is exposed to harsh weather conditions, including rain, sun exposure, and temperature fluctuations. Over time, this can cause the paint to chip, fade, or peel, leaving your once-beautiful furniture looking tired and worn. Fortunately, painting your metal patio furniture is a cost-effective solution that can transform it into a stunning focal point for your outdoor space.
Before we dive into the painting process, it’s important to note that choosing the right paint is crucial for achieving long-lasting and durable results. When selecting paint for metal furniture, look for options specifically designed for exterior use and formulated to adhere well to metal surfaces. These paints often contain rust inhibitors and UV-resistant properties to protect your furniture from the elements.
Additionally, consider the color and finish you desire for your furniture. Whether you prefer a bold and vibrant hue or a more subtle neutral tone, there are numerous options available to suit your personal style and outdoor aesthetic.
Now that you understand the importance of choosing the right paint, let’s move on to the preparation process. Preparing the surface properly is key to ensure the paint adheres well and provides a smooth and even finish. In the next section, we will cover the steps to prepare your old metal patio furniture for painting.
Key Takeaways:
- Revive your old metal patio furniture by choosing the right exterior-grade paint, preparing the surface, and applying a clear coat. Regular maintenance will keep it looking vibrant and stylish for years to come!
- Transform your outdoor space with a fresh coat of paint on your metal patio furniture. Choose durable, metal-adhesive paint, prepare the surface meticulously, and apply a clear coat for long-lasting beauty and protection.
Read more: How To Paint Metal Patio Furniture
Choosing the Right Paint
When it comes to painting old metal patio furniture, selecting the right paint is essential for achieving durable and long-lasting results. Here are some key factors to consider when choosing the paint:
- Exterior-Grade Paint: Look for paints specifically formulated for exterior use. These paints are designed to withstand the elements, including rain, sun exposure, and temperature changes. They are more durable and will provide better protection for your metal furniture.
- Metal-Adhesive Formulation: Ensure that the paint you choose is suitable for metal surfaces. Metal-adhesive paints have special properties that allow them to adhere well to metal, minimizing the risk of peeling or chipping over time.
- Rust Inhibitors: If your metal furniture has rust spots or is prone to rusting, consider a paint that contains rust inhibitors. These additives help prevent further rust formation and protect your furniture from corrosion.
- UV Protection: The sun’s rays can cause colors to fade and surfaces to deteriorate over time. Look for paints with UV protection to ensure that your furniture maintains its vibrant color and withstands sun exposure without fading.
- Finish Options: Consider the finish you desire for your furniture. Glossy finishes provide a shiny and reflective look, while satin or matte finishes offer a more subtle, low-sheen appearance. Choose a finish that complements your outdoor space and personal style.
It is also important to read the manufacturer’s instructions on the paint can to ensure you understand any specific application or curing requirements. Some paints may require a primer or multiple coats, while others may have specific temperature or humidity conditions for optimal application.
Lastly, don’t forget to take into account the color scheme of your outdoor space. This is your opportunity to add a pop of color or harmonize your furniture with the existing elements surrounding it. Consider the tones and shades that will complement your outdoor décor and create a cohesive look.
Now that you have a better understanding of what to look for when choosing paint for your old metal patio furniture, let’s move on to the next step: preparing the surface for painting.
Preparing the Surface
Properly preparing the surface of your old metal patio furniture is essential to ensure the paint adheres well and provides a smooth and long-lasting finish. Follow these steps to prepare the surface before painting:
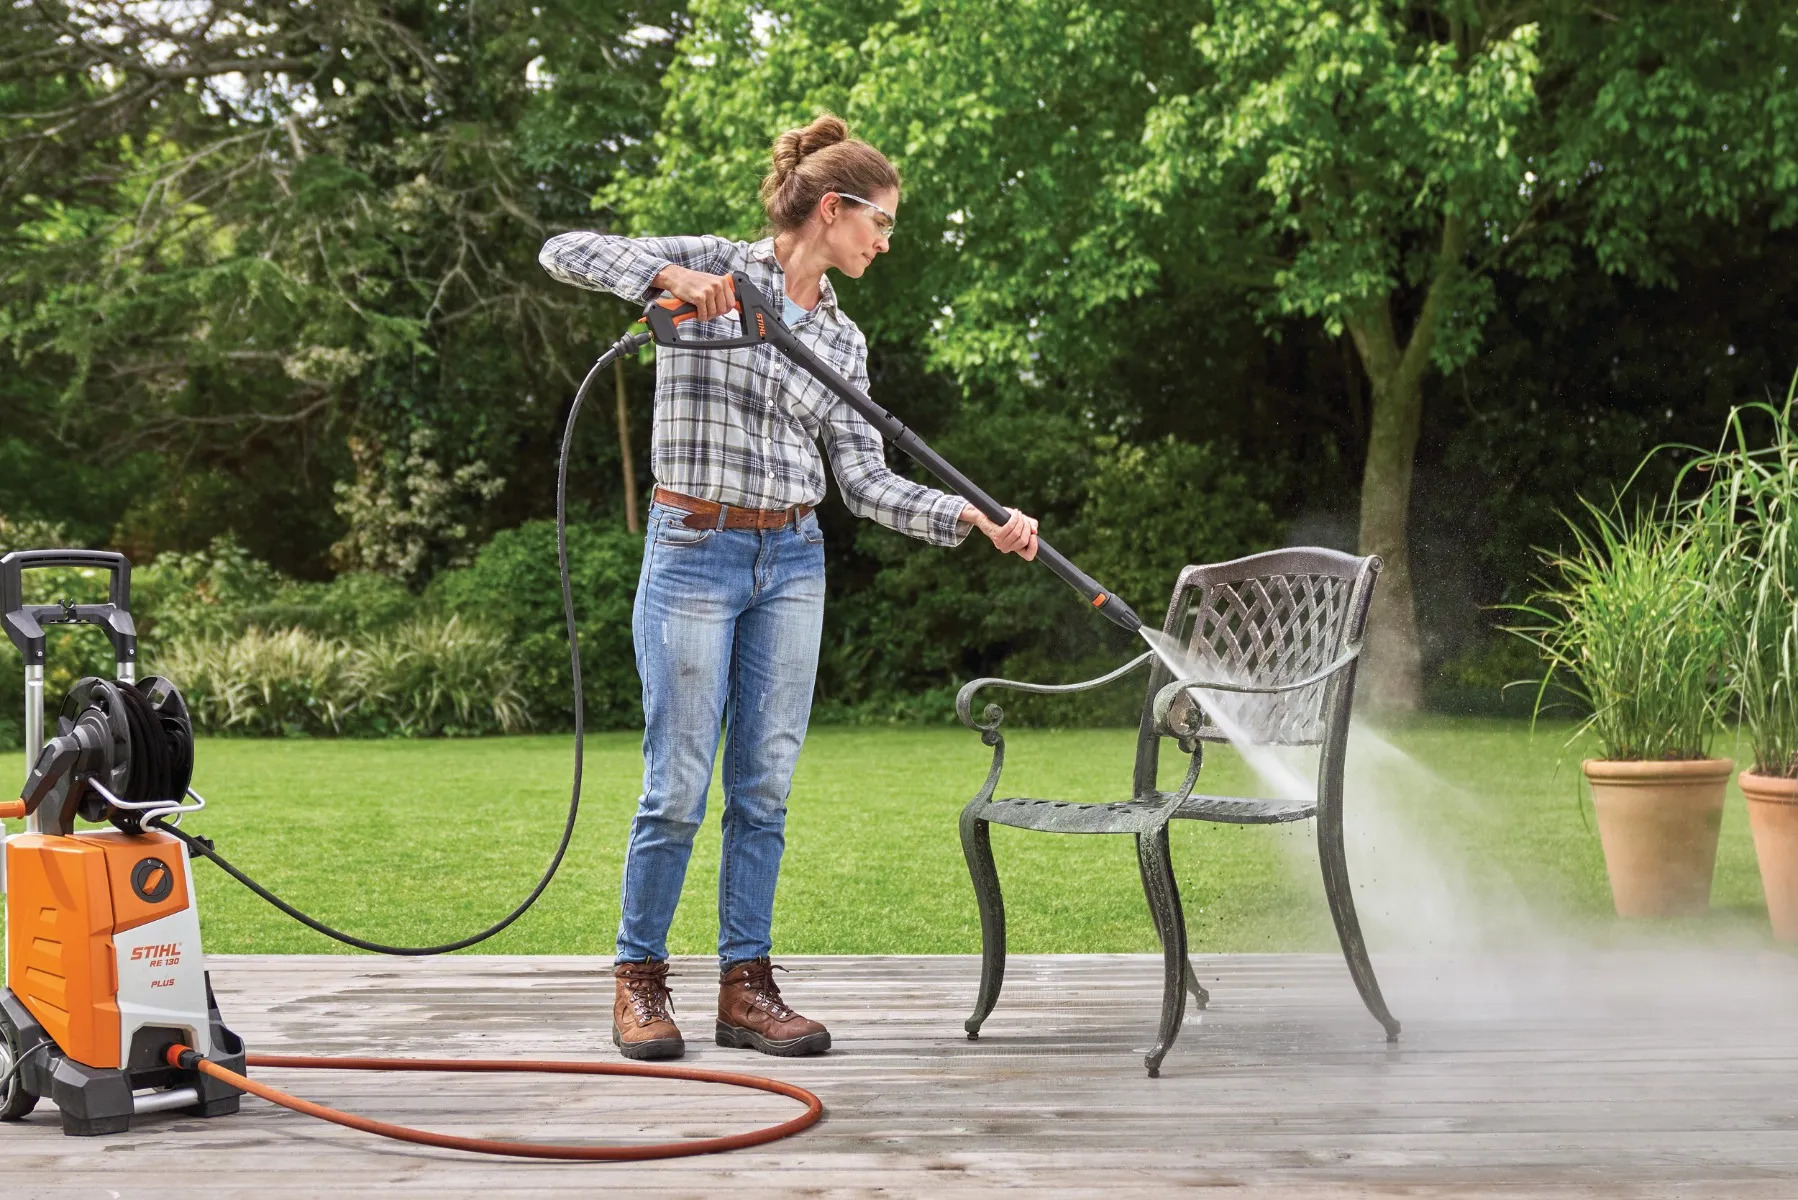
- Clean the Furniture: Start by thoroughly cleaning the surface of the furniture. Use a mild detergent mixed with warm water and a scrub brush or sponge to remove dirt, grime, and any loose debris. Rinse the furniture with clean water and let it dry completely before continuing.
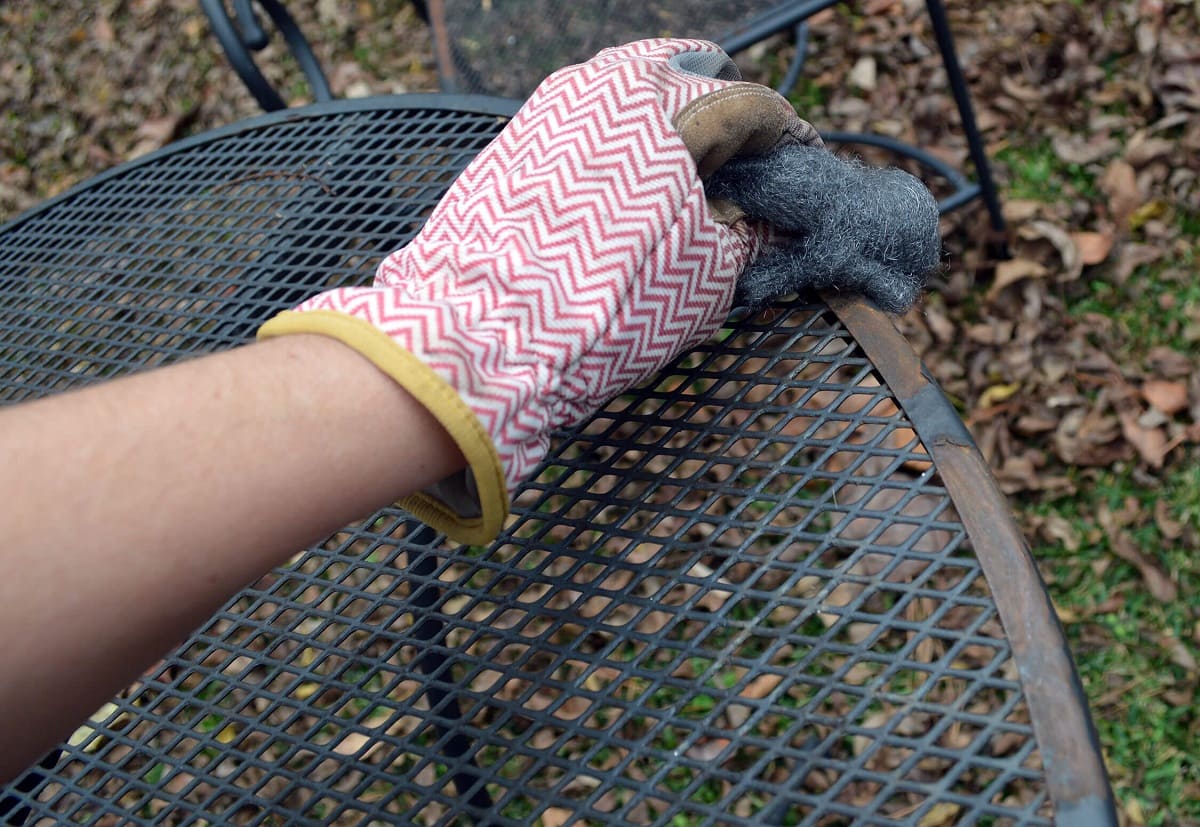
- Remove Rust and Flaking Paint: If your furniture has rust spots or flaking paint, it is important to remove them before painting. Use a wire brush or sandpaper to gently scrape away any loose rust or paint, taking care not to damage the underlying metal. For stubborn rust spots, you can use a rust remover or a solution of vinegar and water.
- Sand the Furniture: After removing any rust or flaking paint, use sandpaper or a sanding block to smooth the surface of the furniture. This will help create a rough texture, allowing the paint to adhere better. Sand in the direction of the metal grain, and be sure to go over all surfaces, including corners and crevices.
- Wipe Down the Surface: After sanding, use a damp cloth or tack cloth to thoroughly wipe down the furniture. This will remove any residual dust or debris from the sanding process and ensure a clean surface for painting.
- Mask Off Areas: If there are any parts of the furniture that you don’t want to paint, such as glass tabletops or certain decorative elements, use painter’s tape or masking tape to cover and protect those areas.
By properly preparing the surface of your old metal patio furniture, you create an ideal foundation for the paint to adhere to. This will help ensure a smooth and even finish, as well as improve the longevity and durability of the painted surface.
Now that the surface is prepped and ready, it’s time to move on to the next step: priming the surface before painting.
Removing Rust and Flaking Paint
If your old metal patio furniture has rust spots or flaking paint, it is important to address these issues before applying a fresh coat of paint. Here’s how you can effectively remove rust and flaking paint:
- Assess the Damage: Carefully inspect your furniture for areas with rust or peeling paint. Note the extent of the damage and prioritize the areas that need attention.
- Rust Removal: For small rust spots, you can use a fine-grit sandpaper or a wire brush to gently scrape away the rust. Be cautious and avoid applying too much pressure, as you don’t want to damage the metal surface. Alternatively, you can use a commercial rust remover product following the manufacturer’s instructions. Apply the rust remover to the affected areas and allow it to sit for the recommended time before scrubbing it off. Rinse the area thoroughly with water and allow it to dry completely.
- Flaking Paint Removal: Use a putty knife or scraper to carefully scrape away any loose or flaking paint from the surface of the furniture. Be gentle to avoid scratching the metal. After removing the loose paint, sand the area lightly with a fine-grit sandpaper to create a smooth surface. Clean the area with a damp cloth to remove any dust or debris.
- Additional Steps for Heavily Damaged Surfaces: If your furniture has extensive rust or paint damage, you may need to use a chemical paint stripper to fully remove the old paint layers. Follow the instructions on the paint stripper product carefully and use protective gloves and eyewear. After stripping the paint, sand the surface to create a smooth and even texture.
- Spot Priming: After removing rust and flaking paint, spot-prime the affected areas. Apply a thin coat of primer specifically designed for metal surfaces using a brush or spray. This will help prevent further rust formation and ensure that the new paint adheres properly to the surface.
Remember, taking the time to properly remove rust and flaking paint will significantly improve the final appearance and longevity of your newly painted metal patio furniture. It is worth the effort to ensure a smooth and successful painting process.
Now that you have addressed the rust and flaking paint issues, let’s move on to the next step: sanding the furniture to create an ideal surface for painting.
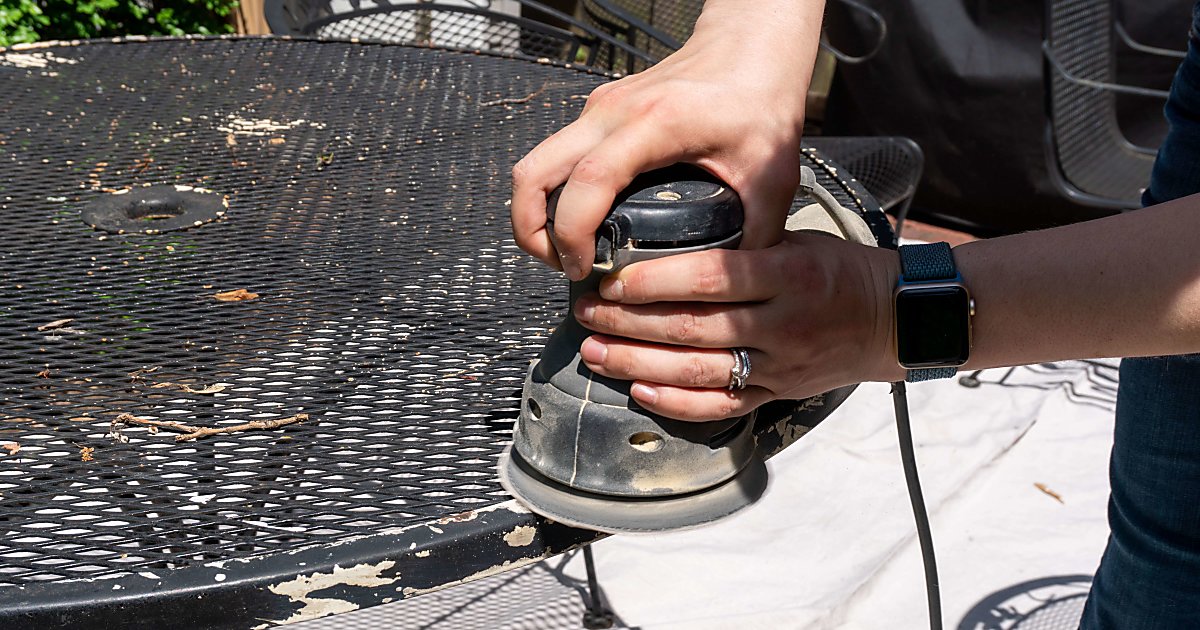
Sanding the Furniture
Sanding your old metal patio furniture is an important step in the preparation process to create a smooth and ideal surface for painting. Sanding helps remove any remaining paint, smooth out rough spots, and create a slightly rough texture for the paint to adhere to. Follow these steps to sand your furniture effectively:
- Gather the Right Tools: You will need a combination of sandpaper or sanding blocks with different grits. Start with a coarse grit (around 80 or 100) to remove any remaining paint or rough spots. Then, move on to a medium grit (around 150) to smooth out the surface. Finish with a fine grit (around 220) to create a smooth and even texture.
- Begin Sanding: Take your coarse-grit sandpaper or sanding block and sand the entire surface of the furniture. Use long, smooth strokes in the direction of the metal grain, applying consistent pressure. This will help remove any remaining paint, rust, or rough areas. Pay extra attention to corners and hard-to-reach spots.
- Switch to Medium Grit: Once you have removed the majority of the old paint and rough spots, switch to the medium-grit sandpaper or block. Continue sanding in the direction of the grain, applying moderate pressure. This step will further smooth out the surface and create a uniform texture.
- Finish with Fine Grit: Finally, use the fine-grit sandpaper or block to achieve a smooth and even finish. This step will help prepare the surface for optimal paint adhesion.
- Clean the Surface: After sanding, wipe down the furniture with a damp cloth to remove any residual dust or debris. This will ensure a clean surface for painting and prevent any particles from affecting the final finish.
It’s important to note that sanding may be tedious, but it is a necessary step in achieving a professional and long-lasting result. By taking your time and using the right tools and techniques, you’ll ensure that your painted metal patio furniture looks its best.
Now that you have sanded the furniture, let’s move on to the next step: cleaning the furniture to remove any dust and residue.
Read more: How To Shine Metal Patio Furniture
Cleaning the Furniture
Before applying paint to your sanded metal patio furniture, it is important to thoroughly clean the surface to remove any dust, dirt, or residue. Cleaning the furniture will ensure that the paint adheres properly and provides a smooth and flawless finish. Follow these steps to clean your furniture effectively:
- Gather Cleaning Supplies: You will need a mild detergent, warm water, a soft-bristle brush or sponge, and a hose or bucket for rinsing.
- Prepare the Cleaning Solution: Dilute the mild detergent in warm water according to the manufacturer’s instructions. Avoid using harsh chemicals or abrasive cleaners that could damage the metal surface.
- Wet the Furniture: Use a hose or dampen a cloth with water to wet the entire surface of the furniture. This will help loosen any dirt or debris and make it easier to clean.
- Scrub the Surface: Dip the soft-bristle brush or sponge into the cleaning solution and gently scrub the furniture in a circular motion. Pay attention to areas that are particularly dirty or have stubborn stains. Avoid applying excessive pressure that could scratch or damage the metal.
- Rinse Well: Use a hose or clean water to thoroughly rinse off the cleaning solution along with any dirt and residue. Ensure that all soap suds are completely removed from the surface.
- Dry the Furniture: Allow the furniture to air dry completely in a well-ventilated area. Alternatively, you can use a clean towel or cloth to dry any remaining moisture. It is crucial that the surface is completely dry before proceeding to the next step.
By meticulously cleaning your furniture, you will create an optimal surface for paint adhesion. Removing dirt, grime, and residual cleaning solutions will help ensure a smooth and durable paint finish, enhancing the overall appearance of your metal patio furniture.
Now that your furniture is clean and dry, it’s time to move on to the next step: priming the surface for painting.
Before painting old metal patio furniture, make sure to clean the surface thoroughly with a wire brush and soapy water to remove any rust or dirt. Sand the surface to create a smooth base for the paint to adhere to. Apply a rust-inhibiting primer before painting to ensure a long-lasting finish.
Priming the Surface
Priming the surface of your metal patio furniture is a crucial step in the painting process. Primer helps create a smooth and even base for the paint to adhere to, enhances the durability of the finish, and improves the overall longevity of the painted surface. Follow these steps to prime your furniture effectively:
- Gather the Right Primer: Choose a primer specifically formulated for metal surfaces. Look for a primer that is rust-inhibiting and promotes good adhesion to ensure the best results.
- Prepare the Surface: Ensure that the furniture is clean, dry, and free of any dust or debris. If needed, lightly sand the surface with fine-grit sandpaper to create a slightly rough texture that allows the primer to adhere better.
- Apply the Primer: Stir the primer thoroughly to ensure an even consistency. Using a brush or roller, apply an even coat of primer to the surface of the furniture, following the manufacturer’s instructions. Work in small sections, applying the primer in smooth, even strokes. Take care to cover all areas, including corners and crevices.
- Allow the Primer to Dry: Check the drying time specified on the primer can and allow the primer to dry completely. This typically takes a few hours, but it is recommended to wait for the recommended drying time to ensure that the primer is fully set.
- Inspect and Sand: After the primer has dried, inspect the surface for any imperfections or areas that may require additional attention. If necessary, lightly sand any rough spots or drips with fine-grit sandpaper to create a smooth and even surface.
- Clean the Surface: Use a clean cloth or tack cloth to remove any dust or debris from sanding. This will ensure a clean surface for the paint application.
Priming the surface provides a strong foundation for the paint and helps ensure better adhesion and long-lasting results. It also helps prevent rust formation and adds an extra layer of protection to your metal furniture.
Now that the surface is primed and ready, it’s time to move on to the exciting part: applying the paint to transform your old metal patio furniture.
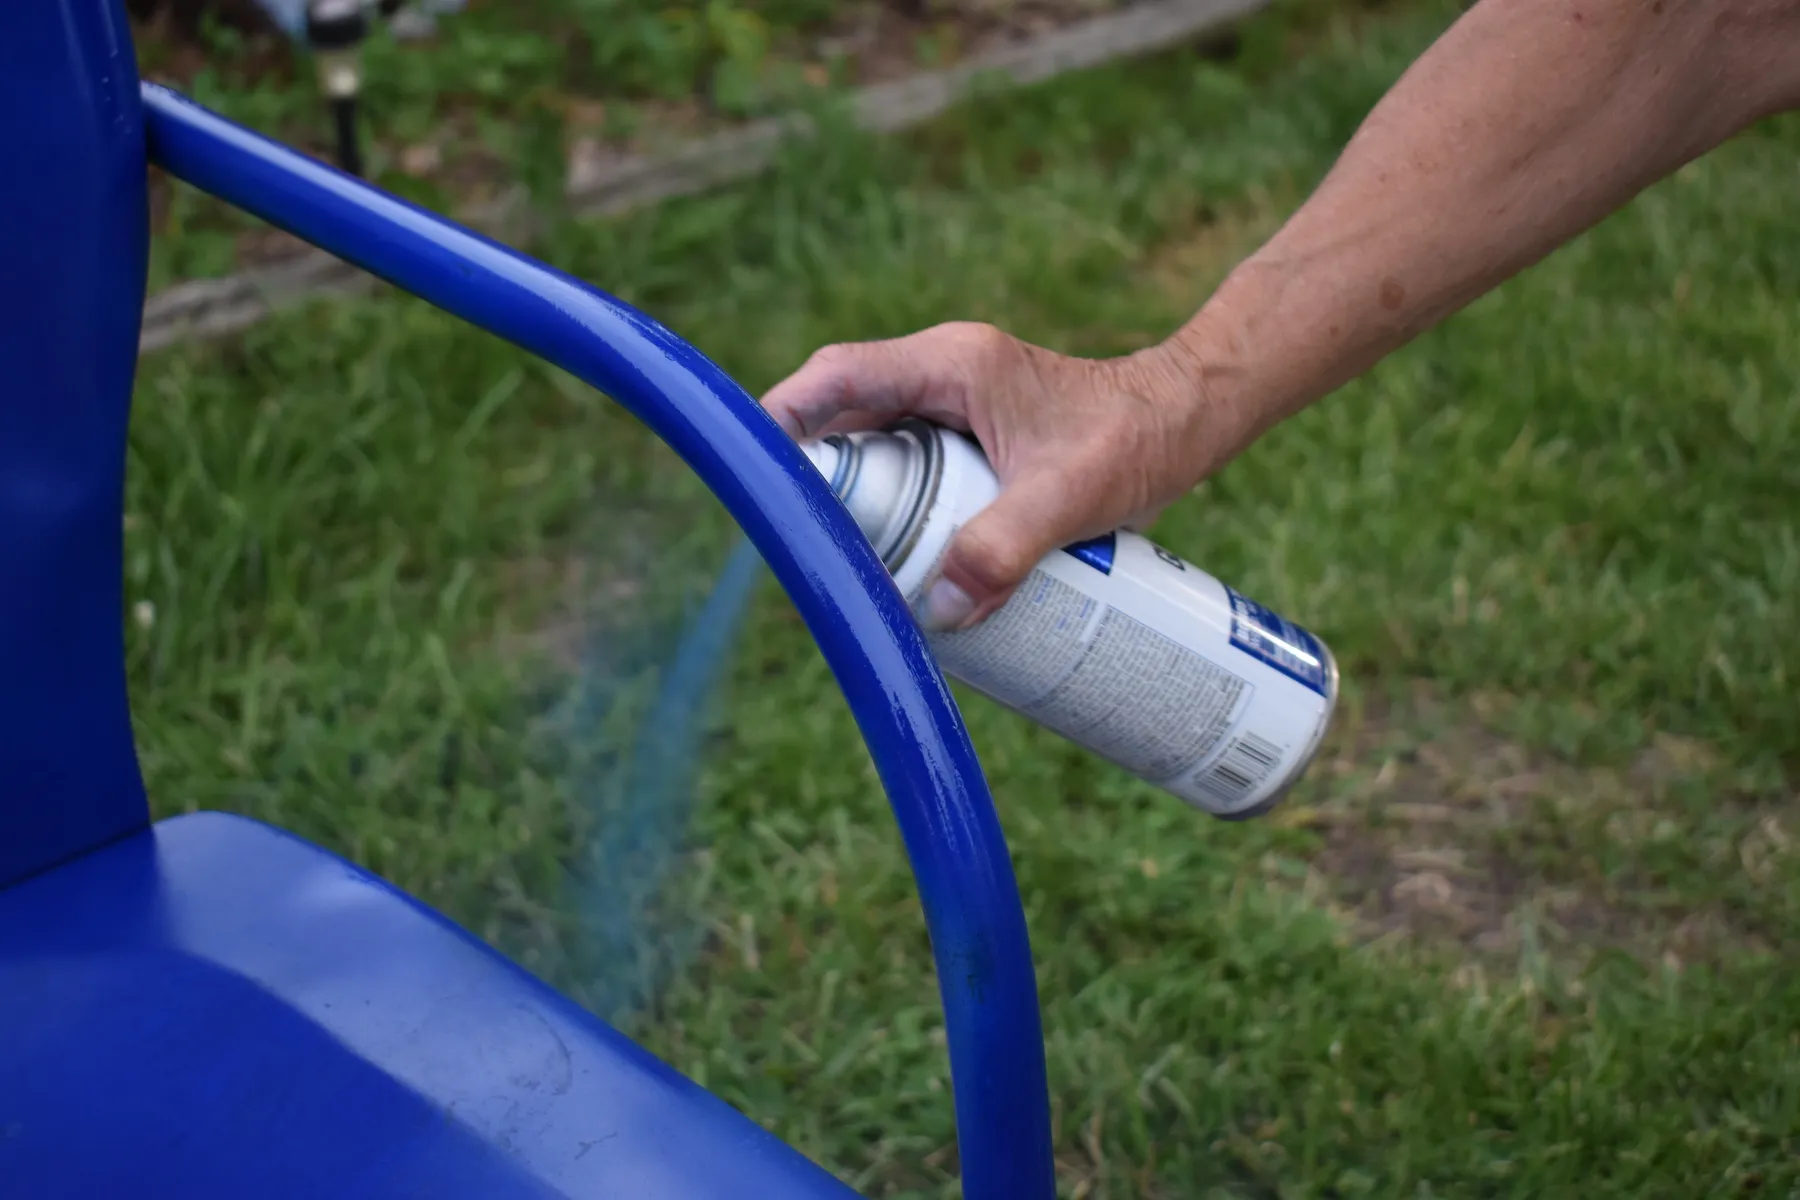
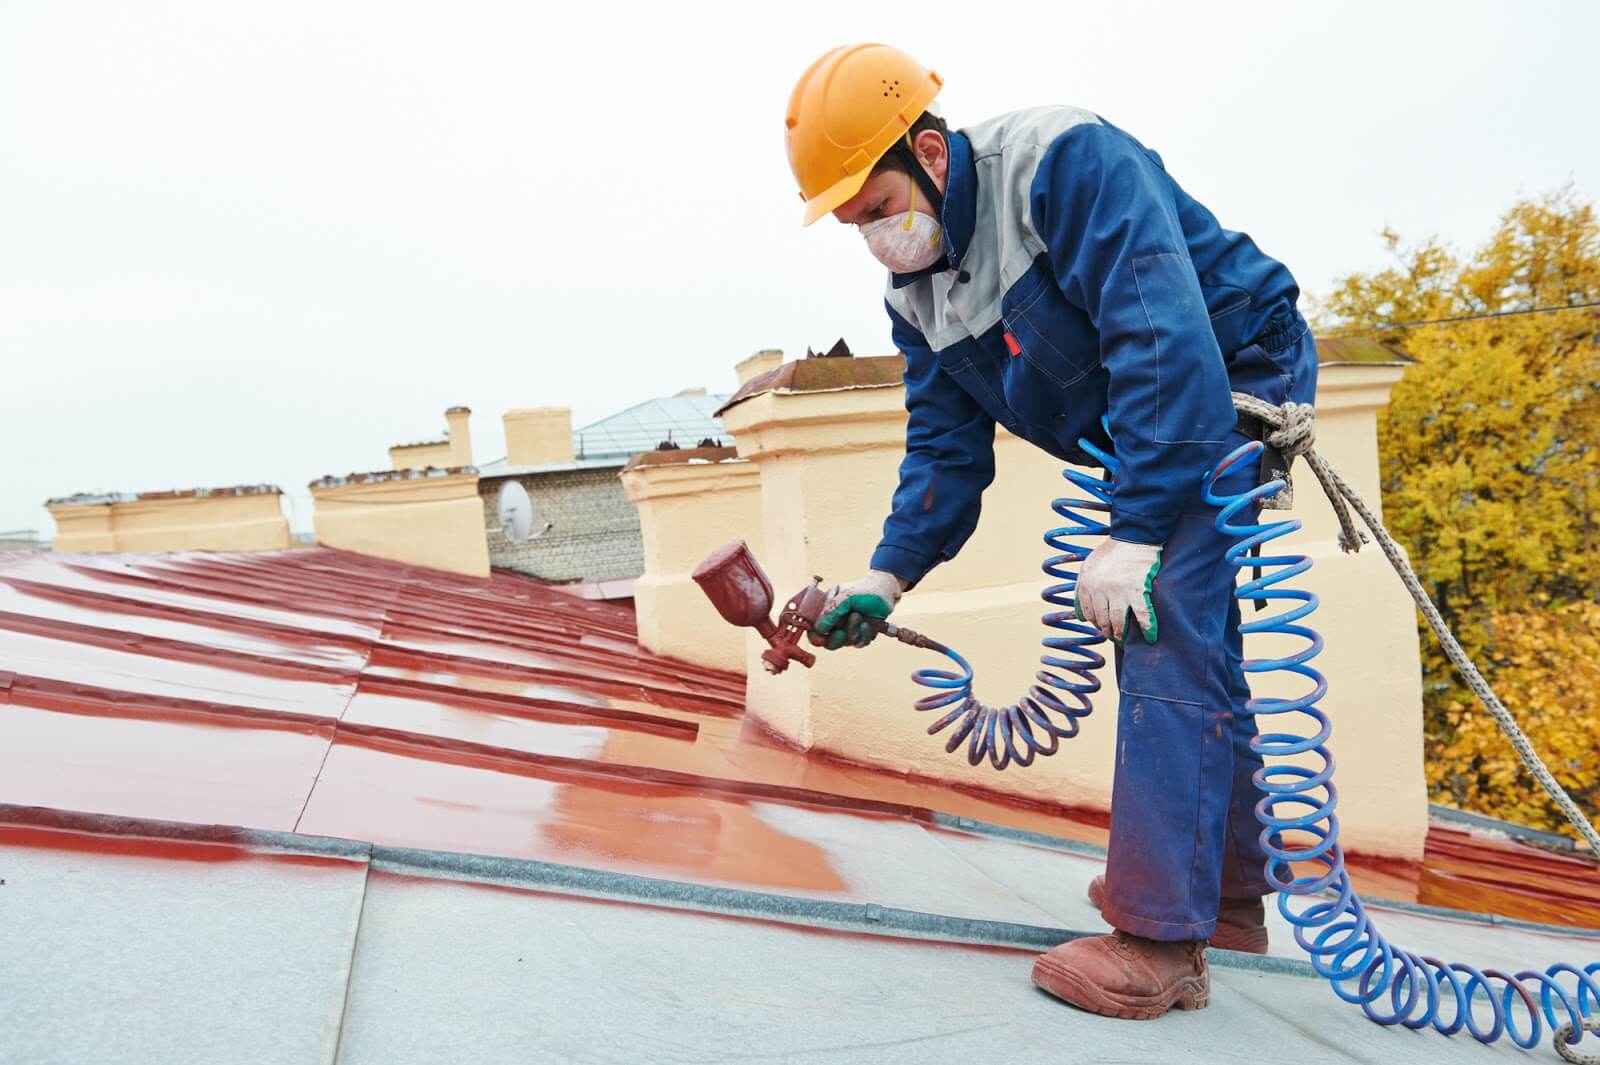
Applying the Paint
Now comes the fun part – applying the paint to your primed metal patio furniture! Follow these steps to ensure a smooth and flawless paint application:
- Select the Right Paint: Choose a high-quality paint specifically formulated for exterior use on metal surfaces. Opt for a paint with good adhesion and durability to withstand outdoor conditions.
- Prepare the Paint: If necessary, stir the paint thoroughly to ensure an even consistency. Some paints may require dilution or mixing, so refer to the manufacturer’s instructions for specific guidelines.
- Choose the Right Applicator: Depending on the size and shape of your furniture, you can use a brush, roller, or sprayer. A brush is useful for detailed areas, while a roller or sprayer can provide a smooth, even coverage on larger surfaces.
- Apply the Paint: Begin by applying a thin and even coat of paint to the surface of the furniture. Work in small sections and use long, smooth strokes, following the grain of the metal. Apply additional coats as needed, allowing sufficient drying time between each coat as instructed on the paint can.
- Pay Attention to Details: Take care to cover all areas, including corners, crevices, and decorative elements. Be mindful of drips or pooling paint, and smooth them out with a brush or roller to maintain an even finish.
- Allow the Paint to Dry: Check the drying time specified by the paint manufacturer and make sure to allow the paint to dry completely. Avoid touching or placing objects on the furniture until it is fully cured.
Remember to work in a well-ventilated area and follow any safety precautions outlined by the paint manufacturer. Painting your metal patio furniture can be a creative and rewarding process, so take your time and enjoy the transformation as the fresh coat of paint revitalizes your outdoor space.
Now that you have applied the paint, let’s move on to the next step: applying a clear coat to protect the painted surface.
Applying a Clear Coat
After applying the paint to your metal patio furniture, it is highly recommended to apply a clear coat to provide an additional layer of protection and enhance the longevity of the painted surface. A clear coat acts as a barrier against UV rays, moisture, and wear, ensuring that your furniture maintains its vibrant color and withstands outdoor conditions. Follow these steps to apply a clear coat effectively:
- Choose the Right Clear Coat: Select a clear coat specifically designed for outdoor use on metal surfaces. Look for a clear coat that provides UV protection, weather resistance, and durability.
- Read the Instructions: Familiarize yourself with the manufacturer’s instructions on the clear coat can. Take note of any specific preparation or application requirements, such as dilution, mixing, or recommended drying time.
- Prepare the Furniture: Ensure that the painted surface is clean and free of any dust, debris, or smudges. Use a clean cloth or tack cloth to wipe down the furniture, ensuring a smooth and clean surface for the clear coat.
- Apply the Clear Coat: Using a brush or sprayer, apply a thin and even coat of clear coat to the painted surface. Work in small sections, using long, smooth strokes. Pay attention to any areas that require extra protection, such as corners or edges.
- Allow the Clear Coat to Dry: Check the recommended drying time specified by the clear coat manufacturer. Allow the clear coat to dry completely before applying additional coats or handling the furniture. This will ensure that the clear coat forms a strong protective layer.
- Apply Additional Coats: Depending on the specific instructions of the clear coat, you may need to apply multiple coats for optimal protection. Allow each coat to dry before applying the next, and ensure that the previous coat is fully cured.
Applying a clear coat not only adds an extra layer of protection to your painted metal patio furniture but also provides a glossy or satin finish, depending on the type of clear coat chosen. This adds to the overall aesthetic appeal of your outdoor space, creating a polished and professional look.
Now that you have applied the clear coat, your painted metal patio furniture is well-protected and ready to be enjoyed. Let’s move on to the final step: caring for your newly painted furniture to ensure its longevity.
Read more: How To Paint Outdoor Metal Furniture
Caring for Painted Metal Furniture
Now that your metal patio furniture is beautifully painted and protected, it’s essential to implement proper care and maintenance to prolong its lifespan and keep it looking its best. Here are some tips to help you care for your painted metal furniture:
- Regular Cleaning: Regularly clean your painted metal furniture with mild soap and water to remove dirt, dust, and debris. Avoid using harsh cleaners or abrasive materials that could damage the paint. Rinse thoroughly and dry the furniture completely to prevent water spots or rust formation.
- Protect from the Elements: If possible, protect your furniture from extreme weather conditions by using furniture covers or storing it indoors during harsh seasons. This will help prevent excessive exposure to rain, sun, and snow, which can prematurely fade or deteriorate the paint.
- Avoid Scratches and Impacts: Be mindful of sharp objects or heavy impacts that may scratch or chip the painted surface. Use caution when moving or placing items on the furniture to avoid damaging the paint.
- Touch Up as Needed: Over time, the painted surface may experience some wear and tear. Keep extra paint or touch-up paint on hand to address any minor chips or scratches that may occur. Follow the manufacturer’s instructions when applying touch-up paint.
- Inspect for Damage: Regularly inspect your painted metal furniture for any signs of damage or deterioration. Look for rust spots, chipping paint, or any areas that may require attention. Promptly address any issues to prevent further damage and maintain the longevity of the paint.
- Reapply Clear Coat: Depending on the specific clear coat used, you may need to reapply it periodically to maintain its protective properties. Follow the manufacturer’s recommendations for reapplication and ensure the painted surface is clean and dry before adding a new layer of clear coat.
By following these care tips, you can ensure that your painted metal furniture remains vibrant and durable for years to come. Regular maintenance and protection will extend its lifespan and enhance the overall enjoyment of your outdoor space.
Congratulations on completing the process of painting and caring for your metal patio furniture. With proper maintenance, your furniture will continue to bring comfort and beauty to your outdoor living area.
Remember, a little care goes a long way when it comes to preserving the beauty of your painted metal furniture.
Conclusion
Reviving your old metal patio furniture with a fresh coat of paint is a fantastic way to breathe new life into your outdoor space. By following the step-by-step guide provided in this article, you have learned how to choose the right paint, prepare the surface, remove rust and flaking paint, sand the furniture, clean it thoroughly, prime the surface, apply the paint, and protect it with a clear coat.
Properly painting and caring for your metal patio furniture will not only enhance its appearance but also extend its lifespan. With the right materials, techniques, and maintenance, your painted furniture will withstand the elements and continue to be a beautiful and functional addition to your outdoor living area.
Don’t forget to choose an exterior-grade paint specifically formulated for metal surfaces, prepare the surface properly by cleaning, sanding, and priming, and apply the paint and clear coat with care. Regular cleaning and maintenance, along with proactive touch-ups as needed, will keep your furniture looking fresh and vibrant for years to come.
Now that you have the knowledge and tools to paint and care for your metal patio furniture, it’s time to put them into practice. Enjoy the process of transforming your outdoor space and creating a stylish and inviting atmosphere where you can relax and entertain.
Remember, a little bit of effort and attention can go a long way when it comes to maintaining the beauty and functionality of your painted metal furniture. So, roll up your sleeves, get creative, and make your outdoor space a reflection of your personal style and taste!
Frequently Asked Questions about How To Paint Old Metal Patio Furniture
Was this page helpful?
At Storables.com, we guarantee accurate and reliable information. Our content, validated by Expert Board Contributors, is crafted following stringent Editorial Policies. We're committed to providing you with well-researched, expert-backed insights for all your informational needs.
0 thoughts on “How To Paint Old Metal Patio Furniture”