Articles
How To Put Gutters On A Shed
Modified: October 18, 2024
Learn the step-by-step process of installing gutters on a shed with this comprehensive guide. Find informative articles and expert tips to ensure a successful installation.
(Many of the links in this article redirect to a specific reviewed product. Your purchase of these products through affiliate links helps to generate commission for Storables.com, at no extra cost. Learn more)
Introduction
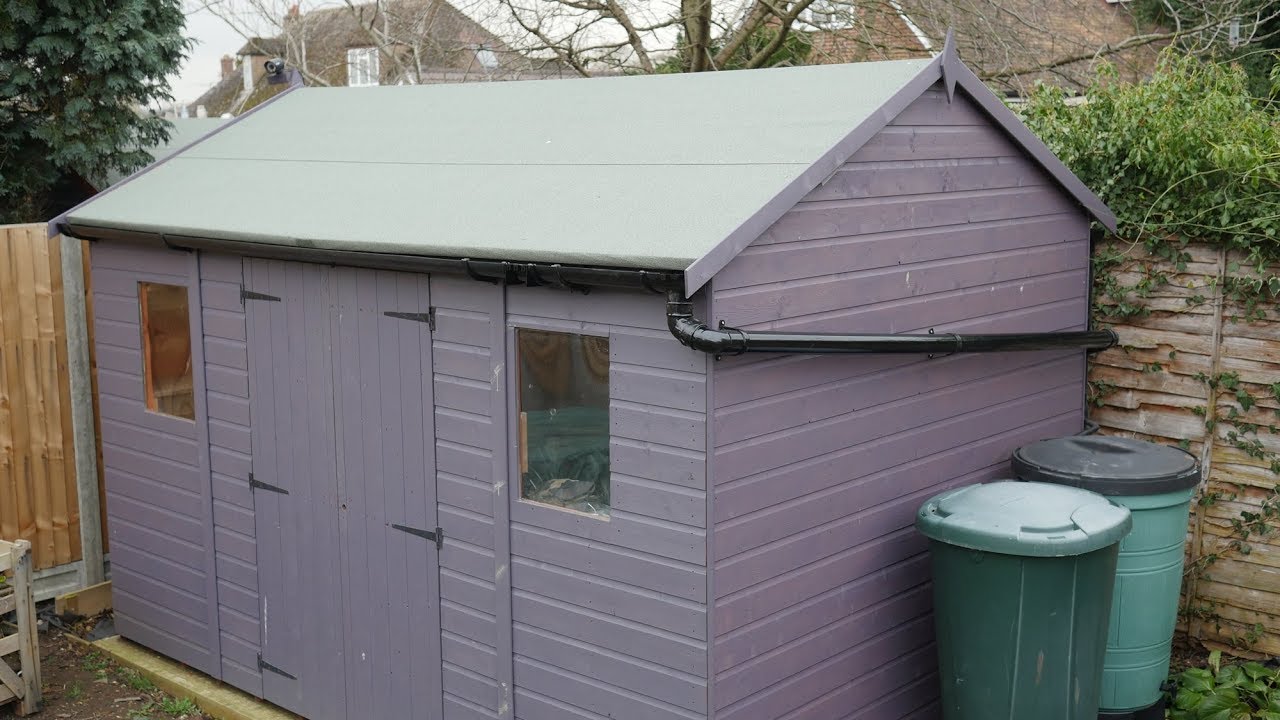
When it comes to sheds, adding gutters may not be the first thing that comes to mind. However, installing gutters on a shed can be a wise decision to protect your investment and ensure long-term functionality. Gutters help to divert rainwater away from the shed, preventing water damage, foundation issues, and potential flooding.
In this article, we will guide you on how to put gutters on a shed, step by step. Whether you have a small storage shed, a garden shed, or a workshop, the process is relatively straightforward and can be accomplished with basic tools and materials.
Before you begin, it’s important to measure and plan accordingly. Consider the slope of the shed’s roof, the amount of rainfall in your area, and the optimal placement for the downspouts. This will help you determine the length of gutters needed and the number of brackets required to support them.
Once you have measured and planned, gather the necessary tools and materials. You will need:
- Gutter sections
- Gutter brackets
- End caps
- Downspout
- Elbow connectors
- Screws
- Sealant
- Measuring tape
- Pencil
- Drill
- Hacksaw
- Caulking gun
- Ladder
Now, let’s get started with the step-by-step process of putting gutters on your shed.
Key Takeaways:
- Protect your shed investment by diverting rainwater away with gutters. Follow step-by-step installation guide for optimal functionality and long-term protection.
- Ensure a smooth installation process by measuring, planning, and gathering necessary tools and materials. Test and adjust gutters for optimal performance and shed protection.
Read more: How To Put Siding On A Shed
Tools and Materials Needed
Before you begin the process of installing gutters on your shed, make sure you have gathered all the necessary tools and materials. Having everything prepared in advance will save you time and ensure a smooth installation process. Here is a list of the tools and materials you will need:
Tools:
- Measuring tape: Essential for accurately measuring the length of gutters and determining the placement of brackets.
- Pencil: Used to mark the positions of brackets and downspouts on the shed.
- Drill: Needed to create holes for attaching gutter brackets to the shed.
- Hacksaw: Used to cut gutter sections to the appropriate size.
- Caulking gun: Required for applying sealant to joints and seams to prevent leaks.
- Ladder: Ensure you have a stable ladder that is tall enough to reach the gutter installation area safely.
- Screwdriver: Used to secure gutter brackets and other components.
Materials:
- Gutter sections: Choose a material that suits your preferences and budget, such as aluminum, vinyl, or steel.
- Gutter brackets: These are used to support the gutters and attach them to the shed structure.
- End caps: Installed at the ends of the gutters to prevent water from overflowing.
- Downspout: A vertical pipe that carries water from the gutters to the ground.
- Elbow connectors: Used to redirect the downspout’s direction when necessary.
- Screws: Ensure you have enough screws to secure the gutter brackets and downspout components.
- Sealant: Choose a waterproof sealant to apply to joints and seams to prevent water leakage.
It is important to use high-quality materials that are suitable for outdoor use and can withstand the elements. Additionally, ensure that the gutter components are compatible and properly sized for your shed’s dimensions.
With all the necessary tools and materials at hand, you are ready to proceed with the gutter installation process. The next step is to measure and plan accordingly, which we will cover in the following section.
Step 1: Measure and Plan
Before you start installing gutters on your shed, it is crucial to take accurate measurements and create a well-thought-out plan. This step will ensure that the gutters fit properly and function effectively in diverting rainwater away from the shed.
Here are the key steps to follow when measuring and planning for gutter installation:
Read more: How To Put A Window In A Shed
1. Assess the Shed
Take a close look at your shed and identify the areas where you want to install gutters. Typically, gutters are placed along the eaves or overhanging parts of the roof. Consider the overall shed design and aesthetics when determining the placements.
2. Measure the Length
Using a measuring tape, measure the length of the roofline where you plan to install gutters. This will give you an idea of how much gutter material you will need. Measure each section separately and account for any corners or angles.
3. Determine the Downspout Placement
Decide where you want the downspouts to be located. It is important to position them in a way that allows for efficient drainage away from the shed. Consider the landscape around the shed and choose areas where water can easily flow without causing pooling or erosion.
4. Calculate Gutter Slope
Gutters need to have a slight slope to ensure water flows towards the downspouts. The recommended slope is 1/16-inch per foot. Calculate the total slope based on the length of the gutter and adjust your installation plan accordingly.
Read more: How To Put Skids On A Shed
5. Mark the Positions
Using a pencil, mark the locations where the gutter brackets will be installed. Space them out evenly along the roofline, making sure to match the manufacturer’s guidelines for maximum distance between brackets.
By taking the time to measure and plan accurately, you will save yourself from potential headaches and ensure a successful gutter installation on your shed. Once you have completed this step, you can move on to gathering the necessary gutter components, which we will discuss in the next section.
Step 2: Gather the Gutter Components
Now that you have measured and planned for the installation of gutters on your shed, it’s time to gather all the necessary gutter components. Having everything ready before you start will make the installation process smoother and more efficient.
Here are the key components you will need:
1. Gutter Sections
Choose the type of gutter material that suits your shed and personal preferences. Aluminum gutters are lightweight and resistant to rust, while vinyl gutters are low-maintenance and easy to install. Steel gutters are durable but require more maintenance to prevent rust. Measure and cut the gutter sections according to the length you determined during the planning phase.
Read more: Where To Put Gutters On House
2. Gutter Brackets
Gutter brackets are essential for supporting the gutters and attaching them to the shed. They come in various styles, so choose the ones that are compatible with your gutter material and provide sufficient support. Place brackets approximately 24-36 inches apart, following the manufacturer’s guidelines. Make sure you have enough brackets to secure the gutters along the entire length.
3. End Caps
End caps are installed at the ends of the gutters to prevent water from overflowing. They come in different shapes to match the gutter style, and they simply snap or slide into place. Ensure you have the correct end caps for your gutter material.
4. Downspout
The downspout is a vertical pipe that carries rainwater from the gutters down to the ground. Measure the distance from the gutter to the desired downspout location and choose a downspout length that fits. You may also need elbow connectors to redirect the downspout’s direction if necessary.
5. Screws and Sealant
Use screws specifically designed for gutter installation to secure the gutter brackets and other components. Also, have a high-quality sealant on hand to ensure watertight connections. Apply sealant to joints and seams to prevent leaks.
Before starting the installation process, double-check that you have all the components you need in the correct sizes and quantities. This way, you can proceed smoothly to the next step: installing the gutter brackets on your shed.
Read more: How To Put A Ceiling In A Basement
Step 3: Install the Gutter Brackets
Now that you have gathered all the necessary gutter components, it’s time to start installing the gutter brackets on your shed. These brackets will provide support and hold the gutters in place along the roofline.
Follow these steps to install the gutter brackets:
1. Mark the Bracket Positions
Using a pencil and the measurements from your planning phase, mark the positions where you will install the gutter brackets. Space the brackets evenly along the roofline, ensuring they are aligned and level. Make sure to follow the manufacturer’s guidelines for maximum distance between brackets.
2. Pre-drill Holes
Using a drill with an appropriate bit, pre-drill holes on the marked positions for the gutter brackets. This will make it easier to attach the brackets securely and prevent the wood from splitting.
Read more: How To Put Gutters On A Flat Roof
3. Attach the Brackets
Place the gutter brackets on the pre-drilled holes and align them with the marked positions. Securely attach the brackets to the shed using screws and a screwdriver or drill. Ensure the brackets are firmly tightened, but be careful not to overtighten and damage the wood or the brackets themselves.
4. Check for Levelness
After installing the first bracket, use a level to ensure it is perfectly horizontal. This will serve as a reference for the rest of the brackets. Adjust as needed and continue installing the remaining brackets, periodically checking for levelness.
5. Measure and Cut Brackets
If any brackets need to be shortened due to corners or angles, use a hacksaw to cut them to the appropriate length. Smooth out any rough edges with sandpaper.
By properly installing the gutter brackets, you are ensuring that the gutters will have strong support and remain firmly attached to your shed. Once you have completed this step, you are ready to move on to attaching the gutters themselves, which we will cover in the next section.
Step 4: Attach the Gutters
With the gutter brackets securely in place, it’s time to attach the gutters to your shed. This step will involve connecting the gutter sections and fastening them to the brackets, ensuring a stable and functional gutter system to divert rainwater away from your shed.
Read more: How To Put Together A Rubbermaid Shed
Follow these steps to attach the gutters:
1. Cut Gutter Sections
If your shed’s roofline exceeds the length of standard gutter sections, you will need to cut the gutter sections to fit. Use a hacksaw to make precise cuts, following the measured length you determined during the planning phase. Remember to wear safety goggles and gloves when cutting.
2. Install End Caps
Place the appropriate end caps on both ends of the gutters to prevent water from overflowing. The end caps should securely snap or slide into place, providing a watertight seal. Double-check that the end caps are securely attached and flush with the gutters.
3. Connect the Gutter Sections
Align the cut gutter sections together, overlapping them slightly. Use a screwdriver or a drill to fasten metal gutter sections with rivets or screws provided by the manufacturer. For vinyl gutters, use special connectors designed for vinyl materials. Ensure the connections are tight to prevent leaks.
Read more: How To Put Air Vents In A Shed
4. Attach the Gutters to Brackets
Once the gutter sections are connected, lift them and carefully place them onto the installed brackets. Slide the back edge of the gutter into the back of the bracket, ensuring a secure fit. Use screws to fasten the front of the gutter to the brackets, following the manufacturer’s recommendations. Repeat this process for each section of the gutter.
5. Check for Proper Alignment
After attaching the gutters, step back and visually check for proper alignment and slope. The gutters should have a slight downward slope towards the downspouts to ensure proper water flow. Make any necessary adjustments to ensure optimal functionality.
By attaching the gutters correctly, you are creating a reliable system that will effectively channel rainwater away from your shed, protecting it from potential water damage. Once you have completed this step, you can move on to connecting the gutters to the downspout, which is covered in the next section.
Step 5: Connect the Gutters to the Downspout
With the gutters securely attached to your shed, the next step is to connect them to the downspout. The downspout is responsible for directing the collected rainwater away from the shed’s foundation, preventing potential damage and water buildup.
Follow these steps to connect the gutters to the downspout:
Read more: How To Put Felt On A Shed Roof
1. Measure and Cut Downspout
Determine the ideal location for the downspout and measure the distance from the bottom of the gutter to the ground or drainage system. Cut the downspout pipe to the measured length using a hacksaw. Smooth out any rough edges with sandpaper.
2. Attach Elbow Connectors
If the downspout needs to change direction to reach the desired location, attach elbow connectors as necessary. These connectors allow for flexibility in redirecting the downspout to accommodate various shed designs and landscape configurations. Connect the elbow connectors to the downspout segments as per the manufacturer’s instructions.
3. Connect the Downspout to the Gutter
Position the bottom of the downspout directly beneath the opening of the gutter. Trim the top of the downspout to fit snugly against the gutter. Use screws or rivets to secure the downspout to the gutter, ensuring a tight and secure connection. Repeat this process for any additional connections or sections of downspouts.
4. Secure the Downspout to the Wall
Secure the downspout to the shed’s wall using brackets or clips. This will provide stability and prevent the downspout from shifting or coming loose. Position the brackets evenly along the length of the downspout, ensuring firm attachment to the shed’s exterior.
Read more: How To Put Together A Plastic Shed
5. Test the Water Flow
With the gutters and downspout connected, it’s important to test the water flow to ensure proper drainage. Use a hose or pour water directly into the gutters to simulate rainfall. Observe the water as it flows through the gutters and down the downspout, checking for any leaks, blockages, or inadequate drainage. Make any necessary adjustments or repairs as needed.
By connecting the gutters to the downspout, you are completing the essential components of a functional gutter system. This step ensures that rainwater is effectively directed away from your shed, protecting its foundation and surrounding areas. Once you have completed this step, you are nearly done. The final step is to test and adjust the gutters, which we will cover in the next section.
Step 6: Test and Adjust the Gutters
After completing the installation of your shed gutters and connecting them to the downspout, it’s essential to test and make any necessary adjustments. This final step ensures that your gutter system is functioning effectively, channeling rainwater away from the shed and preventing any potential damage.
Follow these steps to test and adjust your gutters:
1. Inspect for Leaks
Begin by visually inspecting the gutters for any signs of leaks or water overflow. Check the connections between gutter sections, downspout, and the fittings to ensure they are tightly sealed. Use a hose or pour water into the gutters to simulate rainfall and monitor the flow. Look for any areas with water dripping or escaping the gutter system.
Read more: How To Put On A Metal Roof On A Shed
2. Clear Debris
Clear any leaves, twigs, or other debris from the gutters to ensure proper water flow. Debris can accumulate and create blockages, preventing water from freely flowing through the gutter system. Use a small garden trowel or a gloved hand to remove any accumulated debris from the gutters.
3. Check Slope
Ensure that the gutters have a slight downward slope towards the downspout. This slope allows water to flow freely and prevents water pooling in the gutters. Use a level or measure the gradient to ensure that the gutters are sloping adequately.
4. Adjust Brackets
If you notice any sagging or misalignment in the gutters, adjust the brackets as needed. Loosen the screws on the brackets, reposition the gutters, and tighten the screws to secure them in the correct position. Ensure that the gutters are level and have a smooth, consistent flow towards the downspout.
5. Test Heavy Rainfall
If possible, wait for a heavy rainfall or simulate it using a hose to test the gutter system under demanding conditions. Observe how the gutters handle the increased volume of water and ensure that there are no leaks or overflow. Make any necessary adjustments based on the performance of the gutters during this test.
By thoroughly testing and making necessary adjustments to your gutters, you are ensuring that your shed is well-protected from rainwater damage. Properly functioning gutters will prevent water from pooling or overflowing, keeping your shed and its foundation safe and dry.
Once you have completed this step and ensured the proper functioning of your gutters, congratulate yourself on a job well done. With your shed gutters in place, you can now enjoy the added protection and peace of mind that comes with a well-maintained gutter system.
Read more: What To Put Around The Bottom Of A Shed
Conclusion
Installing gutters on your shed is a smart decision that can provide numerous benefits in terms of protecting your investment. By effectively redirecting rainwater away from the shed, gutters help prevent water damage, foundation issues, and potential flooding. Additionally, they help keep the area around the shed clean and free from erosion caused by excessive water runoff.
In this article, we have walked you through the step-by-step process of putting gutters on your shed. Starting with measuring and planning, you learned the importance of accurately determining the length of the gutters and the optimal placement of the downspout. Gathering the necessary tools and materials allowed you to ensure a smooth installation process.
With the gutters securely attached to your shed using the installed brackets, you have created a reliable system that will effectively channel rainwater. Connecting the gutters to the downspout allows for proper drainage, preventing any potential water buildup around the shed’s foundation.
After completing the installation, testing and adjusting the gutters ensures that they function optimally. Checking for leaks, clearing debris, and verifying the slope helps to ensure that the gutters are effectively diverting water away from the shed.
By following these steps and putting in a little time and effort, you have successfully added gutters to your shed, protecting it from the potential damages caused by water. Now, you can enjoy peace of mind, knowing that your shed is well-equipped to handle rainwater runoff.
Remember, regular maintenance is important to ensure the continued effectiveness of your gutter system. Keep an eye on the gutters, clear any debris, and inspect for any signs of damage or leaks. This will help ensure that your shed remains in excellent condition for years to come.
We hope this guide has been helpful to you in your journey of installing gutters on your shed. Enjoy the benefits of a well-protected shed, thanks to your newly installed gutter system!
Now that you've mastered installing gutters on your shed, you might wonder who to call for professional gutter installation on larger projects. Our next piece demystifies professional services, offering insights into selecting the right experts for your home. Dive into our detailed guide to understand various aspects of professional gutter setup, ensuring your home improvement endeavors are nothing short of successful.
Frequently Asked Questions about How To Put Gutters On A Shed
Was this page helpful?
At Storables.com, we guarantee accurate and reliable information. Our content, validated by Expert Board Contributors, is crafted following stringent Editorial Policies. We're committed to providing you with well-researched, expert-backed insights for all your informational needs.
0 thoughts on “How To Put Gutters On A Shed”